2014 HONDA CIVIC tow
[x] Cancel search: towPage 320 of 469
319
uuWhen Driving uAutomatic Transmission (CVT)
Driving
Automatic Transmission (CVT)The engine runs at a higher idle speed and creeping increases.
Keep the brake pedal firmly depressed when stopped.
Quickly depressing the accelerator pedal while driving uphill may cause the
transmission to drop to a lower ratio, unexpectedly increasing vehicle speed.
Depress the accelerator pedal carefully, especially on slippery roads and curves.■
Creeping
■
Kickdown
1Precautions While DrivingNOTICEThe following can damage the under spoiler:•Parking the vehicle by a parking block•Parallel parking along the road shoulder•Driving towards the bottom of a hill•Driving up or down to a different surface level
(such as a road shoulder)•Driving on a rutted or bumpy road•Driving on a road with potholes.2.4 ℓ engine models
Page 334 of 469
333
uuWhen Driving uTire Pressure Monitoring System (TPMS)
Continued
Driving
Tire Pressure Monitoring System (TPMS)Instead of directly measuring the pressure in each tire, the TPMS on this vehicle
monitors and compares the rolling radius and rotational characteristics of each
wheel and tire while you are driving to determine if one or more tires are
significantly under-inflated. This will cause th e low tire pressure/TPMS indicator to
come on and a message to appear on the i-MID.
You must start TPMS calibration every time you:
• Adjust the pressure in one or more tires.
• Rotate the tires.
• Replace one or more tires.
Before calibrating the TPMS:
• Set the cold tire pressure in all four tires.
2 Checking Tires P. 391
Make sure:
•The vehicle is at a complete stop.
• The shift lever is in
(N
.
• The shift lever is in
(P
.
• The ignition switch is in ON
(w
*1.
*1: Models with the smart entry system have an ENGINE START/STOP button instead of an
ignition switch.■
TPMS CalibrationU.S. models
1 Tire Pressure Monitoring System (TPMS)
The system does not monitor the tires when driving
at low speed.
Conditions such as low ambient temperature and
altitude change directly affect tire pressure and can
trigger the low tire pressure/TPMS indicator to come on.
Tire pressure checked and inflated in:•Warm weather can become under-inflated in
colder weather.•Cold weather can become over-inflated in warmer
weather.
The low tire pressure i ndicator will not come on as a
result of over inflation.
The TPMS may not function properly if tire type and
size are mixed. Make sure to use the same size and
type of tire. 2 Checking and Maintaining Tires P. 391
The low tire pressure/TPMS indicator may come on
with a delay or may not come on at all when:•You rapidly accele rate, decelerate, or turn the
steering wheel.•You drive on snowy or slippery roads.•Snow chains are used.
The low tire pressure/TPMS indicator may come on
under the following conditions:•A compact spare tire
* is used.
•There is a heavier and uneven load on the tires,
such as when towing a trailer, than the condition at
calibration.•Snow chains are used.
Manual transmission modelsAutomatic transmission (CVT) modelsAll models* Not available on all models
Page 352 of 469
351
uuBefore Performing Maintenance uSafety When Performing Maintenance
Maintenance
Safety When Performing MaintenanceSome of the most important safety precautions are given here.
However, we cannot warn you of every conc eivable hazard that can arise in
performing maintenance. Only you can decide whether or not you should perform
a given task.
• To reduce the possibility of fire or explosion, keep cigarettes, sparks, and flames
away from the battery and all fuel related parts.
• Never leave rags, towels, or other flammable objects under the hood.
u Heat from the engine and exhaust can ignite them causing a fire.
• To clean parts, use a commercially available degreaser or parts cleaner, not
gasoline.
• Wear eye protection and protective clothing when working with the battery or
compressed air.
• Engine exhaust contains carbon monoxide, which is poisonous and can kill you.
u Operate the engine only when there is sufficient ventilation.
• The vehicle must be in a stationary condition.
u Make sure your vehicle is parked on level ground, the parking brake is set, and
the engine is off.
• Be aware that hot parts can burn you.
u Make sure to let the engine and exhaust system cool thoroughly before
touching vehicle parts.
• Be aware that moving parts can injure you.
u Do not start the engine unless instructed, and keep your hands and limbs away
from moving parts.■
Maintenance Safety
■
Vehicle Safety
1Safety When Performing Maintenance
3
WARNING
Improperly maintaining this vehicle or
failing to correct a problem before driving
can cause a crash in which you can be
seriously hurt or killed.
Always follow the inspection and
maintenance recommendations according
to the schedules in this owner's manual.
3
WARNING
Failure to properly fol low maintenance
instructions and precautions can cause you
to be seriously hurt or killed.
Always follow the procedures and
precautions in this owner's manual.
Page 356 of 469
355
uuMaintenance Minder
TMuTo Use Maintenance Minder
TM
Continued
Maintenance
■
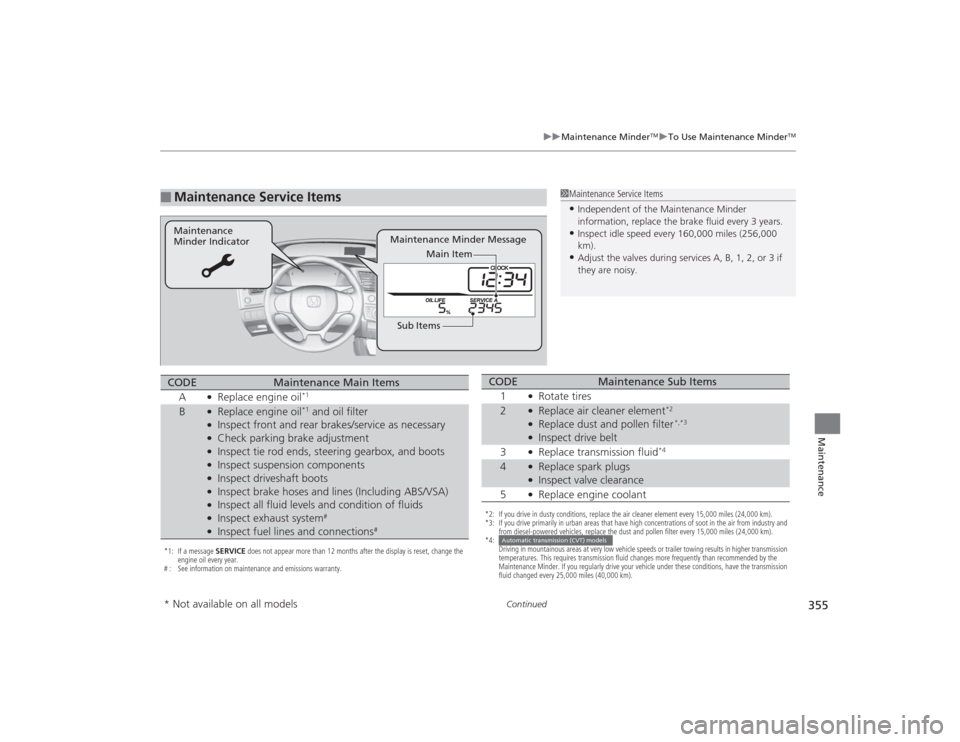
Maintenance Service Items
1Maintenance Service Items•Independent of the Maintenance Minder
information, replace the brake fluid every 3 years.•Inspect idle speed every 160,000 miles (256,000
km).•Adjust the valves during services A, B, 1, 2, or 3 if
they are noisy.
Maintenance Minder Message
Maintenance
Minder Indicator
Sub ItemsMain Item
*1: If a message
SERVICE does not appear more than 12 months after the display is reset, change the
engine oil every year.
# : See information on maintenance and emissions warranty.CODE
Maintenance Main Items
A
●Replace engine oil
*1
B
●Replace engine oil
*1 and oil filter
●Inspect front and rear brakes/service as necessary●Check parking brake adjustment●Inspect tie rod ends, steering gearbox, and boots●Inspect suspension components●Inspect driveshaft boots●Inspect brake hoses and lines (Including ABS/VSA)●Inspect all fluid levels and condition of fluids●Inspect exhaust system
#
●Inspect fuel lines and connections
#
*2: If you drive in dusty conditions, replace the air cleaner element every 15,000 miles (24,000 km).
*3: If you drive primarily in urban areas that have high concentrations of soot in the air from industry and from diesel-powered vehicles, replace the dust and pollen filter every 15,000 miles (24,000 km).
*4: Driving in mountainous areas at very low vehicle speeds or trailer towing results in higher transmission
temperatures. This requires transmission fluid changes more frequently than recommended by the
Maintenance Minder. If you regularly drive your vehicle under these conditions, have the transmission
fluid changed every 25,000 miles (40,000 km).CODE
Maintenance Sub Items
1
●Rotate tires
2
●Replace air cleaner element
*2
●Replace dust and pollen filter
*,*3
●Inspect drive belt
3●Replace transmission fluid
*4
4
●Replace spark plugs●Inspect valve clearance
5●Replace engine coolant
Automatic transmission (CVT) models
* Not available on all models
Page 360 of 469
359
uuMaintenance Minder
TMuTo Use Maintenance Minder
TM
Continued
Maintenance
■
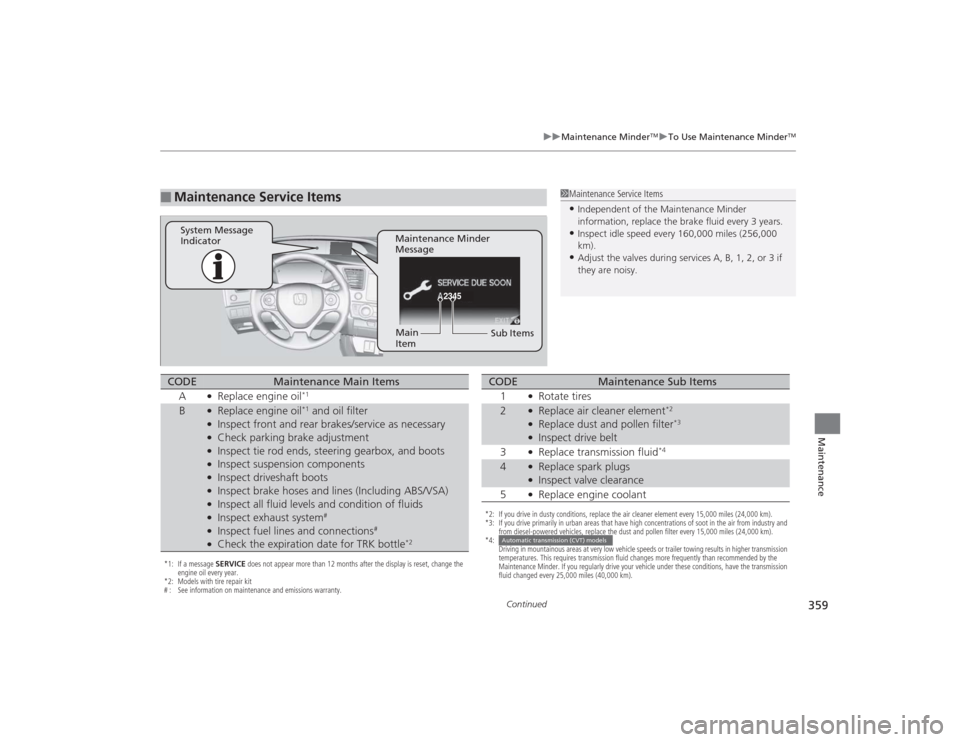
Maintenance Service Items
1Maintenance Service Items•Independent of the Maintenance Minder
information, replace the brake fluid every 3 years.•Inspect idle speed every 160,000 miles (256,000
km).•Adjust the valves during services A, B, 1, 2, or 3 if
they are noisy.
2345
Maintenance Minder
Message
System Message
Indicator
Sub Items
Main
Item
*1: If a message
SERVICE does not appear more than 12 months after the display is reset, change the
engine oil every year.
*2: Models with tire repair kit
# : See information on maintenance and emissions warranty.CODE
Maintenance Main Items
A
●Replace engine oil
*1
B
●Replace engine oil
*1 and oil filter
●Inspect front and rear brakes/service as necessary●Check parking brake adjustment●Inspect tie rod ends, steering gearbox, and boots●Inspect suspension components●Inspect driveshaft boots●Inspect brake hoses and lines (Including ABS/VSA)●Inspect all fluid levels and condition of fluids●Inspect exhaust system
#
●Inspect fuel lines and connections
#
●Check the expiration date for TRK bottle
*2
*2: If you drive in dusty conditions, replace the air cleaner element every 15,000 miles (24,000 km).
*3: If you drive primarily in urban areas that have high concentrations of soot in the air from industry and from diesel-powered vehicles, replace the dust and pollen filter every 15,000 miles (24,000 km).
*4: Driving in mountainous areas at very low vehicle speeds or trailer towing results in higher transmission
temperatures. This requires transmission fluid changes more frequently than recommended by the
Maintenance Minder. If you regularly drive your vehicle under these conditions, have the transmission
fluid changed every 25,000 miles (40,000 km).CODE
Maintenance Sub Items
1
●Rotate tires
2
●Replace air cleaner element
*2
●Replace dust and pollen filter
*3
●Inspect drive belt
3●Replace transmission fluid
*4
4
●Replace spark plugs●Inspect valve clearance
5●Replace engine coolant
Automatic transmission (CVT) models
Page 364 of 469
363
uuMaintenance Under the Hood uOpening the Hood
Maintenance
Opening the Hood
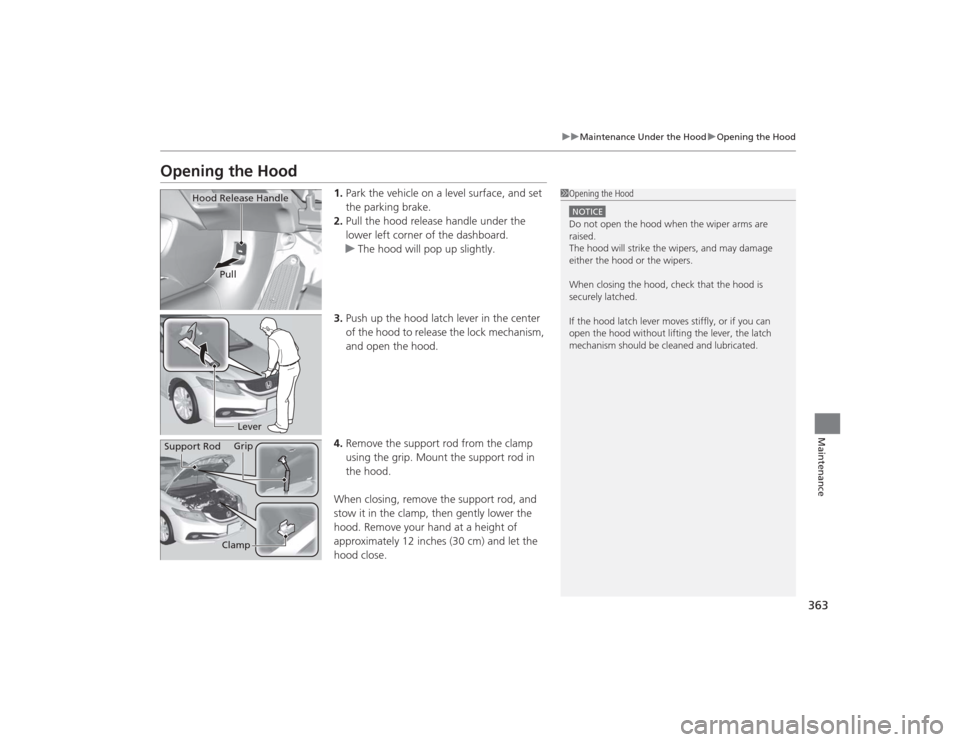
1. Park the vehicle on a level surface, and set
the parking brake.
2. Pull the hood release handle under the
lower left corner of the dashboard.
u The hood will pop up slightly.
3. Push up the hood latch lever in the center
of the hood to release the lock mechanism,
and open the hood.
4. Remove the support rod from the clamp
using the grip. Mount the support rod in
the hood.
When closing, remove the support rod, and
stow it in the clamp, then gently lower the
hood. Remove your hand at a height of
approximately 12 inches (30 cm) and let the
hood close.
1 Opening the HoodNOTICEDo not open the hood when the wiper arms are
raised.
The hood will strike the wipers, and may damage
either the hood or the wipers.
When closing the hood, check that the hood is
securely latched.
If the hood latch lever moves stiffly, or if you can
open the hood without lifting the lever, the latch
mechanism should be cleaned and lubricated.
Hood Release Handle
Pull
Lever
Support Rod Grip
Clamp
Page 366 of 469
365
uuMaintenance Under the Hood uOil Check
Continued
Maintenance
Oil CheckWe recommend that you check the engine oil level every time you refuel.
Park the vehicle on level ground.
Wait approximately three minutes after turning the engine off before you check the
oil.
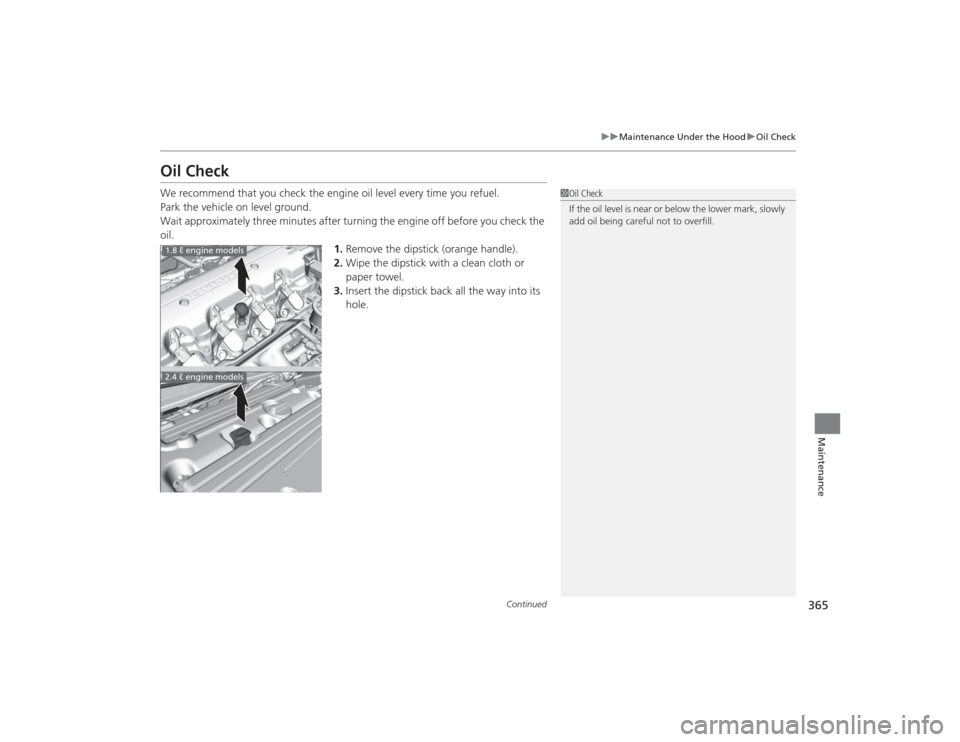
1.Remove the dipstick (orange handle).
2. Wipe the dipstick with a clean cloth or
paper towel.
3. Insert the dipstick back all the way into its
hole.
1Oil Check
If the oil level is near or below the lower mark, slowly
add oil being careful not to overfill.
1.8 ℓ engine models2.4 ℓ engine models
Page 377 of 469
376Maintenance
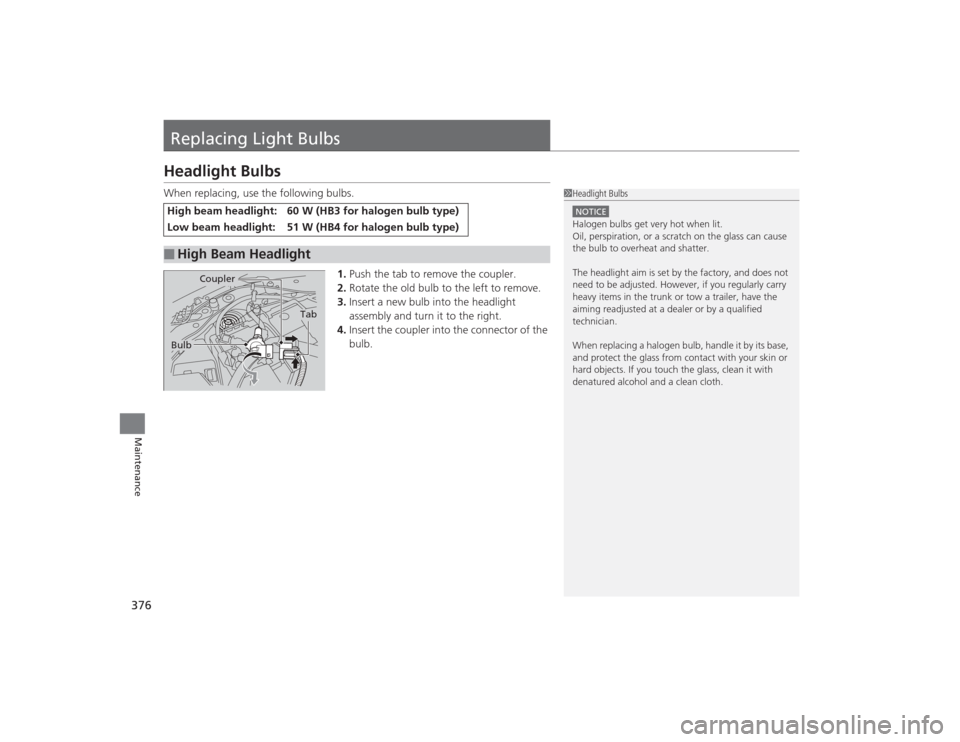
Replacing Light BulbsHeadlight BulbsWhen replacing, use the following bulbs.1.Push the tab to remove the coupler.
2. Rotate the old bulb to the left to remove.
3. Insert a new bulb into the headlight
assembly and turn it to the right.
4. Insert the coupler into the connector of the
bulb.High beam headlight:
60 W (HB3 for halogen bulb type)
Low beam headlight:
51 W (HB4 for halogen bulb type)
■
High Beam Headlight
1Headlight BulbsNOTICEHalogen bulbs get very hot when lit.
Oil, perspiration, or a scratch on the glass can cause
the bulb to overheat and shatter.
The headlight aim is set by the factory, and does not
need to be adjusted. However, if you regularly carry
heavy items in the trunk or tow a trailer, have the
aiming readjusted at a dealer or by a qualified
technician.
When replacing a halogen bulb, handle it by its base,
and protect the glass from contact with your skin or
hard objects. If you touch the glass, clean it with
denatured alcohol and a clean cloth.
Tab
Coupler
Bulb