Page 178 of 469

177
uuAudio System Basic Operation uPlaying AM/FM Radio
Features
Playing AM/FM Radio
1Playing AM/FM Radio
The ST indicator appears on the display indicating
stereo FM broadcasts.
Stereo reproduction in AM is not available.
You can store six AM stations and twelve FM stations
into the preset memory.
A.SEL function scans and stores up to six AM stations
and twelve FM stations with a strong signal into the
preset button memory.
If you do not like the stations auto select has stored,
you can manually store your preferred frequencies.
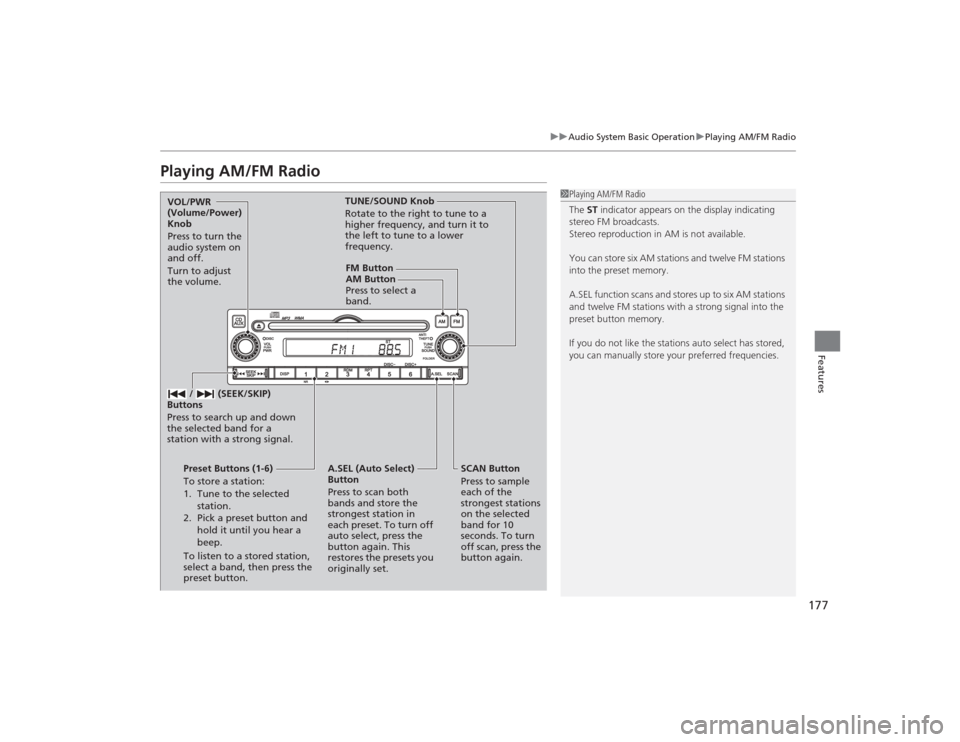
FM Button
SCAN Button
Press to sample
each of the
strongest stations
on the selected
band for 10
seconds. To turn
off scan, press the
button again.
VOL/PWR
(Volume/Power)
Knob
Press to turn the
audio system on
and off.
Turn to adjust
the volume.
Preset Buttons (1-6)
To store a station:
1. Tune to the selected station.
2. Pick a preset button and hold it until you hear a
beep.
To listen to a stored station,
select a band, then press the
preset button. / (SEEK/SKIP)
Buttons
Press to search up and down
the selected band for a
station with a strong signal.
A.SEL (Auto Select)
Button
Press to scan both
bands and store the
strongest station in
each preset. To turn off
auto select, press the
button again. This
restores the presets you
originally set. TUNE/SOUND Knob
Rotate to the right to tune to a
higher frequency, and turn it to
the left to tune to a lower
frequency.
AM Button
Press to select a
band.
Page 182 of 469
181
uuAudio System Basic Operation uPlaying AM/FM Radio
Continued
Features
Playing AM/FM Radio
002300
75°
F miles
FM Button / Button
Press to display and select an
RDS category.SCAN Button
Press to sample each of the
strongest stations on the
selected band for 10 seconds.
To turn off scan, press the
button again. (Power) Button
Press to turn the audio
system on and off.
Preset Buttons (1-6)
To store a station:
1. Tune to the selected station.
2. Pick a preset button and hold it until you hear a beep.
To listen to a stored station, select a
band, then press the preset button.
/ (Seek/Skip) Buttons
Press to search up and down the
selected band for a station with
a strong signal.SETUP Button
Press to display menu items.
Selector Knob
Turn to adjust the volume.
Press and turn to tune the radio
frequency.
AM Button
Press to select a band.
Page 183 of 469
uuAudio System Basic Operation uPlaying AM/FM Radio
182Features
Use the auto select feature to scan both bands and store the strongest station in
each preset. 1.Press the SETUP button.
2. Rotate to select Auto Select, then
press .
To turn off auto select, press again. This
restores the presets you originally set.■
Auto Select
1 Playing AM/FM Radio
The ST indicator appears on the display indicating
stereo FM broadcasts.
Stereo reproduction in AM is not available.
Switching the Audio Mode
Press the SOURCE button on the steering wheel.
2 Audio Remote Controls
* P. 174
You can store six AM stations and twelve FM stations
into the preset memory.
Auto Select function scans and stores up to six AM
stations and twelve FM stations with a strong signal
into the preset button memory.
If you do not like the stations auto select has stored,
you can manually store your preferred frequencies.
Sound Settings
* Not available on all models
Page 205 of 469
204
uuAudio System Basic Operation uPlaying AM/FM Radio
Features
Playing AM/FM Radio*1:Some or all of the lists may not be displayed.
002300
75°
F miles
Audio/Information Screen
Tune Icons
Select or to tune the radio
frequency.BACK
Select to go back to the previous display. (Power) Button
Press to turn the audio system
on and off.
Seek Icons
Select or to search up and down the selected band
for a station with a strong signal.
MENU
Select to display the menu items. VOL (Volume)
Select to adjust the volume.
Open/Close Icon
*1
Displays/hides the detailed
information.
Page 206 of 469

Continued
205
uuAudio System Basic Operation uPlaying AM/FM Radio
Features
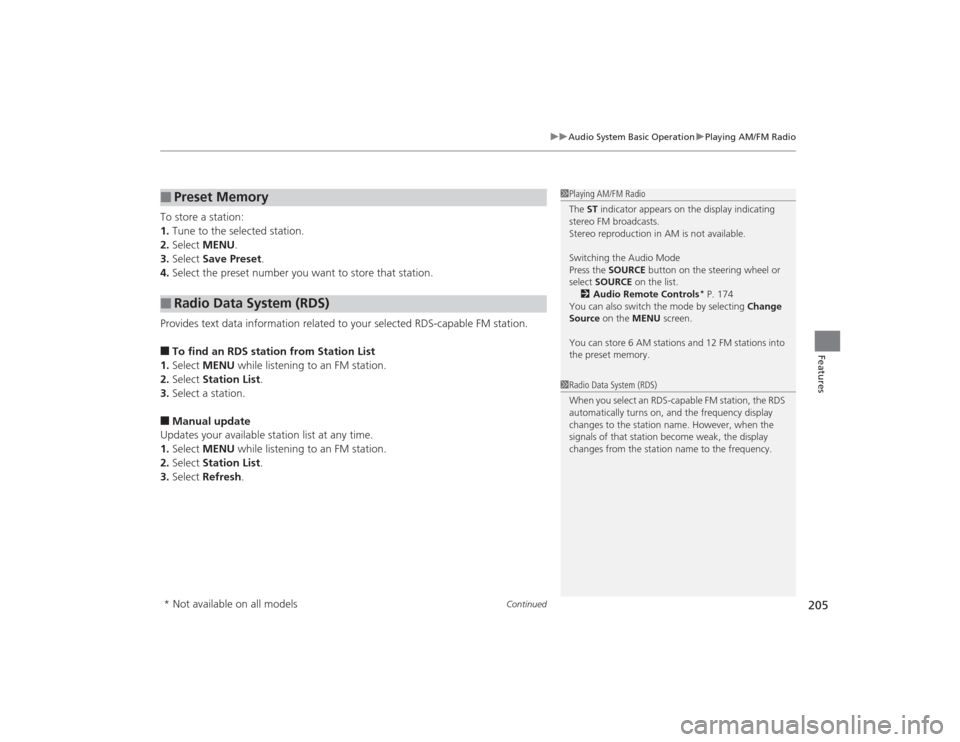
To store a station:
1. Tune to the selected station.
2. Select MENU .
3. Select Save Preset .
4. Select the preset number you want to store that station.
Provides text data information related to your selected RDS-capable FM station.■To find an RDS station from Station List
1. Select MENU while listening to an FM station.
2. Select Station List .
3. Select a station.■Manual update
Updates your available station list at any time.
1. Select MENU while listening to an FM station.
2. Select Station List .
3. Select Refresh .■
Preset Memory
■
Radio Data System (RDS)
1Playing AM/FM Radio
The ST indicator appears on the display indicating
stereo FM broadcasts.
Stereo reproduction in AM is not available.
Switching the Audio Mode
Press the SOURCE button on the steering wheel or
select SOURCE on the list.
2 Audio Remote Controls
* P. 174
You can also switch the mode by selecting Change
Source on the MENU screen.
You can store 6 AM stations and 12 FM stations into
the preset memory.
1 Radio Data System (RDS)
When you select an RDS-capable FM station, the RDS
automatically turns on, and the frequency display
changes to the station name. However, when the
signals of that station become weak, the display
changes from the station name to the frequency.
* Not available on all models
Page 237 of 469
236
uuCustomized Features
*u
Features
Ring Tone
Edit Speed DialConnect Phone
Phone
Default
Automatic Phone SyncBluetooth Device ListEdit Pairing CodeBluetooth Device List
Rear Camera
Fixed GuidelineDynamic Guideline
Camera
Bluetooth On/Off Status
Default
BluetoothDefault
HondaLink AssistEnable Text/EmailSelect Account
New Message Notification
LaneWatch
*
Show with Turn Signal
Display Time after Turn Signal Off
Reference Line
Default
Bluetooth
PhoneText/Email
* Not available on all models
Page 244 of 469
243
uuCustomized Features
*u
Continued
Features
*1:Default SettingSetup
Group Customizable Features Description Selectable SettingsCamera
Rear
Camera
Fixed Guideline
Selects whether the fixed guidelines come on the
rear camera monitor.
On
*1/
Off
Dynamic Guideline
Selects whether the dynamic guidelines come on
the rear camera monitor.
On
*1/Off
Default
Cancels/Resets all customized items in the Rear
Camera group as default.
Yes /No
Lane-
Watch
*
Show with Turn Signal
Selects whether the LaneWatch display comes on
when you move the turn signal lever to the
passenger side.
On
*1/Off
Display Time after Turn
Signal Off
Changes the length of time the LaneWatch
display stays on after you pull the turn signal lever
back.
0 second
*1/2 seconds
Reference Lines
Selects whether the reference lines come on the
LaneWatch monitor.
On
*1/Off
Default
Cancels/Resets all customized items in the
LaneWatch group as default.
Yes/No
* Not available on all models
Page 332 of 469

331
uuWhen Driving uLaneWatch
TM*
Continued
Driving
LaneWatch
TM
*
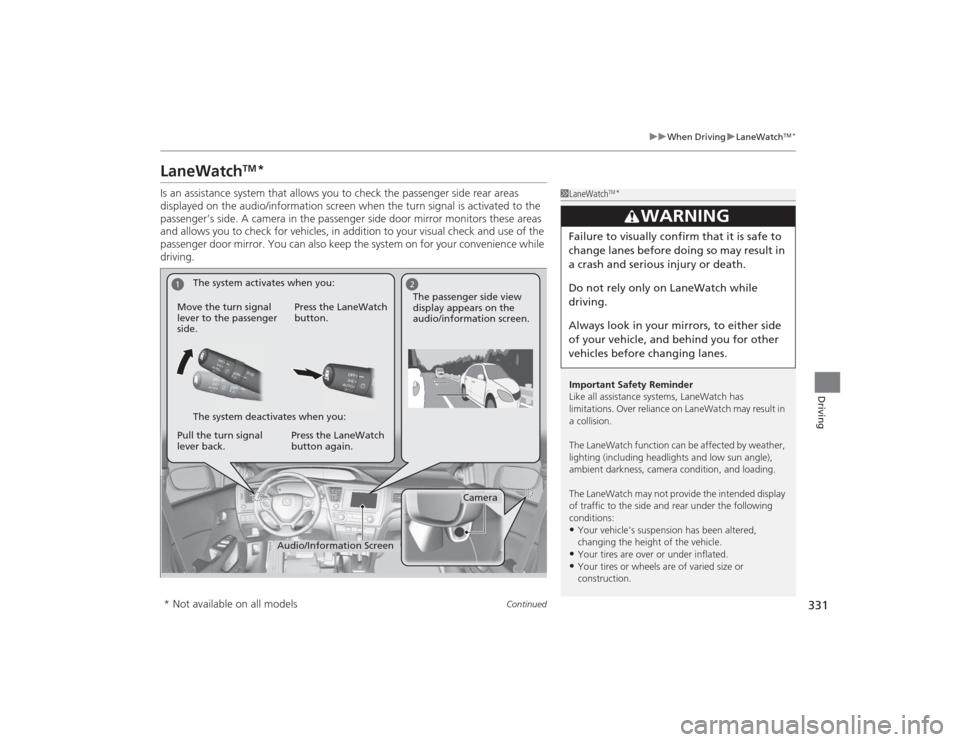
Is an assistance system that allows you to check the passenger side rear areas
displayed on the audio/information screen when the turn signal is activated to the
passenger’s side. A camera in the passenger side door mirror monitors these areas
and allows you to check for vehicles, in addition to your visual check and use of the
passenger door mirror. You can also keep the system on for your convenience while
driving.
1LaneWatch
TM*
Important Safety Reminder
Like all assistance systems, LaneWatch has
limitations. Over reliance on LaneWatch may result in
a collision.
The LaneWatch function can be af fected by weather,
lighting (including headlights and low sun angle),
ambient darkness, camera condition, and loading.
The LaneWatch may not provide the intended display
of traffic to the side and rear under the following
conditions:•Your vehicle’s suspension has been altered,
changing the height of the vehicle.•Your tires are over or under inflated.•Your tires or wheels are of varied size or
construction.
3
WARNING
Failure to visually confirm that it is safe to
change lanes before doing so may result in
a crash and serious injury or death.
Do not rely only on LaneWatch while
driving.
Always look in your mirrors, to either side
of your vehicle, and behind you for other
vehicles before changing lanes.
1
2
Camera
Audio/Information Screen
Move the turn signal
lever to the passenger
side.
Press the LaneWatch
button.
Pull the turn signal
lever back. Press the LaneWatch
button again. The passenger side view
display appears on the
audio/information screen.
The system activates when you:
The system deactivates when you:
* Not available on all models