Page 33 of 46

32
Handling the Unexpected
If a Tire Goes Flat Temporarily Repairing a Flat Tire
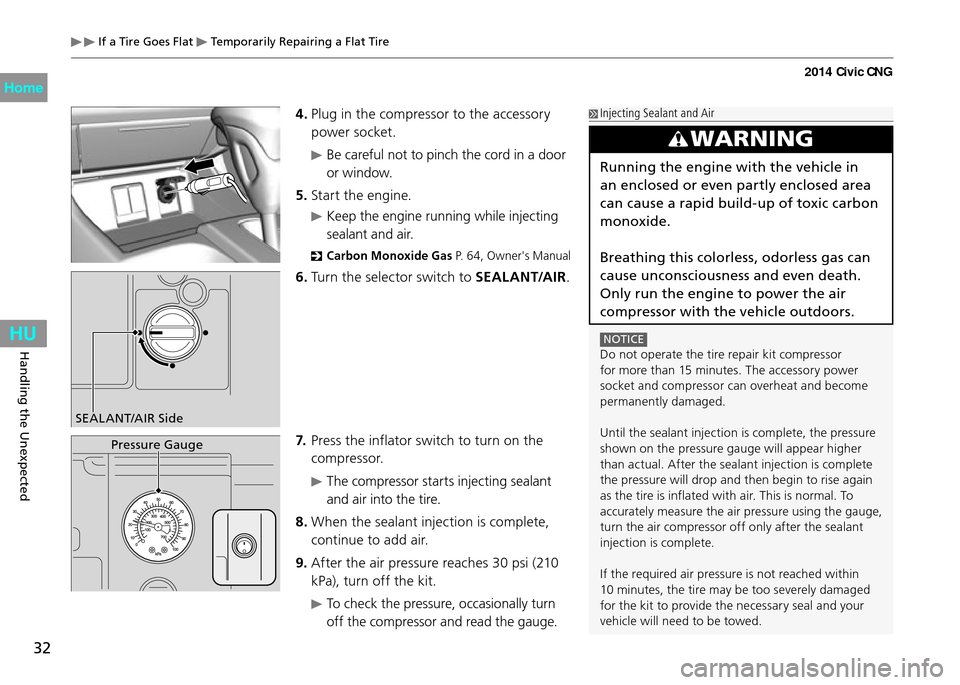
4. Plug in the compressor to the accessory
power socket.
Be careful not to pinch the cord in a door
or window.
5. Start the engine.
Keep the engine running while injecting
sealant and air.
Carbon Monoxide Ga s
P. 64, Owner's Manual
6. Turn the selector switch to SEALANT/AIR .
7. Press the inflator switch to turn on the
compressor.
The compressor starts injecting sealant
and air into the tire.
8. When the sealant injection is complete,
continue to add air.
9. After the air pressure reaches 30 psi (210
kPa), turn off the kit.
To check the pressure, occasionally turn
off the compressor and read the gauge.
Injecting Sealant and Air
SEAL ANT/AIR Side
Pressure Gauge
WARNING
Running the engine with the vehicle in
an enclosed or even partly enclosed area
can cause a rapid build-up of toxic carbon
monoxide.
Breathing this colorless, odorless gas can
cause unconsciousness and even death.
Only run the engine to power the air
compressor with the vehicle outdoors.
NOTICE Do not operate the tire repair kit compressor
for more than 15 minutes. The accessory power
socket and compressor can overheat and become
permanently damaged.
Until the sealant injection is complete, the pressure
shown on the pressure gauge will appear higher
than actual. After the sealant injection is complete
the pressure will drop and then begin to rise again
as the tire is inflated with air. This is normal. To
accurately measure the air pressure using the gauge,
turn the air compressor off only after the sealant
injection is complete.
If the required air pressure is not reached within
10 minutes, the tire may be too severely damaged
for the kit to provide the necessary seal and your
vehicle will need to be towed.
2014 Civic CNG
Page 37 of 46

36
Handling the Unexpected
If a Tire Goes Flat Temporarily Repairing a Flat Tire
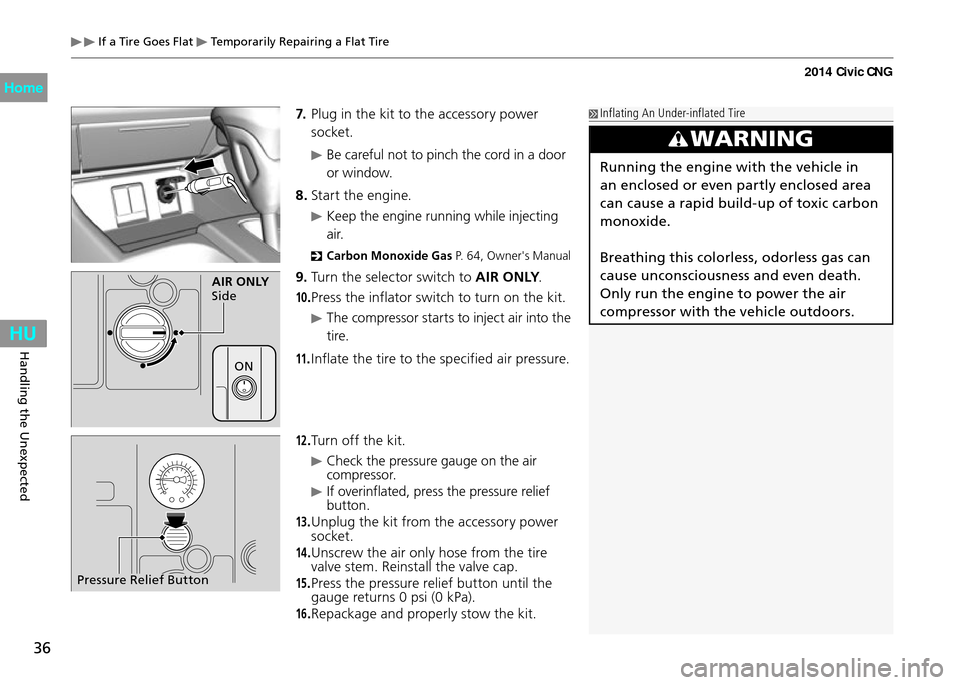
7. Plug in the kit to the accessory power
socket.
Be careful not to pinch the cord in a door
or window.
8. Start the engine.
Keep the engine running while injecting
a i r.
Carbon Monoxide Ga s
P. 64, Owner's Manual
9. Turn the selector switch to AIR ONLY .
10. Press the inflator switch to turn on the kit.
The compressor starts to inject air into the
tire.
11. Inflate the tire to the specified air pressure.
12. Turn off the kit.
Check the pressure gauge on the air
compressor.
If overinflated, press the pressure relief
button.
13. Unplug the kit from the accessory power
socket.
14. Unscrew the air only hose from the tire
valve stem. Reinstall the valve cap.
15. Press the pressure relief button until the
gauge returns 0 psi (0 kPa).
16. Repackage and properly stow the kit.
Inflating An Under-inflated Tire
AIR ONLY
Side
Pressure Relief Button
WARNING
Running the engine with the vehicle in
an enclosed or even partly enclosed area
can cause a rapid build-up of toxic carbon
monoxide.
Breathing this colorless, odorless gas can
cause unconsciousness and even death.
Only run the engine to power the air
compressor with the vehicle outdoors.
ON
2014 Civic CNG
Page 38 of 46

37
Fuel Leaks
Handling the Unexpected
If a Fuel Leak is Detected
If you smell natural gas or hear a hissing sound, except when refueling, the fuel
system may have a leak. If a Fuel Leak is Detected
WARNING
Compressed natural gas is flammable and
highly explosive. You could be killed or
seriously injured if leaking natural gas is
ignited.
If you suspect a leak, have your vehicle
immediately inspected and repaired by an
authorized Honda Civic Natural Gas
d e a l e r.
Do not jump start your vehicle if you suspect a gas
leak.
Turning Off the Manual Shut-Off Valve
We recommend that you locate the valve before
driving so that you can turn it off quickly if
ne ce s s ar y.
Turn off the valve if you ever suspect a fuel leak or
are involved in an accident.
Turn the manual shut-off valve to OFF also when
you are storing your vehicle for an extended period.
Turning Off the Manual Shut-Off Valve
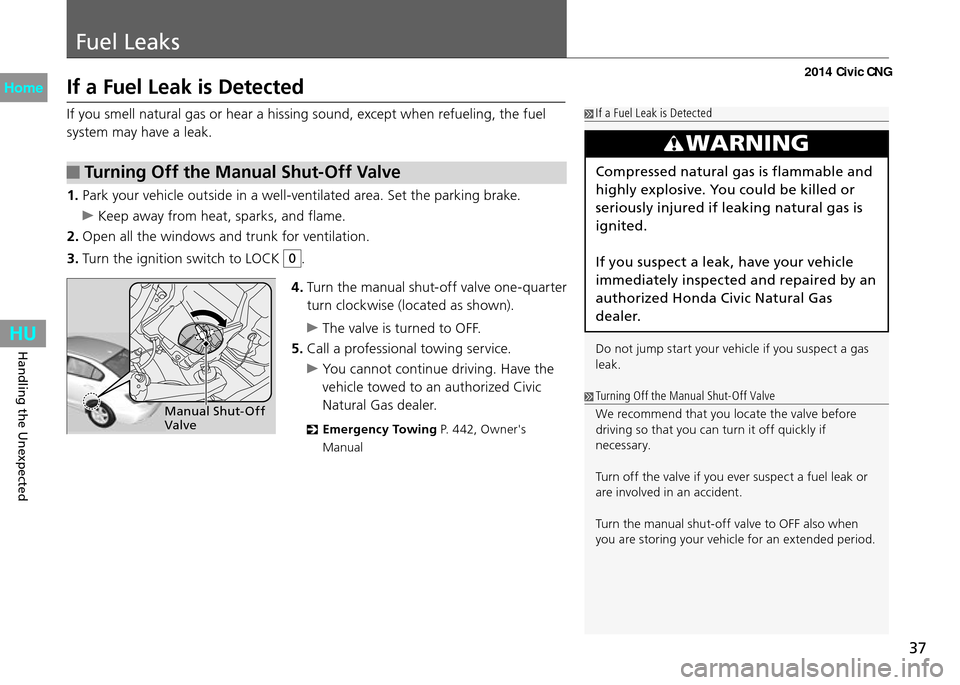
4. Turn the manual shut-off valve one-quarter
turn clockwise (located as shown).
The valve is turned to OFF.
5. Call a professional towing service.
You cannot continue driving. Have the
vehicle towed to an authorized Civic
Natural Gas dealer.
Emergency Towing
P. 442, Owner's
Manual
1. Park your vehicle outside in a well-ventilated area. Set the parking brake.
Keep away from heat, sparks, and flame.
2. Open all the windows and trunk for ventilation.
3. Turn the ignition switch to LOCK
0.
Manual Shut-Off
Valve
2014 Civic CNG
Page 42 of 46

41
Handling the Unexpected
Fuses Fuse Locations
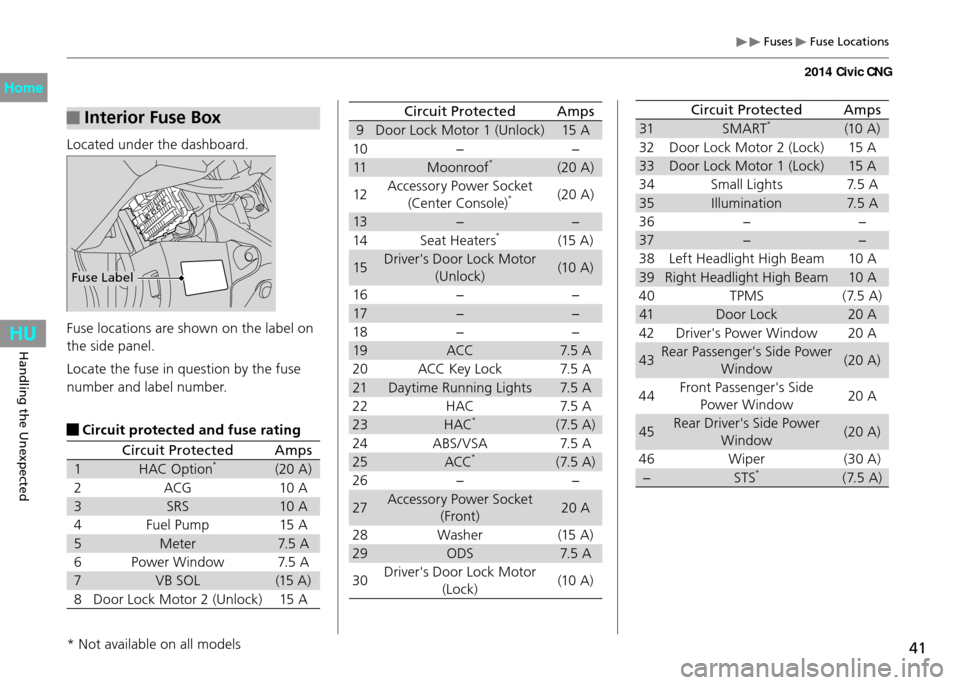
Interior Fuse BoxCircuit ProtectedAmps
9 Door Lock Motor 1 (Unlock) 15 A
10 − −
11 Moonroof
*(20 A)
12 Accessory Power Socket
(Center Console)
*(20 A)
13 − −
14 Seat Heaters
*(15 A)
15 Driver's Door Lock Motor
(Unlock) (10 A)
16 − −
17 − −
18 − −
19 ACC 7.5 A
20 ACC Key Lock 7.5 A
21 Daytime Running Lights 7.5 A
22 HAC 7.5 A
23 HAC
*(7.5 A)
24 ABS/ VSA 7.5 A
25 ACC
*(7.5 A)
26 − −
27 Accessory Power Socket
(Front) 20 A
28 Washer (15 A)
29 ODS 7.5 A
30 Driver's Door Lock Motor
(Lock) (10 A)
Circuit Protected
Amps
31 SMART*(10 A)
32 Door Lock Motor 2 (Lock) 15 A
33 Door Lock Motor 1 (Lock) 15 A
34 Small Lights 7.5 A
35 Illumination 7.5 A
36 − −
37 − −
38 Left Headlight High Beam 10 A
39 Right Headlight High Beam 10 A
40 TPMS (7.5 A)
41 Door Lock 20 A
42 Driver's Power Window 20 A
43 Rear Passenger's Side Power
Window (20 A)
44 Front Passenger's Side
Power Window 20 A
45 Rear Driver's Side Power
Window (20 A)
46 Wiper (30 A)
− STS
*(7.5 A)
Located under the dashboard.
Fuse locations are shown on the label on
the side panel.
Locate the fuse in question by the fuse
number and label number.
Circuit protected and fuse rating
Circuit Protected
Amps
1 HAC Option*(20 A)
2 ACG 10 A
3 SRS 10 A
4 Fuel Pump 15 A
5 Meter 7.5 A
6 Power Window 7.5 A
7 VB SOL (15 A)
8 Door Lock Motor 2 (Unlock) 15 A
* Not available on all models
Fuse Label
2014 Civic CNG