Page 12 of 46

11
When Driving
Continued
Driving
Starting the Engine
Starting the Engine
Keep your foot firmly on the brake pedal when
starting the engine.
The engine is harder to start in cold weather and
in thinner air found at altitudes above 8,000 feet
(2,400 meters).
When starting the engine in cold weather, turn
off all electrical accessories (the lights, heating
and cooling system, and rear defogger) in order to
reduce battery drain.
If you live in a region where winter is extremely
cold, an engine block heater will improve starting
and warming of the engine. If temperatures
consistently below -22°F (-30°C) are expected, the
coolant mixture should be changed to a higher
concentration to prevent freezing. Consult a dealer
for details.
If the exhaust system sounds abnormal or you
can smell exhaust gas inside the vehicle, have
your vehicle checked by a dealer. There may be a
problem with the engine or exhaust system.
Brake Pedal
1. Make sure the parking brake is applied.
2. Check that the shift lever is in P
, then
depress the brake pedal.
Although it is possible to start the vehicle
in
N, it is safer to start it in P.
2014 Civic CNG
Page 15 of 46
When Driving Shifting
14
Driving
Shifting
Change the shift position in accordance with your driving needs.
Shift lever positions
Park
Used when parking or starting the
engine
Reverse
Used when reversing
Neutral
Used when idling
Drive
Used for normal driving (gears change
between 1st and 5th automatically)
Drive (D3)
Used when going up or down hills
Second
Used to increase engine braking
(the transmission is locked in 2nd gear)
First
Used to further increase engine braking
(the transmission is locked in 1st gear)
Release Button
Shifting
You cannot turn the ignition switch to LOCK
0 and
remove the key unless the shift lever is in P.
The vehicle may move forward very slightly even in
N while the engine is cold.
Depress the brake pedal firmly and, when necessary,
apply the parking brake.
2014 Civic CNG
Page 16 of 46

When Driving Shifting
15Continued
Driving
Shift Lever Operation
Shift Lever Position Indicator
Tachometer’s red zone
Depress the brake pedal and press
the shift lever release button to
shift.
Shift without pressing the shift
lever release button.
Press the shift lever release button
and shift.
Shift Lever Operation
NOTICE
When you change the shift lever from D to R and
vice versa, come to a complete stop and keep the
brake pedal depressed.
Operating the shift lever before the vehicle has
come to a complete standstill can damage the
transmission.
Use the shift lever position indicator to check the
lever position before pulling away.
Whichever position the shift lever is in when driving,
a blinking
D indicator indicates a transmission
problem.
Avoid sudden acceleration and have the
transmission checked by a dealer as soon as
possible.
The fuel supply may be cut off if you drive at engine
speeds in or over the tachometer’s red zone (engine
speed limit). If this happens, you may experience a
slight jolt.
It may not be possible to operate the shift lever
if the brake pedal is applied while the shift lever
release button is held down.
Depress the brake pedal first.
2014 Civic CNG
Page 24 of 46
23
Replacing Light Bulbs
Continued
Maintenance
High-Mount Brake Light Bulb
When replacing, use the following bulb.
High-Mount Brake Light: 21W
1. Open the trunk.
2.
Remove the screw from the center of each
trunk lining fastener, then remove the
fasteners.
3.
Pull the upper edge of the trunk lining
down.
Trunk Lining
Screw
Fastener
2014 Civic CNG
Page 25 of 46
24
Maintenance
Replacing Light Bulbs High-Mount Brake Light Bulb
4. Turn the socket to the left and remove it.
5. Remove the old bulb and insert a new
bulb.Bulb
Socket
2014 Civic CNG
Page 30 of 46

29Continued
Handling the Unexpected
If a Tire Goes Flat Temporarily Repairing a Flat Tire
Models with tire repair kit
Temporarily Repairing a Flat Tire
This vehicle is not equipped with a spare tire. If the tire has a large cut or is
otherwise severely damaged, you will need to have the vehicle towed. If the tire
only has a small puncture, from a nail for instance, you can use the temporary tire
repair kit so that you can drive to the nearest service station for a more permanent
repair.
If a tire goes flat while driving, grasp the steering wheel firmly, and brake gradually
to reduce speed. Then stop in a safe place.
1. Park the vehicle on firm, level, and non-slippery surface and apply the parking
brake.
2. Put the shift lever in
P.
3. Turn on the hazard warning lights and turn the ignition switch to LOCK
0.
When towing a trailer, unhitch the trailer.
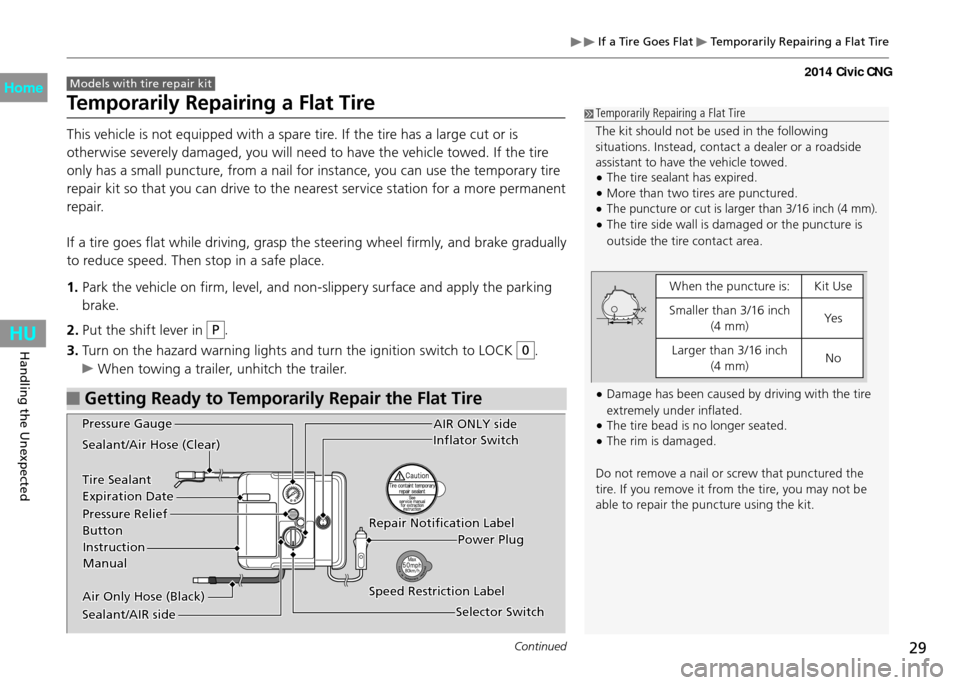
Getting Ready to Temporarily Repair the Flat Tire
AIR ONLY side
Inflator Switch
Repair Notification Label
Power Plug
Speed Restriction Label
Selector Switch
Pressure Gauge
Sealant/Air Hose (Clear)
Tire Sealant
Expiration Date
Pressure Relief
Button
Instruction
Manual
Air Only Hose (Black)
Sealant/AIR side
Temporarily Repairing a Flat Tire
The kit should not be used in the following
situations. Instead, contact a dealer or a roadside
assistant to have the vehicle towed.
The tire sealant has expired.
•More than two tires are punctured.
•The puncture or cut is larger than 3/16 inch (4 mm).
•The tire side wall is damaged or the puncture is
•outside the tire contact area.
When the puncture is: Kit Use
Smaller than 3/16 inch (4 mm) Ye s
Larger than 3/16 inch (4 mm) No
Damage has been caused by driving with the tire
•extremely under inflated.
The tire bead is no longer seated.
•The rim is damaged.
•
Do not remove a nail or screw that punctured the
tire. If you remove it from the tire, you may not be
able to repair the puncture using the kit.
2014 Civic CNG
Page 41 of 46

40
Handling the Unexpected
Fuses Fuse Locations
Circuit ProtectedAmps
1 EPS
70 A
− (40 A)
ABS/ VSA Motor 30 A ABS/ VSA FSR 30 A − (30 A)
Main Fuse 100 A
2 IG Main
50 A
Fuse Box Main 60 A
Fuse Box Main 2 60 A Headlight Main 30 A − (30 A)
Rear Defogger 30 A − (30 A)
Blower 40 A
− (30 A)
Sub Fan Motor 20 A
Main Fan Motor 20 A
3 − −
4 Left Headlight Low Beam 15 A
5 ST MG 7.5 A
6 Right Headlight Low Beam 15 A
7 − −
8 − −
9 − −
10 − −
Circuit Protected Amps
11 Oil Level 7.5 A
12 Fog Lights
*(20 A)
13 Driver's Power Seat (Sliding)*(20 A)
14 Hazard 10 A
15 FI Sub 15 A
16 IG Coil 15 A
17 Stop 15 A
18 Horn 10 A
19 Premium Amp
*(20 A)
20 INJ (15 A)
21 IGP 15 A
22 DBW 15 A
23 H/L LO 20 A
24 Driver's Power Seat
(Reclining)
*(20 A)
25 MG Clutch 7.5 A
26 − −
27 SMALL 20 A
28 Interior Lights 7.5 A
29 Back Up 10 A
Fuse Locations
If any electrical devices are not working,
turn the ignition switch to LOCK
0 and
check to see if any applicable fuse is
blown.
Engine Compartment Fuse Box
Located near the brake fluid reservoir.
Push the tabs to open the box.
Fuse locations are shown on the fuse box
cover. Locate the fuse in question by the
fuse number and box cover number.
Circuit protected and fuse rating
* Not available on all models
Ta b
2014 Civic CNG
Page 43 of 46

Specifications
42
Information
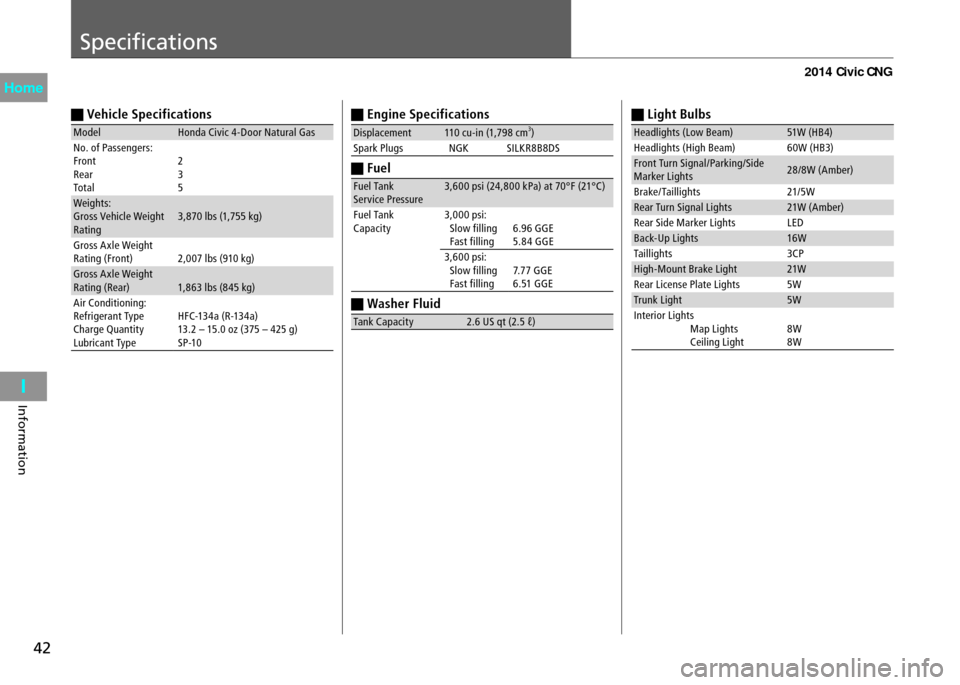
Vehicle Specifications
ModelHonda Civic 4-Door Natural Gas
No. of Passengers:
Front
Rear
Total 2
3
5
Weights:
Gross Vehicle Weight
Rating 3,870 lbs (1,755 kg)
Gross A xle Weight
Rating (Front) 2,007 lbs (910 kg)
Gross A xle Weight
Rating (Rear) 1,863 lbs (845 kg)
Air Conditioning:
Refrigerant Type
Charge Quantity
Lubricant Type HFC-134a (R-134a)
13.2 – 15.0 oz (375 – 425 g)
SP-10
Engine Specifications
Displacement
110 cu-in (1,798 cm3)
Spark Plugs NGKSILKR8B8DS
Fuel
Fuel Tank
Service Pressure 3,600 psi (24,800 kPa) at 70°F (21°C)
Fuel Tank
Capacity 3,000 psi:
Slow filling
Fast filling
6.96 GGE
5.84 GGE
3,600 psi:
Slow filling
Fast filling
7.77 GGE
6.51 GGE
Washer Fluid
Tank Capacity 2.6 US qt (2.5 ℓ)
Light Bulbs
Headlights (Low Beam) 51W (HB4)
Headlights (High Beam) 60W (HB3)
Front Turn Signal/Parking/Side
Marker Lights
28/8W (Amber)
Brake/Taillights 21/ 5W
Rear Turn Signal Lights 21W (Amber)
Rear Side Marker Lights LED
Back-Up Lights 16 W
Taillights 3CP
High-Mount Brake Light 21W
Rear License Plate Lights 5W
Trunk Light 5W
Interior Lights
Map Lights
Ceiling Light 8W
8W
2014 Civic CNG