Page 383 of 595
uuBluetooth ® HandsFreeLink ®u HFL Menus
382Features
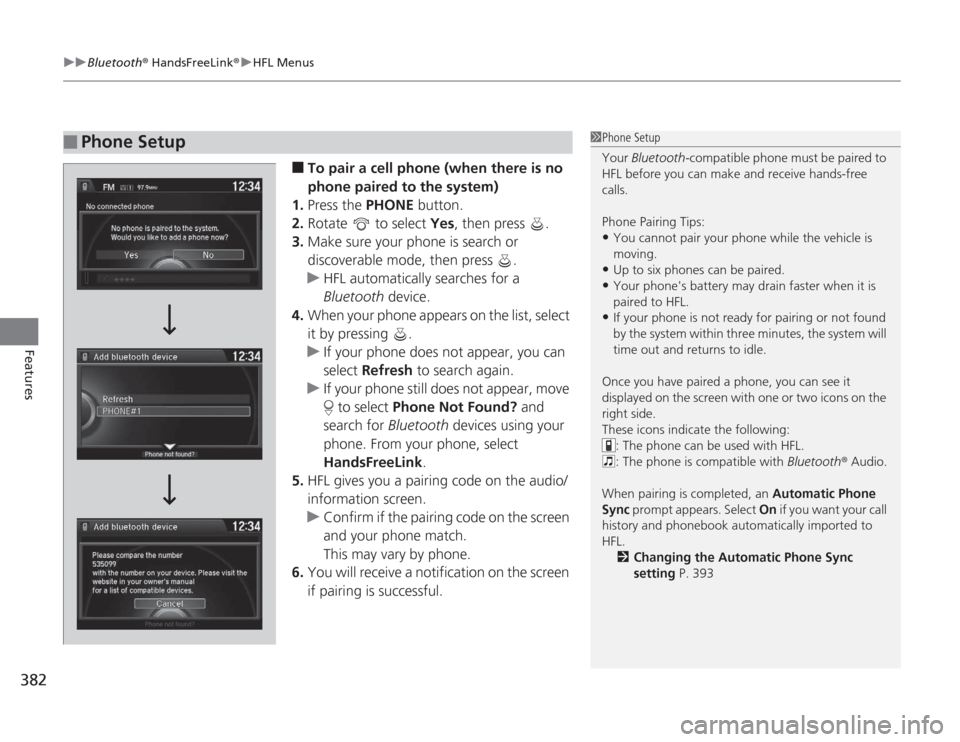
■
To pair a cell phone (when there is no
phone paired to the system)
1. Press the PHONE button.
2. Rotate to select Yes, then press .
3. Make sure your phone is search or
discoverable mode, then press .
u HFL automatically searches for a
Bluetooth device.
4. When your phone appears on the list, select
it by pressing .
u If your phone does not appear, you can
select Refresh to search again.
u If your phone still does not appear, move
to select Phone Not Found? and
search for Bluetooth devices using your
phone. From your phone, select
HandsFreeLink .
5. HFL gives you a pairing code on the audio/
information screen.
u Confirm if the pairing code on the screen
and your phone match.
This may vary by phone.
6. You will receive a notification on the screen
if pairing is successful.
■
Phone Setup
1Phone Setup
Your Bluetooth -compatible phone must be paired to
HFL before you can make and receive hands-free
calls.
Phone Pairing Tips:•You cannot pair your phone while the vehicle is
moving.•Up to six phones can be paired.•Your phone's battery may drain faster when it is
paired to HFL.•If your phone is not ready for pairing or not found
by the system within three minutes, the system will
time out and returns to idle.
Once you have paired a phone, you can see it
displayed on the screen with one or two icons on the
right side.
These icons indicate the following: : The phone can be used with HFL.
: The phone is compatible with Bluetooth® Audio.
When pairing is completed, an Automatic Phone
Sync prompt appears. Select On if you want your call
history and phonebook automatically imported to
HFL.
2 Changing the Automatic Phone Sync
setting P. 393
Page 409 of 595

uuBluetooth ® HandsFreeLink ®u HFL Menus
408Features
HFL can display newly received text messages and E-mails as well as 20 of the most
recently received messages on a linked cell phone. Each received message can be
read aloud and replied to using a fixed common phrase.
1.A pop-up appears and notifies you of a new
text message or E-mail.
2. Rotate to select Read to listen to the
message, then press .
u The text message or E-mail is displayed.
The system automatically starts reading
out the message.
3. To discontinue the message read-out, press
.■
Receiving a Text Message/E-mail
1Receiving a Text Message/E-mail
The system does not display any received messages
while you are driving. You can only hear them read
aloud.
With some phones, you may be able to display up to
20 most recent text messages and E-mails.
State or local laws may limit your use of the HFL text
message/E-mail feature. Only use the text message/
E-mail feature when conditions allow you to do so
safely.
When you receive a text message or E-mail for the
first time since the phone is paired to HFL, you are
asked to turn the New Text/Email Alert setting to
On .
2 To turn on or off the text/E-mail notice
P. 387
Page 444 of 595
443
uuWhen Driving uShifting
Continued
Driving
ShiftingFully depress the clutch pedal to operate the shift lever and change gears, then
slowly release the pedal.
Depress the clutch pedal, and pause for a few seconds before shifting into
(R
, or
shift into one of the forward gears for a moment. This stops the gears so they do not
“grind.”
■
Shift Lever Operation
Manual transmission models
1 Shifting
NOTICEDo not shift to
(R
before the vehicle comes to a
complete stop.
Shifting to
( R
before stopping can damage the
transmission.
NOTICEBefore downshifting, make sure the engine will not
go into the tachometer's red zone. Should this occur,
it can severely damage your engine.
There is a metallic part on the shift lever. If you leave
the vehicle park ed outside for a long time on a hot
day, be careful before moving the shift lever. Because
of heat, the shift lever ma y be extremely hot. If the
outside temperature is low, the shift lever may feel
cold.
Page 448 of 595

447
uuWhen Driving uCruise Control
*
Continued
Driving
Cruise Control
*
Maintains a constant vehicle speed without having to keep your foot on the
accelerator. Use cruise control on freeways or open roads where you can travel at a
constant speed with little acceleration or deceleration.
1Cruise Control
*
It may not be possible to maintain a constant speed
when driving uphill or downhill.
When not using cruise control:
Turn off cruise control by pressing the CRUISE
button.
While in the ECON mode, it may take relatively more
time to accelerate to maintain the set speed.
When the engine speed slows down, try to
downshift.
You can maintain the set speed if you change gear
within five seconds.
3
WARNING
Improper use of the cruise control can lead
to a crash.
Use the cruise control only when traveling
on open highways in good weather.Manual transmission models
When to use■
Shift positions for cruise control:
In
( D
or
(S Always keep sufficient distance
between you and the vehicle in
front of you.
Automatic transmission/CVT models■
Vehicle speed for cruise control:
Desired speed in a range above
roughly 25 mph (40 km/h) ~How to use
CRUISE MAIN is on in the
instrument panel.Cruise control is ready to use.
■
Press the
CRUISE
button on
the steering wheel.
* Not available on all models
Page 450 of 595

449
uuWhen Driving uCruise Control
*
Driving
Increase or decrease the vehicle speed using the RES/+ or –/SET buttons on the
steering wheel.
• Each time you press the button, the vehicle speed is increased or decreased by
about 1 mph (1.6 km/h).
• If you keep the button pressed, the vehicle speed increases or decreases until you
release it. This speed is then set.
To cancel cruise control, do any of the
following:
•Press the CANCEL button.
• Press the CRUISE button.
• Depress the brake pedal.
• Depress the clutch pedal for five seconds or
more.
The CRUISE CONTROL indicator goes off.■
To Adjust the Vehicle Speed
1To Adjust the Vehicle Speed
You can set the vehicle speed using the –/SET button
on the steering wheel when adjusting the speed with
the accelerator and brake pedals.
■
To Cancel
To decrease speedTo increase speed
1 To Cancel
Resuming the prior set speed:
After cruise control has been canceled, you can still
resume the prior set speed by pressing the RES/+
button while driving at a speed of at least 25 mph
(40 km/h) or more.
You cannot set or resume in the following situations:•When vehicle speed is less than 25 mph (40 km/h)•When the CRUISE button is turned off
At vehicle speeds of 22 mph (35 km/h) or less, cruise
control is canceled automatically.
CRUISE
Button
CANCEL
Button
Page 455 of 595
uuWhen Driving uACC (Adaptive Cruise Control)
*
454Driving
Increase or decrease the vehicle speed using the RES/+ or –/SET buttons on the
steering wheel.
• Each time you press the button, the vehicle speed is increased or decreased by
about 1 mph or 1 km/h accordingly.
• If you keep the button pressed, the vehicle speed increases or decreases by about
5 mph or 5 km/h accordingly.■
To Adjust the Vehicle Speed
1To Adjust the Vehicle Speed
If a vehicle ahead is going at a speed slower than your
increased set speed, ACC may not accelerate your
vehicle. This is to maintain the distance between your
vehicle and the vehicle ahead.
You can set the vehicle speed using the –/SET button
on the steering wheel when adjusting the speed with
the accelerator and brake pedals.
To increase speedTo decrease speed
Page 468 of 595

467
uuWhen Driving uVSA ® (Vehicle Stability Assist), aka ESC (Electronic Stability Control), System
Driving
This button is on the driver side control panel.
To turn the VSA ® system on and off, press and
hold it until you hear a beep.
VSA ® will stop and the indicator will come on.
To turn it on again, press the (VSA ® OFF )
button until you hear a beep.
VSA ® is turned on every time you start the
engine, even if you turned it off the last time
you drove the vehicle.
■
VSA ® On and Off
1 VSA ® (Vehicle Stability Assist), aka ESC (Electronic Stability Control), System
Without VSA ®, your vehicle will have normal braking
and cornering ability, but it will not have VSA ®
traction and stability enhancement.
In certain unusual conditions when your vehicle gets
stuck in shallow mud or fresh snow, it may be easier
to free it with the VSA ® temporarily switched off.
When the VSA ® system is off, the traction control
system is also off. You should only attempt to free
your vehicle with the VSA ® off if you are not able to
free it when the VSA ® is on.
Immediately after freeing your vehicle, be sure to
switch VSA® on again. We do not recommend driving
your vehicle with the VSA ® and traction control
systems switched off.
If the low tire pressure/TPMS indicator comes on or
blinks, the VSA ® system comes on automatically. In
this case, you cannot turn the system off by pressing
the button.
You may hear a motor sound coming from the
engine compartment while system checks are being
performed immediatel y after starting the engine or
while driving. This is normal.
VSA ® OFF Indicator
Page 480 of 595

479
Driving
Multi-View Rear CameraAbout Your Multi-View Rear CameraThe audio/information screen can display your vehicle’s rear view. The display
automatically changes to the rear view when the shift lever is moved to
(R
.
You can view three different camera angles on the rearview display. Press the
selector knob or the interface dial to switch the angle.
If the last used viewing mode is Wide or Normal, the same mode is selected the next
time you shift into
(R
. If Top View was last used, Wide mode is selected.
■
Multi-View Rear Camera Display Area
Models with two displays/Models with navigation system
1 About Your Multi-View Rear Camera
The rear camera view is restricted. You cannot see
the corner ends of the bumper or what is underneath
the bumper. Its unique lens also makes objects
appear closer or farther than they actually are.
Visually confirm that it is safe to drive before backing
up. Certain conditions (such as weather, lighting, and
high temperatures) may also restrict the rear view. Do
not rely on the rearview display which does not give
you all information about conditions at the back of
your vehicle.
If the camera lens is covered with dirt or moisture,
use a soft, moist cloth to keep the lens clean and free
of debris.
You can change the Fixed Guideline and Dynamic
Guideline settings. 2 Customized Features P. 299
Fixed Guideline
On : Guidelines appear when you shift into
(R
.
Off : Guidelines do not appear.
Dynamic Guideline
On : Guidelines move according to the steering wheel
direction.
Off : Guidelines do not move.
Top Down View Mode Normal View Mode Wide View Mode
Guidelines
Bumper
Camera
Approx. 118 inches (3 m)Approx. 79 inches (2 m)Approx. 39 inches (1 m)
Approx. 20 inches (50 cm)

