2014 HONDA ACCORD COUPE warning
[x] Cancel search: warningPage 473 of 593
472
Driving
Braking
Brake System
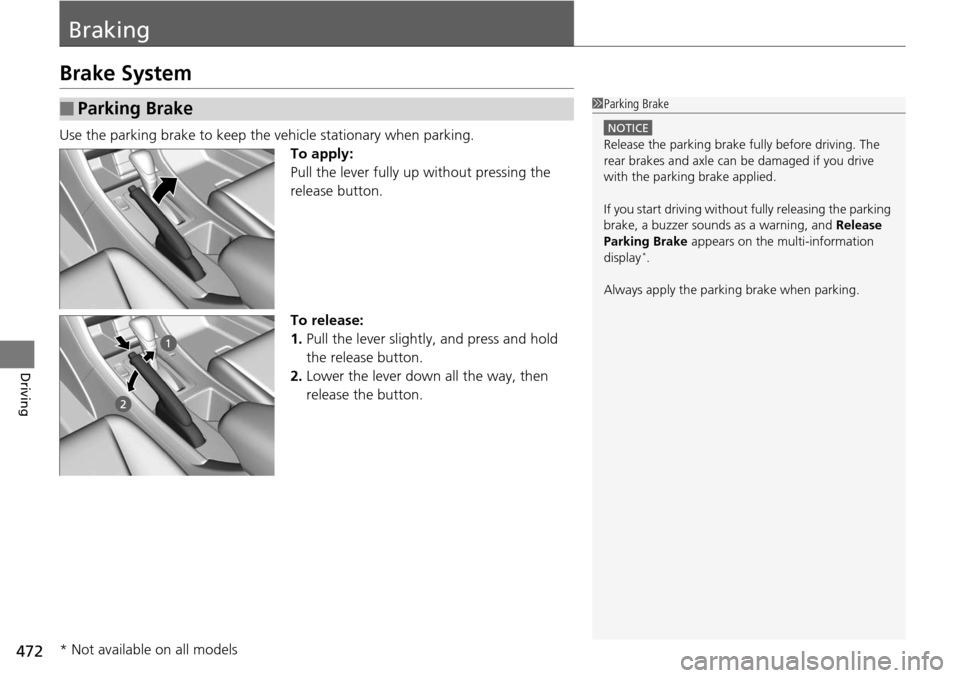
Use the parking brake to keep the vehicle stationary when parking.To apply:
Pull the lever fully up without pressing the
release button.
To release:
1.Pull the lever slightly, and press and hold
the release button.
2. Lower the lever down all the way, then
release the button.
■Parking Brake1Parking Brake
NOTICE
Release the parking brake fu lly before driving. The
rear brakes and axle can be damaged if you drive
with the parki ng brake applied.
If you start driving without fully releasing the parking
brake, a buzzer sounds as a warning, and Release
Parking Brake appears on the multi-information
display
*.
Always apply the parking brake when parking.
* Not available on all models
Page 481 of 593
480
uuRefueling uHow to Refuel
Driving
How to Refuel
1. Stop your vehicle with the service station
pump on the left side of the vehicle in the
rear.
2. Turn off the engine.
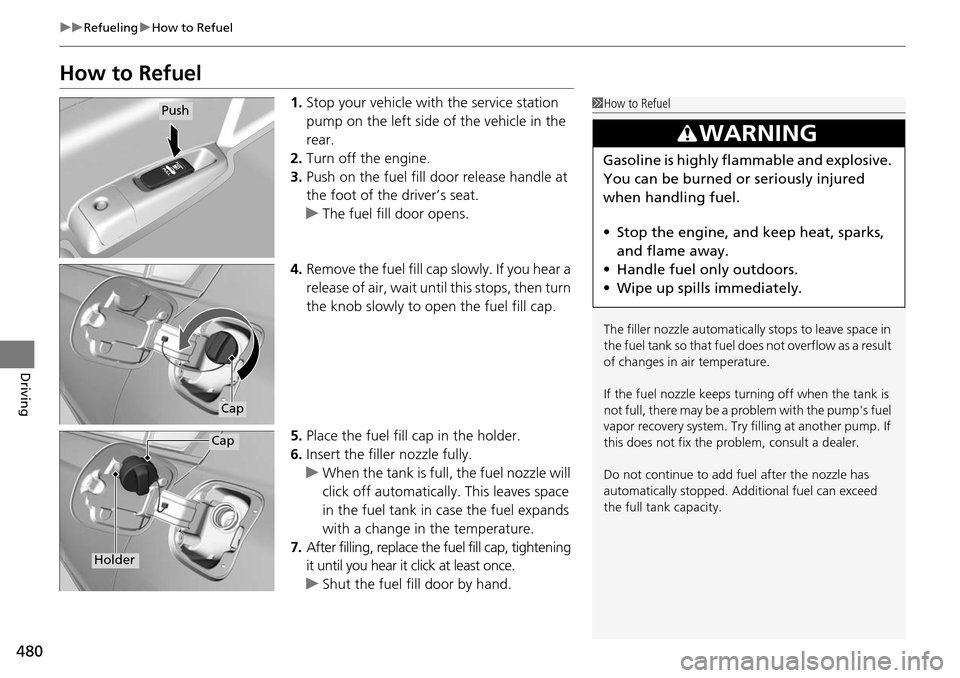
3. Push on the fuel fill door release handle at
the foot of the driver’s seat.
u The fuel fill door opens.
4. Remove the fuel fill cap slowly. If you hear a
release of air, wait unt il this stops, then turn
the knob slowly to open the fuel fill cap.
5. Place the fuel fill cap in the holder.
6. Insert the filler nozzle fully.
u When the tank is full, the fuel nozzle will
click off automatically . This leaves space
in the fuel tank in case the fuel expands
with a change in the temperature.
7. After filling, replace the fuel fill cap, tightening
it until you hear it click at least once.
u Shut the fuel fill door by hand.1How to Refuel
The filler nozzle automatically stops to leave space in
the fuel tank so that fuel does not overflow as a result
of changes in air temperature.
If the fuel nozzle keeps turning off when the tank is
not full, there may be a problem with the pump's fuel
vapor recovery system. Try fi lling at another pump. If
this does not fix the problem, consult a dealer.
Do not continue to add fuel after the nozzle has
automatically stopped. Addi tional fuel can exceed
the full tank capacity.
3WARNING
Gasoline is highly flammable and explosive.
You can be burned or seriously injured
when handling fuel.
• Stop the engine, and keep heat, sparks,
and flame away.
• Handle fuel only outdoors.
• Wipe up spills immediately.
Push
Cap
Cap
Holder
Page 483 of 593
482
Driving
Accessories and Modifications
Accessories
When installing accessories, check the following:
• Do not install accessories on the windshield. They can obstruct your view and
delay your reaction to driving conditions.
• Do not install accessories over areas marked SRS AIRBAG, on the sides or backs
of the front seats, on front or side pillars, or near the side windows.
Accessories installed in these areas may interfere with proper operation of the
vehicle’s airbags or may be propelled into you or another occupant if the airbags
deploy.
• Be sure electronic accessories do not over load electrical circuits or interfere with
proper operation of your vehicle.
2 Fuses P. 562
•Before installing any electron ic accessory, have the installer contact a dealer for
assistance. If possible, have a d ealer inspect the final installation.
Modifications
Do not modify your vehicle or use non-Honda components that can affect its
handling, stability, and reliability.
Overall vehicle performance can be affect ed. Always make sure all equipment is
properly installed and maintained, and th at it meets federal, state, province,
territory, and local regulations.
1 Accessories and Modifications
Honda Genuine accessor ies are recommended to
ensure proper operati on on your vehicle.
3WARNING
Improper accessories or modifications can
affect your vehicle's handling, stability, and
performance, and cause a crash in which
you can be seriously hurt or killed.
Follow all instruction s in this owner's
manual regarding accessories and
modifications.
Page 486 of 593
485
uuBefore Performing Maintenance uSafety When Performing Maintenance
Maintenance
Safety When Performing Maintenance
Some of the most important safe ty precautions are given here.
However, we cannot warn you of every conceivable hazard that can arise in
performing maintenance. Only you can decide whether or not you should perform
a given task.
• To reduce the possibility of fire or explos ion, keep cigarettes, sparks, and flames
away from the battery and all fuel related parts.
• Never leave rags, towels, or other flammable objects under the hood.
u Heat from the engine and exhaust can ignite them causing a fire.
• To clean parts, use a co mmercially available degreas er or parts cleaner, not
gasoline.
• Wear eye protection and protective clothi ng when working with the battery or
compressed air.
• Engine exhaust contains carbon monoxide, which is poisonous and can kill you.
u Only operate the engine if th ere is sufficient ventilation.
• The vehicle must be in a stationary condition.
u Make sure your vehicle is parked on le vel ground, the parking brake is set, and
the engine is off.
• Be aware that hot parts can burn you.
u Make sure to let the engine and exhaust system cool thoroughly before
touching vehicle parts.
• Be aware that moving parts can injure you.
u Do not start the engine unless instruct ed, and keep your hands and limbs away
from moving parts.
■Maintenance Safety
■Vehicle Safety
1 Safety When Performing Maintenance
3WARNING
Improperly maintaining this vehicle or
failing to correct a pr oblem before driving
can cause a crash in which you can be
seriously hurt or killed.
Always follow the inspection and
maintenance recommendations according
to the schedules in this owner's manual.
3WARNING
Failure to properly follow maintenance
instructions and precautions can cause you
to be seriously hurt or killed.
Always follow the procedures and
precautions in this owner's manual.
Page 507 of 593
uuMaintenance Under the Hood uEngine Coolant
506
Maintenance
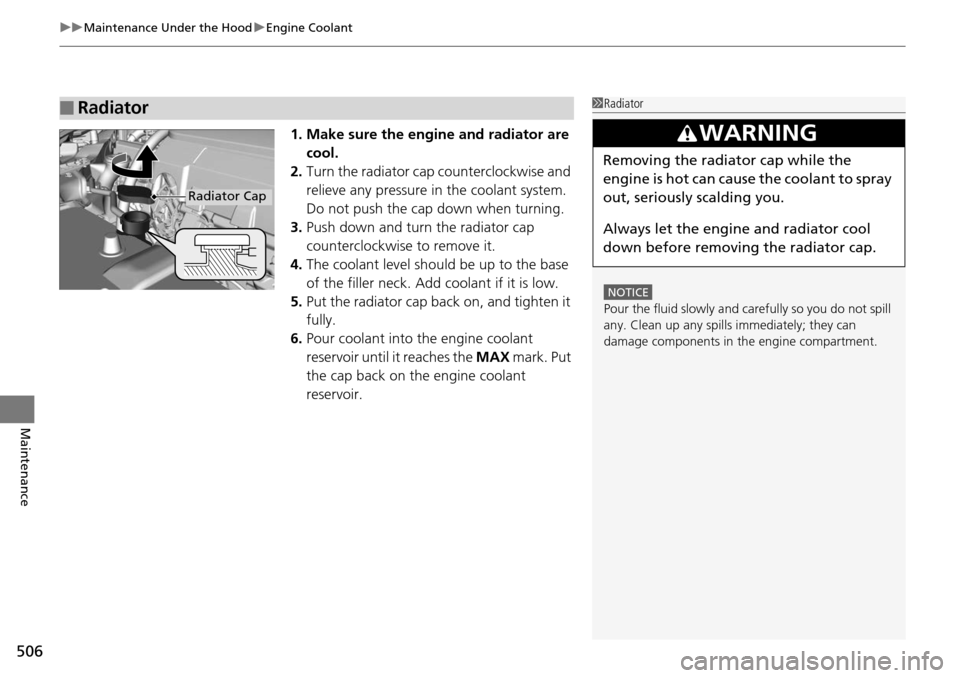
1. Make sure the engine and radiator are
cool.
2. Turn the radiator cap counterclockwise and
relieve any pressure in the coolant system.
Do not push the cap down when turning.
3. Push down and turn the radiator cap
counterclockwise to remove it.
4. The coolant level should be up to the base
of the filler neck. Add coolant if it is low.
5. Put the radiator cap back on, and tighten it
fully.
6. Pour coolant into the engine coolant
reservoir until it reaches the MAX mark. Put
the cap back on the engine coolant
reservoir.
■Radiator1 Radiator
NOTICE
Pour the fluid slowly and ca refully so you do not spill
any. Clean up any spills immediately; they can
damage components in the engine compartment.
3WARNING
Removing the radiator cap while the
engine is hot can cause the coolant to spray
out, seriously scalding you.
Always let the engine and radiator cool
down before removing the radiator cap.
Radiator Cap
Page 524 of 593
523
Maintenance
Checking and Maintaining Tires
Checking Tires
To safely operate your vehicle, your tires must be of the proper type and size, in
good condition with adequate tread, and properly inflated.
■Inflation guidelines
Properly inflated tires provid e the best combination of hand ling, tread life, and comfort.
Refer to the driver’s doorjamb label or spec ification’s page for the specified pressure.
Underinflated tires wear unev enly, adversely affect handling and fuel economy, and
are more likely to fail from overheating.
Overinflated tires make your vehicle ride ha rshly, are more prone to road hazards,
and wear unevenly.
Every day before you drive, look at each of the tires. If one looks lower than the
others, check the pressure with a tire gauge.
At least once a month or before long trips , use a gauge to measure the pressure in
all tires, including the spare. Even tires in good condition can lose 1 to 2 psi (10 to
20 kPa, 0.1 to 0.2 kgf/cm
2) per month.
■Inspection guidelines
Every time you check inflation, also examine the tires and valve stems.
Look for:
• Bumps or bulges on the side or in the tread. Replace the tire if you find any cuts,
splits, or cracks in the side of the tire . Replace it if you see fabric or cord.
• Remove any foreign objects and inspect for air leaks.
• Uneven tread wear. Have a deal er check the wheel alignment.
• Excessive tread wear.
2 Wear Indicators P. 528
•Cracks or other damage around valve stem.
1Checking Tires
Measure the air pressure when tires are cold. This
means the vehicle has been parked for at least three
hours, or driven less than 1 mile (1.6 km). If
necessary, add or releas e air until the specified
pressure is reached.
If checked when hot, tire pressure can be as much as
4–6 psi (30–40 kPa, 0.3–0.4 kgf/cm
2) higher than if
checked when cold.
Whenever tire pressure is adjusted, you must
calibrate the TPMS. 2 TPMS Calibration P. 468
Have a dealer check the tires if you feel a consistent
vibration while driving. Ne w tires and any that have
been removed and reinst alled should be properly
balanced.
3WARNING
Using tires that are excessively worn or
improperly inflated can cause a crash in
which you can be seriously hurt or killed.
Follow all instruction s in this owner’s
manual regarding ti re inflation and
maintenance.
Page 528 of 593
527
uuChecking and Maintaining Tires uDOT Tire Quality Grading (U.S. Vehicles)
Maintenance
The traction grades, from highest to lowest, are AA, A, B, and C.
Those grades represent the tire's ability to stop on wet pavement
as measured under controlled conditions on specified
government test surfaces of asph alt and concrete. A tire marked
C may have poor traction performance.
The temperature grades are A (the highest), B, and C,
representing the tire's resistance to the generation of heat and its
ability to dissipate heat when te sted under controlled conditions
on a specified indoor laboratory test wheel. Sustained high
temperature can cause the material of the tire to degenerate and
reduce tire life, and ex cessive temperature can lead to sudden tire
failure. The grade C corresponds to a level of performance which
all passenger car tires must meet under the Federal Motor Vehicle
Safety Standard No. 109. Grades B and A represent higher levels
of performance on the laboratory test wheel than the minimum
required by law.
■Traction
■Temperature
1 Traction
Warning: The traction grade
assigned to this tire is based on
straight-ahead braking traction tests,
and does not include acceleration,
cornering, hydroplaning, or peak
traction characteristics.
1Temperature
Warning: The temperature grade for
this tire is establishe d for a tire that is
properly inflated and not
overloaded. Excessive speed,
underinflation, or excessive loading,
either separately or in combination,
can cause heat buildup and possible
tire failure.
Page 530 of 593
529
uuChecking and Maintaining Tires uTire and Wheel Replacement
Maintenance
Tire and Wheel Replacement
Replace your tires with radials of the same size, load range, speed rating, and
maximum cold tire pressure rating (as shown on the tire’s sidewall). Using tires of a
different size or construction can cause the ABS and VSA® (vehicle stability assist)
system to work incorrectly.
It is best to replace all four tires at the same time. If that isn’t possible, replace the
front or rear tires in pairs.
Make sure that the wheel’s specifications match those of the original wheels.1 Tire and Wheel Replacement
3WARNING
Installing improper tires on your vehicle can
affect handling and stability. This can cause
a crash in which you can be seriously hurt or
killed.
Always use the size and type of tires
recommended in this owner’s manual.