Page 99 of 360

Black plate (1,1)GMC Terrain/Terrain Denali Owner Manual (GMNA-Localizing-U.S./Canada/
Mexico-6081485) - 2014 - CRC - 12/6/13
Storage 4-1
Storage
Storage Compartments
Storage Compartments . . . . . . . 4-1
Glove Box . . . . . . . . . . . . . . . . . . . . 4-1
Cupholders . . . . . . . . . . . . . . . . . . . 4-1
Center Console Storage . . . . . . 4-1
Additional Storage Features
Cargo Cover . . . . . . . . . . . . . . . . . . 4-2
Cargo Tie-Downs . . . . . . . . . . . . . 4-2
Convenience Net . . . . . . . . . . . . . 4-2
Roof Rack System
Roof Rack System . . . . . . . . . . . . 4-2
Storage
Compartments
{Warning
Do not store heavy or sharp
objects in storage compartments.
In a crash, these objects may
cause the cover to open and
could result in injury.
Glove Box
Open the glove box by lifting up on
the lever.
Cupholders
Two cupholders are in the center
console. Cupholders may be located
in the second row seat armrest. To
access, pull the armrest down.
Center Console Storage
There is storage in the center
console; lift the lever on the front to
open. If equipped there is a USB
port and auxiliary jack input inside.
Page 245 of 360

Black plate (29,1)GMC Terrain/Terrain Denali Owner Manual (GMNA-Localizing-U.S./Canada/
Mexico-6081485) - 2014 - CRC - 12/6/13
Vehicle Care 10-29
4. Turn the bulb socketcounterclockwise to remove it
from the lamp assembly.
5. Remove the bulb from the socket or disconnect the bulb
assembly from the harness
connector.
6. Install the new bulb.
7. Reinstall the bulb socket to the lamp assembly, turning
clockwise.
8. Replace the dust cover cap on headlamps.
9. Reinstall the wheel well cover access port cap and secure by
installing the screw.Fog Lamps
To replace one of these bulbs:
1. Locate the fog lamp assemblyunder the front fascia.
2. Remove the bulb from the lamp assembly by turning it
counterclockwise and pulling
straight out.
3. Disconnect the electrical connector.
4. Reverse Steps 2 and 3 for assembly.
Taillamps, Turn Signal,
Sidemarker, Stoplamps,
and Back-Up Lamps
1. Stop/Tail/Turn Signal/Sidemarker Lamp
2. Auxiliary Taillamp
3. Back-up Lamp
Stop/Tail/Turn Signal/
Sidemarker Lamp
To replace one of these lamps:
1. Open the liftgate. See Liftgate
on page 2-9.
Page 246 of 360
Black plate (30,1)GMC Terrain/Terrain Denali Owner Manual (GMNA-Localizing-U.S./Canada/
Mexico-6081485) - 2014 - CRC - 12/6/13
10-30 Vehicle Care
2. Remove the two screw coversfrom the taillamp assembly.
3. Remove the two screwssecuring the taillamp assembly.
4. Pull the taillamp assembly out of the vehicle body.
5. Disconnect the lamp wiring harness.
6. Turn the bulb socket
counterclockwise and pull it out.
7. Pull the bulb straight out of the socket.
8. Install the new bulb.
9. Push the bulb socket in and turn it clockwise.
10. Reverse Steps 2–5 to reinstall the lamp assembly.11. Verify that the taillampassembly tab, located at the
bottom of the taillamp
assembly, is aligned to the
fascia bracket before securing
with screws.
Auxiliary Taillamp
To replace one of these lamps:
1. Open the liftgate. See Liftgate
on page 2-9.
2. Remove the interior trim access panel.
Page 248 of 360

Black plate (32,1)GMC Terrain/Terrain Denali Owner Manual (GMNA-Localizing-U.S./Canada/
Mexico-6081485) - 2014 - CRC - 12/6/13
10-32 Vehicle Care
6. Push the bulb socket in and turnit clockwise.
7. Reinstall the interior trim access panel.
License Plate Lamp
Lamp Assembly
Bulb Assembly
1. Bulb Socket
2. Bulb
3. Lamp Assembly
To replace one of these bulbs:
1. Open the liftgate partway. See Liftgate on page 2-9.
2. Push the left end of the lamp assembly toward the right.
3. Pull the lamp assembly down to remove it from the liftgate. 4. Turn the bulb socket (1)
counterclockwise to remove it
from the lamp assembly (3).
5. Pull the bulb (2) straight out of the bulb socket (1).
6. Push the replacement bulb straight into the bulb socket and
turn the bulb socket clockwise to
install it into the lamp assembly.
7. Push the lamp assembly into the liftgate engaging the clip side
first.
8. Push on the lamp side opposite the clip until the lamp assembly
snaps into place.
Replacement Bulbs
Exterior Lamp Bulb
Number
Auxiliary Taillamp 161
Back-Up Lamp 921
Fog Lamp H11 LL
Headlamp
High Beam 9005LL
Page 254 of 360

Black plate (38,1)GMC Terrain/Terrain Denali Owner Manual (GMNA-Localizing-U.S./Canada/
Mexico-6081485) - 2014 - CRC - 12/6/13
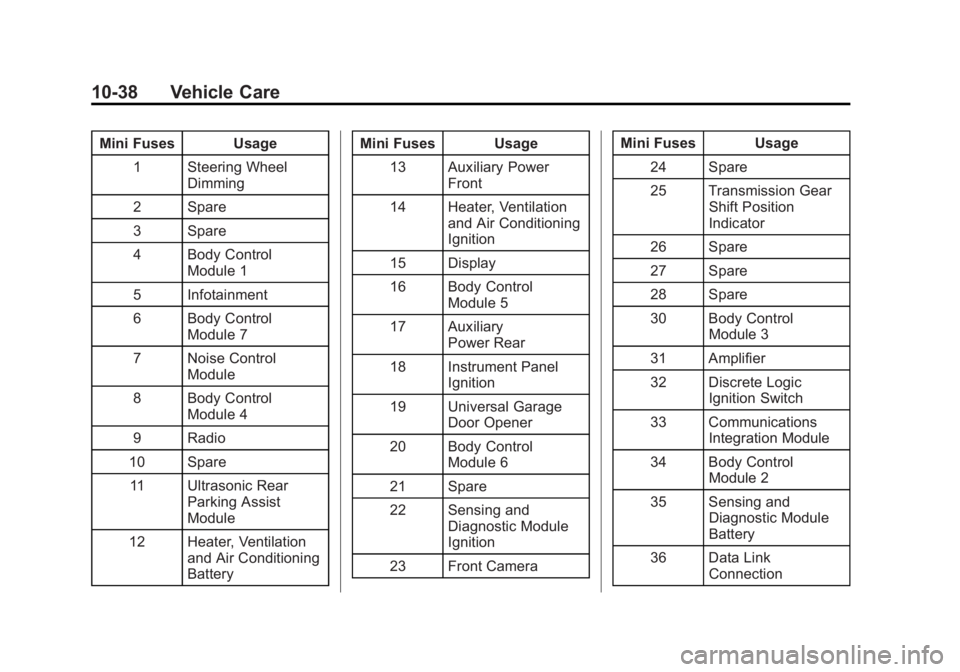
10-38 Vehicle Care
Mini Fuses Usage1 Steering Wheel Dimming
2 Spare
3 Spare
4 Body Control Module 1
5 Infotainment
6 Body Control Module 7
7 Noise Control Module
8 Body Control Module 4
9 Radio
10 Spare 11 Ultrasonic Rear Parking Assist
Module
12 Heater, Ventilation and Air Conditioning
Battery Mini Fuses Usage
13 Auxiliary Power Front
14 Heater, Ventilation and Air Conditioning
Ignition
15 Display
16 Body Control Module 5
17 Auxiliary Power Rear
18 Instrument Panel Ignition
19 Universal Garage Door Opener
20 Body Control Module 6
21 Spare
22 Sensing and Diagnostic Module
Ignition
23 Front Camera Mini Fuses Usage
24 Spare
25 Transmission Gear Shift Position
Indicator
26 Spare
27 Spare
28 Spare
30 Body Control Module 3
31 Amplifier
32 Discrete Logic Ignition Switch
33 Communications Integration Module
34 Body Control Module 2
35 Sensing and Diagnostic Module
Battery
36 Data Link Connection