Page 128 of 544

Black plate (68,1)GMC Sierra Owner Manual (GMNA-Localizing-U.S./Canada/Mexico-
5853626) - 2014 - 3rd crc - 6/6/14
3-68 Seats and Restraints
7. If your child restraint has a toptether, follow the child restraint
manufacturer's instructions
regarding the use of the top
tether. See Lower Anchors and
Tethers for Children (LATCH
System) on page 3-46 for more
information on using the top
tether anchors.
8. Before placing a child in the child restraint, make sure it is
securely held in place. To check,
grasp the child restraint at the
safety belt path and attempt to
move it side to side and back
and forth. When the child
restraint is properly installed,
there should be no more than
2.5 cm (1 in) of movement.
To remove the child restraint,
unbuckle the vehicle safety belt and
let it return to the stowed position.
If the top tether is attached to a top
tether anchor, disconnect it.Securing Child Restraints
(Rear Seat)
When securing a child restraint in a
rear seating position, study the
instructions that came with the child
restraint to make sure it is
compatible with this vehicle.
If the child restraint has the LATCH
system, see Lower Anchors and
Tethers for Children (LATCH
System) on page 3-46 for how and
where to install the child restraint
using LATCH. If a child restraint is
secured in the vehicle using a
safety belt and it uses a top tether,
see Lower Anchors and Tethers for
Children (LATCH System) on
page 3-46 for top tether anchor
locations.
Do not secure a child seat in a
position without a top tether anchor
if a national or local law requires
that the top tether be anchored, or if
the instructions that come with the
child restraint say that the top strap
must be anchored. In Canada, the law requires that
forward-facing child restraints have
a top tether, and that the tether be
attached.
If the child restraint does not have
the LATCH system, you will be
using the safety belt to secure the
child restraint in this position. Be
sure to follow the instructions that
came with the child restraint. Secure
the child in the child restraint when
and as the instructions say.
If more than one child restraint
needs to be installed in the rear
seat, be sure to read
Where to Put
the Restraint on page 3-44.
Double Cab
1. Remove the headrest prior to installing a forward-facing child
restraint in an outboard rear
seating position. See “Headrest
Removal and Reinstallation”
under Lower Anchors and
Tethers for Children (LATCH
System) on page 3-46.
Page 130 of 544

Black plate (70,1)GMC Sierra Owner Manual (GMNA-Localizing-U.S./Canada/Mexico-
5853626) - 2014 - 3rd crc - 6/6/14
3-70 Seats and Restraints
6. To tighten the belt, push downon the child restraint, pull the
shoulder portion of the belt to
tighten the lap portion of the belt,
and feed the shoulder belt back
into the retractor. When installing
a forward-facing child restraint, it
may be helpful to use your knee
to push down on the child
restraint as you tighten the belt. Try to pull the belt out of the
retractor to make sure the
retractor is locked. If the
retractor is not locked, repeat
Steps 4 and 5.
7. For forward-facing child restraints, attach and tighten the
top tether to the top tether
anchor (loop). Refer to the child
restraint instructions, the vehicle
LATCH anchor weight limits and
instructions listed in Lower
Anchors and Tethers for
Children (LATCH System) on
page 3-46.
8. Before placing a child in the child restraint, make sure it is
securely held in place. To check,
grasp the child restraint at the
safety belt path and attempt to
move it side to side and back
and forth. When the child
restraint is properly installed,
there should be no more than
2.5 cm (1 in) of movement. To remove the child restraint,
unbuckle the vehicle safety belt and
let it return to the stowed position.
If the top tether is attached to a top
tether anchor, disconnect it.
Reinstall the headrest before the
seating position is used. See
“Headrest Removal and
Reinstallation”
underLower Anchors
and Tethers for Children (LATCH
System) on page 3-46 for additional
information on installing the
headrest properly.
Crew Cab
1. Put the child restraint on the seat.
2. Pick up the latch plate, and run the lap and shoulder portions of
the vehicle's safety belt through
or around the restraint. The child
restraint instructions will show
you how.
Page 132 of 544

Black plate (72,1)GMC Sierra Owner Manual (GMNA-Localizing-U.S./Canada/Mexico-
5853626) - 2014 - 3rd crc - 6/6/14
3-72 Seats and Restraints
6. If the child restraint has a toptether, follow the child restraint
manufacturer's instructions
regarding the use of the top
tether. See Lower Anchors and
Tethers for Children (LATCH
System) on page 3-46 for more
information on using the top
tether anchors.
7. Before placing a child in the child restraint, make sure it is
securely held in place. To check,
grasp the child restraint at the
safety belt path and attempt to
move it side to side and back
and forth. When the child
restraint is properly installed,
there should be no more than
2.5 cm (1 in) of movement. To remove the child restraint,
unbuckle the vehicle safety belt and
let it return to the stowed position.
If the top tether is attached to a top
tether anchor, disconnect it.
For outboard rear seating positions,
if the child restraint cannot be
installed properly with the headrest
in place, the headrest may be
removed. See your dealer for
assistance with removal, and store
the removed headrest in a secure
place. When the child restraint is
removed, reinstall the headrest
before the seating position is used.
For reinstallation instructions, see
“Headrest Removal and
Reinstallation”
underLower Anchors
and Tethers for Children (LATCH
System) on page 3-46.
Page 269 of 544

Black plate (9,1)GMC Sierra Owner Manual (GMNA-Localizing-U.S./Canada/Mexico-
5853626) - 2014 - 3rd crc - 6/6/14
Climate Controls 8-9
Operation Tips
.Clear away any ice, snow,
or leaves from air inlets at the
base of the windshield that could
block the flow of air into the
vehicle.
.Keep the path under the front
seats clear of objects to help
circulate the air inside of the
vehicle more effectively.
.Use of non-GM approved hood
deflectors can adversely affect
the performance of the system.
Check with your dealer before
adding equipment to the outside
of the vehicle.
Maintenance
Passenger Compartment
Air Filter
The filter removes dust, pollen, and
other airborne irritants from outside
air that is pulled into the vehicle.
The filter should be replaced as part
of routine scheduled maintenance.
SeeMaintenance Schedule on
page 11-3. To find out what type of
filter to use, see Maintenance
Replacement Parts on page 11-14.
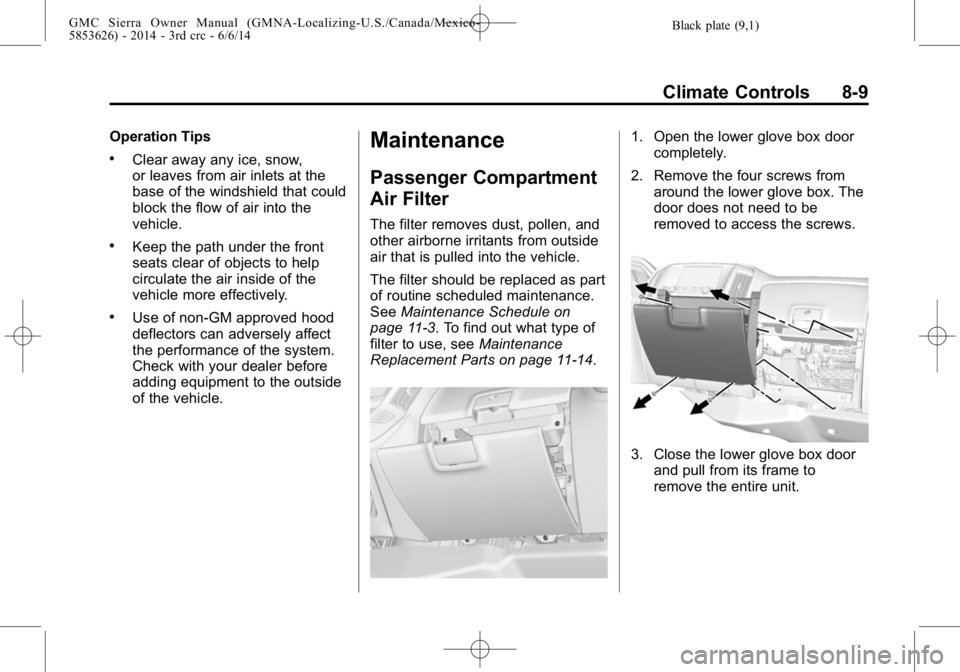
1. Open the lower glove box door completely.
2. Remove the four screws from around the lower glove box. The
door does not need to be
removed to access the screws.
3. Close the lower glove box doorand pull from its frame to
remove the entire unit.
Page 459 of 544

Black plate (85,1)GMC Sierra Owner Manual (GMNA-Localizing-U.S./Canada/Mexico-
5853626) - 2014 - 3rd crc - 6/6/14
Vehicle Care 10-85
{Warning
Wheel nuts that are improperly or
incorrectly tightened can cause
the wheels to become loose or
come off. The wheel nuts should
be tightened with a torque wrench
to the proper torque specification
after replacing. Follow the torque
specification supplied by the
aftermarket manufacturer when
using accessory locking wheel
nuts. SeeCapacities and
Specifications on page 12-2 for
original equipment wheel nut
torque specifications.
{Caution
Improperly tightened wheel nuts
can lead to brake pulsation and
rotor damage. To avoid expensive
brake repairs, evenly tighten the
wheel nuts in the proper
(Continued)
Caution (Continued)
sequence and to the proper
torque specification. See
Capacities and Specifications for
the wheel nut torque specification.
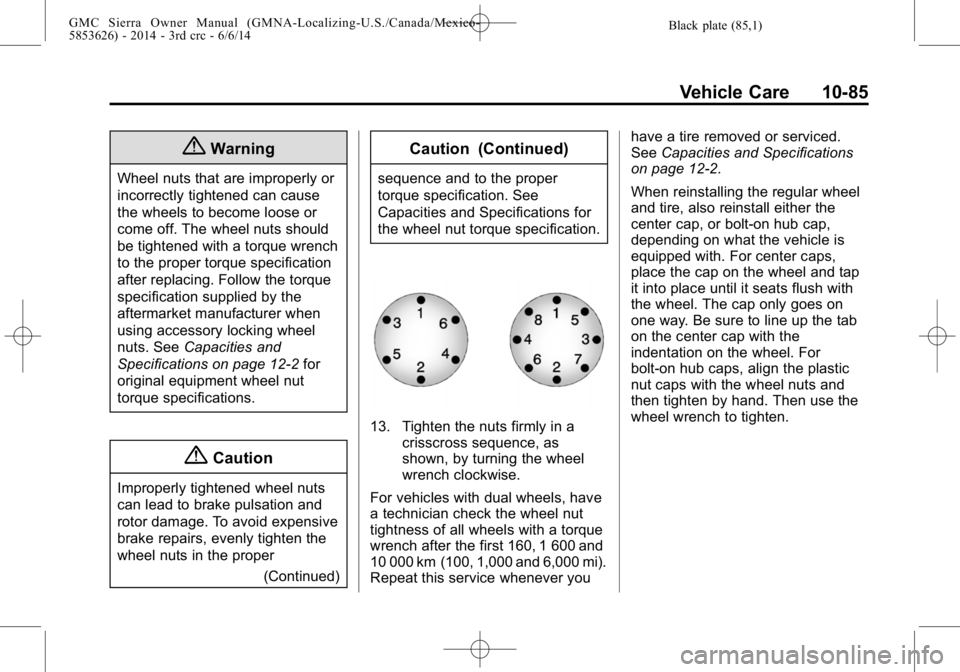
13. Tighten the nuts firmly in acrisscross sequence, as
shown, by turning the wheel
wrench clockwise.
For vehicles with dual wheels, have
a technician check the wheel nut
tightness of all wheels with a torque
wrench after the first 160, 1 600 and
10 000 km (100, 1,000 and 6,000 mi).
Repeat this service whenever you have a tire removed or serviced.
See
Capacities and Specifications
on page 12-2.
When reinstalling the regular wheel
and tire, also reinstall either the
center cap, or bolt-on hub cap,
depending on what the vehicle is
equipped with. For center caps,
place the cap on the wheel and tap
it into place until it seats flush with
the wheel. The cap only goes on
one way. Be sure to line up the tab
on the center cap with the
indentation on the wheel. For
bolt-on hub caps, align the plastic
nut caps with the wheel nuts and
then tighten by hand. Then use the
wheel wrench to tighten.
Page:
< prev 1-8 9-16 17-24