2014 GMC SIERRA light
[x] Cancel search: lightPage 49 of 544

Black plate (13,1)GMC Sierra Owner Manual (GMNA-Localizing-U.S./Canada/Mexico-
5853626) - 2014 - 3rd crc - 6/6/14
Keys, Doors, and Windows 2-13
Immobilizer
SeeRadio Frequency Statement on
page 13-15.
Immobilizer Operation
This vehicle has a passive
theft-deterrent system.
The system does not have to be
manually armed or disarmed.
The vehicle is automatically
immobilized when the vehicle is
turned off.
The system is automatically
disarmed when the key is turned to
ON/RUN, ACC/ACCESSORY,
or START from the LOCK/OFF
position. The security light, in the instrument
cluster, comes on if there is a
problem with arming or disarming
the theft-deterrent system.
When trying to start the vehicle, the
security light comes on briefly when
the ignition is turned on.
If the engine does not start and the
security light stays on, there is a
problem with the system. Turn the
ignition off and try again.
If the engine still does not start, and
the key appears to be undamaged,
try another ignition key. It may be
necessary to check the fuse. See
Fuses on page 10-43. If the engine
still does not start with the other key,
the vehicle needs service. If the
vehicle does start, the first key may
be faulty. See your dealer.
It is possible for the immobilizer
system to learn new or replacement
keys. Up to eight keys can be
programmed for the vehicle. To
program additional keys, see
Keys
on page 2-1. To program additional
transmitters, see Remote Keyless
Entry (RKE) System Operation on
page 2-3.
Do not leave the key or device that
disarms or deactivates the vehicle
theft system in the vehicle.
See your dealer to get a new key
blank cut exactly as the ignition key
that operates the system.
Page 51 of 544

Black plate (15,1)GMC Sierra Owner Manual (GMNA-Localizing-U.S./Canada/Mexico-
5853626) - 2014 - 3rd crc - 6/6/14
Keys, Doors, and Windows 2-15
2. Press one of the four arrows onthe control pad to move the
mirror in the desired direction.
3. Adjust each outside mirror so that a little of the vehicle and the
area behind it can be seen.
4. Move the selector switch to the center position when not
adjusting either outside mirror.
Crew/Double Cab Premium
Shown, Other Models Similar
1. Press (1) or (2) to select the driver or passenger side mirror. 2. Press one of the four arrows on
the control pad while the
indicator light on button (1) or (2)
is illuminated, to move the mirror
in the desired direction.
3. Adjust each outside mirror so that a little of the vehicle and the
area behind it can be seen.
4. Press either (1) or (2) again to deselect the mirror.
If you do not deselect the mirror, the
feature will turn off after about
one minute.
If equipped, the mirrors may include
a memory function that works with
the memory seats. See Memory
Seats on page 3-6.
Folding Mirrors
Power Folding
If equipped with power folding
mirrors:
1. Press
g(2) to fold the mirrors
out to the driving position.
2. Press
g(2) again to fold the
mirrors in to the folded position.
The mirrors may also include a
memory function that works with the
memory seats. See Memory Seats
on page 3-6.
Page 52 of 544

Black plate (16,1)GMC Sierra Owner Manual (GMNA-Localizing-U.S./Canada/Mexico-
5853626) - 2014 - 3rd crc - 6/6/14
2-16 Keys, Doors, and Windows
Resetting the Power Folding
Mirrors
Reset the power folding mirrors if:
.The mirrors are accidentally
obstructed while folding.
.They are accidentally manually
folded/unfolded.
.The mirrors will not stay in the
unfolded position.
.The mirrors vibrate at normal
driving speeds.
Fold and unfold the mirrors three
times using the mirror controls to
reset them to their normal position.
A popping noise may be heard. This
sound is normal after a manual
folding operation.
Manual Folding
If equipped, push the mirror toward
the vehicle to fold. Push the mirror
outward to return to its original
position. Manually fold the mirrors inward to
prevent damage when going
through an automatic car wash.
Auto Folding Mirrors
If equipped, with the ignition off,
press and hold
Qon the RKE
transmitter for approximately
one second to fold the mirrors.
Press and hold
Kon the RKE
transmitter to unfold the mirrors.
See Remote Keyless Entry (RKE)
System Operation on page 2-3.
This feature is turned on and off
through Vehicle Personalization.
See Vehicle Personalization on
page 5-45.
Turn Signal Indicator
If equipped, indicator lights on the
mirror flash in the direction of the
turn or lane change.
Heated Mirrors
1
(Rear Window Defogger):
If equipped, the rear window
defogger also heats the side
mirrors.
W(Heated Side Mirrors):
If equipped, press to turn the heated
mirrors on or off.
If the vehicle has trailer-tow mirrors,
only the upper glass of the mirror is
heated. The lower convex part of
the towing mirrors is not heated.
See “Rear Window Defogger” under
Climate Control Systems (with
Heater Only) on page 8-1 orClimate
Control Systems (with Air
Conditioning) on page 8-3 orDual
Automatic Climate Control System
on page 8-5.
Page 58 of 544

Black plate (22,1)GMC Sierra Owner Manual (GMNA-Localizing-U.S./Canada/Mexico-
5853626) - 2014 - 3rd crc - 6/6/14
2-22 Keys, Doors, and Windows
Window Lockout
Crew/Double Cab Premium
Shown, Other Models Similar
Z(Window Lockout): The driver
door power window switch has a
lockout feature. This feature
prevents the rear windows from
operating, except from the driver
position. Press the switch to engage
or disengage the lockout feature. An
indicator light on the switch will
come on when the lockout feature is
engaged, and will go off when
disengaged.
Rear Windows
Power Sliding Rear Window
If equipped, the power sliding rear
window works when the ignition has
been turned to ACC/ACCESSORY
or ON/RUN, or when Retained
Accessory Power (RAP) is active.
See Retained Accessory Power
(RAP) on page 9-28.
.Press the switch to open the
window.
.Pull the switch to close the
window. The power sliding rear window
cannot be operated manually.
Sun Visors
Pull the sun visor down to block
glare. If equipped, detach the sun
visor from the center mount to pivot
to the side window or to extend
along the rod.
Page 69 of 544

Black plate (9,1)GMC Sierra Owner Manual (GMNA-Localizing-U.S./Canada/Mexico-
5853626) - 2014 - 3rd crc - 6/6/14
Seats and Restraints 3-9
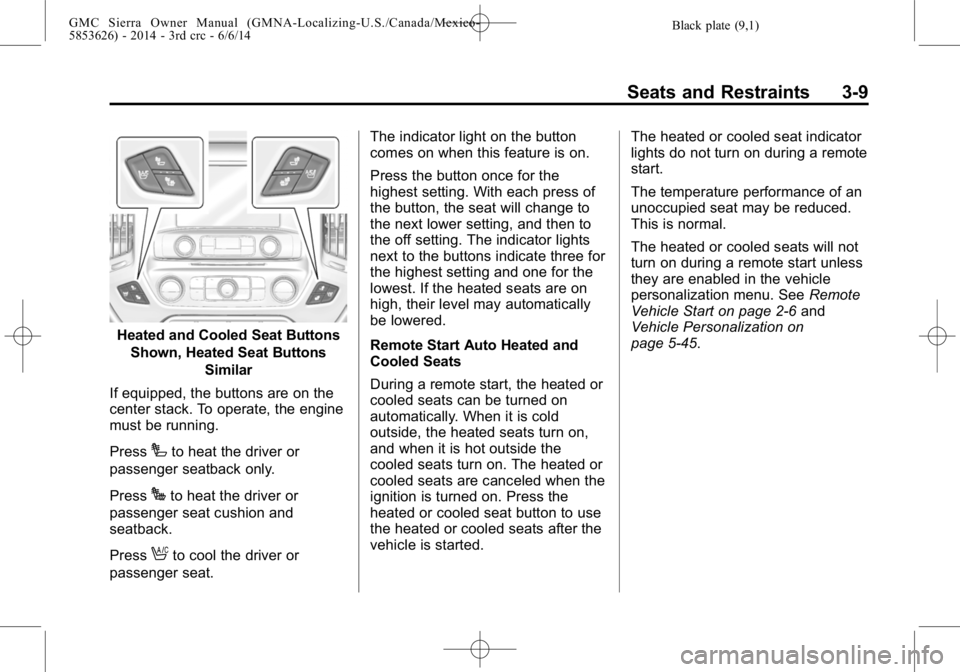
Heated and Cooled Seat ButtonsShown, Heated Seat Buttons Similar
If equipped, the buttons are on the
center stack. To operate, the engine
must be running.
Press
Ito heat the driver or
passenger seatback only.
Press
Jto heat the driver or
passenger seat cushion and
seatback.
Press
Ato cool the driver or
passenger seat. The indicator light on the button
comes on when this feature is on.
Press the button once for the
highest setting. With each press of
the button, the seat will change to
the next lower setting, and then to
the off setting. The indicator lights
next to the buttons indicate three for
the highest setting and one for the
lowest. If the heated seats are on
high, their level may automatically
be lowered.
Remote Start Auto Heated and
Cooled Seats
During a remote start, the heated or
cooled seats can be turned on
automatically. When it is cold
outside, the heated seats turn on,
and when it is hot outside the
cooled seats turn on. The heated or
cooled seats are canceled when the
ignition is turned on. Press the
heated or cooled seat button to use
the heated or cooled seats after the
vehicle is started.
The heated or cooled seat indicator
lights do not turn on during a remote
start.
The temperature performance of an
unoccupied seat may be reduced.
This is normal.
The heated or cooled seats will not
turn on during a remote start unless
they are enabled in the vehicle
personalization menu. See
Remote
Vehicle Start on page 2-6 and
Vehicle Personalization on
page 5-45.
Page 74 of 544

Black plate (14,1)GMC Sierra Owner Manual (GMNA-Localizing-U.S./Canada/Mexico-
5853626) - 2014 - 3rd crc - 6/6/14
3-14 Seats and Restraints
.Wear the shoulder belt over the
shoulder and across the chest.
These parts of the body are best
able to take belt restraining
forces. The shoulder belt locks if
there is a sudden stop or crash.
{Warning
You can be seriously injured,
or even killed, by not wearing
your safety belt properly.
.Never allow the lap or
shoulder belt to become
loose or twisted.
.Never wear the shoulder belt
under both arms or behind
your back.
.Never route the lap or
shoulder belt over an
armrest.
Lap-Shoulder Belt
If the vehicle is a regular cab, then
all seating positions in the vehicle
have a lap-shoulder belt. If the
vehicle is a double or crew cab,
then all seating positions in the
vehicle have a lap-shoulder belt
except for the center front
passenger position (if equipped),
which has a lap belt. SeeLap Belt
on page 3-19 for more information.
The following instructions explain
how to wear a lap-shoulder belt
properly.
1. Adjust the seat, if the seat is adjustable, so you can sit up
straight. To see how, see “Seats”
in the Index. 2. Pick up the latch plate and pull
the belt across you. Do not let it
get twisted.
The lap-shoulder belt may lock if
you pull the belt across you very
quickly. If this happens, let the
belt go back slightly to unlock it.
Then pull the belt across you
more slowly.
If the shoulder portion of a
passenger belt is pulled out all
the way, the child restraint
locking feature may be engaged.
If this happens, let the belt go
back all the way and start again.
Engaging the child restraint
locking feature may affect the
passenger sensing system,
if equipped. See Passenger
Sensing System on page 3-31
for more information.
Page 75 of 544

Black plate (15,1)GMC Sierra Owner Manual (GMNA-Localizing-U.S./Canada/Mexico-
5853626) - 2014 - 3rd crc - 6/6/14
Seats and Restraints 3-15
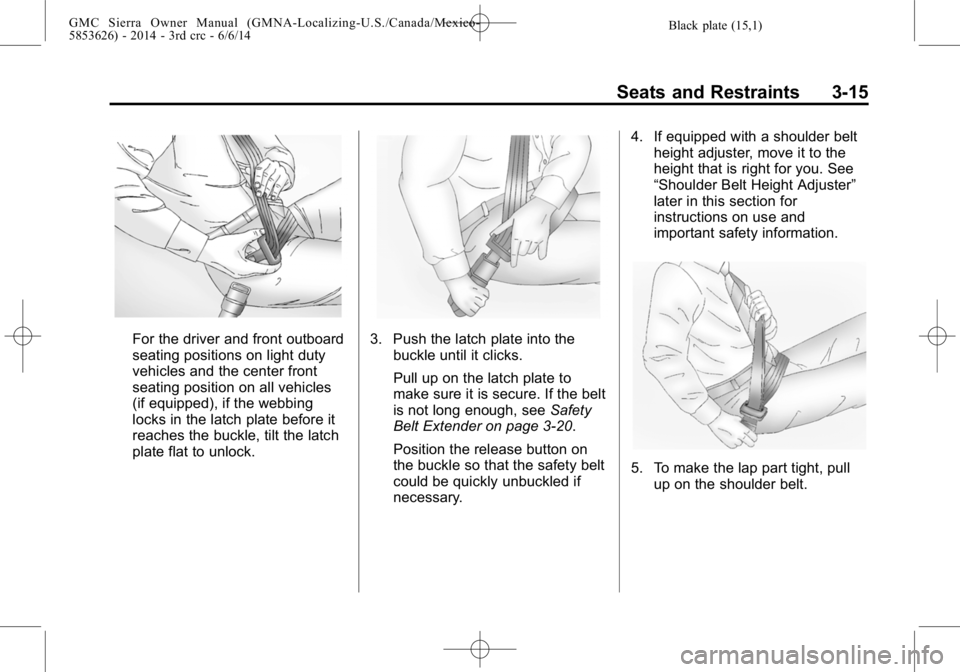
For the driver and front outboard
seating positions on light duty
vehicles and the center front
seating position on all vehicles
(if equipped), if the webbing
locks in the latch plate before it
reaches the buckle, tilt the latch
plate flat to unlock.3. Push the latch plate into thebuckle until it clicks.
Pull up on the latch plate to
make sure it is secure. If the belt
is not long enough, see Safety
Belt Extender on page 3-20.
Position the release button on
the buckle so that the safety belt
could be quickly unbuckled if
necessary. 4. If equipped with a shoulder belt
height adjuster, move it to the
height that is right for you. See
“Shoulder Belt Height Adjuster”
later in this section for
instructions on use and
important safety information.
5. To make the lap part tight, pull
up on the shoulder belt.
Page 80 of 544

Black plate (20,1)GMC Sierra Owner Manual (GMNA-Localizing-U.S./Canada/Mexico-
5853626) - 2014 - 3rd crc - 6/6/14
3-20 Seats and Restraints
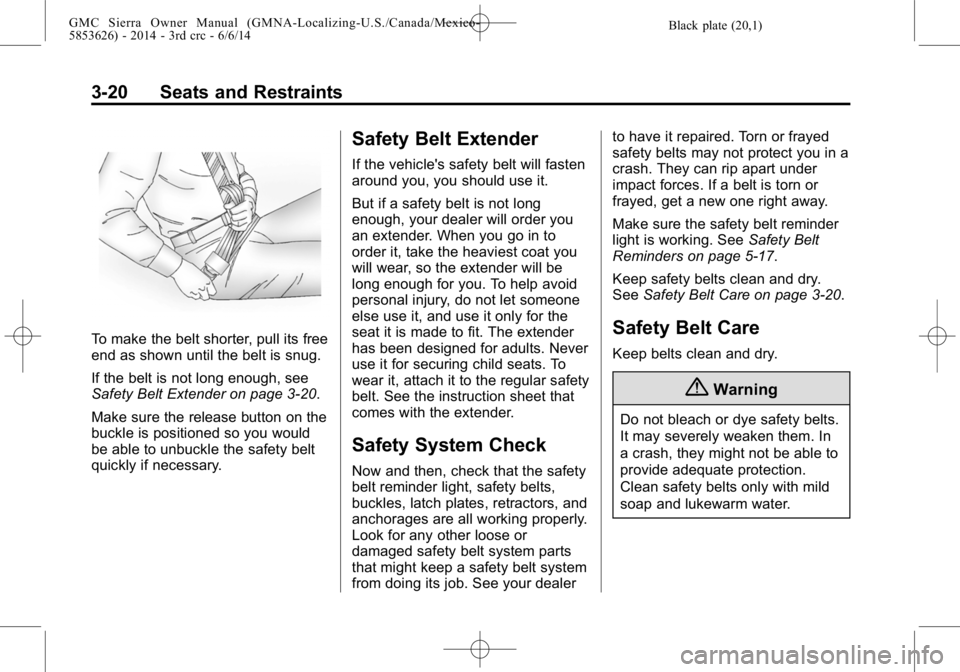
To make the belt shorter, pull its free
end as shown until the belt is snug.
If the belt is not long enough, see
Safety Belt Extender on page 3-20.
Make sure the release button on the
buckle is positioned so you would
be able to unbuckle the safety belt
quickly if necessary.
Safety Belt Extender
If the vehicle's safety belt will fasten
around you, you should use it.
But if a safety belt is not long
enough, your dealer will order you
an extender. When you go in to
order it, take the heaviest coat you
will wear, so the extender will be
long enough for you. To help avoid
personal injury, do not let someone
else use it, and use it only for the
seat it is made to fit. The extender
has been designed for adults. Never
use it for securing child seats. To
wear it, attach it to the regular safety
belt. See the instruction sheet that
comes with the extender.
Safety System Check
Now and then, check that the safety
belt reminder light, safety belts,
buckles, latch plates, retractors, and
anchorages are all working properly.
Look for any other loose or
damaged safety belt system parts
that might keep a safety belt system
from doing its job. See your dealerto have it repaired. Torn or frayed
safety belts may not protect you in a
crash. They can rip apart under
impact forces. If a belt is torn or
frayed, get a new one right away.
Make sure the safety belt reminder
light is working. See
Safety Belt
Reminders on page 5-17.
Keep safety belts clean and dry.
See Safety Belt Care on page 3-20.
Safety Belt Care
Keep belts clean and dry.
{Warning
Do not bleach or dye safety belts.
It may severely weaken them. In
a crash, they might not be able to
provide adequate protection.
Clean safety belts only with mild
soap and lukewarm water.