2014 GMC SIERRA buttons
[x] Cancel search: buttonsPage 231 of 544
Black plate (27,1)GMC Sierra Owner Manual (GMNA-Localizing-U.S./Canada/Mexico-
5853626) - 2014 - 3rd crc - 6/6/14
Infotainment System 7-27
3. Wait until after the beepcompletes, then clearly speak
one of the commands described
in this section.
Press
gto interrupt any voice
recognition system prompt. For
example, if the prompt seems to
be taking too long to finish,
press
gagain and the beep
should happen right away.
There are two voice prompt modes
supported:
.Long verbal prompts: The longer
prompts provide more
information regarding the
supported actions.
.Short prompts: The short
prompts provide simple
instructions about what can be
stated.
If a command is not spoken, the
voice recognition system says a
help prompt. Prompts and Screen Displays
While a voice recognition session is
active, there will be corresponding
buttons on screens displayed.
Manual interaction in the voice
recognition session is permitted.
Interaction during a voice session
may be completed entirely using
voice commands, or some
selections may expedite a session.
If a selection is made using a
manual control, the dialog will
progress in the same way as if the
selection was made through a voice
command. Once the system is able
to complete the task, or the session
is terminated, the voice recognition
dialog stops.
An example of this type of manual
intervention is pressing on an entry
of a displayed number list instead of
speaking the number associated
with the entry desired.
Canceling Voice Recognition
.Press the Home screen button.
This will terminate the voice
recognition session.
.Press or say
“Cancel”or“Exit” to
terminate the voice recognition
session and display the screen
from which voice recognition
was initiated.
.Pression the steering wheel
controls to terminate the voice
session and display the screen
from which voice recognition
was initiated.
Helpful Hints for Speaking
Commands
Voice recognition can understand
commands that are either naturally
stated in sentence form (English
only), or direct commands that state
the application and the task.
Page 237 of 544
Black plate (33,1)GMC Sierra Owner Manual (GMNA-Localizing-U.S./Canada/Mexico-
5853626) - 2014 - 3rd crc - 6/6/14
Infotainment System 7-33
To minimize driver distraction,
before driving, and with the vehicle
parked:
.Become familiar with the
features of the cell phone.
Organize the phone book and
contact lists clearly and delete
duplicate or rarely used entries.
If possible, program speed dial
or other shortcuts.
.Review the controls and
operation of the infotainment
system.
.Pair cell phone(s) to the vehicle.
The system may not work with
all cell phones. See“Pairing”in
this section.
.If the cell phone has voice
dialing capability, learn to use
that feature to access the
address book or contact list. See
“Voice Pass-Thru” in this
section.
.See “Storing and Deleting Phone
Numbers” in this section.
{Warning
When using a cell phone, it can
be distracting to look too long or
too often at the screen of the
phone or the infotainment system.
Taking your eyes off the road too
long or too often could cause a
crash resulting in injury or death.
Focus your attention on driving.
Vehicles with a Bluetooth system
can use a Bluetooth-capable cell
phone with a Hands-Free Profile to
make and receive phone calls. The
infotainment system and voice
recognition are used to control the
system. The system can be used
while in ON/RUN or ACC/
ACCESSORY. The range of the
Bluetooth system can be up to 9.1 m
(30 ft). Not all phones support all
functions and not all phones work
with the Bluetooth system. See
www.gm.com/bluetooth for more
information about compatible
phones.
Bluetooth Controls
Use the buttons on the instrument
panel, faceplate, and the steering
wheel to operate the Bluetooth
system.
Steering Wheel Controls
g(Push to Talk): Press to answer
incoming calls, confirm system
information, and start voice
recognition.
i(End Call): Press to end a call,
reject a call, or cancel an operation.
Press to mute or unmute the
infotainment system.
Infotainment System Controls
For information about how to
navigate the menu system using the
infotainment controls, see Overview
on page 7-2.
MENU: Turn to scroll through a list.
Press to select the highlighted list
option.
{(Home Page): Press to go to the
Home Page. See Home Page on
page 7-6.
Page 298 of 544
Black plate (28,1)GMC Sierra Owner Manual (GMNA-Localizing-U.S./Canada/Mexico-
5853626) - 2014 - CRC - 6/6/14
9-28 Driving and Operating
engine and transmission gently
until the oil warms up and
lubricates all moving parts.
Fast Idle System
If equipped, this feature is available
only with cruise control. The manual
fast idle switch is operated using the
cruise control buttons on the left
side of the steering wheel.
This system can be used to
increase engine idle speed
whenever the following conditions
are met:
.The parking brake is set.
.The brake pedal is not pressed.
.The vehicle must not be moving
and the accelerator must not be
pressed.
To control the fast idle:
.To enable the Fast Idle System,
press and release the cruise
control on/off button and ensure
that the switch indicator light
is lit.
.Press and release the cruise
control SET- button. Engine
speed will be held at
approximately 1200 rpm.
One of the following actions will turn
off the fast idle:
.Pressing the brake.
.Selecting the cruise control
cancel button.
.Releasing the parking brake.
.Moving the transmission shift
lever out of P (Park) or
N (Neutral).
.Selecting the cruise control on/
off button when it was
previously on.
.Pressing the cruise control SET-
button a second time.
.Pressing the accelerator more
than one-quarter of the
way down.
.Turning the ignition switch to the
LOCK/OFF position.
Retained Accessory
Power (RAP)
The following vehicle accessories
can be used for up to 10 minutes
after the engine is turned off:
.Audio System
.Power Windows
.OnStar System (if equipped)
.Sunroof (if equipped)
These features work when the key
is in ON/RUN or ACC/
ACCESSORY. Once the key is
turned from ON/RUN to LOCK/OFF,
the windows and sunroof continue
to work up to 10 minutes or until any
door is opened. The radio continues
to work for up to 10 minutes or until
the driver door is opened.
Accessory Power Outlets (APOs)
The vehicle may have APOs in
several locations. See Power
Outlets on page 5-6.
Page 307 of 544

Black plate (37,1)GMC Sierra Owner Manual (GMNA-Localizing-U.S./Canada/Mexico-
5853626) - 2014 - CRC - 6/6/14
Driving and Operating 9-37
Manual Mode
Range Selection Mode
If equipped, Range Selection Mode
helps control the vehicle's
transmission and vehicle speed
while driving downhill or towing a
trailer by letting you select a desired
range of gears.
To use this feature:
1. Move the shift lever toM (Manual Mode).
2. Press the plus/minus buttons on the shift lever to select the
desired range of gears for
current driving conditions. When the shift lever is moved from
D (Drive) to M (Manual Mode), a
number displays next to the M,
indicating the current transmission
range.
This number is the highest gear that
the transmission will command while
operating in M (Manual Mode).
All gears below that number are
available. As driving conditions
change, the transmission can
automatically shift to lower gears.
For example, when M5 is selected,
1 (First) through 5 (Fifth) gears are
automatically shifted by the
transmission, but 6 (Sixth) cannot
be used until the plus/minus button
on the shift lever is used to change
to the range.
In vehicles with gasoline engines,
when the shift lever is moved from
D (Drive) to M (Manual Mode), a
downshift may occur. The gear that
the transmission is operating in
when the shift lever is moved from
D (Drive) to M (Manual Mode)
determines if a downshift occurs.
See the following chart.
Page 365 of 544
Black plate (95,1)GMC Sierra Owner Manual (GMNA-Localizing-U.S./Canada/Mexico-
5853626) - 2014 - CRC - 6/6/14
Driving and Operating 9-95
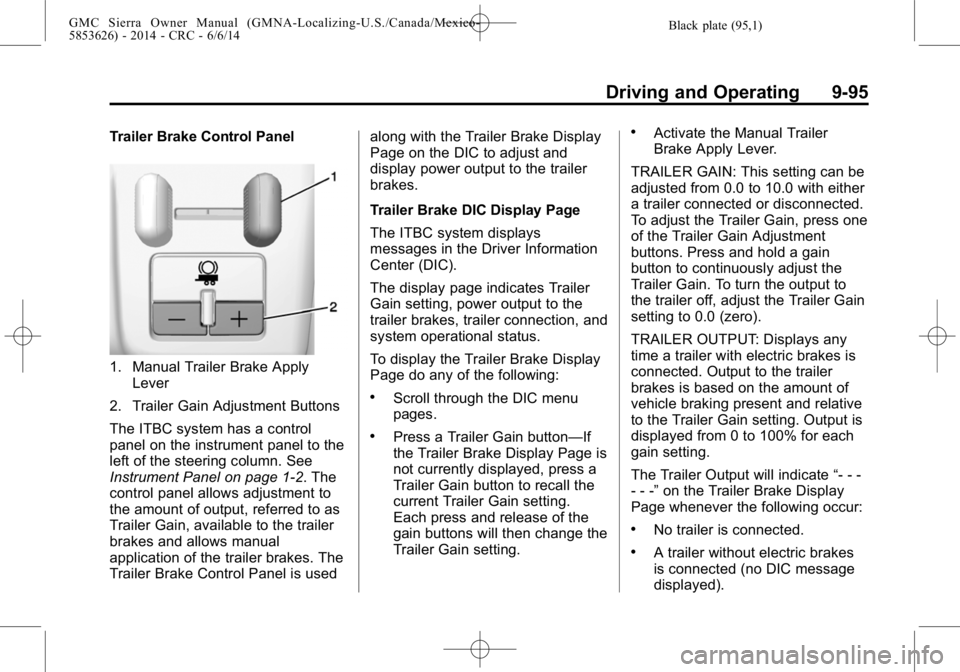
Trailer Brake Control Panel
1. Manual Trailer Brake ApplyLever
2. Trailer Gain Adjustment Buttons
The ITBC system has a control
panel on the instrument panel to the
left of the steering column. See
Instrument Panel on page 1-2. The
control panel allows adjustment to
the amount of output, referred to as
Trailer Gain, available to the trailer
brakes and allows manual
application of the trailer brakes. The
Trailer Brake Control Panel is used along with the Trailer Brake Display
Page on the DIC to adjust and
display power output to the trailer
brakes.
Trailer Brake DIC Display Page
The ITBC system displays
messages in the Driver Information
Center (DIC).
The display page indicates Trailer
Gain setting, power output to the
trailer brakes, trailer connection, and
system operational status.
To display the Trailer Brake Display
Page do any of the following:
.Scroll through the DIC menu
pages.
.Press a Trailer Gain button—If
the Trailer Brake Display Page is
not currently displayed, press a
Trailer Gain button to recall the
current Trailer Gain setting.
Each press and release of the
gain buttons will then change the
Trailer Gain setting.
.Activate the Manual Trailer
Brake Apply Lever.
TRAILER GAIN: This setting can be
adjusted from 0.0 to 10.0 with either
a trailer connected or disconnected.
To adjust the Trailer Gain, press one
of the Trailer Gain Adjustment
buttons. Press and hold a gain
button to continuously adjust the
Trailer Gain. To turn the output to
the trailer off, adjust the Trailer Gain
setting to 0.0 (zero).
TRAILER OUTPUT: Displays any
time a trailer with electric brakes is
connected. Output to the trailer
brakes is based on the amount of
vehicle braking present and relative
to the Trailer Gain setting. Output is
displayed from 0 to 100% for each
gain setting.
The Trailer Output will indicate “- - -
- - -” on the Trailer Brake Display
Page whenever the following occur:
.No trailer is connected.
.A trailer without electric brakes
is connected (no DIC message
displayed).
Page 366 of 544
Black plate (96,1)GMC Sierra Owner Manual (GMNA-Localizing-U.S./Canada/Mexico-
5853626) - 2014 - CRC - 6/6/14
9-96 Driving and Operating
.A trailer with electric brakes has
become disconnected (a
CHECK TRAILER WIRING
message will also display on
the DIC).
.There is a fault present in the
wiring to the trailer brakes (a
CHECK TRAILER WIRING
message will also display on
the DIC).
.The ITBC system is not working
due to a fault (a SERVICE
TRAILER BRAKE SYSTEM
message will also display in
the DIC).
Manual Trailer Brake Apply
The Manual Trailer Brake Apply
Lever is used to apply the trailer ’s
electric brakes independent of the
vehicle’s brakes. Sliding the lever to
the left will apply only the trailer
brakes. Use this lever to adjust
Trailer Gain to properly adjust the
power output to the trailer brakes. The trailer's and the vehicle's brake
lamps will come on when either
vehicle brakes or manual trailer
brakes are applied.
Trailer Gain Adjustment Procedure
Trailer Gain should be set for a
specific trailering condition and must
be adjusted any time vehicle
loading, trailer loading, or road
surface conditions change.
{Warning
Trailer brakes that are
over-gained or under-gained may
not stop the vehicle and the trailer
as intended and can result in a
crash. Always follow the
instructions to set the Trailer Gain
for the proper trailer stopping
performance.
Use the following to adjust Trailer
Gain for each towing condition:
1. Drive the vehicle with the trailer
attached on a level road surface
representative of the towing
condition and free of traffic at
about 32 to 40 km/h (20 to
25 mph) and fully apply the
Manual Trailer Brake Apply
Lever.
Adjusting Trailer Gain at speeds
lower than 32 to 40 km/h (20 to
25 mph) may result in an
incorrect gain setting.
2. Adjust the Trailer Gain, using the Trailer Gain Adjustment Buttons,
to just below the point of trailer
wheel lock-up, indicated by
trailer wheel squeal or tire
smoke when a trailer wheel
locks.
Trailer wheel lock-up may not
occur if towing a heavily loaded
trailer. In this case, adjust the
Trailer Gain to the highest
allowable setting for the towing
condition.
Page 388 of 544

Black plate (14,1)GMC Sierra Owner Manual (GMNA-Localizing-U.S./Canada/Mexico-
5853626) - 2014 - 3rd crc - 6/6/14
10-14 Vehicle Care
How to Reset the Engine Oil
Life System
Reset the system whenever the
engine oil is changed so that the
system can calculate the next
engine oil change. Always reset the
engine oil life to 100% after every oil
change. It will not reset itself. To
reset the engine oil life system:
1. Display the OIL LIFEREMAINING on the DIC. If the
vehicle does not have DIC
buttons, the vehicle must be in
P (Park) to access this display.
See Driver Information Center
(DIC) (Base Level) on page 5-30
or Driver Information Center
(DIC) (Uplevel) on page 5-32.
2. Press and hold
V, or the trip
odometer reset stem if the
vehicle does not have DIC
buttons, for several seconds.
The oil life will change to 100%. The oil life system can also be reset
as follows:
1. Turn the ignition to ON/RUN with
the engine off.
2. Fully press the accelerator pedal slowly three times within
five seconds.
3. Display the OIL LIFE REMAINING on the DIC. If the
display shows 100%, the system
is reset.
If the vehicle has a CHANGE
ENGINE OIL SOON message and it
comes back on when the vehicle is
started and/or the OIL LIFE
REMAINING is near 0%, the engine
oil life system has not been reset.
Repeat the procedure.
Automatic Transmission
Fluid
When to Check and Change
Automatic Transmission Fluid
It is usually not necessary to check
the transmission fluid level. The only
reason for fluid loss is a
transmission leak or overheated
transmission. If a small leak is
suspected, then use the following
checking procedures to check the
fluid level. However, if there is a
large leak, then it may be necessary
to have the vehicle towed to a
dealer service department and have
it repaired before driving the vehicle
further.
Page 437 of 544
Black plate (63,1)GMC Sierra Owner Manual (GMNA-Localizing-U.S./Canada/Mexico-
5853626) - 2014 - 3rd crc - 6/6/14
Vehicle Care 10-63
The TPMS malfunction indicator is
combined with the low tire pressure
telltale. When the system detects a
malfunction, the telltale will flash for
approximately one minute and then
remain continuously illuminated.
This sequence will continue upon
subsequent vehicle start-ups as
long as the malfunction exists.
When the malfunction indicator is
illuminated, the system may not be
able to detect or signal low tire
pressure as intended. TPMS
malfunctions may occur for a variety
of reasons, including the installation
of replacement or alternate tires or
wheels on the vehicle that prevent
the TPMS from functioning properly.
Always check the TPMS malfunction
telltale after replacing one or more
tires or wheels on your vehicle to
ensure that the replacement or
alternate tires and wheels allow the
TPMS to continue to function
properly.
SeeTire Pressure Monitor
Operation on page 10-63. See
Radio Frequency Statement on
page 13-15.
Tire Pressure Monitor
Operation
This vehicle may have a Tire
Pressure Monitor System (TPMS).
The TPMS is designed to warn the
driver when a low tire pressure
condition exists. TPMS sensors are
mounted onto each tire and wheel
assembly, excluding the spare tire
and wheel assembly. The TPMS
sensors monitor the air pressure in
the tires and transmit the tire
pressure readings to a receiver
located in the vehicle.
When a low tire pressure condition
is detected, the TPMS illuminates
the low tire pressure warning light located on the instrument cluster.
If the warning light comes on, stop
as soon as possible and inflate the
tires to the recommended pressure
shown on the Tire and Loading
Information label. See
Vehicle Load
Limits on page 9-15.
A message to check the pressure in
a specific tire displays in the Driver
Information Center (DIC). The low
tire pressure warning light and the
DIC warning message come on at
each ignition cycle until the tires are
inflated to the correct inflation
pressure. If the vehicle has DIC
buttons, tire pressure levels can be
viewed. For additional information
and details about the DIC operation
and displays, see Driver Information
Center (DIC) (Base Level) on
page 5-30 orDriver Information
Center (DIC) (Uplevel) on page 5-32
and Tire Messages on page 5-42.
The low tire pressure warning light
may come on in cool weather when
the vehicle is first started, and then
turn off as the vehicle is driven. This
could be an early indicator that the