Page 417 of 544

Black plate (43,1)GMC Sierra Owner Manual (GMNA-Localizing-U.S./Canada/Mexico-
5853626) - 2014 - 3rd crc - 6/6/14
Vehicle Care 10-43
headlamp wiring checked right away
if the lamps go on and off or
remain off.
Windshield Wipers
If the wiper motor overheats due to
heavy snow or ice, the windshield
wipers will stop until the motor cools
and will then restart.
Although the circuit is protected
from electrical overload, overload
due to heavy snow or ice may
cause wiper linkage damage.
Always clear ice and heavy snow
from the windshield before using the
windshield wipers.
If the overload is caused by an
electrical problem and not snow or
ice, be sure to get it fixed.
Fuses
The wiring circuits in the vehicle are
protected from short circuits by
fuses. This greatly reduces the
chance of fires caused by electrical
problems.Look at the silver-colored band
inside the fuse. If the band is broken
or melted, replace the fuse. Be sure
you replace a bad fuse with a new
one of the identical size and rating.
Fuses of the same amperage can
be temporarily borrowed from
another fuse location, if a fuse goes
out. Replace the fuse as soon as
you can.
Engine Compartment
Fuse Block
If the vehicle has a diesel engine,
see the Duramax diesel
supplement.
The engine compartment fuse block
is in the engine compartment, on
the driver side of the vehicle.
Lift the cover to access the fuse
block.
{Caution
Spilling liquid on any electrical
component on the vehicle may
damage it. Always keep the
covers on any electrical
component.
A fuse puller is available in the left
instrument panel fuse block.
Page 418 of 544
Black plate (44,1)GMC Sierra Owner Manual (GMNA-Localizing-U.S./Canada/Mexico-
5853626) - 2014 - 3rd crc - 6/6/14
10-44 Vehicle Care
Micro
J-Case Fuses Usage
1 Trailer Brake
2 Trailer Battery
J-Case Fuses Usage
3 Antilock Brake System Pump
4 Instrument Panel BEC 1
5 Spare
6 4WD Trec
7 Spare
8 Instrument Panel BEC 2
9 Spare
10 Rear Window Defogger
11 Starter
Page 419 of 544

Black plate (45,1)GMC Sierra Owner Manual (GMNA-Localizing-U.S./Canada/Mexico-
5853626) - 2014 - 3rd crc - 6/6/14
Vehicle Care 10-45
J-CaseFuses Usage
12 Cooling Fan 1
13 Cooling Fan 2
Mini Fuses (2 Pin) Usage
14 Trailer Stop/Turn Lamps, Left
15 Trailer Park Lamps
16 Trailer Back-up Lamp
17 Trailer Stop/Turn Lamps, Right
Micro Fuses (2 Pin) Usage
18 Fuel Pump
19 Integrated Chassis Control Module
20 Electronic Suspension
Control Module Micro Fuses
(2 Pin) Usage
21 Fuel Pump Power Module
22 Upfitter Switch 1
23 Upfitter 2
24 Front Wiper
25 Antilock Brake System Valves
26 Upfitter SW 2
27 Upfitter SW 3
28 Parking Lamps, Right
29 Parking Lamps, Left
30 Upfitter 3
31 Upfitter SW 4
32 Upfitter 4
33 Back-up Lamps
34 Engine Control Module Ignition Micro Fuses
(2 Pin) Usage
35 Air Conditioning Compressor Clutch
36 Heated Mirrors
37 Upfitter 1
38 Center High-Mounted
Stoplamp
39 Miscellaneous Ignition
40 Transmission Ignition
41 Fuel Pump 2
42 Cooling Fan Clutch
43 Engine
44 Fuel Injectors A, Odd
45 Fuel Injectors B, Even
46 Oxygen Sensor B
47 Throttle Control
Page 421 of 544
Black plate (47,1)GMC Sierra Owner Manual (GMNA-Localizing-U.S./Canada/Mexico-
5853626) - 2014 - 3rd crc - 6/6/14
Vehicle Care 10-47
Instrument Panel Fuse
Block (Left)
The left instrument panel fuse block
access door is on the driver side
edge of the instrument panel.
Pull off the cover to access the fuse
block.
Page 423 of 544
Black plate (49,1)GMC Sierra Owner Manual (GMNA-Localizing-U.S./Canada/Mexico-
5853626) - 2014 - 3rd crc - 6/6/14
Vehicle Care 10-49
Number Usage43 Left Front Heated/ Cooled Seat
44 Amplifier
45 Spare
49 Accessory Power Outlet 1/Cigarette
Lighter
50 Run/CrankInstrument Panel Fuse
Block (Right)
The right instrument panel fuse
block access door is on the
passenger side edge of the
instrument panel.
Pull off the cover to access the fuse
block.
Page 440 of 544

Black plate (66,1)GMC Sierra Owner Manual (GMNA-Localizing-U.S./Canada/Mexico-
5853626) - 2014 - 3rd crc - 6/6/14
10-66 Vehicle Care
4. If the vehicle has an uplevelDIC, use the DIC controls on the
right side of the steering wheel
to scroll to the Tire Pressure
screen under the DIC info page.
If the vehicle has a base level
DIC, use the trip odometer reset
stem to scroll to the Tire
Pressure screen.
5. If the vehicle has an uplevel DIC, press and hold the
V(Set/
Reset) button located in the
center of the DIC controls.
If the vehicle has a base level
DIC, press and hold the trip
odometer reset stem for about
five seconds. A message asking
if the process should begin
should appear. Select yes and
press the trip odometer reset
stem to confirm the selection.
The horn sounds twice to signal
the receiver is in relearn mode
and the TIRE LEARNING
ACTIVE message displays on
the DIC screen. 6. Start with the driver side
front tire.
7. Place the relearn tool against the tire sidewall, near the valve
stem. Then press the button to
activate the TPMS sensor.
A horn chirp confirms that the
sensor identification code has
been matched to this tire and
wheel position.
8. Proceed to the passenger side front tire, and repeat the
procedure in Step 7.
9. Proceed to the passenger side rear tire, and repeat the
procedure in Step 7.
10. Proceed to the driver side rear tire, and repeat the procedure
in Step 7. The horn sounds two
times to indicate the sensor
identification code has been
matched to the driver side rear
tire, and the TPMS sensor
matching process is no longer
active. The TIRE LEARNING
ACTIVE message on the DIC
display screen goes off. 11. Turn the ignition switch to
LOCK/OFF.
12. Set all four tires to the recommended air pressure
level as indicated on the Tire
and Loading Information label.
Tire Inspection
We recommend that the tires,
including the spare tire, if the
vehicle has one, be inspected
for signs of wear or damage at
least once a month.
Replace the tire if:
.The indicators at three or
more places around the tire
can be seen.
.There is cord or fabric
showing through the tire's
rubber.
.The tread or sidewall is
cracked, cut, or snagged
deep enough to show cord or
fabric.
Page 446 of 544

Black plate (72,1)GMC Sierra Owner Manual (GMNA-Localizing-U.S./Canada/Mexico-
5853626) - 2014 - 3rd crc - 6/6/14
10-72 Vehicle Care
The Tire and Loading
Information label indicates the
original equipment tires on the
vehicle. SeeVehicle Load Limits
on page 9-15 for the label
location and more information
about the Tire and Loading
Information label.
Different Size Tires and
Wheels
If wheels or tires are installed that
are a different size than the original
equipment wheels and tires, vehicle
performance, including its braking,
ride and handling characteristics,
stability, and resistance to rollover
may be affected. If the vehicle has
electronic systems such as antilock
brakes, rollover airbags, traction
control, electronic stability control,
or All-Wheel Drive, the performance
of these systems can also be
affected.
{Warning
If different sized wheels are used,
there may not be an acceptable
level of performance and safety if
tires not recommended for those
wheels are selected. This
increases the chance of a crash
and serious injury. Only use GM
specific wheel and tire systems
developed for the vehicle, and
have them properly installed by a
GM certified technician.
See Buying New Tires on
page 10-70 andAccessories and
Modifications on page 10-3.
Uniform Tire Quality
Grading
Quality grades can be found
where applicable on the tire
sidewall between tread shoulder
and maximum section width. For
example:
Treadwear 200 Traction AA
Temperature A
The following information relates
to the system developed by the
United States National Highway
Traffic Safety Administration
(NHTSA), which grades tires by
treadwear, traction, and
temperature performance. This
applies only to vehicles sold in
the United States. The grades
are molded on the sidewalls of
most passenger car tires. The
Uniform Tire Quality Grading
(UTQG) system does not apply
to deep tread, winter tires,
compact spare tires, tires with
Page 451 of 544

Black plate (77,1)GMC Sierra Owner Manual (GMNA-Localizing-U.S./Canada/Mexico-
5853626) - 2014 - 3rd crc - 6/6/14
Vehicle Care 10-77
Warning (Continued)
changing a flat tire. If it is used for
anything else, you or others could
be badly injured or killed if the
vehicle slips off the jack. If a jack
is provided with the vehicle, only
use it for changing a flat tire.
If a tire goes flat, avoid further tire
and wheel damage by driving slowly
to a level place, well off the road,
if possible. Turn on the hazard
warning flashers. See Hazard
Warning Flashers on page 6-4.
{Warning
Changing a tire can be
dangerous. The vehicle can slip
off the jack and roll over or fall
causing injury or death. Find a
level place to change the tire. To
help prevent the vehicle from
moving:
1. Set the parking brake firmly.
2. Put an automatic transmission in P (Park) or a
manual transmission in
1 (First) or R (Reverse).
3. For four-wheel-drive vehicles, be sure the
transfer case is in a drive
gear– not in N (Neutral).
4. Turn off the engine and do not restart while the vehicle
is raised.
5. Do not allow passengers to remain in the vehicle.
(Continued)
Warning (Continued)
6. Place wheel blocks on bothsides of the tire at the
opposite corner of the tire
being changed.
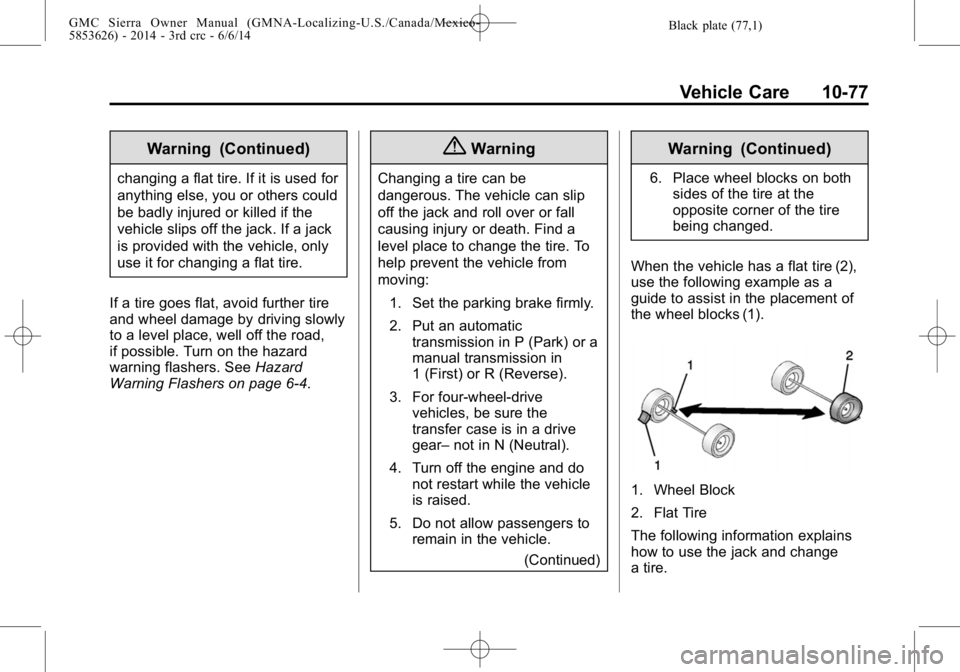
When the vehicle has a flat tire (2),
use the following example as a
guide to assist in the placement of
the wheel blocks (1).
1. Wheel Block
2. Flat Tire
The following information explains
how to use the jack and change
a tire.