2014 GMC SIERRA seats
[x] Cancel search: seatsPage 131 of 544

Black plate (71,1)GMC Sierra Owner Manual (GMNA-Localizing-U.S./Canada/Mexico-
5853626) - 2014 - 3rd crc - 6/6/14
Seats and Restraints 3-71
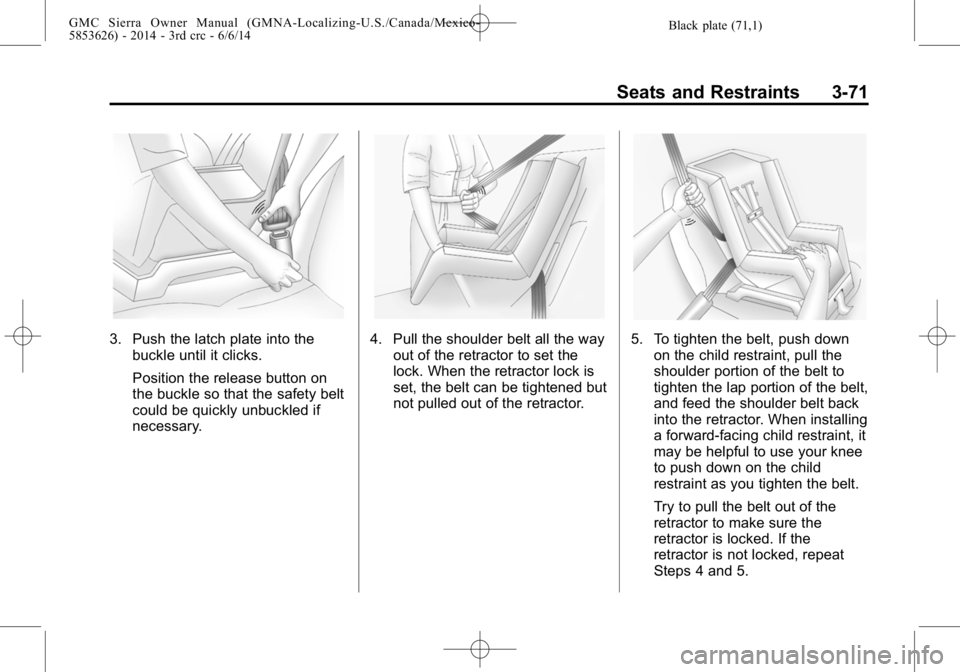
3. Push the latch plate into thebuckle until it clicks.
Position the release button on
the buckle so that the safety belt
could be quickly unbuckled if
necessary.4. Pull the shoulder belt all the wayout of the retractor to set the
lock. When the retractor lock is
set, the belt can be tightened but
not pulled out of the retractor.5. To tighten the belt, push downon the child restraint, pull the
shoulder portion of the belt to
tighten the lap portion of the belt,
and feed the shoulder belt back
into the retractor. When installing
a forward-facing child restraint, it
may be helpful to use your knee
to push down on the child
restraint as you tighten the belt.
Try to pull the belt out of the
retractor to make sure the
retractor is locked. If the
retractor is not locked, repeat
Steps 4 and 5.
Page 132 of 544

Black plate (72,1)GMC Sierra Owner Manual (GMNA-Localizing-U.S./Canada/Mexico-
5853626) - 2014 - 3rd crc - 6/6/14
3-72 Seats and Restraints
6. If the child restraint has a toptether, follow the child restraint
manufacturer's instructions
regarding the use of the top
tether. See Lower Anchors and
Tethers for Children (LATCH
System) on page 3-46 for more
information on using the top
tether anchors.
7. Before placing a child in the child restraint, make sure it is
securely held in place. To check,
grasp the child restraint at the
safety belt path and attempt to
move it side to side and back
and forth. When the child
restraint is properly installed,
there should be no more than
2.5 cm (1 in) of movement. To remove the child restraint,
unbuckle the vehicle safety belt and
let it return to the stowed position.
If the top tether is attached to a top
tether anchor, disconnect it.
For outboard rear seating positions,
if the child restraint cannot be
installed properly with the headrest
in place, the headrest may be
removed. See your dealer for
assistance with removal, and store
the removed headrest in a secure
place. When the child restraint is
removed, reinstall the headrest
before the seating position is used.
For reinstallation instructions, see
“Headrest Removal and
Reinstallation”
underLower Anchors
and Tethers for Children (LATCH
System) on page 3-46.
Page 144 of 544

Black plate (6,1)GMC Sierra Owner Manual (GMNA-Localizing-U.S./Canada/Mexico-
5853626) - 2014 - 3rd crc - 6/6/14
5-6 Instruments and Controls
To set the clock display:
1. Select SETTINGS from theHome Page, then select Time
and Date.
2. Select Clock Display.
3. Turn the MENU knob to Off or On.
4. Press the MENU knob to select.
Press
oBACK to go to the last
menu and save the changes.
Setting the Time and Date with
Touchscreen Controls
To set the time:
1. Press the SETTINGS screen button from the Home Page,
then press Time and Date.
2. Press Set Time and press
«or
ªto increase or decrease
hours, minutes, and AM or PM.
Press 12–24 Hr for 12 or
24 hour clock.
3. Press the
}screen button to go
back to the previous menu. If auto timing is set, the time
displayed on the clock may not
update immediately when driving
into a new time zone.
To set the date:
1. Press the SETTINGS screen
button from the Home Page,
then press Time and Date.
2. Press Set Date and press
«or
ªto increase or decrease
month, day, or year.
3. Press the
}screen button to go
back to the previous menu.
To set the clock display:
1. Press the SETTINGS screen button and press Time and Date.
2. Press Clock Display and press OFF or ON to turn the clock
display off or on.
3. Press the
}screen button to go
back to the previous menu.
Power Outlets
Accessory power outlets can be
used to plug in electrical equipment,
such as a cell phone, MP3
player, etc.
The vehicle may have up to four
accessory power outlets.
Vehicles with a Center Console
.One or two in front of the
cupholders on the center
console.
.One inside the center storage
console.
.One on the rear of the center
storage console.
Vehicles with Bench Seats
.One on the center stack below
the climate control system.
.One or two in the storage area
on the bench seat.
Lift the cover to access and replace
when not in use.
Page 146 of 544

Black plate (8,1)GMC Sierra Owner Manual (GMNA-Localizing-U.S./Canada/Mexico-
5853626) - 2014 - 3rd crc - 6/6/14
5-8 Instruments and Controls
Power Outlet 110 Volt
Alternating Current
Base Shown, Uplevel Similar
If equipped with this power outlet, it
can be used to plug in electrical
equipment that uses a maximum
limit of 150 watts.
For vehicles with a center console,
the 110 volt power outlet is in front
of the cupholders in the center
console.
For vehicles with bench seats, the
110 volt power outlet is on the
center stack. An indicator light on the outlet turns
on to show it is in use. The light
comes on when the ignition is in
ON/RUN, equipment requiring less
than 150 watts is plugged into the
outlet, and no system fault is
detected.
The indicator light does not come on
when the ignition is in LOCK/OFF or
if the equipment is not fully seated
into the outlet.
If equipment is connected using
more than 150 watts or a system
fault is detected, a protection circuit
shuts off the power supply and the
indicator light turns off. To reset the
circuit, unplug the item and plug it
back in or turn the Retained
Accessory Power (RAP) off and
then back on. See
Retained
Accessory Power (RAP) on
page 9-28. The power outlet is not designed for
the following, and may not work
properly if they are plugged in:
.Equipment with high initial peak
wattage, such as
compressor-driven refrigerators
and electric power tools.
.Other equipment requiring an
extremely stable power supply,
such as
microcomputer-controlled
electric blankets and touch
sensor lamps.
Page 173 of 544

Black plate (35,1)GMC Sierra Owner Manual (GMNA-Localizing-U.S./Canada/Mexico-
5853626) - 2014 - 3rd crc - 6/6/14
Instruments and Controls 5-35
Vehicle Messages
Messages displayed on the DIC
indicate the status of the vehicle or
some action may be needed to
correct a condition. Multiple
messages may appear one after
another.
The messages that do not require
immediate action can be
acknowledged and cleared by
pressing
Vor the trip odometer
reset stem on the base cluster.
The messages that require
immediate action cannot be cleared
until that action is performed.
All messages should be taken
seriously and clearing the message
does not correct the problem.
The following are the possible
messages and some information
about them.
If the vehicle has a diesel engine,
see the Duramax diesel
supplement.
Battery Voltage and
Charging Messages
BATTERY LOW START
VEHICLE
When the vehicle’ s battery is
severely discharged, this message
will display and four chimes will
sound. Start the vehicle
immediately. If the vehicle is not
started and the battery continues to
discharge, the climate controls,
heated seats, and audio systems
will shut off and the vehicle may
require a jump start. These systems
will function again after the vehicle
is started.
BATTERY SAVER ACTIVE
This message displays when the
battery voltage drops below
expected levels and features are
disabled. Turn off all unnecessary
accessory features.
SERVICE BATTERY
CHARGING SYSTEM
On some vehicles, this message
displays if there is a problem with
the battery charging system. Under
certain conditions, the charging
system light may also turn on in the
instrument cluster. See Charging
System Light on page 5-21. Driving
with this problem could drain the
battery. Turn off all unnecessary
accessories. Have the electrical
system checked as soon as
possible. See your dealer.
TRANSPORT MODE ON
This message is displayed when the
vehicle is in transport mode. Some
features can be disabled while in
this mode, including Remote
Keyless Entry (RKE), remote start,
and the vehicle alarm system. Take
the vehicle to your dealer for service
to turn transport mode off.
Page 187 of 544

Black plate (49,1)GMC Sierra Owner Manual (GMNA-Localizing-U.S./Canada/Mexico-
5853626) - 2014 - 3rd crc - 6/6/14
Instruments and Controls 5-49
Unlocked Door Anti-lockout
When on, this feature will keep the
driver door from locking when the
door is open. If Off is selected, the
Delayed Door Lock menu will be
available.
Select Off or On.
Auto Door Unlock
This allows selection of which of the
doors will automatically unlock when
the vehicle is shifted into P (Park)
with an automatic transmission or
when the vehicle is turned off with a
manual transmission.
Select Off, All Doors, or Driver Door.
Delayed Door Lock
When on, this feature will delay the
locking of the doors. To override the
delay, press the power door lock
switch on the door.
Select Off or On.Remote Lock, Unlock, Start
Select and the following may
display:
.Remote Unlock Light Feedback
.Remote Lock Feedback
.Remote Door Unlock
.Remote Start Auto Cool Seats
.Remote Start Auto Heat Seats
.Passive Door Unlock
.Passive Door Lock
.Remote Left in Vehicle Alert
Remote Unlock Light Feedback
When on, the exterior lamps will
flash when unlocking the vehicle
with the RKE transmitter.
Select Off or Flash Lights.
Remote Lock Feedback
This allows selection of what type of
feedback is given when locking the
vehicle with the RKE transmitter.
Select Off, Lights and Horn, Lights
Only, or Horn Only. Remote Door Unlock
This allows selection of which doors
will unlock when pressing
Kon the
RKE transmitter.
Select All Doors or Driver Door.
Remote Start Auto Cool Seats
If equipped and turned on, this
feature will turn the vented seats on
when using remote start on
warm days.
Select Off or On.
Remote Start Auto Heat Seats
If equipped and turned on, this
feature will turn the heated seats on
when using remote start on
cold days.
Select Off or On.
Passive Door Unlock
This allows the selection of what
doors will unlock when using the
button on the driver door to unlock
the vehicle.
Page 203 of 544

Black plate (9,1)GMC Sierra Owner Manual (GMNA-Localizing-U.S./Canada/Mexico-
5853626) - 2014 - 3rd crc - 6/6/14
Lighting 6-9
When the battery's state of charge
is low, the voltage is raised slightly
to quickly bring the charge back up.
When the state of charge is high,
the voltage is lowered slightly to
prevent overcharging. The voltmeter
gauge or the voltage display on the
Driver Information Center (DIC),
if equipped, may show the voltage
moving up or down. This is normal.
If there is a problem, an alert will be
displayed.
The battery can be discharged at
idle if the electrical loads are very
high. This is true for all vehicles.
This is because the generator
(alternator) may not be spinning fast
enough at idle to produce all the
power that is needed for very high
electrical loads.A high electrical load occurs when
several of the following are on, such
as: headlamps, high beams, fog
lamps, rear window defogger,
climate control fan at high speed,
heated seats, engine cooling fans,
trailer loads, and loads plugged into
accessory power outlets.
EPM works to prevent excessive
discharge of the battery. It does this
by balancing the generator's output
and the vehicle's electrical needs.
It can increase engine idle speed to
generate more power, whenever
needed. It can temporarily reduce
the power demands of some
accessories.
Normally, these actions occur in
steps or levels, without being
noticeable. In rare cases at the
highest levels of corrective action,
this action may be noticeable to the
driver. If so, a DIC message might
be displayed and it is recommended
that the driver reduce the electrical
loads as much as possible. See
“Battery Voltage and Charging
Messages”
underVehicle Messages
on page 5-35.
Battery Power Protection
This feature shuts off the dome and
reading lamps, if they are left on for
more than 10 minutes after the
ignition is turned off. The cargo
lamp shuts off after 20 minutes. This
prevents the battery from
running down.
Page 269 of 544

Black plate (9,1)GMC Sierra Owner Manual (GMNA-Localizing-U.S./Canada/Mexico-
5853626) - 2014 - 3rd crc - 6/6/14
Climate Controls 8-9
Operation Tips
.Clear away any ice, snow,
or leaves from air inlets at the
base of the windshield that could
block the flow of air into the
vehicle.
.Keep the path under the front
seats clear of objects to help
circulate the air inside of the
vehicle more effectively.
.Use of non-GM approved hood
deflectors can adversely affect
the performance of the system.
Check with your dealer before
adding equipment to the outside
of the vehicle.
Maintenance
Passenger Compartment
Air Filter
The filter removes dust, pollen, and
other airborne irritants from outside
air that is pulled into the vehicle.
The filter should be replaced as part
of routine scheduled maintenance.
SeeMaintenance Schedule on
page 11-3. To find out what type of
filter to use, see Maintenance
Replacement Parts on page 11-14.
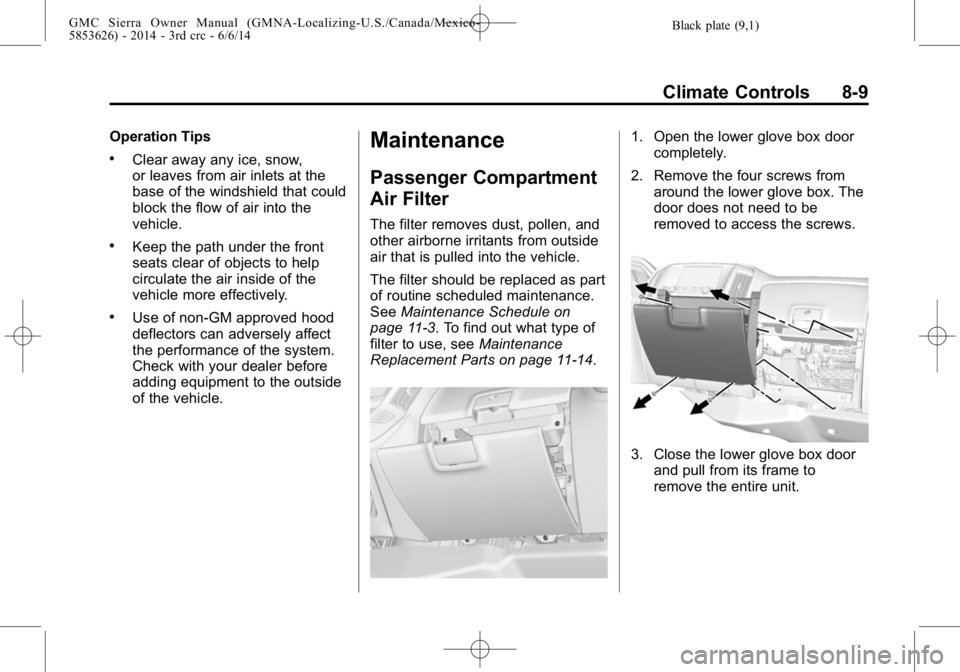
1. Open the lower glove box door completely.
2. Remove the four screws from around the lower glove box. The
door does not need to be
removed to access the screws.
3. Close the lower glove box doorand pull from its frame to
remove the entire unit.