2014 GMC SIERRA 1500 auxiliary battery
[x] Cancel search: auxiliary batteryPage 193 of 542
Black plate (1,1)GMC Sierra Owner Manual (GMNA-Localizing-U.S./Canada/Mexico-
5853626) - 2014 - 3rd crc - 8/15/13
Lighting 6-1
Lighting
Exterior Lighting
Exterior Lamp Controls . . . . . . . . 6-1
Exterior Lamps OffReminder . . . . . . . . . . . . . . . . . . . . 6-2
Headlamp High/Low-Beam Changer . . . . . . . . . . . . . . . . . . . . . 6-2
Flash-to-Pass . . . . . . . . . . . . . . . . . 6-3
Daytime Running Lamps (DRL) . . . . . . . . . . . . . . . . 6-3
Automatic Headlamp System . . . . . . . . . . . . . . . . . . . . . . 6-3
Hazard Warning Flashers . . . . . 6-4
Turn and Lane-Change Signals . . . . . . . . . . . . . . . . . . . . . . 6-5
Fog Lamps . . . . . . . . . . . . . . . . . . . . 6-5
Auxiliary Roof-Mounted Lamp . . . . . . . . . 6-6
Interior Lighting
Instrument Panel IlluminationControl . . . . . . . . . . . . . . . . . . . . . . 6-6
Cargo Lamp . . . . . . . . . . . . . . . . . . 6-7
Dome Lamps . . . . . . . . . . . . . . . . . 6-7
Reading Lamps . . . . . . . . . . . . . . . 6-7
Lighting Features
Entry Lighting . . . . . . . . . . . . . . . . . 6-8
Exit Lighting . . . . . . . . . . . . . . . . . . . 6-8
Battery Load Management . . . . 6-8
Battery Power Protection . . . . . . 6-9
Exterior Lighting
Exterior Lamp Controls
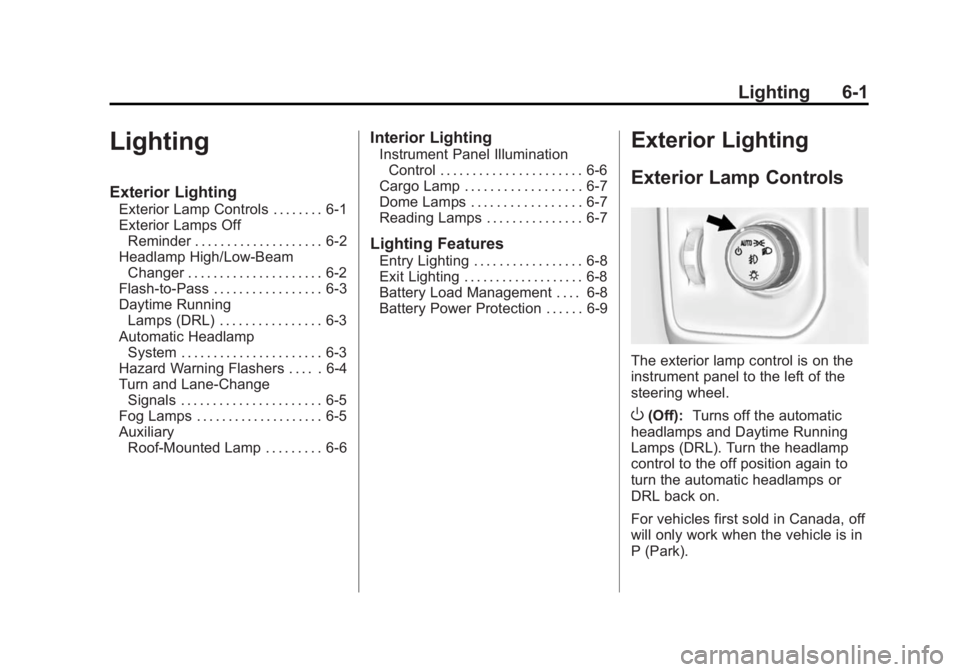
The exterior lamp control is on the
instrument panel to the left of the
steering wheel.
O(Off): Turns off the automatic
headlamps and Daytime Running
Lamps (DRL). Turn the headlamp
control to the off position again to
turn the automatic headlamps or
DRL back on.
For vehicles first sold in Canada, off
will only work when the vehicle is in
P (Park).
Page 222 of 542
Black plate (20,1)GMC Sierra Owner Manual (GMNA-Localizing-U.S./Canada/Mexico-
5853626) - 2014 - 3rd crc - 8/15/13
7-20 Infotainment System
There may be problems with
operation and function in the
following situations:
.When connecting an iPod with a
more recent version of the
firmware installed than is
supported by the infotainment
system.
.When connecting an iPod on
which firmware from other
providers is installed.
To connect and control an iPod:
1. Connect one end of the standard iPod USB cable to the iPod's
dock connector.
2. Connect the other end to a USB port in the center console.
3. Press the MEDIA button to select the source.
iPod music information displays on
the radio’s display and begins
playing through the vehicle’s audio
system. The iPod battery recharges
automatically while the vehicle is on.
When the vehicle is off while an
iPod is connected using the iPod
USB cable, the iPod battery stops
charging and the iPod automatically
turns off.
If the iPod is an unsupported model,
it can still be listened to in the
vehicle by connecting to the
auxiliary input jack using a standard
3.5 mm (1/8 in) stereo cable.
iPod Menu
Press the MENU knob to display the
iPod Menu and the following may
display:
Browse :
Select to display the files
or songs on the iPod. See “Browse
iPod Media” later in this section.
Tone Settings : Select to adjust
Bass, Midrange, Treble, Balance,
Fade, and EQ (Equalizer). See
“Tone Settings” under“Playing an
Audio CD.”
Auto Volume : If equipped, see
“Playing an Audio CD.” EQ (Equalizer) Settings:
If equipped, this feature adjusts the
Equalizer settings. See
“EQ
(Equalizer) Settings” inAM-FM
Radio on page 7-9.
Browse iPod Media
Use the following to browse:
Playlists:
1. Turn the MENU knob to highlight and press to view the playlists
stored on the iPod.
2. Turn the MENU knob to highlight and press to select a playlist
name to view a list of all songs
in the playlist.
3. Turn the MENU knob to highlight and press to select the song
from the list to begin playback.
Artists:
1. Turn the MENU knob to highlight and press to view the artists
stored on the iPod.
Page 359 of 542
Black plate (91,1)GMC Sierra Owner Manual (GMNA-Localizing-U.S./Canada/Mexico-
5853626) - 2014 - 3rd crc - 8/15/13
Driving and Operating 9-91
forward that it will contact the back
of the cab in sharp turns. This is
especially important for short box
pickups. Trailer pin box extensions
and sliding fifth-wheel hitch
assemblies can help this condition.
There should be at least 15 cm (6 in)
of clearance between the top of the
pickup box and the bottom of the
trailer shelf that extends over
the box.
Make sure the hitch is attached to
the tow vehicle frame rails. Do not
use the pickup box for support.
Safety Chains
Always attach chains between the
vehicle and the trailer. Cross the
safety chains under the tongue of
the trailer to help prevent the tongue
from contacting the road if it
becomes separated from the hitch.
Instructions about safety chains
may be provided by the hitch
manufacturer or by the trailer
manufacturer. If the trailer being
towed weighs up to 2 271 kg
(5,000 lb) with a factory-installedstep bumper, safety chains may be
attached to the attaching points on
the bumper; otherwise, safety
chains should be attached to holes
on the trailer hitch platform. Always
leave just enough slack so the
combination can turn. Never allow
safety chains to drag on the ground.
Trailer Brakes
A loaded trailer that weighs more
than 900 kg (2,000 lb) needs to have
its own brake system that is
adequate for the weight of the
trailer. Be sure to read and follow
the instructions for the trailer brakes
so they are installed, adjusted, and
maintained properly.
Do not tap into the vehicle's
hydraulic brake system.
Auxiliary Battery
The auxiliary battery provision can
be used to supply electrical power
to additional equipment that may be
added, such as a slide-in camper.
If equipped, this relay will be on the
driver side of the vehicle, next to the
underhood electrical center.
Be sure to follow the proper
installation instructions included with
any electrical equipment that is
installed.
{Caution
Leaving electrical equipment on
for extended periods will drain the
battery. Always turn off electrical
equipment when not in use and
do not use equipment that
exceeds the maximum amperage
rating of 30 amps for the auxiliary
battery provision.
Trailer Wiring Harness
The vehicle is equipped with one of
the following wiring harnesses for
towing a trailer or hauling a slide-in
camper.
Page 382 of 542
Black plate (10,1)GMC Sierra Owner Manual (GMNA-Localizing-U.S./Canada/Mexico-
5853626) - 2014 - 3rd crc - 8/15/13
10-10 Vehicle Care
1. Positive (+) Terminal. SeeJump
Starting on page 10-89.
2. Battery on page 10-31.
3. Coolant Surge Tank and Pressure Cap. See Cooling
System on page 10-19.
4. Engine Air Cleaner/Filter on
page 10-17.
5. Automatic Transmission Dipstick. See “How to Check
Automatic Transmission Fluid”
under Automatic Transmission
Fluid on page 10-14.
6. Engine Oil Dipstick. See “Checking Engine Oil” under
Engine Oil on page 10-10.
7. Engine Oil Fill Cap. See “When
to Add Engine Oil” underEngine
Oil on page 10-10.
8. Engine Cooling Fan (Out of View). See Cooling System on
page 10-19. 9. Remote Negative (–) Location.
See Jump Starting on
page 10-89.
10. Power Steering Fluid Reservoir. See Power Steering
Fluid (2500/3500 Series) on
page 10-26 orPower Steering
Fluid (1500 Series) on
page 10-26.
11. Windshield Washer Fluid Reservoir. See “Adding Washer
Fluid” under Washer Fluid on
page 10-27.
12. Brake Fluid Reservoir. See Brake Fluid on page 10-29.
13. Auxiliary Battery (If Equipped). SeeBattery on page 10-31.
14. Engine Compartment Fuse
Block on page 10-43.
If the vehicle has a diesel engine
and/or an Allison Transmission, see
the Duramax diesel supplement.Engine Oil
For diesel engine vehicles, see
“Engine Oil” in the Duramax diesel
supplement.
To ensure proper engine
performance and long life, careful
attention must be paid to engine oil.
Following these simple, but
important steps will help protect
your investment:
.Always use engine oil approved
to the proper specification and of
the proper viscosity grade. See
“Selecting the Right Engine Oil”
in this section.
.Check the engine oil level
regularly and maintain the
proper oil level. See “Checking
Engine Oil” and“When to Add
Engine Oil” in this section.
.Change the engine oil at the
appropriate time. See Engine Oil
Life System on page 10-13.
.Always dispose of engine oil
properly. See “What to Do with
Used Oil” in this section.
Page 420 of 542
Black plate (48,1)GMC Sierra Owner Manual (GMNA-Localizing-U.S./Canada/Mexico-
5853626) - 2014 - 3rd crc - 8/15/13
10-48 Vehicle Care
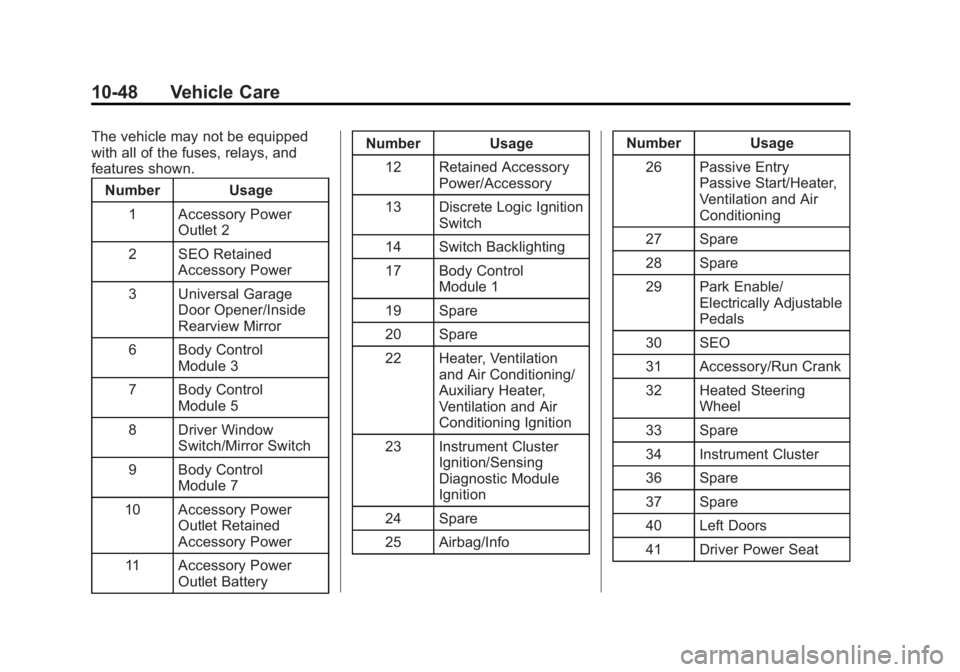
The vehicle may not be equipped
with all of the fuses, relays, and
features shown.Number Usage
1 Accessory Power Outlet 2
2 SEO Retained Accessory Power
3 Universal Garage Door Opener/Inside
Rearview Mirror
6 Body Control Module 3
7 Body Control Module 5
8 Driver Window Switch/Mirror Switch
9 Body Control Module 7
10 Accessory Power Outlet Retained
Accessory Power
11 Accessory Power Outlet Battery Number Usage
12 Retained Accessory Power/Accessory
13 Discrete Logic Ignition Switch
14 Switch Backlighting
17 Body Control Module 1
19 Spare
20 Spare
22 Heater, Ventilation and Air Conditioning/
Auxiliary Heater,
Ventilation and Air
Conditioning Ignition
23 Instrument Cluster Ignition/Sensing
Diagnostic Module
Ignition
24 Spare
25 Airbag/Info Number Usage
26 Passive Entry Passive Start/Heater,
Ventilation and Air
Conditioning
27 Spare
28 Spare
29 Park Enable/ Electrically Adjustable
Pedals
30 SEO
31 Accessory/Run Crank
32 Heated Steering Wheel
33 Spare
34 Instrument Cluster
36 Spare
37 Spare
40 Left Doors
41 Driver Power Seat
Page 465 of 542
Black plate (93,1)GMC Sierra Owner Manual (GMNA-Localizing-U.S./Canada/Mexico-
5853626) - 2014 - 3rd crc - 8/15/13
Vehicle Care 10-93
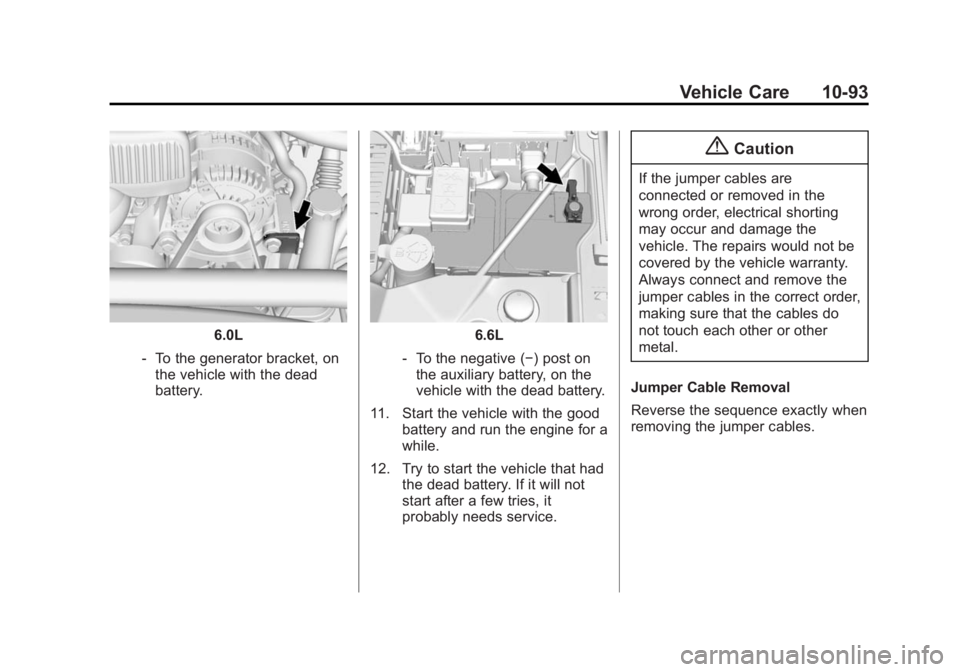
6.0L
‐ To the generator bracket, on
the vehicle with the dead
battery.6.6L
‐ To the negative (−) post on
the auxiliary battery, on the
vehicle with the dead battery.
11. Start the vehicle with the good battery and run the engine for a
while.
12. Try to start the vehicle that had the dead battery. If it will not
start after a few tries, it
probably needs service.
{Caution
If the jumper cables are
connected or removed in the
wrong order, electrical shorting
may occur and damage the
vehicle. The repairs would not be
covered by the vehicle warranty.
Always connect and remove the
jumper cables in the correct order,
making sure that the cables do
not touch each other or other
metal.
Jumper Cable Removal
Reverse the sequence exactly when
removing the jumper cables.
Page 530 of 542
Black plate (2,1)GMC Sierra Owner Manual (GMNA-Localizing-U.S./Canada/Mexico-
5853626) - 2014 - 3rd crc - 8/15/13
i-2 INDEX
Automatic TransmissionManual Mode . . . . . . . . . . . . . . . . . 9-37
Shift Lock Control
Function Check . . . . . . . . . . . 10-36
Auxiliary Roof Mounted Lamp . . . . . . . . . . . 6-6
Auxiliary Jack . . . . . . . . . . . . . . . . . . 7-22
Axle, Front . . . . . . . . . . . . . . . . . . . . 10-33
Axle, Rear . . . . . . . . . . . . . . . . . . . . 10-34
B
Battery . . . . . . . . . . . . . . . . . . . . . . . 10-31 Jump Starting . . . . . . . . . . . . . . . 10-89
Load Management . . . . . . . . . . . . . 6-8
Power Protection . . . . . . . . . . . . . . 6-9
Voltage and Charging
Messages . . . . . . . . . . . . . . . . . . . 5-35
Blade Replacement, Wiper . . . 10-37
Blind Spot Mirrors . . . . . . . . . . . . . 2-17
Bluetooth
Overview . . . . . . . . 7-32, 7-34, 7-39, 7-44, 7-48
Bluetooth Audio . . . . . . . . . . . . . . . 7-22 Brake
Pedal and Adjustable
Throttle . . . . . . . . . . . . . . . . . . . . . . 9-24
System Warning Light . . . . . . . . 5-24
Brakes . . . . . . . . . . . . . . . . . . . . . . . . 10-28 Antilock . . . . . . . . . . . . . . . . . . . . . . . 9-52
Assist . . . . . . . . . . . . . . . . . . . . . . . . . 9-53
Fluid . . . . . . . . . . . . . . . . . . . . . . . . 10-29
Parking . . . . . . . . . . . . . . . . . . . . . . . 9-53
System Messages . . . . . . . . . . . . 5-35
Braking . . . . . . . . . . . . . . . . . . . . . . . . . 9-3
Break-In, New Vehicle . . . . . . . . . 9-24
Bulb Replacement . . . . . . . . . . . . 10-42
Center High-MountedStoplamp (CHMSL) and
Cargo Lamp . . . . . . . . . . . . . . . 10-41
Fog Lamps . . . . . . . . . . . . . 6-5, 10-40
Halogen Bulbs . . . . . . . . . . . . . . 10-39
Headlamp Aiming . . . . . . . . . . . 10-38
Headlamps . . . . . . . . . . . . . . . . . 10-39
Headlamps, Front Turn Signal, Sidemarker, and
Parking Lamps . . . . . . . . . . . . 10-39 Bulb Replacement (cont'd)
License Plate Lamps . . . . . . . 10-42
Taillamps . . . . . . . . . . . . . . . . . . . 10-40
Taillamps, Turn Signal,
Stoplamps, and
Back-up Lamps . . . . . . . . . . . 10-40
Buying New Tires . . . . . . . . . . . . . 10-70
C
Calibration . . . . . . . . . . . . . . . . . . . . . . 5-5
California Fuel Requirements . . . . . . . . . . . 9-70
Perchlorate MaterialsRequirements . . . . . . . . . . . . . . . 10-3
Warning . . . . . . . . . . . . . . . . . . . . . . 10-2
Canadian Vehicle Owners . . . . . . . . iii
Capacities and
Specifications . . . . . . . . . . . . . . . . 12-2
Carbon Monoxide Engine Exhaust . . . . . . . . . . . . . . . 9-33
Tailgate . . . . . . . . . . . . . . . . . . . . . . . 2-10
Winter Driving . . . . . . . . . . . . . . . . 9-13
Card Reader SD . . . . . . . . . . . . . . . . . . . . . . . . . . . . 7-21