2014 GMC SIERRA 1500 maintenance
[x] Cancel search: maintenancePage 272 of 542
Black plate (4,1)GMC Sierra Owner Manual (GMNA-Localizing-U.S./Canada/Mexico-
5853626) - 2014 - 3rd crc - 8/15/13
9-4 Driving and Operating
If the engine ever stops while the
vehicle is being driven, brake
normally but do not pump the
brakes. Doing so could make the
pedal harder to push down. If the
engine stops, there will be some
power brake assist but it will be
used when the brake is applied.
Once the power assist is used up, it
can take longer to stop and the
brake pedal will be harder to push.
Steering
Electric Power Steering
(1500 Series)
If the vehicle has electric power
steering, it does not have power
steering fluid. Regular maintenance
is not required.
If power steering assist is lost due
to a system malfunction, the vehicle
can be steered, but may require
increased effort. See your dealer if
there is a problem.If the steering wheel is turned until it
reaches the end of its travel, and is
held in that position for an extended
period of time, power steering assist
may be reduced.
If the steering assist is used for an
extended period of time, power
assist may be reduced.
Normal use of the power steering
assist should return when the
system cools down.
See specific vehicle steering
messages under
Steering System
Messages on page 5-41.Hydraulic Power Steering
(2500/3500 Series)
If the vehicle has hydraulic power
steering, it may require
maintenance. See Power Steering
Fluid (2500/3500 Series) on
page 10-26 orPower Steering Fluid
(1500 Series) on page 10-26. If power steering assist is lost
because the engine stops or a
system malfunctions, the vehicle
can be steered but may require
increased effort.
See your dealer if there is a
problem.
{Caution
If the steering wheel is turned
until it reaches the end of its
travel, and is held in that position
for more than 15 seconds,
damage may occur to the power
steering system and there may be
loss of power steering assist.
Curve Tips
.Take curves at a reasonable
speed.
.Reduce speed before entering a
curve.
.Maintain a reasonable steady
speed through the curve.
Page 274 of 542
Black plate (6,1)GMC Sierra Owner Manual (GMNA-Localizing-U.S./Canada/Mexico-
5853626) - 2014 - 3rd crc - 8/15/13
9-6 Driving and Operating
If the vehicle starts to slide, follow
these suggestions:
.Ease your foot off the
accelerator pedal and steer the
way you want the vehicle to go.
The vehicle may straighten out.
Be ready for a second skid if it
occurs.
.Slow down and adjust your
driving according to weather
conditions. Stopping distance
can be longer and vehicle
control can be affected when
traction is reduced by water,
snow, ice, gravel, or other
material on the road. Learn to
recognize warning clues—such
as enough water, ice, or packed
snow on the road to make a
mirrored surface —and slow
down when you have any doubt.
.Try to avoid sudden steering,
acceleration, or braking,
including reducing vehicle speed
by shifting to a lower gear. Any
sudden changes could cause
the tires to slide. Remember: Antilock brakes help
avoid only the braking skid.
Off-Road Driving
Four-wheel-drive vehicles can be
used for off-road driving. Vehicles
without four-wheel drive and
vehicles not equipped with All
Terrain (AT) or On-Off Road (OOR)
tires must not be driven off-road
except on a level, solid surface. For
more contact information about the
original equipment tires, see the
Limited Warranty and Owner
Assistance Information manual.
One of the best ways for successful
off-road driving is to control the
speed.
{Warning
When driving off-road, bouncing
and quick changes in direction
can easily throw you out of
position. This could cause you to
(Continued)
Warning (Continued)
lose control and crash. You and
your passengers should always
wear safety belts.
Before Driving Off-Road
.Have all necessary maintenance
and service work completed.
.Fuel the vehicle, fill fluid levels,
and check inflation pressure in
all tires, including the spare,
if equipped.
.Read all the information about
four-wheel-drive vehicles in this
manual.
.Remove any underbody air
deflector, if equipped. Re-attach
the air deflector after off-road
driving.
.Know the local laws that apply to
off-road driving.
Page 279 of 542
Black plate (11,1)GMC Sierra Owner Manual (GMNA-Localizing-U.S./Canada/Mexico-
5853626) - 2014 - 3rd crc - 8/15/13
Driving and Operating 9-11
If the standing water is not too deep,
drive slowly through it. At faster
speeds, water splashes and the
vehicle can stall. When going
through water, the brakes get wet
and it may take longer to stop. See
“Driving on Wet Roads”later in this
section.
After Off-Road Driving
Remove any brush or debris that
has collected on the underbody or
chassis, or under the hood. These
accumulations can be a fire hazard.
After operation in mud or sand,
have the brake linings cleaned and
checked. These substances can
cause glazing and uneven braking.
Check the body structure, steering,
suspension, wheels, tires, and
exhaust system for damage and
check the fuel lines and cooling
system for any leakage.
More frequent maintenance service
is required. See the Maintenance
Schedule on page 11-3.
Driving on Wet Roads
Rain and wet roads can reduce
vehicle traction and affect your
ability to stop and accelerate.
Always drive slower in these types
of driving conditions and avoid
driving through large puddles and
deep‐standing or flowing water.
{Warning
Wet brakes can cause crashes.
They might not work as well in a
quick stop and could cause
pulling to one side. You could
lose control of the vehicle.
After driving through a large
puddle of water or a car/vehicle
wash, lightly apply the brake
pedal until the brakes work
normally.
Flowing or rushing water creates
strong forces. Driving through
flowing water could cause the
vehicle to be carried away. If this
(Continued)
Warning (Continued)
happens, you and other vehicle
occupants could drown. Do not
ignore police warnings and be
very cautious about trying to drive
through flowing water.
Hydroplaning
Hydroplaning is dangerous. Water
can build up under the vehicle's
tires so they actually ride on the
water. This can happen if the road is
wet enough and you are going fast
enough. When the vehicle is
hydroplaning, it has little or no
contact with the road.
There is no hard and fast rule about
hydroplaning. The best advice is to
slow down when the road is wet.
Page 336 of 542
Black plate (68,1)GMC Sierra Owner Manual (GMNA-Localizing-U.S./Canada/Mexico-
5853626) - 2014 - 3rd crc - 8/15/13
9-68 Driving and Operating
This is normal operation; the vehicle
does not need service. Clean the
windshield.
Lane markings may not be detected
on curves, highway exit ramps,
or hills; or due to poor visibility.
If the LDW camera system does not
seem to operate properly, cleaning
the outside of the windshield in front
of the camera sensor may correct
the issue.
{Warning
LDW does not provide a warning
to help avoid a crash, unless it
detects the lane markings. LDW
may not detect the lane markings
if the camera sensor is blocked
by dirt, snow, or ice, or if the
windshield is damaged. It may
also not detect a lane on winding
or hilly roads, or in conditions that
can limit visibility such as fog,
rain, or snow, or if the headlamps(Continued)
Warning (Continued)
or windshield are not cleaned or
in proper condition. Keep the
windshield, headlamps, and
camera sensors clean and in
good repair.
LDW warnings may occur due to tar
marks, shadows, cracks in the road,
or other road imperfections. This is
normal system operation; the
vehicle does not need service.
Fuel
For diesel engine vehicles, see
“Fuel for Diesel Engines” in the
Duramax diesel supplement.
For gasoline engine vehicles, use of
the recommended fuel is an
important part of the proper
maintenance of this vehicle. When
driving in the U.S., to help keep the
engine clean and maintain optimum
vehicle performance, we
recommend using TOP TIER
Detergent Gasolines.
See www.toptiergas.com for a list of
TOP TIER Detergent Gasolines.
Page 345 of 542
Black plate (77,1)GMC Sierra Owner Manual (GMNA-Localizing-U.S./Canada/Mexico-
5853626) - 2014 - 3rd crc - 8/15/13
Driving and Operating 9-77
3. When the wheel chocks are inplace, release the regular brakes
until the chocks absorb the load.
4. Reapply the brake pedal. Then apply the parking brake and shift
into P (Park).
5. Release the brake pedal.
Leaving After Parking on a Hill
1. Apply and hold the brake pedal.
2. Start the engine.
3. Shift into a gear.
4. Release the parking brake.
5. Let up on the brake pedal.
6. Drive slowly until the trailer is clear of the chocks.
7. Stop and have someone pick up and store the chocks.
Maintenance when Trailer
Towing
The vehicle needs service more
often when pulling a trailer. See
Maintenance Schedule on
page 11-3. Things that are especially important in trailer
operation are automatic
transmission fluid, engine oil, axle
lubricant, belts, cooling system, and
brake system. It is a good idea to
inspect these before and during
the trip.
Check periodically to see that all
hitch nuts and bolts are tight.
Trailer Towing
If the vehicle has a diesel engine,
see the Duramax diesel
supplement.
If the vehicle is bi-fuel, see the
bi-fuel supplement.
Do not tow a trailer during break-in.
See
New Vehicle Break-In on
page 9-24.
{Warning
The driver can lose control when
pulling a trailer if the correct
equipment is not used or the
vehicle is not driven properly. For
example, if the trailer is too
heavy, the brakes may not work
well or even at all. The driver and
passengers could be seriously
injured. The vehicle may also be
damaged; the resulting repairs
would not be covered by the
vehicle warranty. Pull a trailer
only if all the steps in this section
have been followed. Ask your
dealer for advice and information
about towing a trailer with the
vehicle.
Page 376 of 542
Black plate (4,1)GMC Sierra Owner Manual (GMNA-Localizing-U.S./Canada/Mexico-
5853626) - 2014 - 3rd crc - 8/15/13
10-4 Vehicle Care
This vehicle has an airbag system.
Before attempting to do your own
service work, seeServicing the
Airbag-Equipped Vehicle on
page 3-35.
Keep a record with all parts receipts
and list the mileage and the date of
any service work performed. See
Maintenance Records on
page 11-16.
{Caution
Even small amounts of
contamination can cause damage
to vehicle systems. Do not allow
contaminants to contact the fluids,
reservoir caps, or dipsticks.
Hood
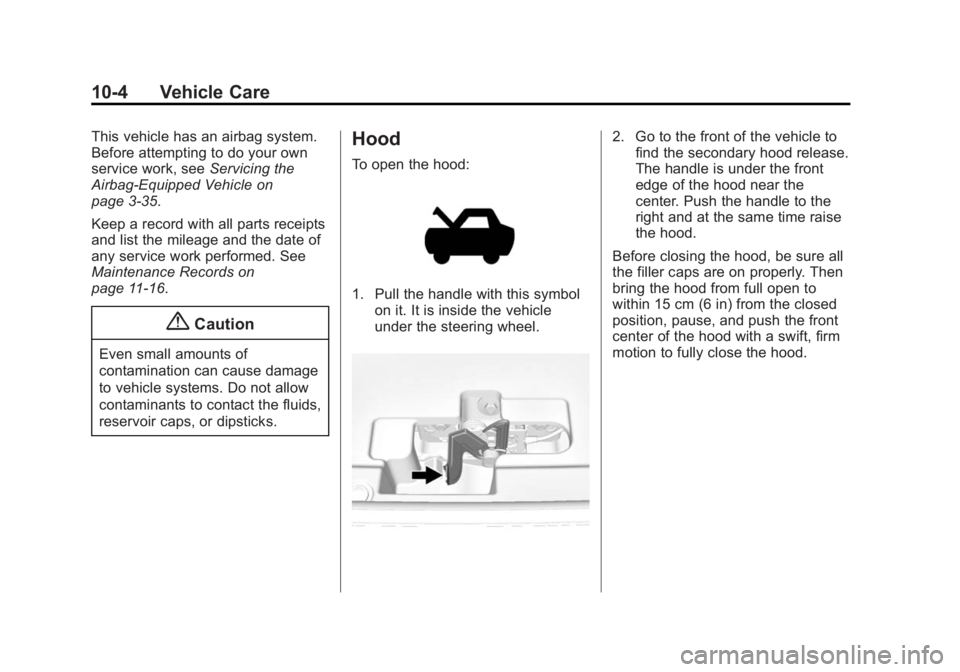
To open the hood:
1. Pull the handle with this symbol on it. It is inside the vehicle
under the steering wheel.
2. Go to the front of the vehicle tofind the secondary hood release.
The handle is under the front
edge of the hood near the
center. Push the handle to the
right and at the same time raise
the hood.
Before closing the hood, be sure all
the filler caps are on properly. Then
bring the hood from full open to
within 15 cm (6 in) from the closed
position, pause, and push the front
center of the hood with a swift, firm
motion to fully close the hood.
Page 387 of 542
Black plate (15,1)GMC Sierra Owner Manual (GMNA-Localizing-U.S./Canada/Mexico-
5853626) - 2014 - 3rd crc - 8/15/13
Vehicle Care 10-15
{Caution
Use of the incorrect automatic
transmission fluid may damage
the vehicle, and the damage may
not be covered by the vehicle
warranty. Always use the
automatic transmission fluid listed
inRecommended Fluids and
Lubricants on page 11-12.
Change the fluid and filter at the
scheduled maintenance intervals
listed in Maintenance Schedule on
page 11-3. Be sure to use the
transmission fluid listed in
Recommended Fluids and
Lubricants on page 11-12.
How to Check Automatic
Transmission Fluid
{Caution
Too much or too little fluid can
damage the transmission. Too
much can mean that some of the
fluid could come out and fall on
hot engine parts or exhaust
system parts, starting a fire. Too
little fluid could cause the
transmission to overheat. Be sure
to get an accurate reading if
checking the transmission fluid.
Before checking the fluid level,
prepare the vehicle:
1. Start the engine and park the vehicle on a level surface. Keep
the engine running.
2. Apply the parking brake and place the shift lever in P (Park).
3. With your foot on the brake pedal, move the shift lever
through each gear range, pausing for about three seconds
in each range. Then, move the
shift lever back to P (Park).
4. Allow the engine to idle (500– 800 rpm) for at least one minute.
Slowly release the brake pedal.
5. Keep the engine running and check the transmission fluid
temperature on the Driver
Information Center (DIC). See
Driver Information Center (DIC)
(Base Level) on page 5-30 or
Driver Information Center (DIC)
(Uplevel) on page 5-32.
6. Using the transmission fluid temperature reading, determine
and perform the appropriate
check procedure. If the
transmission fluid temperature
reading is not within the required
temperature ranges, allow the
vehicle to cool, or operate the
vehicle until the appropriate
transmission fluid temperature is
reached.
Page 390 of 542
Black plate (18,1)GMC Sierra Owner Manual (GMNA-Localizing-U.S./Canada/Mexico-
5853626) - 2014 - 3rd crc - 8/15/13
10-18 Vehicle Care
When to Inspect the Engine Air
Cleaner/Filter
Inspect the air cleaner/filter at the
scheduled maintenance intervals
and replace it at the first oil change
after each 80 000 km (50,000 mi)
interval. SeeMaintenance Schedule
on page 11-3. If driving in dusty/dirty
conditions, inspect the filter at each
engine oil change.
How to Inspect the Engine Air
Cleaner/Filter
To inspect the air cleaner/filter,
remove the engine air cleaner/filter
from the vehicle by following
Steps 1−8. When the engine air
cleaner/filter is removed, lightly
shake it to release loose dust and
dirt. If the engine air cleaner/filter
remains covered with dirt, a new
filter is required. Never use
compressed air to clean the filter. Replacing the Engine Air Cleaner/
Filter
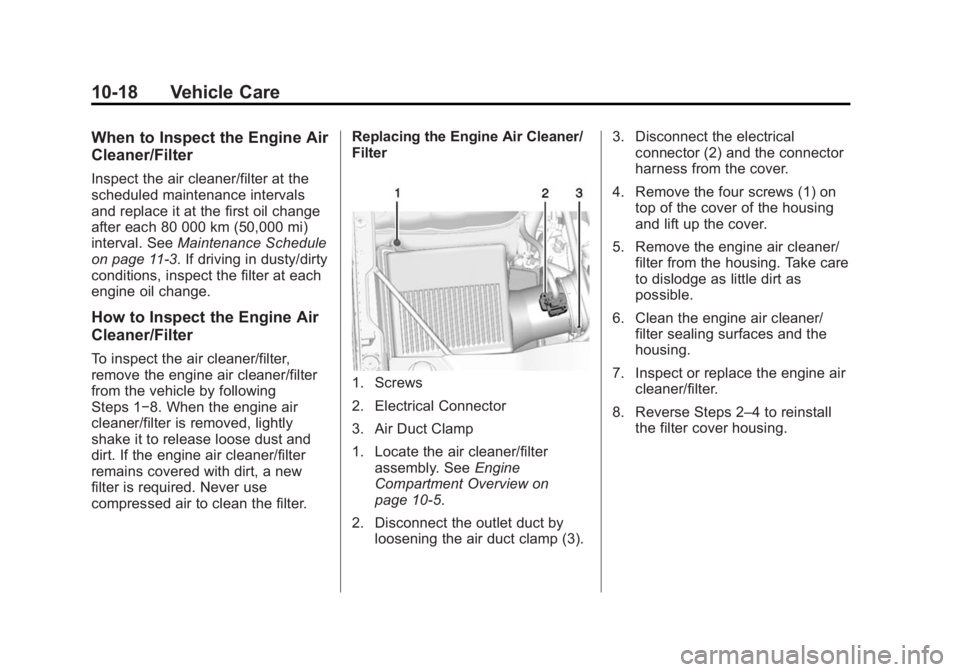
1. Screws
2. Electrical Connector
3. Air Duct Clamp
1. Locate the air cleaner/filter
assembly. See Engine
Compartment Overview on
page 10-5.
2. Disconnect the outlet duct by loosening the air duct clamp (3). 3. Disconnect the electrical
connector (2) and the connector
harness from the cover.
4. Remove the four screws (1) on top of the cover of the housing
and lift up the cover.
5. Remove the engine air cleaner/ filter from the housing. Take care
to dislodge as little dirt as
possible.
6. Clean the engine air cleaner/ filter sealing surfaces and the
housing.
7. Inspect or replace the engine air cleaner/filter.
8. Reverse Steps 2–4 to reinstall the filter cover housing.