Page 328 of 408

Black plate (76,1)GMC Savana Owner Manual (GMNA-Localizing-U.S./Canada-6014682) -
2014 - CRC 2nd Edition - 8/26/13
10-76 Vehicle Care
10. Turn the jack handlecounterclockwise to lower the
vehicle. Lower the jack
completely.
{Warning
Wheel nuts that are not tight can
work loose. If all the nuts on a
wheel come off, the wheel can
come off the vehicle, causing a
crash. All wheel nuts must be
properly tightened. Follow the
rules in this section to be sure
they are.
{Warning
If wheel studs are damaged, they
can break. If all the studs on a
wheel broke, the wheel could
come off and cause a crash.
If any stud is damaged because
of a loose-running wheel, it could
be that all of the studs are
(Continued)
Warning (Continued)
damaged. To be sure, replace all
studs on the wheel. If the stud
holes in a wheel have become
larger, the wheel could collapse in
operation. Replace any wheel if
its stud holes have become larger
or distorted in any way. Inspect
hubs and hub‐piloted wheels for
damage. Because of loose
running wheels, piloting pad
damage may occur and require
replacement of the entire hub, for
proper centering of the wheels.
When replacing studs, hubs,
wheel nuts or wheels, be sure to
use GM original equipment parts.
{Warning
Wheel nuts that are improperly or
incorrectly tightened can cause
the wheels to become loose or(Continued)
Warning (Continued)
come off. The wheel nuts should
be tightened with a torque wrench
to the proper torque specification
after replacing. Follow the torque
specification supplied by the
aftermarket manufacturer when
using accessory locking wheel
nuts. SeeCapacities and
Specifications on page 12-2 for
original equipment wheel nut
torque specifications.
{Caution
Improperly tightened wheel nuts
can lead to brake pulsation and
rotor damage. To avoid expensive
brake repairs, evenly tighten the
wheel nuts in the proper
sequence and to the proper
torque specification. See
Capacities and Specifications for
the wheel nut torque specification.
Page 329 of 408

Black plate (77,1)GMC Savana Owner Manual (GMNA-Localizing-U.S./Canada-6014682) -
2014 - CRC 2nd Edition - 8/26/13
Vehicle Care 10-77
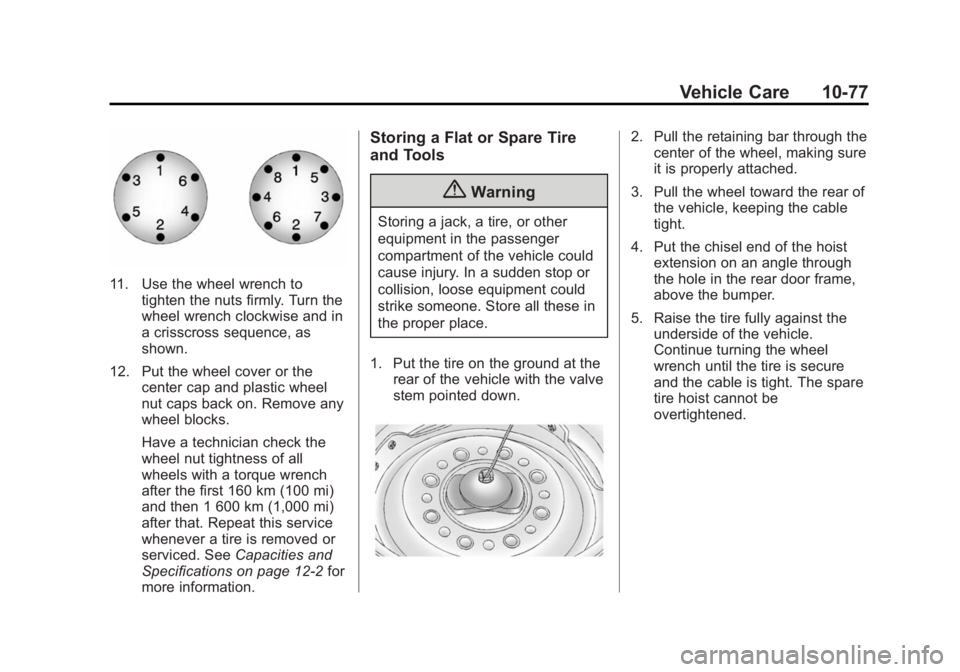
11. Use the wheel wrench totighten the nuts firmly. Turn the
wheel wrench clockwise and in
a crisscross sequence, as
shown.
12. Put the wheel cover or the center cap and plastic wheel
nut caps back on. Remove any
wheel blocks.
Have a technician check the
wheel nut tightness of all
wheels with a torque wrench
after the first 160 km (100 mi)
and then 1 600 km (1,000 mi)
after that. Repeat this service
whenever a tire is removed or
serviced. See Capacities and
Specifications on page 12-2 for
more information.
Storing a Flat or Spare Tire
and Tools
{Warning
Storing a jack, a tire, or other
equipment in the passenger
compartment of the vehicle could
cause injury. In a sudden stop or
collision, loose equipment could
strike someone. Store all these in
the proper place.
1. Put the tire on the ground at the rear of the vehicle with the valve
stem pointed down.
2. Pull the retaining bar through thecenter of the wheel, making sure
it is properly attached.
3. Pull the wheel toward the rear of the vehicle, keeping the cable
tight.
4. Put the chisel end of the hoist extension on an angle through
the hole in the rear door frame,
above the bumper.
5. Raise the tire fully against the underside of the vehicle.
Continue turning the wheel
wrench until the tire is secure
and the cable is tight. The spare
tire hoist cannot be
overtightened.
Page 398 of 408

Black plate (2,1)GMC Savana Owner Manual (GMNA-Localizing-U.S./Canada-6014682) -
2014 - CRC 2nd Edition - 8/26/13
i-2 INDEX
BluetoothOverview . . . . . . . . . . . . . . . . . . . . . 7-22
Brake System Warning Light . . . . . . . . 5-21
Brakes . . . . . . . . . . . . . . . . . . . . . . . . 10-25 Antilock . . . . . . . . . . . . . . . . . . . . . . . 9-30
Fluid . . . . . . . . . . . . . . . . . . . . . . . . 10-26
Parking . . . . . . . . . . . . . . . . . . . . . . . 9-31
System Messages . . . . . . . . . . . . 5-31
Braking . . . . . . . . . . . . . . . . . . . . . . . . . 9-3
Break-In, New Vehicle . . . . . . . . . 9-14
Bulb Replacement . . . . . . . . . . . . 10-38 Center High-MountedStoplamp (CHMSL) . . . . . . . 10-37
Front Turn Signal, Sidemarker, and
Parking Lamps . . . . . . . . . . . . 10-36
Halogen Bulbs . . . . . . . . . . . . . . 10-34
Headlamp Aiming . . . . . . . . . . . 10-33
Headlamps . . . . . . . . . . . . . . . . . 10-34
License Plate Lamps . . . . . . . 10-38
Taillamps . . . . . . . . . . . . . . . . . . . 10-36
Buying New Tires . . . . . . . . . . . . . 10-63C
Calibration . . . . . . . . . . . . . . . . . . . . . . 5-4
California Fuel Requirements . . . . . . . . . . . 9-43
Perchlorate MaterialsRequirements . . . . . . . . . . . . . . . 10-3
Warning . . . . . . . . . . . . . . . . . . . . . . 10-2
Camera Rear Vision (RVC) . . . . . . . . . . . . 9-38
Canadian Vehicle Owners . . . . . . . . iii
Capacities and Specifications . . . . . . . . . . . . . . . . 12-2
Carbon Monoxide Engine Exhaust . . . . . . . . . . . . . . . 9-21
Winter Driving . . . . . . . . . . . . . . . . . 9-7
Cargo Door Relocking . . . . . . . . . . 2-7
Cautions, Danger, and
Warnings . . . . . . . . . . . . . . . . . . . . . . . . iv
CD Player . . . . . . . . . . . . . . . . . . . . . 7-12
Center High-Mounted Stoplamp (CHMSL) . . . . . . . . . 10-37
Chains, Tire . . . . . . . . . . . . . . . . . . 10-68
Charging System Light . . . . . . . . 5-18 Check
Engine Light . . . . . . . . . . . . . . . . . . 5-18
Ignition
Transmission Lock . . . . . . . . 10-32
Child Restraints Infants and YoungChildren . . . . . . . . . . . . . . . . . . . . . 3-35
Lower Anchors and Tethers for Children . . . . . . . . . 3-41
Older Children . . . . . . . . . . . . . . . . 3-33
Securing . . . . . . . . . . 3-47, 3-49, 3-52
Systems . . . . . . . . . . . . . . . . . . . . . . 3-37
Cigarette Lighter . . . . . . . . . . . . . . . . 5-8
Circuit Breakers . . . . . . . . . . . . . . 10-40
Cleaning Exterior Care . . . . . . . . . . . . . . . 10-86
Interior Care . . . . . . . . . . . . . . . . 10-91
Climate Control Systems . . . . . . . 8-1 Air Conditioning . . . . . . . . . . . . . . . 8-1
Heating . . . . . . . . . . . . . . . . . . . . . . . . 8-1
Rear . . . . . . . . . . . . . . . . . . . . . . . . . . . 8-4
Rear Heating System . . . . . . . . . . 8-4
Clock . . . . . . . . . . . . . . . . . . . . . . . . . . . 5-6
Cluster, Instrument . . . . . . . . . . . . 5-10
Collision Damage Repair . . . . . . 13-9