2014 GMC SAVANA lock
[x] Cancel search: lockPage 324 of 408
Black plate (72,1)GMC Savana Owner Manual (GMNA-Localizing-U.S./Canada-6014682) -
2014 - CRC 2nd Edition - 8/26/13
10-72 Vehicle Care
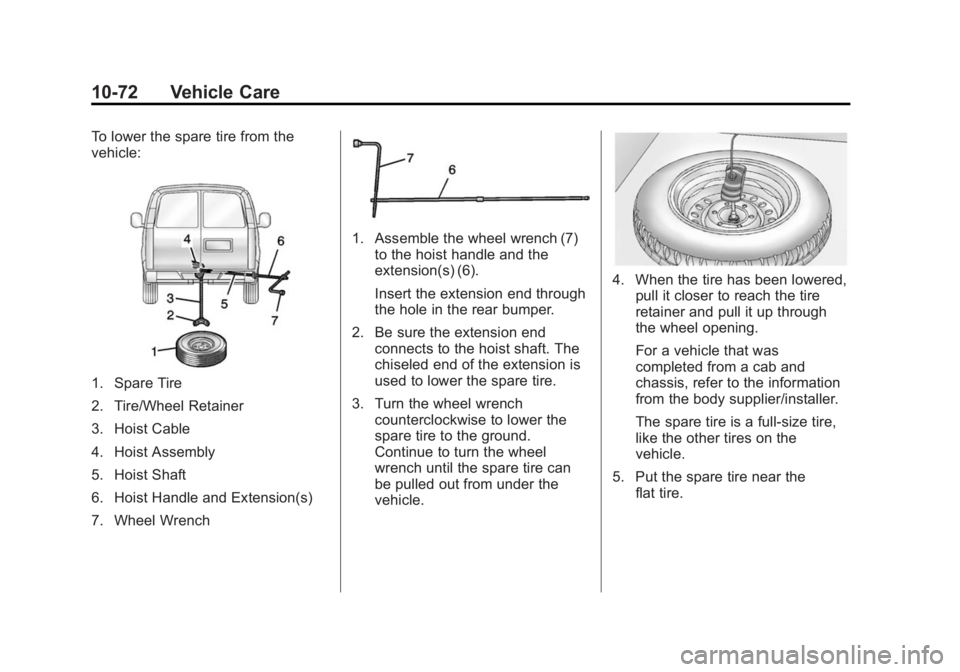
To lower the spare tire from the
vehicle:
1. Spare Tire
2. Tire/Wheel Retainer
3. Hoist Cable
4. Hoist Assembly
5. Hoist Shaft
6. Hoist Handle and Extension(s)
7. Wheel Wrench
1. Assemble the wheel wrench (7)to the hoist handle and the
extension(s) (6).
Insert the extension end through
the hole in the rear bumper.
2. Be sure the extension end connects to the hoist shaft. The
chiseled end of the extension is
used to lower the spare tire.
3. Turn the wheel wrench counterclockwise to lower the
spare tire to the ground.
Continue to turn the wheel
wrench until the spare tire can
be pulled out from under the
vehicle.
4. When the tire has been lowered,pull it closer to reach the tire
retainer and pull it up through
the wheel opening.
For a vehicle that was
completed from a cab and
chassis, refer to the information
from the body supplier/installer.
The spare tire is a full-size tire,
like the other tires on the
vehicle.
5. Put the spare tire near the flat tire.
Page 325 of 408
Black plate (73,1)GMC Savana Owner Manual (GMNA-Localizing-U.S./Canada-6014682) -
2014 - CRC 2nd Edition - 8/26/13
Vehicle Care 10-73
Removing the Flat Tire and
Installing the Spare Tire
If the vehicle has plastic wheel nut
caps, loosen them by turning the
wheel wrench counterclockwise.
The wheel nut caps are designed to
remain with the center cap. Remove
the center cap.
If the wheel has a smooth center
piece, place the chisel end of the
wheel wrench in the slot on the
wheel and gently pry it out.
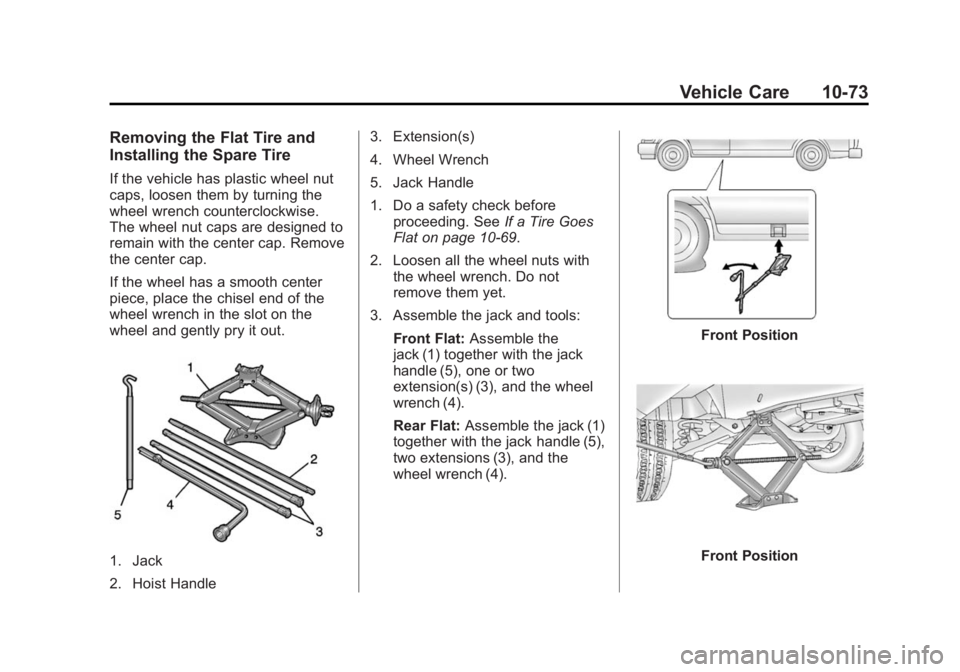
1. Jack
2. Hoist Handle3. Extension(s)
4. Wheel Wrench
5. Jack Handle
1. Do a safety check before
proceeding. See If a Tire Goes
Flat on page 10-69.
2. Loosen all the wheel nuts with the wheel wrench. Do not
remove them yet.
3. Assemble the jack and tools: Front Flat: Assemble the
jack (1) together with the jack
handle (5), one or two
extension(s) (3), and the wheel
wrench (4).
Rear Flat: Assemble the jack (1)
together with the jack handle (5),
two extensions (3), and the
wheel wrench (4).
Front Position
Front Position
Page 326 of 408

Black plate (74,1)GMC Savana Owner Manual (GMNA-Localizing-U.S./Canada-6014682) -
2014 - CRC 2nd Edition - 8/26/13
10-74 Vehicle Care
Rear Position
Rear Alternative Position (DieselVehicles) 4. Position the jack under the
vehicle, as shown.
The front position jacking point is
on the frame. The rear position
jacking point is on the rear axle.
If the exhaust system interferes
with the jack location in the rear
axle, such as in Diesel vehicles,
place the jack (1) on the rear
axle between the axle housing
and the shock absorber bracket
in order to avoid any
interference with the exhaust
pipe (2).
{Warning
Getting under a vehicle when it is
jacked up is dangerous. If the
vehicle slips off the jack you could
be badly injured or killed. Never
get under a vehicle when it is
supported only by a jack.
{Warning
Raising the vehicle with the jack
improperly positioned can
damage the vehicle and even
make the vehicle fall. To help
avoid personal injury and vehicle
damage, be sure to fit the jack lift
head into the proper location
before raising the vehicle.
5. Turn the wheel wrench clockwise to raise the vehicle.
Raise the vehicle far enough off
the ground so there is enough
room for the spare tire to fit.
Page 328 of 408
Black plate (76,1)GMC Savana Owner Manual (GMNA-Localizing-U.S./Canada-6014682) -
2014 - CRC 2nd Edition - 8/26/13
10-76 Vehicle Care
10. Turn the jack handlecounterclockwise to lower the
vehicle. Lower the jack
completely.
{Warning
Wheel nuts that are not tight can
work loose. If all the nuts on a
wheel come off, the wheel can
come off the vehicle, causing a
crash. All wheel nuts must be
properly tightened. Follow the
rules in this section to be sure
they are.
{Warning
If wheel studs are damaged, they
can break. If all the studs on a
wheel broke, the wheel could
come off and cause a crash.
If any stud is damaged because
of a loose-running wheel, it could
be that all of the studs are
(Continued)
Warning (Continued)
damaged. To be sure, replace all
studs on the wheel. If the stud
holes in a wheel have become
larger, the wheel could collapse in
operation. Replace any wheel if
its stud holes have become larger
or distorted in any way. Inspect
hubs and hub‐piloted wheels for
damage. Because of loose
running wheels, piloting pad
damage may occur and require
replacement of the entire hub, for
proper centering of the wheels.
When replacing studs, hubs,
wheel nuts or wheels, be sure to
use GM original equipment parts.
{Warning
Wheel nuts that are improperly or
incorrectly tightened can cause
the wheels to become loose or(Continued)
Warning (Continued)
come off. The wheel nuts should
be tightened with a torque wrench
to the proper torque specification
after replacing. Follow the torque
specification supplied by the
aftermarket manufacturer when
using accessory locking wheel
nuts. SeeCapacities and
Specifications on page 12-2 for
original equipment wheel nut
torque specifications.
{Caution
Improperly tightened wheel nuts
can lead to brake pulsation and
rotor damage. To avoid expensive
brake repairs, evenly tighten the
wheel nuts in the proper
sequence and to the proper
torque specification. See
Capacities and Specifications for
the wheel nut torque specification.
Page 329 of 408
Black plate (77,1)GMC Savana Owner Manual (GMNA-Localizing-U.S./Canada-6014682) -
2014 - CRC 2nd Edition - 8/26/13
Vehicle Care 10-77
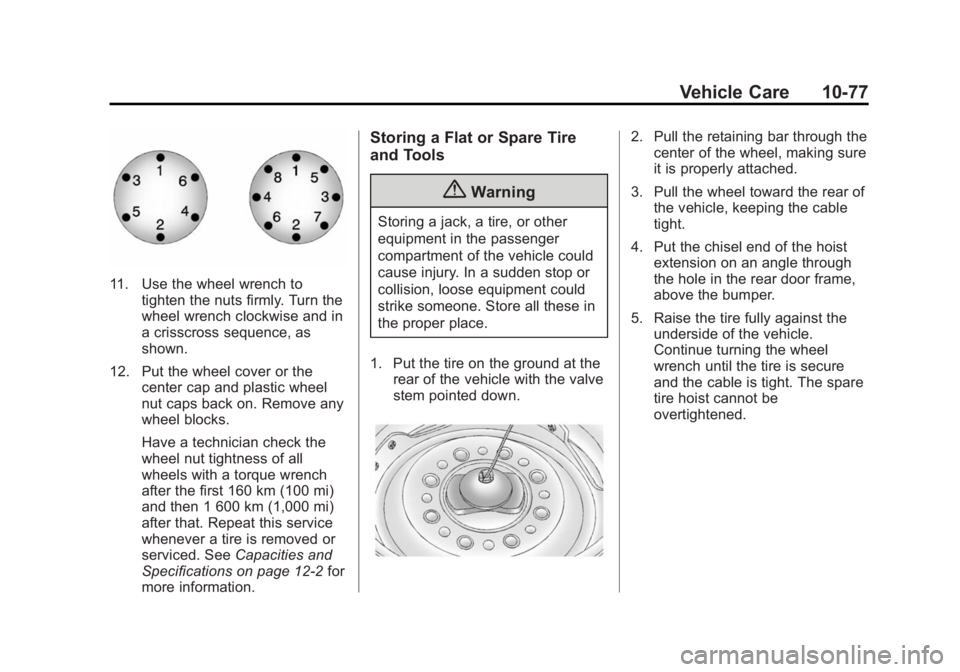
11. Use the wheel wrench totighten the nuts firmly. Turn the
wheel wrench clockwise and in
a crisscross sequence, as
shown.
12. Put the wheel cover or the center cap and plastic wheel
nut caps back on. Remove any
wheel blocks.
Have a technician check the
wheel nut tightness of all
wheels with a torque wrench
after the first 160 km (100 mi)
and then 1 600 km (1,000 mi)
after that. Repeat this service
whenever a tire is removed or
serviced. See Capacities and
Specifications on page 12-2 for
more information.
Storing a Flat or Spare Tire
and Tools
{Warning
Storing a jack, a tire, or other
equipment in the passenger
compartment of the vehicle could
cause injury. In a sudden stop or
collision, loose equipment could
strike someone. Store all these in
the proper place.
1. Put the tire on the ground at the rear of the vehicle with the valve
stem pointed down.
2. Pull the retaining bar through thecenter of the wheel, making sure
it is properly attached.
3. Pull the wheel toward the rear of the vehicle, keeping the cable
tight.
4. Put the chisel end of the hoist extension on an angle through
the hole in the rear door frame,
above the bumper.
5. Raise the tire fully against the underside of the vehicle.
Continue turning the wheel
wrench until the tire is secure
and the cable is tight. The spare
tire hoist cannot be
overtightened.
Page 337 of 408
Black plate (85,1)GMC Savana Owner Manual (GMNA-Localizing-U.S./Canada-6014682) -
2014 - CRC 2nd Edition - 8/26/13
Vehicle Care 10-85
3. Firmly set the parking brake.See Parking Brake on
page 9-31.
4. Put the transmission in P (Park).
5. Secure the vehicle to the dolly following the manufacturer's
instructions.
6. Use an adequate clamping device designed for towing to
ensure that the front wheels are
locked into the straight position.
7. Turn the ignition to LOCK/OFF. If the tow vehicle will not be
started or driven for six weeks or
more, remove the battery cable
from the negative terminal (post)
of the battery to prevent the
battery from draining while
towing. Rear Towing (Rear Wheels Off the
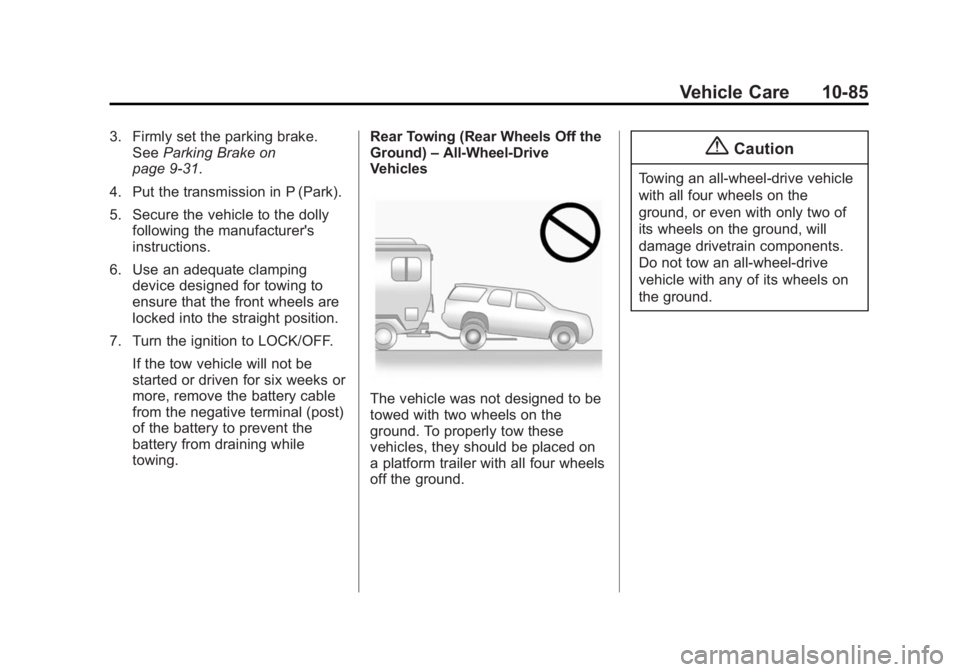
Ground)
–All-Wheel-Drive
Vehicles
The vehicle was not designed to be
towed with two wheels on the
ground. To properly tow these
vehicles, they should be placed on
a platform trailer with all four wheels
off the ground.
{Caution
Towing an all-wheel-drive vehicle
with all four wheels on the
ground, or even with only two of
its wheels on the ground, will
damage drivetrain components.
Do not tow an all-wheel-drive
vehicle with any of its wheels on
the ground.
Page 338 of 408
Black plate (86,1)GMC Savana Owner Manual (GMNA-Localizing-U.S./Canada-6014682) -
2014 - CRC 2nd Edition - 8/26/13
10-86 Vehicle Care
Appearance Care
Exterior Care
Locks
Locks are lubricated at the factory.
Use a de-icing agent only when
absolutely necessary, and have the
locks greased after using. See
Recommended Fluids and
Lubricants on page 11-11.
Washing the Vehicle
To preserve the vehicle's finish,
wash it often and out of direct
sunlight.
{Caution
Do not use petroleum-based,
acidic, or abrasive cleaning
agents as they can damage the
vehicle's paint, metal, or plastic
parts. If damage occurs, it would
not be covered by the vehicle
warranty. Approved cleaning(Continued)
Caution (Continued)
products can be obtained from
your dealer. Follow all
manufacturer directions regarding
correct product usage, necessary
safety precautions, and
appropriate disposal of any
vehicle care product.
{Caution
Avoid using high-pressure
washes closer than 30 cm (12 in)
to the surface of the vehicle. Use
of power washers exceeding
8,274 kPa (1,200 psi) can result
in damage or removal of paint
and decals.
The
esymbol is on any
underhood compartment electrical
center that should not be power washed. This could cause damage
that would not be covered by the
vehicle warranty.
If using an automatic car wash,
follow the car wash instructions. The
windshield wiper and rear window
wiper, if equipped, must be off.
Remove any accessories that may
be damaged or interfere with the car
wash equipment.
Rinse the vehicle well, before
washing and after, to remove all
cleaning agents completely. If they
are allowed to dry on the surface,
they could stain.
Dry the finish with a soft, clean
chamois or an all-cotton towel to
avoid surface scratches and water
spotting.
Finish Care
Application of aftermarket clearcoat
sealant/wax materials is not
recommended. If painted surfaces
are damaged, see your dealer to
have the damage assessed and
repaired. Foreign materials such as
Page 342 of 408

Black plate (90,1)GMC Savana Owner Manual (GMNA-Localizing-U.S./Canada-6014682) -
2014 - CRC 2nd Edition - 8/26/13
10-90 Vehicle Care
Inspect power steering for proper
hook-up, binding, leaks, cracks,
chafing, etc.
Visually check constant velocity joint
boots and axle seals for leaks.
1500 Series vehicles, at least every
other oil change lubricate the outer
tie rod ends.
2500/3500 Series vehicles, at least
every other engine oil change
lubricate the upper and lower
control arm ball joints.
Control arm ball joints on 1500
series vehicles are
maintenance-free.
2500/3500 Series vehicles equipped
with steering linkage, at least every
other engine oil change lubricate the
tie rod ball joints, idler arm pivot
shaft bearings, idler arm socket, and
pitman arm socket.{Caution
Lubrication of applicable Steering/
Suspension points should not be
done unless temperature is -12°C
(10°F) or higher, or damage could
result.
Body Component Lubrication
Lubricate all key lock cylinders,
hood hinges, liftgate hinges, and the
fuel door hinge unless the
components are plastic. Applying
silicone grease on weatherstrips
with a clean cloth will make them
last longer, seal better, and not stick
or squeak.
Underbody Maintenance
At least twice a year, Spring and
Fall, use plain water to flush dirt and
debris from the vehicle's underbody.
Your dealer or an underbody car
washing system can do this. If not
removed, rust and corrosion can
develop.
Sheet Metal Damage
If the vehicle is damaged and
requires sheet metal repair or
replacement, make sure the body
repair shop applies anti-corrosion
material to parts repaired or
replaced to restore corrosion
protection.
Original manufacturer replacement
parts will provide the corrosion
protection while maintaining the
vehicle warranty.
Finish Damage
Quickly repair minor chips and
scratches with touch-up materials
available from your dealer to avoid
corrosion. Larger areas of finish
damage can be corrected in your
dealer's body and paint shop.
Chemical Paint Spotting
Airborne pollutants can fall upon
and attack painted vehicle surfaces
causing blotchy, ring-shaped
discolorations, and small, irregular