2014 FORD TAURUS warning lights
[x] Cancel search: warning lightsPage 209 of 550

Visual Park Aid Alert
Note:Visual park alert is only available when the transmission is in R
(Reverse).
Note:The reverse sensing system is not effective at speeds above 3 mph
(5 km/h) and may not detect certain angular or moving objects.
The visual park aid alert allows the driver to view the area that is being
detected by the reverse sensing system. The system uses red, yellow and
green highlights which appear on top of the video image when an object
is detected by the reverse sensing system. The alert highlights the
closest object detected. The reverse sensing alert can be disabled and if
visual park aid alert is enabled, highlighted areas are still displayed.
Selectable settings for this feature are ON and OFF.
Manual Zoom
WARNING:When manual zoom is on, the full area behind the
vehicle is not shown. Be aware of your surroundings when using
the manual zoom feature.
Note:Manual zoom is only available when the transmission is in R
(Reverse).
Note:When manual zoom is enabled, only the centerline is shown.
Allows the driver to get a closer view of an object behind the vehicle.
The zoomed image keeps the bumper in the image to provide a
reference. When the transmission is shifted out of R (Reverse), the
feature automatically turns off and must be reset when it is used again.
Selectable settings for this feature are (+) and (-). The default setting
for the manual zoom is OFF.
Rear Camera Delay
When shifting the transmission out of R (Reverse) and into any gear
other than P (Park), the camera image remains in the display until the
vehicle speed reaches 6 mph (10 km/h). This occurs when the rear
camera delay feature is on, or until a radio button is selected.
Selectable settings for this feature are ON and OFF. The default setting
for the rear camera delay is OFF.
208Parking Aids
2014 Taurus
Owners Guide gf, 1st Printing, April 2013
USA(fus)
Page 246 of 550

Hitches
Do not use a hitch that either clamps onto the bumper or attaches to the
axle.
Distribute the trailer load so 10-15% of the total trailer weight is on the
tongue.
Safety Chains
Note:Never attach safety chains to the bumper.
Always connect the safety chains to the hook retainers of your vehicle
hitch.
To connect the safety chains, cross them under the trailer tongue and
allow enough slack for turning tight corners. Do not allow the chains to
drag on the ground.
Trailer Brakes
WARNING:Do not connect a trailer’s hydraulic brake system
directly to your vehicle’s brake system. Your vehicle may not have
enough braking power and your chances of having a collision greatly
increase.
Electric brakes and manual, automatic or surge-type trailer brakes are
safe if you install them properly and adjust them to the manufacturer’s
specifications. The trailer brakes must meet local and federal regulations.
The rating for the tow vehicle’s braking system operation is at
the gross vehicle weight rating, not the gross combined weight
rating.
Trailer Lamps
WARNING:Never connect any trailer lamp wiring to the
vehicle’s tail lamp wiring; this may damage the electrical system
resulting in a fire. Contact an authorized dealer as soon as possible for
assistance in proper trailer tow wiring installation. Additional electrical
equipment may be required.
Trailer lamps are required on most towed vehicles. Make sure all running
lights, brake lights, turn signals and hazard lights are working.
Before Towing a Trailer
Practice turning, stopping and backing up to get the feel of your
vehicle-trailer combination before starting on a trip. When turning, make
wider turns so the trailer wheels clear curbs and other obstacles.
Towing245
2014 Taurus
Owners Guide gf, 1st Printing, April 2013
USA(fus)
Page 335 of 550

Low tire
pressure
warning lightPossible cause Customer action required
Flashing
warning lightSpare tire in use Repair the damaged road wheel
and tire assembly and reinstall it on
the vehicle to restore system
function. For a description on how
the system functions, seeWhen
Your Temporary Spare Tire is
Installedin this section.
TPMS
malfunctionIf the tires are properly inflated
and the spare tire is not in use but
the light remains on, contact your
authorized dealer as soon as
possible.
When Inflating Your Tires
When putting air into your tires (such as at a gas station or in your
garage), the tire pressure monitoring system may not respond
immediately to the air added to your tires.
It may take up to two minutes of driving over 20 mph (32 km/h) for the
light to turn off after you have filled your tires to the recommended
inflation pressure.
How Temperature Affects Your Tire Pressure
The tire pressure monitoring system monitors tire pressure in each
pneumatic tire. While driving in a normal manner, a typical passenger
tire inflation pressure may increase about 2 to 4 psi (14 to 28 kPa) from
a cold start situation. If the vehicle is stationary overnight with the
outside temperature significantly lower than the daytime temperature,
the tire pressure may decrease approximately 3 psi (21 kPa) for a drop
of 30°F (17°C) in ambient temperature. This lower pressure value may
be detected by the tire pressure monitoring system as being significantly
lower than the recommended inflation pressure and activate the system
warning light for low tire pressure. If the low tire pressure warning light
is on, visually check each tire to verify that no tire is flat. If one or more
tires are flat, repair as necessary. Check the air pressure in the road
tires. If any tire is under-inflated, carefully drive the vehicle to the
nearest location where air can be added to the tires. Inflate all the tires
to the recommended inflation pressure.
334Wheels and Tires
2014 Taurus
Owners Guide gf, 1st Printing, April 2013
USA(fus)
Page 345 of 550

Preparation
Park the vehicle in a safe, level and secure area, away from moving
traffic. Turn the hazard lights on. Apply the parking brake and turn the
engine off. Inspect the flat tire for visible damage.
Sealant compound contains latex. To avoid any allergic reactions, use the
non-latex gloves located in the accessory box on the underside of the
temporary mobility kit housing.
Do not remove any foreign object that has pierced the tire. If a puncture
is located in the tire sidewall, stop and call roadside assistance.
1. Remove the valve cap from the tire valve.
2. Unwrap the clear tube from the compressor housing.
3. Remove the tube cap and fasten the metal connector of the tube to
the tire valve, turning clockwise. Make sure the connection is tightly
fastened.
4. Plug the power cable into the
12-volt power point in the vehicle.
5. Remove the warning sticker found on the canister and place it on the
top of the instrument panel or the center of the dash.
6.Note:Start the engine only if the vehicle is outdoors or in a
well-ventilated area.
344Wheels and Tires
2014 Taurus
Owners Guide gf, 1st Printing, April 2013
USA(fus)
Page 528 of 550

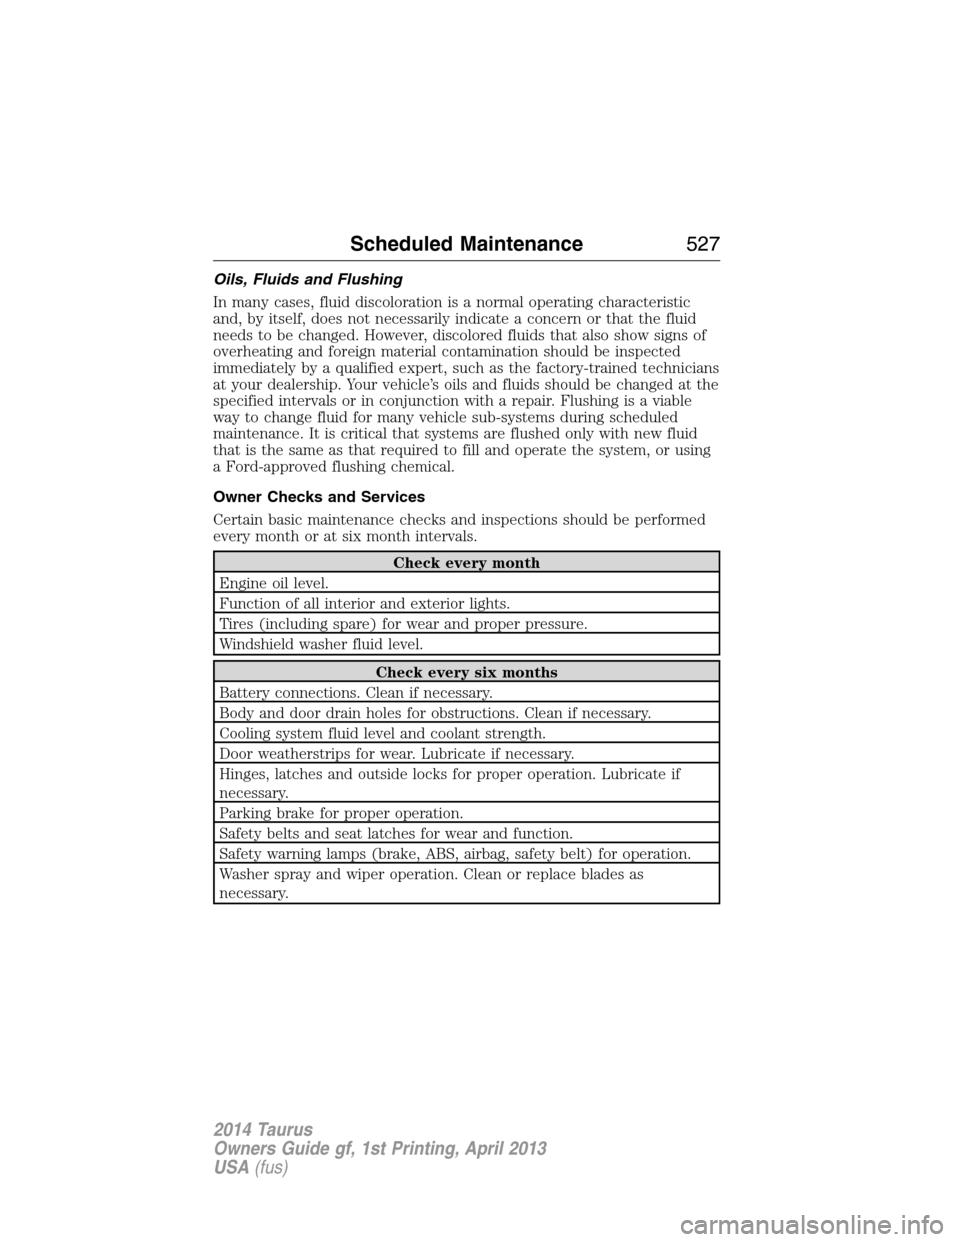
Oils, Fluids and Flushing
In many cases, fluid discoloration is a normal operating characteristic
and, by itself, does not necessarily indicate a concern or that the fluid
needs to be changed. However, discolored fluids that also show signs of
overheating and foreign material contamination should be inspected
immediately by a qualified expert, such as the factory-trained technicians
at your dealership. Your vehicle’s oils and fluids should be changed at the
specified intervals or in conjunction with a repair. Flushing is a viable
way to change fluid for many vehicle sub-systems during scheduled
maintenance. It is critical that systems are flushed only with new fluid
that is the same as that required to fill and operate the system, or using
a Ford-approved flushing chemical.
Owner Checks and Services
Certain basic maintenance checks and inspections should be performed
every month or at six month intervals.
Check every month
Engine oil level.
Function of all interior and exterior lights.
Tires (including spare) for wear and proper pressure.
Windshield washer fluid level.
Check every six months
Battery connections. Clean if necessary.
Body and door drain holes for obstructions. Clean if necessary.
Cooling system fluid level and coolant strength.
Door weatherstrips for wear. Lubricate if necessary.
Hinges, latches and outside locks for proper operation. Lubricate if
necessary.
Parking brake for proper operation.
Safety belts and seat latches for wear and function.
Safety warning lamps (brake, ABS, airbag, safety belt) for operation.
Washer spray and wiper operation. Clean or replace blades as
necessary.
Scheduled Maintenance527
2014 Taurus
Owners Guide gf, 1st Printing, April 2013
USA(fus)
Page 546 of 550

H
Hazard flashers .........................255
HD Radio™ ...............................442
Headlamps
aiming ......................................298
bulb specifications ..................304
flash to pass ..............................89
high beam ...........................89, 92
replacing bulbs .......................300
Head restraints .........................142
Heated steering wheel ..............491
Heating ..............130–131, 133, 135
Help ............................................490
Homelink wireless control
system ........................................155
Hood ..........................................277
How to use voice commands ...436
I
Ignition ...............................164, 350
Illuminated visor mirror ...100–101
Information displays .................110
Inspection/maintenance (I/M)
testing ........................................179
Instrument panel
cleaning ...................................309
cluster ......................................104
Intelligent Access Key ................57
J
Jack ............................................335
positioning ...............................335
storage .....................................335Joining two calls
(multiparty/conference call) ....390
Jump-starting your vehicle ......256
K
Keyless entry system
autolock .....................................70
keypad .......................................72
locking and unlocking doors ....74
programming entry code .........72
Keys .......................................57, 77
positions of the ignition .........164
L
Lamps
bulb replacement
specifications chart ................304
headlamps, flash to pass ..........89
interior lamps ...........................94
replacing bulbs .......................300
Lane keeping system ................221
LATCH anchors ...........................28
Lights, warning and indicator ..104
Listening to music ....................439
Load limits .................................235
Locks
autolock .....................................70
childproof ..................................32
doors ..........................................68
Lubricant specifications ...........352
Lug nuts ....................................349
M
Making and receiving calls .......462
Index545
2014 Taurus
Owners Guide gf, 1st Printing, April 2013
USA(fus)
Page 550 of 550

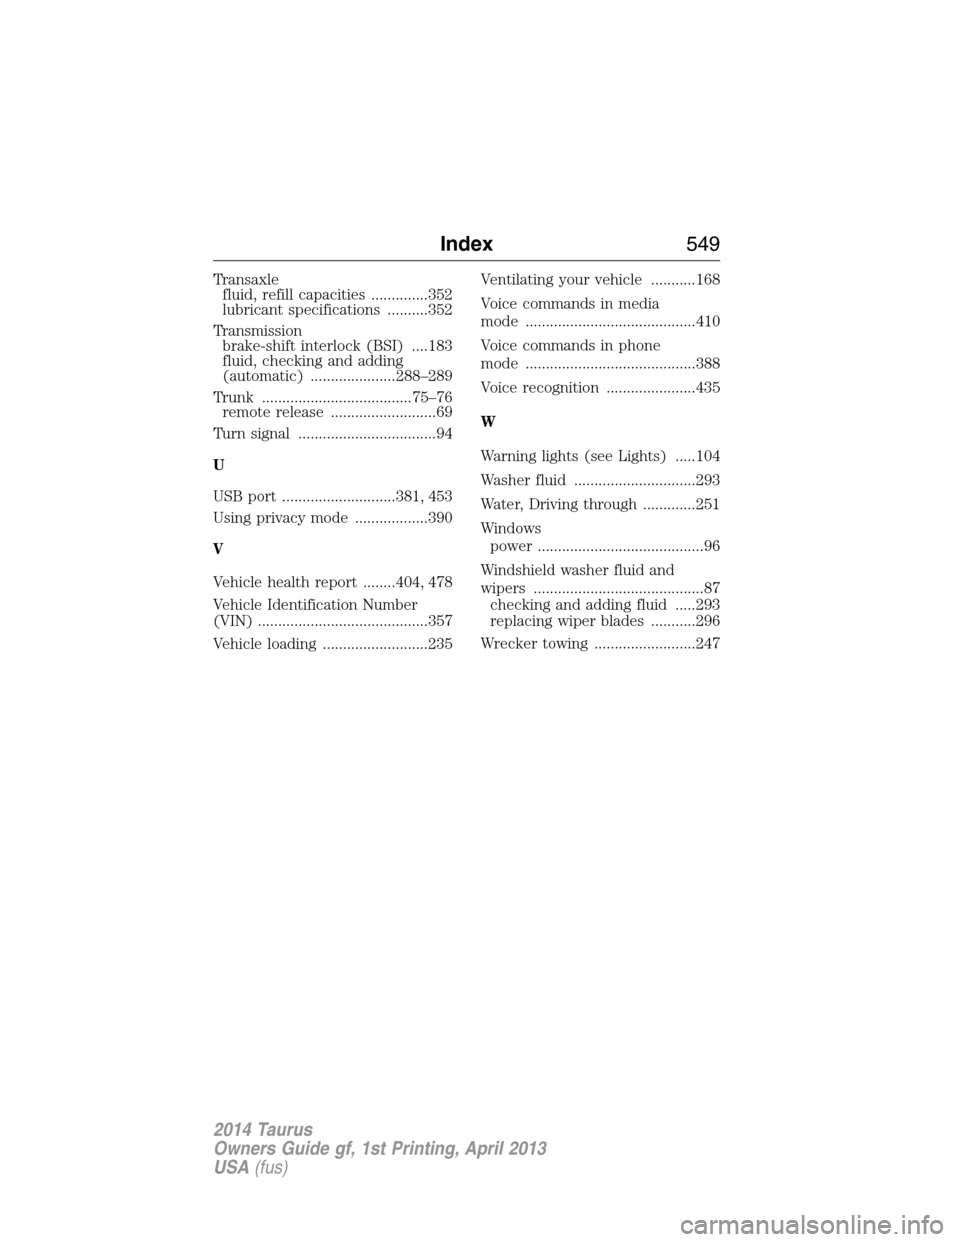
Transaxle
fluid, refill capacities ..............352
lubricant specifications ..........352
Transmission
brake-shift interlock (BSI) ....183
fluid, checking and adding
(automatic) .....................288–289
Trunk .....................................75–76
remote release ..........................69
Turn signal ..................................94
U
USB port ............................381, 453
Using privacy mode ..................390
V
Vehicle health report ........404, 478
Vehicle Identification Number
(VIN) ..........................................357
Vehicle loading ..........................235Ventilating your vehicle ...........168
Voice commands in media
mode ..........................................410
Voice commands in phone
mode ..........................................388
Voice recognition ......................435
W
Warning lights (see Lights) .....104
Washer fluid ..............................293
Water, Driving through .............251
Windows
power .........................................96
Windshield washer fluid and
wipers ..........................................87
checking and adding fluid .....293
replacing wiper blades ...........296
Wrecker towing .........................247
Index549
2014 Taurus
Owners Guide gf, 1st Printing, April 2013
USA(fus)