2014 FORD TAURUS checking
[x] Cancel search: checkingPage 290 of 550

6F50/6F55 Transmission
WARNING:The dipstick cap and surrounding components may
be hot; gloves are recommended.
WARNING:Use gloves when moving the air filter assembly;
components will be hot.
Note:Automatic transmission fluid expands when warmed. To obtain an
accurate fluid check, drive the vehicle until it is warmed up
(approximately 20 miles [30 km]). If your vehicle has been operated for
an extended period at high speeds, in city traffic during hot weather or
pulling a trailer, the vehicle should be turned off until normal operating
temperatures are reached to allow the fluid to cool before checking.
Depending on vehicle use, cooling times could take up to 30 minutes or
longer.
Refer to yourscheduled maintenance informationfor scheduled
intervals for fluid checks and changes. Your transmission does not
consume fluid. However, the fluid level should be checked if the
transmission is not working properly, i.e., if the transmission slips or
shifts slowly or if you notice some sign of fluid leakage.
1. Drive the vehicle 20 miles (30 km) or until it reaches normal operating
temperature.
2. Park the vehicle on a level surface and engage the parking brake.
3. With the parking brake engaged and your foot on the brake pedal,
start the engine and move the gearshift lever through all of the gear
ranges. Allow a minimum of 10 seconds for each gear to engage.
4. Latch the gearshift lever inP(Park) and leave the engine running.
5. Remove the dipstick, wiping it clean with a clean, dry lintfree rag. If
necessary, refer toUnder hood overviewin this chapter for the location
of the dipstick. (For vehicles with the EcoBoost engine, move the air
filter assembly aside to access the transmission dipstick. SeeMoving the
Air Filter Assembly (EcoBoost engine)for more information.
6. Install the dipstick making sure it is fully seated in the filler tube by
turning it to the locked position.
7. Remove the dipstick and inspect the fluid level. The fluid should be in
the designated areas for normal operating temperature.
Maintenance289
2014 Taurus
Owners Guide gf, 1st Printing, April 2013
USA(fus)
Page 297 of 550

CHECKING THE WIPER BLADES
Run the tip of your fingers over the edge of the blade
to check for roughness.
Clean the wiper blades with washer fluid or water
applied with a soft sponge or cloth.
CHANGING THE WIPER BLADES
1. Pull the wiper blade and arm away
from the glass.
2. Squeeze the locking tabs to release
the blade from the arm and pull the
blade away from the arm to remove it.
3. Attach the new blade to the arm
and snap it into place.
Replace wiper blades at least once per
year for optimum performance.
Poor wiper quality can be improved by
cleaning the wiper blades and the
windshield.
To prolong the life of the wiper
blades, it is highly recommended to
scrape off the ice on the windshield
before turning on the wipers. The layer of ice has many sharp edges and
can damage the micro edge of the wiper rubber element.
AIR FILTER CHECK
WARNING:To reduce the risk of vehicle damage and/or personal
burn injuries, do not start your engine with the air cleaner
removed and do not remove it while the engine is running.
When changing the air filter element, use only the air filter element
listed. Refer toMotorcraft® Part Numbersin theCapacities and
Specificationschapter.
296Maintenance
2014 Taurus
Owners Guide gf, 1st Printing, April 2013
USA(fus)
Page 324 of 550

Maximum Inflation Pressureis the tire manufacturer’s maximum
permissible pressure or the pressure at which the maximum load
can be carried by the tire. This pressure is normally higher than the
manufacturer’s recommended cold inflation pressure, which can be found
on the Safety Compliance Certification Label (affixed to either the door
hinge pillar, door-latch post, or the door edge that meets the door-latch
post, next to the driver’s seating position), or Tire Label which is located
on the B-Pillar or the edge of the driver’s door. The cold inflation
pressure should never be set lower than the recommended pressure on
the Safety Compliance Certification Label or Tire Label.
When weather temperature changes occur, tire inflation pressures also
change. A 10°F (6°C) temperature drop can cause a corresponding drop
of 1 psi (7 kPa) in inflation pressure. Check your tire pressures
frequently and adjust them to the proper pressure which can be found
on the Safety Compliance Certification Label or Tire Label.
To check the pressure in your tire(s):
1. Make sure the tires are cool, meaning they are not hot from driving
even a mile.
Note:If you are checking tire pressure when the tire is hot (for
example, driven more than 1 mile [1.6 kilometers]), never bleed or
reduce air pressure. The tires are hot from driving and it is normal for
pressures to increase above recommended cold pressures. A hot tire at
or below recommended cold inflation pressure could be significantly
under-inflated.
Note:If you have to drive a distance to get air for your tire(s), check
and record the tire pressure first and add the appropriate air pressure
when you get to the pump. It is normal for tires to heat up and the air
pressure inside to go up as you drive.
2. Remove the cap from the valve on one tire, then firmly press the tire
gauge onto the valve and measure the pressure.
3. Add enough air to reach the recommended air pressure.
Note:If you overfill the tire, release air by pressing on the metal stem in
the center of the valve. Then recheck the pressure with your tire gauge.
4. Replace the valve cap.
5. Repeat this procedure for each tire, including the spare.
Wheels and Tires323
2014 Taurus
Owners Guide gf, 1st Printing, April 2013
USA(fus)
Page 331 of 550

The tires on your vehicle may have all-weather treads to provide traction
in rain and snow. However, in some climates, you may need to use snow
tires and chains. If you need to use chains, it is recommended that steel
wheels (of the same size and specifications) be used, as chains may chip
aluminum wheels.
Follow these guidelines when using snow tires and chains:
•If possible, avoid fully loading your vehicle.
•Use only SAE Class S cables or equivalent on P235/60R17 or
P235/55R18 tires on the front tires only. SAE Class S chains or other
conventional link chains may cause damage to the vehicle’s wheel
house and/or body. Use of optional spike spider type traction devices
or equivalent is also acceptable.
•Do not install tire chains, cables or optional traction devices on the
rear tires. This could cause damage to the vehicle’s wheel house or
body.
•Do not use tire chains, cables or optional traction devices with
optional P255/45R19 or 245/45R20 tires.
•Install tire cables securely, verifying that the tire cables do not touch
any wiring, brake lines or fuel lines.
•Do not exceed 30 mph (48 km/h) with tire cables on your vehicle.
•Drive cautiously. If you hear the cables rub or bang against your
vehicle, stop and retighten the cables. If this does not work, remove
the cables to prevent damage to your vehicle.
•Remove the tire cables when they are no longer needed. Do not use
tire cables on dry roads.
TIRE PRESSURE MONITORING SYSTEM
WARNING:The tire pressure monitoring system is NOT a
substitute for manually checking tire pressure. The tire pressure
should be checked periodically (at least monthly) using a tire gauge.
SeeInflating Your Tiresin this chapter. Failure to properly maintain
your tire pressure could increase the risk of tire failure, loss of control,
vehicle rollover and personal injury.
330Wheels and Tires
2014 Taurus
Owners Guide gf, 1st Printing, April 2013
USA(fus)
Page 346 of 550

7. Push and turn dial (A)
counterclockwise to the sealant
position. Turn on the kit by pressing
the on button (B).
8. Inflate the tire to the pressure
listed on the Tire Label located on
the driver’s door or the door jamb
area.
Note:When the sealing compound is first added into the tire, the air
pressure gauge reading on the compressor unit may indicate a higher
value; this is normal and should be no reason for concern. The pressure
will drop after about 30 seconds of operation. The tire pressure has to be
checked with the compressor in the OFF position to get the correct tire
pressure reading.
9. When the recommended tire pressure is reached, turn off the kit by
pressing the on and off button, then disconnect the kit from the tire
valve and the power point. Re-install the valve cap on the tire valve,
place the tube cap on the metal connector, and return the kit to the
stowage area.
10.Note:Immediately and cautiously, drive the vehicle 4 miles
(6 kilometers) to distribute the sealant evenly inside the tire. Do not
exceed 50 mph (80 km/h).
Note:If you experience any unusual vibration, ride disturbance or
noise while driving, reduce your speed until you can safely pull off to
the side of the road to call for roadside assistance.Note:Do not
proceed to the second stage of this operation.
11. After 4 miles (6 kilometers), stop and check the tire pressure.
SeeSecond Stage: Checking Tire Pressure.
A
B
Wheels and Tires345
2014 Taurus
Owners Guide gf, 1st Printing, April 2013
USA(fus)
Page 347 of 550

Second Stage: Checking Tire Pressure
WARNING:The power plug may get hot after use and should be
handled carefully while unplugging.
Check the air pressure of your tires as follows:
1. Remove the valve cap from the tire valve.
2. Unhook the black hose from the side of the compressor and fasten
firmly on the valve stem by turning clockwise.
WARNING:If you are proceeding from theFirst stage:
Reinflating the tire with sealing compound and airsection
and have injected sealant in the tire and the pressure is below 20 psi
(1.4 bar), stop and call roadside assistance. If tire pressure is above
20 psi (1.4 bar), continue to the next step.
3. Turn the dial clockwise to the air position. Turn on the kit by pressing
the on/off button.
4. Adjust the tire to the
recommended inflation pressure
from the tire label located on the
driver’s door or door jamb area.
Pressing the deflation button near
the sealant canister removes air
from the tire.
Note:The tire pressure has to be
checked with the compressor in the
off position to get the correct tire
pressure reading.
5. Turn the compressor off by pressing the on/off button.
6. Unplug the hoses, re-install the valve cap on the tire and return the
kit to the stowage area.
PSI
BAR
346Wheels and Tires
2014 Taurus
Owners Guide gf, 1st Printing, April 2013
USA(fus)
Page 348 of 550
What to do after the Tire has been Sealed
After using the temporary mobility kit to seal your tire, replace the
sealant canister and clear tube (hose). Sealing compound and spare
parts can be obtained and replaced at an authorized Ford Motor
Company dealership or tire dealer. Empty sealant bottles may be
disposed of at home. However, liquid residue from the sealing compound
should be disposed by your local Ford Motor Company dealership or tire
dealer, or in accordance with local waste disposal regulations.
Note:After the sealing compound has been used, the maximum vehicle
speed is 50 mph (80 km/h) and the maximum driving distance is
120 miles (200 km). Inspect the sealed tire immediately.
Note:After sealant use, the TPMS sensor and valve stem on the wheel
must be replaced by an authorized Ford dealer.
You can check the tire pressure any time within the 120 miles (200 km)
by performing the procedure fromSecond stage: Checking tire
pressurelisted previously.
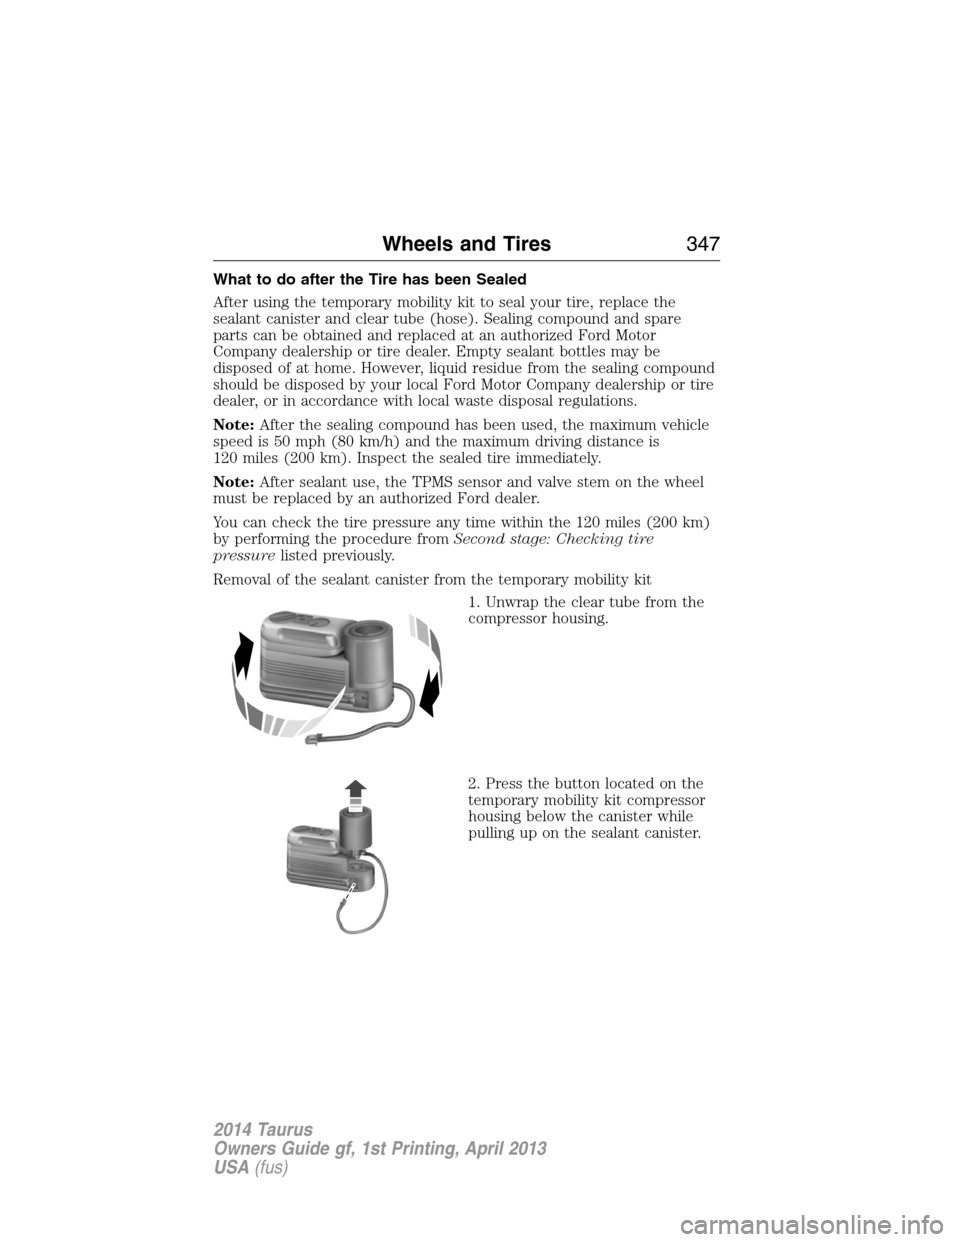
Removal of the sealant canister from the temporary mobility kit
1. Unwrap the clear tube from the
compressor housing.
2. Press the button located on the
temporary mobility kit compressor
housing below the canister while
pulling up on the sealant canister.
Wheels and Tires347
2014 Taurus
Owners Guide gf, 1st Printing, April 2013
USA(fus)
Page 356 of 550

Items CapacityFord part name or
equivalentFord part number / Ford
specification
A/C Refrigerant
Compressor Oil
8
2.0L GTDI &
3.5LTiVCT
5.2floz
(0.153 L)Motorcraft PAG
Refrigerant Compressor
OilYN-12–D
WSH-M1C231–B
1Use only Motorcraft DOT 4 LV High Performance Brake Fluid or equivalent meeting
WSS-M6C65-A2 and ISO 4925 Class 6. Use of any fluid other than the recommended fluid may
cause brake system damage.2Approximate dry fill capacity. Actual amount may vary during fluid changes.3Automatic transmissions that require MERCON LV should only use MERCON® LV fluid. Refer to
scheduled maintenance informationto determine the correct service interval. Use of any fluid
other than the recommended fluid may cause transmission damage.4See your authorized dealer for fluid level checking or filling.5Your engine has been designed to use Motorcraft engine oils or equivalent oils that meet Ford
specifications. It is also acceptable to use an engine oil of recommended viscosity grade that
meets API SN requirements and displays the API Certification Mark for gasoline engines.6Do not use supplemental engine oil additives in your engine. They are unnecessary and could
lead to engine damage that is not covered by Ford’s warranty.7Add the coolant type originally equipped in your vehicle.8Warning: The A/C refrigerant system contains refrigerant R134A under high pressure. Opening
the A/C refrigerant system can cause personal injury. A/C refrigerant system is to be serviced
only by qualified personnel.
Capacities and Specifications355
2014 Taurus
Owners Guide gf, 1st Printing, April 2013
USA(fus)