2014 FORD SUPER DUTY buttons
[x] Cancel search: buttonsPage 3 of 10

1
3
4
2
5
76
8
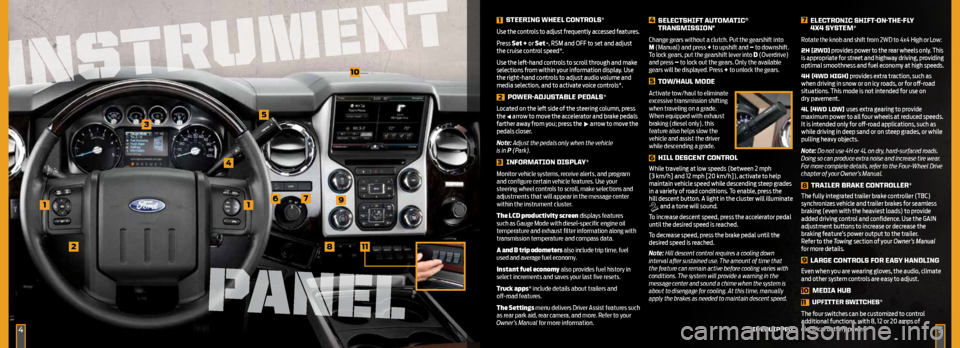
1 STeering WHeeL cOnTrOLS*
use the controls to adjust frequently accessed features.
p ress Set + or Set -, rsm and oFF to set and adjust
the cruise control speed*.
use the left-hand controls to scroll through and make
selections from within your information display. use
the right-hand controls to adjust audio volume and
media selection, and to activate voice controls*.
2
POWer -AdJuSTABLe Ped ALS*
l ocated on the left side of the steering column, press
the
arrow to move the accelerator and brake pedals
farther away from you; press the arrow to move the
pedals closer.
Note: Adjust the pedals only when the vehicle
is in P (Park).
3 infOrMATiOn diSPLAY*
Monitor vehicle systems, receive alerts, and program
and configure certain vehicle features. Use your
steering wheel controls to scroll, make selections and
adjustments that will appear in the message center
within the instrument cluster.
The LCD productivity screen displays features
such as Gauge Mode with diesel-specific engine oil
temperature and exhaust filter information along with
transmission temperature and compass data.
A and B trip odometers also include trip time, fuel
used and average fuel economy.
Instant fuel economy also provides fuel history in
select increments and saves your last five resets.
Truck apps* include details about trailers and
off-road features.
The Settings menu delivers Driver Assist features such
as rear park aid, rear camera, and more. Refer to your
Owner’s Manual for more information.
4 SeLecTSHifT A uTOMATic®
TrAnSMiSSiOn*
Change gears without a clutch. Put the gearshift into
M (Manual) and press + to upshift and – to downshift.
To lock gears, put the gearshift lever into D (Overdrive)
and press – to lock out the gears. Only the available
gears will be displayed. Press + to unlock the gears.
5 TOW/HA uL MOde
Activate tow/haul to eliminate
excessive transmission shifting
when traveling on a grade.
When equipped with exhaust
braking (diesel only), this
feature also helps slow the
vehicle and assist the driver
while descending a grade.
6 HiLL deScenT cOnTrOL
while traveling at low speeds (between 2 mph
[3 km/h] and 12 mph [20 km/h]), activate to help
maintain vehicle speed while descending steep grades
in a variety of road conditions. t
o enable, press the
hill descent button. a light in the cluster will illuminate
and a tone will sound.
t o increase descent speed, press the accelerator pedal
until the desired speed is reached.
t o decrease speed, press the brake pedal until the
desired speed is reached.
Note: Hill descent control requires a cooling down
interval after sustained use. The amount of time that
the feature can remain active before cooling varies with
conditions. The system will provide a warning in the
message center and sound a chime when the system is
about to disengage for cooling. At this time, manually
apply the brakes as needed to maintain descent speed.
7 eLecTrOnic SHifT-On-THe -fLY
4X4 SYSTeM*
Rotate the knob and shift from 2WD to 4x4 High or Low:
2H (2Wd ) provides power to the rear wheels only. t his
is appropriate for street and highway driving, providing
optimal smoothness and fuel economy at high speeds.
4H (4Wd HigH) provides extra traction, such as
when driving in snow or on icy roads, or for off-road
situations. t his mode is not intended for use on
dry pavement.
4L (4Wd LOW) uses extra gearing to provide
maximum power to all four wheels at reduced speeds.
It is intended only for off-road applications, such as
while driving in deep sand or on steep grades, or while
pulling heavy objects.
Note: Do not use 4H or 4L on dry, hard-surfaced roads.
Doing so can produce extra noise and increase tire wear.
For more complete details, refer to the Four-Wheel Drive
chapter of your Owner’s Manual.
8 TrAiLer BrAke cOnTrOLLer*
t he fully integrated trailer brake controller (tBC)
synchronizes vehicle and trailer brakes for seamless
braking (even with the heaviest loads) to provide
added driving control and confidence. use the G aIn
adjustment buttons to increase or decrease the
braking feature’s power output to the trailer.
r efer to the Towing section of your Owner’s Manual
for more details.
9 LArge cOnTrOLS fOr eASY HAndLing
even when you are wearing gloves, the audio, climate
and other system controls are easy to adjust.
10 MediA HuB
11 uPfiTTer SWiT
cHeS*
t he four switches can be customized to control
additional functions, with 8, 12 or 20 amps of
electrical battery power.
91
11
*if e QuiPPed45
10
INSTRUMENT
INSTRUMENT
PANEL
Page 5 of 10

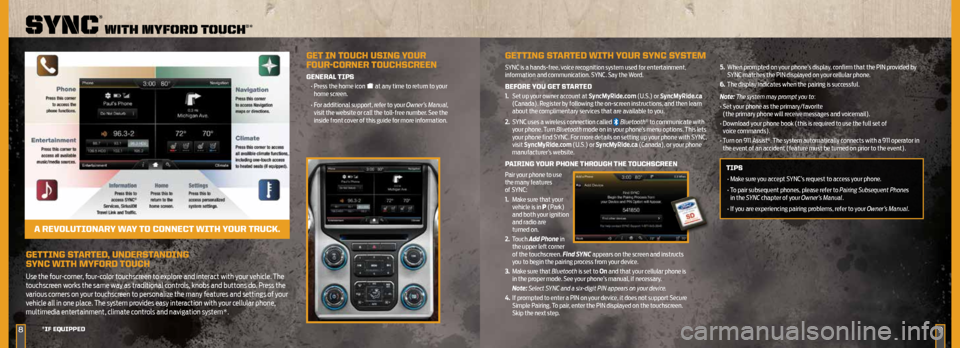
geTTing STArTed, underSTAnding
SYnc WiTH MYfOrd T OucH
Use the four-corner, four-color touchscreen to explore and interact with your vehicle. The
touchscreen works the same way as traditional controls, knobs and buttons do. Press the
various corners on your touchscreen to personalize the many features and settings of your
vehicle all in one place. The system provides easy interaction with your cellular phone,
multimedia entertainment, climate controls and navigation system*.
89
sync
®
wiTh myford Touch®*
*if eQuiPPed
geT in TOucH uSing YOur
fOur-cOrner TOucHScreen
generAL TiPS
• Press the home icon at any time to return to your
home screen.
• For additional support, refer to your Owner’s Manual,
visit the website or call the toll-free number. See the
inside front cover of this guide for more information.
A reVOL uTiOnAr Y WAY TO cOnnecT WiTH YOur Truck.
geTTing S TArTed WiTH Y Our SYnc S YSTeM
SYNC is a hands-free, voice recognition system used for entertainment,
information and communication. SYNC. Say the Word.
BefOre YOu geT STAr Ted
1. Set up your owner account at SyncMyRide.com (U.S.) or SyncMyRide.ca
(Canada). Register by following the on-screen instructions, and then learn
about the complimentary services that are available to you.
2. SYNC uses a wireless connection called
Bluetooth® to communicate with
your phone. Turn Bluetooth mode on in your phone’s menu options. This lets
your phone find SYNC. For more details on setting up your phone with SYNC,
visit SyncMyRide.com (U.S.) or SyncMyRide.ca (Canada), or your phone
manufacturer’s website.
P Airing YOur PHOne THrOugH THe TOucHScreen
Pair your phone to use
the many features
of SYNC:
1. Make sure that your
vehicle is in P (Park)
and both your ignition
and radio are
turned on.
2. Touch Add Phone in
the upper left corner
of the touchscreen. Find SYNC appears on the screen and instructs
you to begin the pairing process from your device.
3. Make sure that Bluetooth is set to On and that your cellular phone is
in the proper mode. See your phone’s manual, if necessary.
Note: Select SYNC and a six-digit PIN appears on your device.
4. If prompted to enter a PIN on your device, it does not support Secure
Simple Pairing. To pair, enter the PIN displayed on the touchscreen.
Skip the next step. 5.
When prompted on your phone’s display, confirm that the PIN provided by
SYNC matches the PIN displayed on your cellular phone.
6. The display indicates when the pairing is successful.
Note: The system may prompt you to:
• Set your phone as the primary/favorite
(the primary phone will receive messages and voicemail).
• Download your phone book (this is required to use the full set of
voice commands).
• Turn on 911 Assist
®. The system automatically connects with a 911 operator in
the event of an accident (feature must be turned on prior to the event).
TiPS
• Make sure you accept SYNC’s request to access your phone.
• To pair subsequent phones, please refer to Pairing Subsequent Phones
in the SYNC chapter of your Owner’s Manual.
• If you are experiencing pairing problems, refer to your Owner’s Manual.
Page 7 of 10

13
enTerTAinMenT
No matter how you store your music, SYNC makes it
yours to enjoy when you’re behind the wheel. Just press
the lower-left, red corner of the touchscreen. From here,
you can easily go between AM/FM, Sirius, and other
media sources.
SeT YOur rAdiO PreSeTS
• Touch the Entertainment corner on
the touchscreen.
• Touch FM.
• Touch Direct Tune.
• Enter the desired station and touch Enter.
• Touch Presets and then touch and hold one of the
memory preset buttons to save it. You will hear a
brief mute and the sound will return when the station
is saved.
Bring in YOur OWn MuSic
Plug in your USB media devices, such as phones and MP3 players, and use SYNC to play all of your
favorite music through a variety of devices, including:
• USB
• Bluetooth
® Streaming: Connect, disconnect, add or delete, even set a device as your favorite so that
the system automatically attempts to connect to that device at every ignition cycle.
• SD Card
• A/V In
Refer to your Owner’s Manual, visit the website or call the toll-free number. See the inside front cover of
this guide for more information.
uSing SYnc TO AcceSS digiTAL MediA
In vehicles equipped with MyFord Touch, the media hub is located in the center console (as shown
below).
Plug in your USB media devices such as phones and MP3 players and use SYNC to play all of
your favorite music.
uSing V Oice cOMMAndS TO PLAY MuSic
1. Plug your media player into your USB outlet.
2. Press the voice button
. When prompted, say “USB” , then follow-up by saying a voice command.
MediA HuB
12
sync
®
wiTh myford Touch®*
*if eQuiPPed
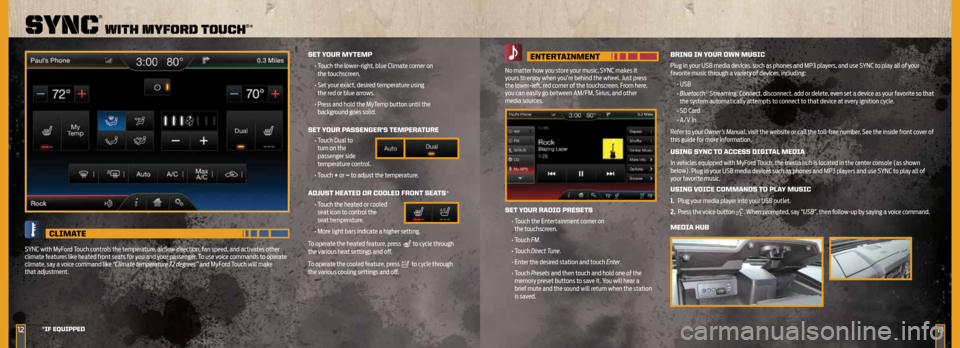
SeT YOur MYTeMP
• Touch the lower-right, blue Climate corner on
the touchscreen.
• Set your exact, desired temperature using
the red or blue arrows.
• Press and hold the MyTemp button until the
background goes solid.
SeT YOur P ASSenger’S TeMPerATure
• Touch Dual to
turn on the
passenger side
temperature control.
• Touch + or – to adjust the temperature.
AdJuST HeATed Or cOOLed frOnT SeATS*
• Touch the heated or cooled
seat icon to control the
seat temperature.
• More light bars indicate a higher setting.
To operate the heated feature, press
to cycle through
the various heat settings and off.
To operate the cooled feature, press
to cycle through
the various cooling settings and off.
cLiMATe
SYNC with MyFord Touch controls the temperature, airflow direction, fan speed, and activates other
climate features like heated front seats for you and your passenger. To use voice commands to operate
climate, say a voice command like “Climate temperature 72 degrees” and MyFord Touch will make
that adjustment.