2014 FORD SUPER DUTY brake light
[x] Cancel search: brake lightPage 11 of 458
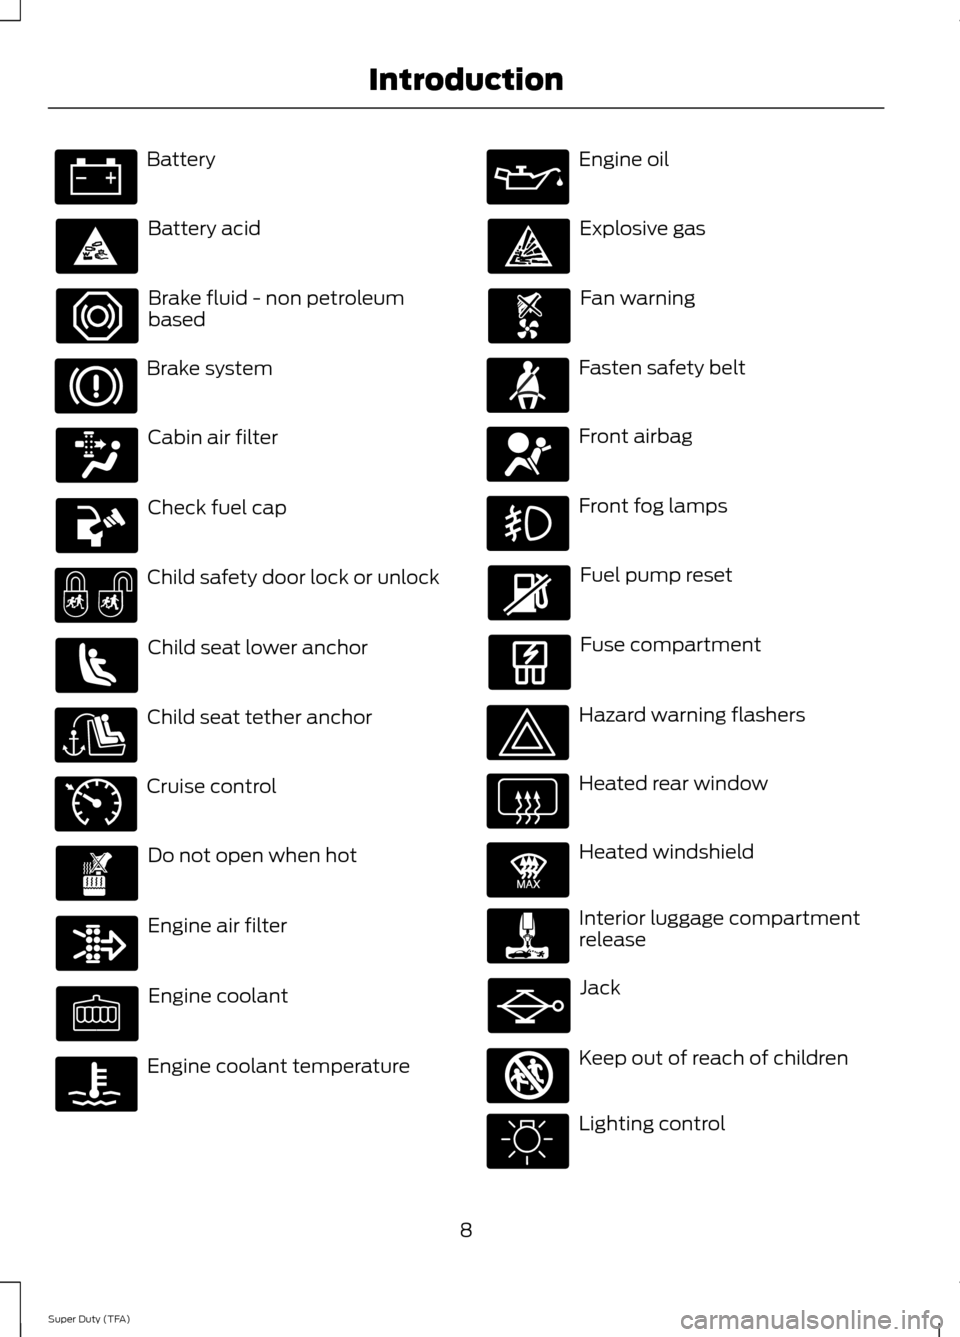
Battery
Battery acid
Brake fluid - non petroleum
based
Brake system
Cabin air filter
Check fuel cap
Child safety door lock or unlock
Child seat lower anchor
Child seat tether anchor
Cruise control
Do not open when hot
Engine air filter
Engine coolant
Engine coolant temperature Engine oil
Explosive gas
Fan warning
Fasten safety belt
Front airbag
Front fog lamps
Fuel pump reset
Fuse compartment
Hazard warning flashers
Heated rear window
Heated windshield
Interior luggage compartment
release
Jack
Keep out of reach of children
Lighting control
8
Super Duty (TFA) Introduction E71340 E91392 E161353
Page 33 of 458
All safety restraints in the vehicle are
combination lap and shoulder belts. The
driver safety belt has the first type of
locking mode. The front outboard
passenger and rear outboard seat safety
belts have both types of locking modes
described as follows:
Vehicle Sensitive Mode
This is the normal retractor mode, which
allows free shoulder belt length
adjustment to your movements and
locking in response to vehicle movement.
For example, if the driver brakes suddenly
or turns a corner sharply, or the vehicle
receives an impact of approximately 5 mph
(8 km/h) or more, the combination safety
belts will lock to help reduce forward
movement of the driver and passengers.
In addition, the retractor is designed to lock
if the webbing is pulled out too quickly. If
this occurs, let the belt retract slightly and
pull webbing out again in a slow and
controlled manner.
Automatic Locking Mode
In this mode, the shoulder belt is
automatically pre-locked. The belt will still
retract to remove any slack in the shoulder
belt. The automatic locking mode is not
available on the driver safety belt.
When to Use the Automatic Locking
Mode
Use this mode any time a child safety seat,
except a booster, is installed in passenger
front or rear seating positions. You should
properly restrain children 12 years old and
under in a rear seating position whenever
possible. See Child Safety (page 14).
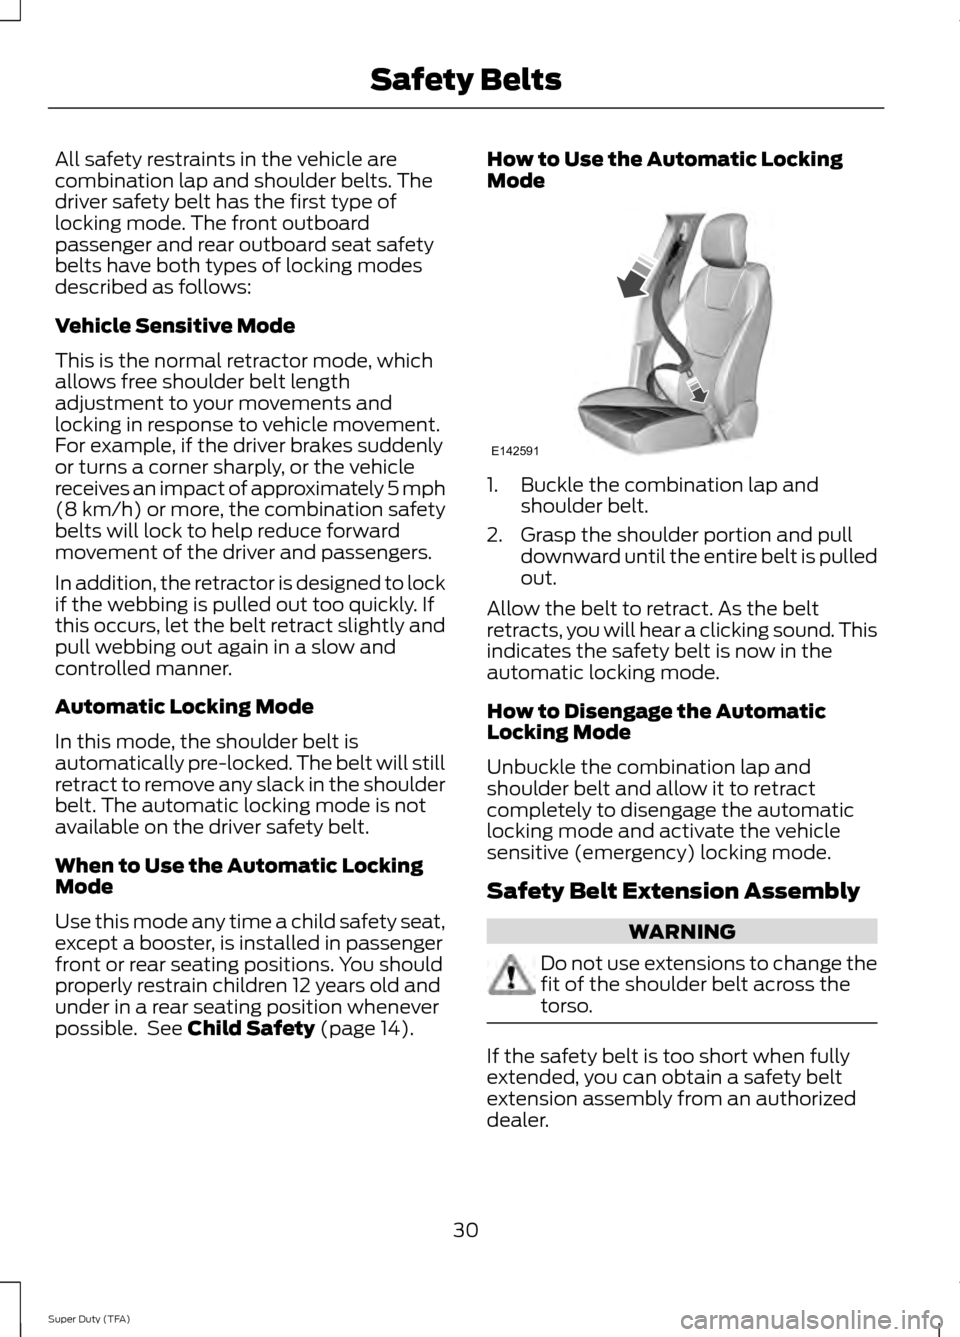
How to Use the Automatic Locking
Mode
1. Buckle the combination lap and
shoulder belt.
2. Grasp the shoulder portion and pull downward until the entire belt is pulled
out.
Allow the belt to retract. As the belt
retracts, you will hear a clicking sound. This
indicates the safety belt is now in the
automatic locking mode.
How to Disengage the Automatic
Locking Mode
Unbuckle the combination lap and
shoulder belt and allow it to retract
completely to disengage the automatic
locking mode and activate the vehicle
sensitive (emergency) locking mode.
Safety Belt Extension Assembly WARNING
Do not use extensions to change the
fit of the shoulder belt across the
torso.
If the safety belt is too short when fully
extended, you can obtain a safety belt
extension assembly from an authorized
dealer.
30
Super Duty (TFA) Safety BeltsE142591
Page 36 of 458
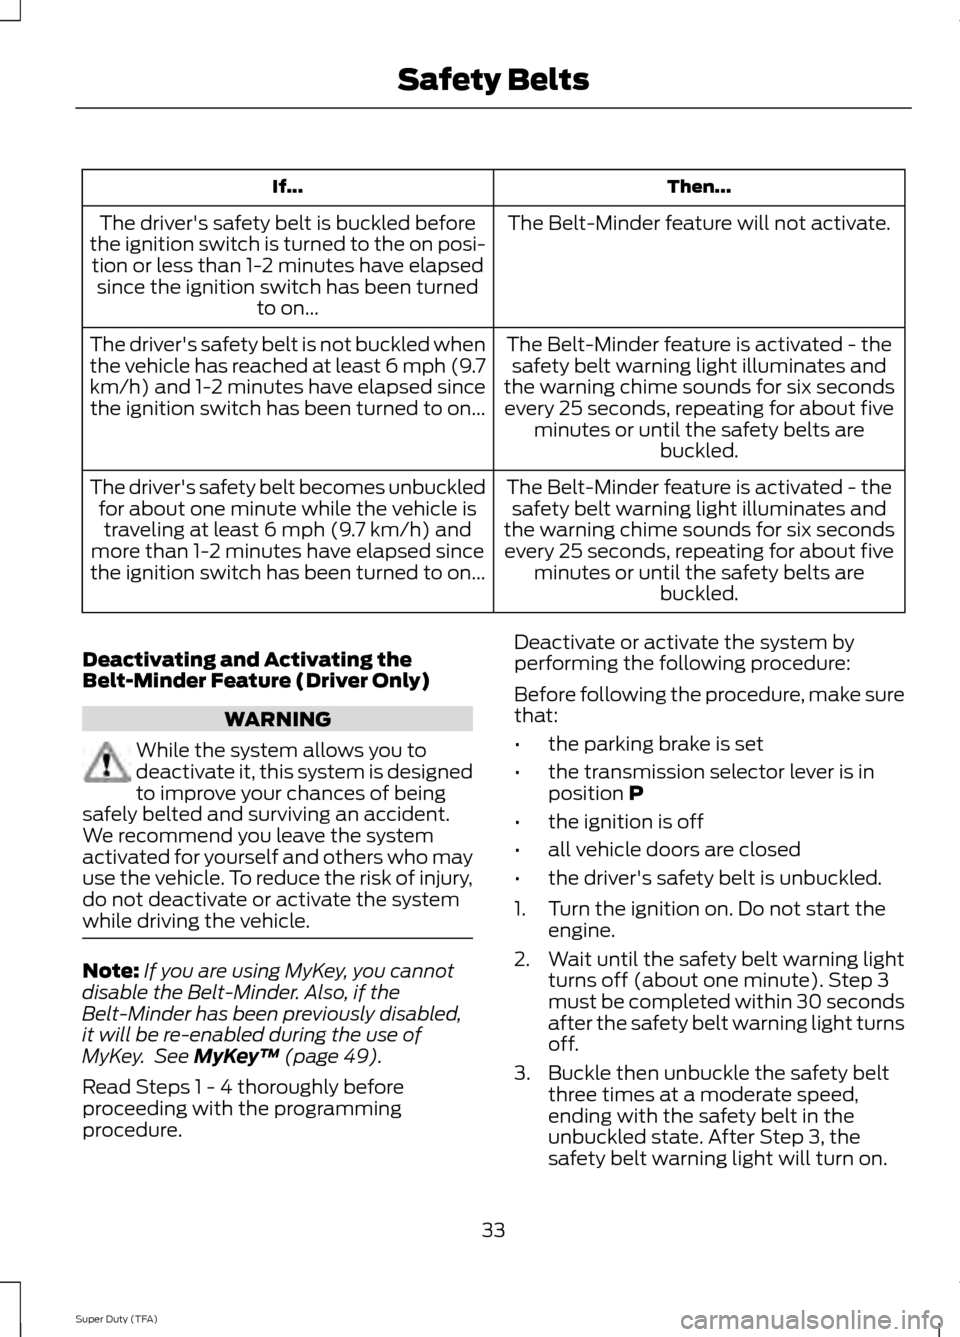
Then...
If...
The Belt-Minder feature will not activate.
The driver's safety belt is buckled before
the ignition switch is turned to the on posi- tion or less than 1-2 minutes have elapsed since the ignition switch has been turned to on...
The Belt-Minder feature is activated - thesafety belt warning light illuminates and
the warning chime sounds for six seconds every 25 seconds, repeating for about five minutes or until the safety belts are buckled.
The driver's safety belt is not buckled when
the vehicle has reached at least 6 mph (9.7
km/h) and 1-2 minutes have elapsed since
the ignition switch has been turned to on...
The Belt-Minder feature is activated - thesafety belt warning light illuminates and
the warning chime sounds for six seconds every 25 seconds, repeating for about five minutes or until the safety belts are buckled.
The driver's safety belt becomes unbuckled
for about one minute while the vehicle istraveling at least 6 mph (9.7 km/h) and
more than 1-2 minutes have elapsed since
the ignition switch has been turned to on...
Deactivating and Activating the
Belt-Minder Feature (Driver Only) WARNING
While the system allows you to
deactivate it, this system is designed
to improve your chances of being
safely belted and surviving an accident.
We recommend you leave the system
activated for yourself and others who may
use the vehicle. To reduce the risk of injury,
do not deactivate or activate the system
while driving the vehicle. Note:
If you are using MyKey, you cannot
disable the Belt-Minder. Also, if the
Belt-Minder has been previously disabled,
it will be re-enabled during the use of
MyKey. See MyKey ™ (page 49).
Read Steps 1 - 4 thoroughly before
proceeding with the programming
procedure. Deactivate or activate the system by
performing the following procedure:
Before following the procedure, make sure
that:
•
the parking brake is set
• the transmission selector lever is in
position
P
• the ignition is off
• all vehicle doors are closed
• the driver's safety belt is unbuckled.
1. Turn the ignition on. Do not start the engine.
2. Wait until the safety belt warning light turns off (about one minute). Step 3
must be completed within 30 seconds
after the safety belt warning light turns
off.
3. Buckle then unbuckle the safety belt three times at a moderate speed,
ending with the safety belt in the
unbuckled state. After Step 3, the
safety belt warning light will turn on.
33
Super Duty (TFA) Safety Belts
Page 69 of 458
The system switches the headlamps on
with a reduced output in daylight
conditions.
To switch the system on:
1. Switch the ignition on.
2. Switch the lighting control to the off,
or parking lamp position.
3. Disengage the parking brake.
4. Make sure the transmission selector lever is not in position P.
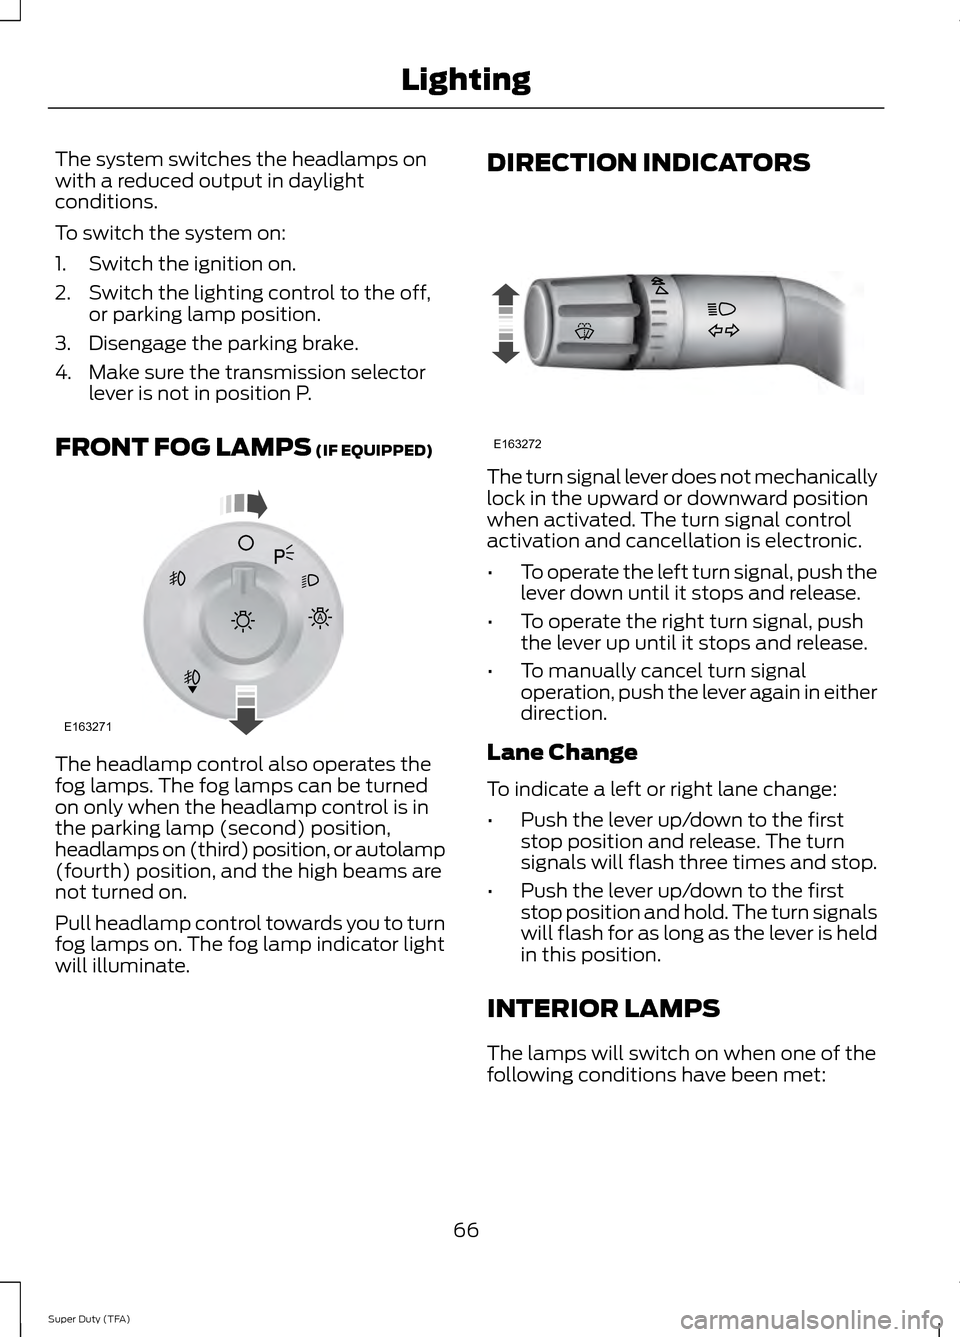
FRONT FOG LAMPS (IF EQUIPPED) The headlamp control also operates the
fog lamps. The fog lamps can be turned
on only when the headlamp control is in
the parking lamp (second) position,
headlamps on (third) position, or autolamp
(fourth) position, and the high beams are
not turned on.
Pull headlamp control towards you to turn
fog lamps on. The fog lamp indicator light
will illuminate. DIRECTION INDICATORS
The turn signal lever does not mechanically
lock in the upward or downward position
when activated. The turn signal control
activation and cancellation is electronic.
•
To operate the left turn signal, push the
lever down until it stops and release.
• To operate the right turn signal, push
the lever up until it stops and release.
• To manually cancel turn signal
operation, push the lever again in either
direction.
Lane Change
To indicate a left or right lane change:
• Push the lever up/down to the first
stop position and release. The turn
signals will flash three times and stop.
• Push the lever up/down to the first
stop position and hold. The turn signals
will flash for as long as the lever is held
in this position.
INTERIOR LAMPS
The lamps will switch on when one of the
following conditions have been met:
66
Super Duty (TFA) LightingE163271
A E163272
Page 79 of 458

Anti-Lock Braking System
If it illuminates when you are
driving, this indicates a
malfunction. You will continue
to have the normal braking system
(without ABS) unless the brake system
warning lamp is also illuminated. Have the
system checked by your authorized dealer.
Battery If it illuminates while driving, it
indicates a malfunction. Switch
off all unnecessary electrical
equipment and have the system checked
by your authorized dealer immediately.
Brake System Illuminates when you engage the
parking brake with the ignition
on.
If it illuminates when you are driving, check
that the parking brake is not engaged. If
the parking brake is not engaged, this
indicates low brake fluid level or a brake
system malfunction. Have the system
checked immediately by your authorized
dealer. WARNING
Driving your vehicle with the warning
lamp on is dangerous. A significant
decrease in braking performance
may occur. It will take you longer to stop
your vehicle. Have your vehicle checked by
your authorized dealer immediately. Driving
extended distances with the parking brake
engaged can cause brake failure and the
risk of personal injury. Check Fuel Cap (If Equipped)
Illuminates when the fuel cap
may not be properly installed.
Continued driving with this light
on may cause the Service engine
soon warning indicator to come on.
Cruise Control
(If Equipped) Illuminates when you switch this
feature on. See
Using Cruise
Control (page 172).
Direction Indicator Illuminates when the left or right
turn signal or the hazard warning
flasher is turned on. If the
indicators stay on or flash faster, check for
a burned out bulb.
Door Ajar Displays when the ignition is on
and any door is not completely
closed.
Electronic Locking Differential Illuminates when using the
electronic locking differential.
Engine Coolant Temperature Illuminates when the engine
coolant temperature is high.
Stop the vehicle as soon as
possible, switch off the engine and let cool.
76
Super Duty (TFA) Instrument Cluster E144522 E71340 E163170
Page 85 of 458
EXHAUST FILTER
For more information, refer to the Diesel
supplement.
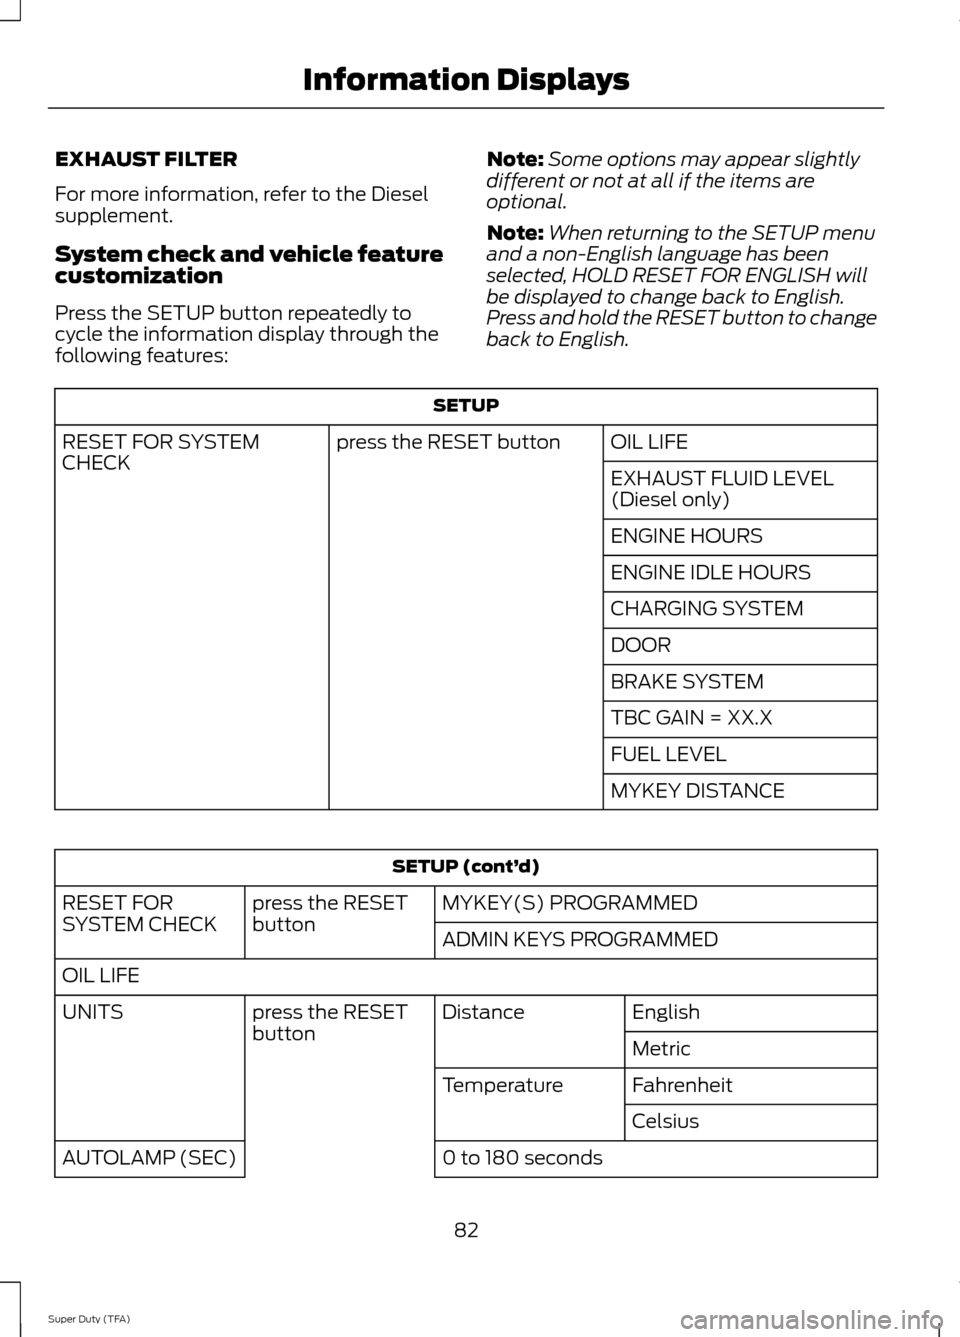
System check and vehicle feature
customization
Press the SETUP button repeatedly to
cycle the information display through the
following features:
Note:
Some options may appear slightly
different or not at all if the items are
optional.
Note: When returning to the SETUP menu
and a non-English language has been
selected, HOLD RESET FOR ENGLISH will
be displayed to change back to English.
Press and hold the RESET button to change
back to English. SETUP
OIL LIFE
press the RESET button
RESET FOR SYSTEM
CHECK
EXHAUST FLUID LEVEL
(Diesel only)
ENGINE HOURS
ENGINE IDLE HOURS
CHARGING SYSTEM
DOOR
BRAKE SYSTEM
TBC GAIN = XX.X
FUEL LEVEL
MYKEY DISTANCESETUP (cont’
d)
MYKEY(S) PROGRAMMED
press the RESET
button
RESET FOR
SYSTEM CHECK
ADMIN KEYS PROGRAMMED
OIL LIFE English
Distance
press the RESET
button
UNITS
Metric
Fahrenheit
Temperature
Celsius
0 to 180 seconds
AUTOLAMP (SEC)
82
Super Duty (TFA) Information Displays
Page 87 of 458
AUTOUNLOCK
This feature automatically unlocks all
vehicle doors when the driver
’s door is
opened within 10 minutes of the ignition
being turned off.
COURTESY WIPE
This feature allows for an extra swipe of
the wipers after a wipe/wash cycle.
CREATE MYKEY / MYKEY SETUP /
CLEAR MYKEY
For more information, See Creating a
MyKey (page 49).
RESET FOR REMOTE START (if
equipped)
REAR PARK AID
This feature sounds a warning tone to warn
the driver of obstacles near the rear
bumper, and functions only when R
(Reverse) gear is selected.
TBC MODE (if equipped)
Allows you to choose the trailer brake
mode.
TRAILER SWAY (if equipped)
This feature uses the electronic stability
control to mitigate trailer sway.
LANGUAGE = ENGLISH / SPANISH /
FRENCH
Allows you to choose which language the
message center will display in.
Waiting four seconds or pressing the
RESET button cycles the message center
through each of the language choices.
Press the RESET button to set the
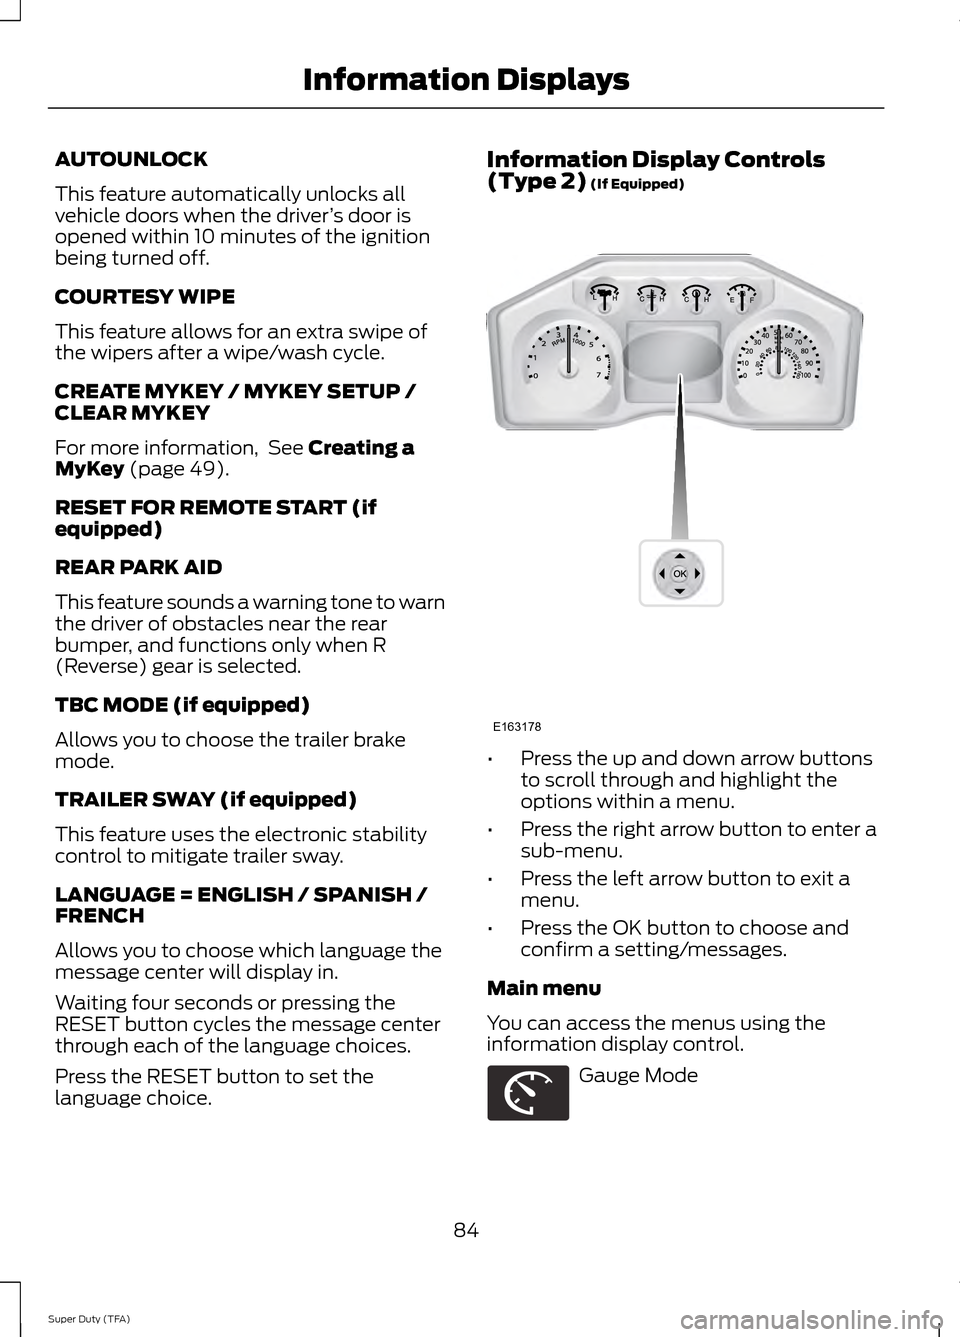
language choice. Information Display Controls
(Type 2)
(If Equipped)
•
Press the up and down arrow buttons
to scroll through and highlight the
options within a menu.
• Press the right arrow button to enter a
sub-menu.
• Press the left arrow button to exit a
menu.
• Press the OK button to choose and
confirm a setting/messages.
Main menu
You can access the menus using the
information display control. Gauge Mode
84
Super Duty (TFA) Information DisplaysE163178 E163179
Page 91 of 458
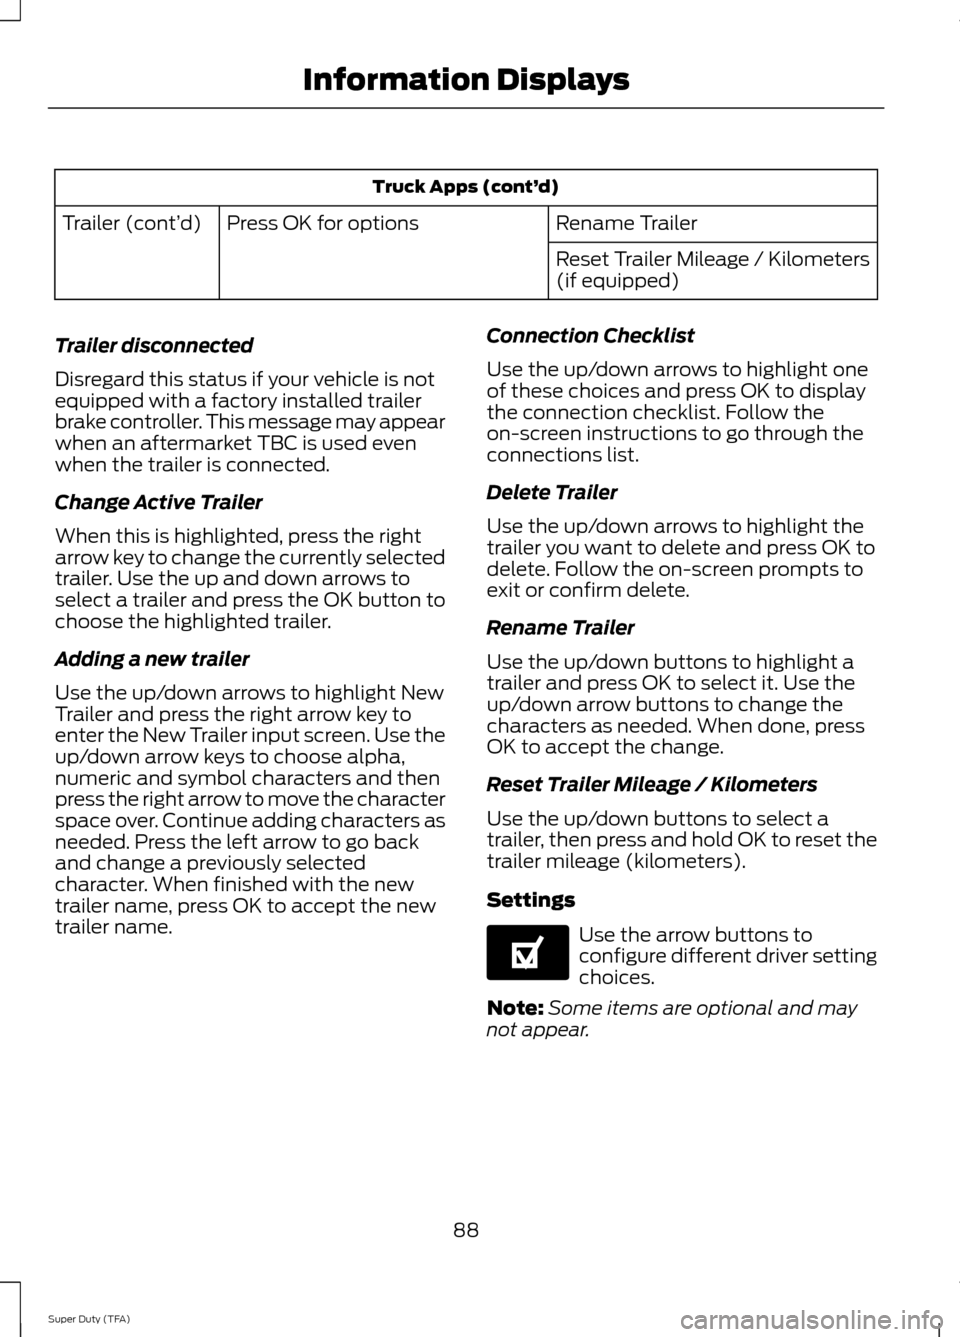
Truck Apps (cont’
d)
Rename Trailer
Press OK for options
Trailer (cont’ d)
Reset Trailer Mileage / Kilometers
(if equipped)
Trailer disconnected
Disregard this status if your vehicle is not
equipped with a factory installed trailer
brake controller. This message may appear
when an aftermarket TBC is used even
when the trailer is connected.
Change Active Trailer
When this is highlighted, press the right
arrow key to change the currently selected
trailer. Use the up and down arrows to
select a trailer and press the OK button to
choose the highlighted trailer.
Adding a new trailer
Use the up/down arrows to highlight New
Trailer and press the right arrow key to
enter the New Trailer input screen. Use the
up/down arrow keys to choose alpha,
numeric and symbol characters and then
press the right arrow to move the character
space over. Continue adding characters as
needed. Press the left arrow to go back
and change a previously selected
character. When finished with the new
trailer name, press OK to accept the new
trailer name. Connection Checklist
Use the up/down arrows to highlight one
of these choices and press OK to display
the connection checklist. Follow the
on-screen instructions to go through the
connections list.
Delete Trailer
Use the up/down arrows to highlight the
trailer you want to delete and press OK to
delete. Follow the on-screen prompts to
exit or confirm delete.
Rename Trailer
Use the up/down buttons to highlight a
trailer and press OK to select it. Use the
up/down arrow buttons to change the
characters as needed. When done, press
OK to accept the change.
Reset Trailer Mileage / Kilometers
Use the up/down buttons to select a
trailer, then press and hold OK to reset the
trailer mileage (kilometers).
Settings
Use the arrow buttons to
configure different driver setting
choices.
Note: Some items are optional and may
not appear.
88
Super Duty (TFA) Information DisplaysE144641