2014 FORD MUSTANG lights
[x] Cancel search: lightsPage 150 of 461
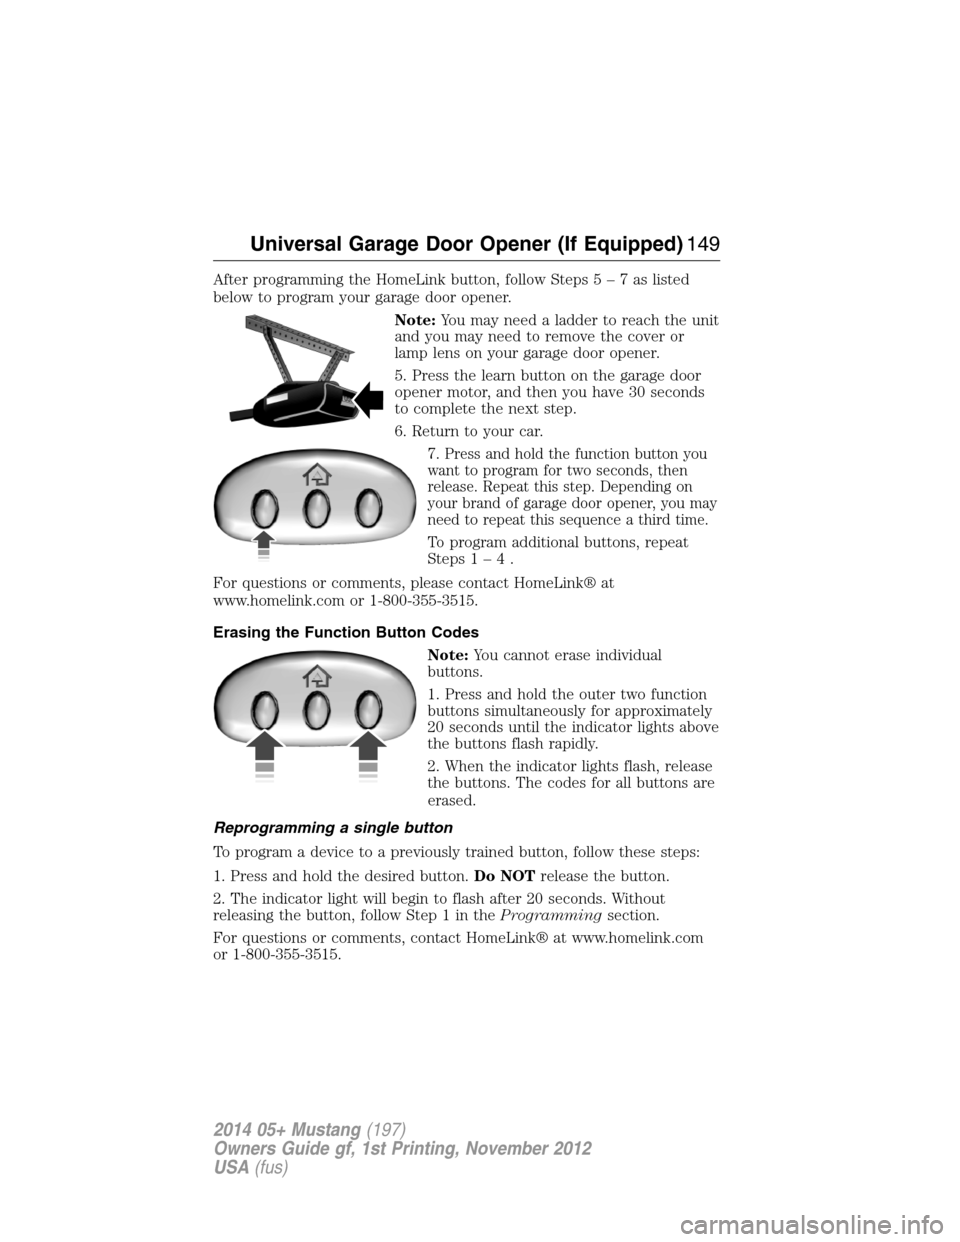
After programming the HomeLink button, follow Steps5–7aslisted
below to program your garage door opener.
Note:You may need a ladder to reach the unit
and you may need to remove the cover or
lamp lens on your garage door opener.
5. Press the learn button on the garage door
opener motor, and then you have 30 seconds
to complete the next step.
6. Return to your car.
7.
Press and hold the function button you
want to program for two seconds, then
release. Repeat this step. Depending on
your brand of garage door opener, you may
need to repeat this sequence a third time.
To program additional buttons, repeat
Steps1–4.
For questions or comments, please contact HomeLink® at
www.homelink.com or 1-800-355-3515.
Erasing the Function Button Codes
Note:You cannot erase individual
buttons.
1. Press and hold the outer two function
buttons simultaneously for approximately
20 seconds until the indicator lights above
the buttons flash rapidly.
2. When the indicator lights flash, release
the buttons. The codes for all buttons are
erased.
Reprogramming a single button
To program a device to a previously trained button, follow these steps:
1. Press and hold the desired button.Do NOTrelease the button.
2. The indicator light will begin to flash after 20 seconds. Without
releasing the button, follow Step 1 in theProgrammingsection.
For questions or comments, contact HomeLink® at www.homelink.com
or 1-800-355-3515.
Universal Garage Door Opener (If Equipped)149
2014 05+ Mustang(197)
Owners Guide gf, 1st Printing, November 2012
USA(fus)
Page 152 of 461
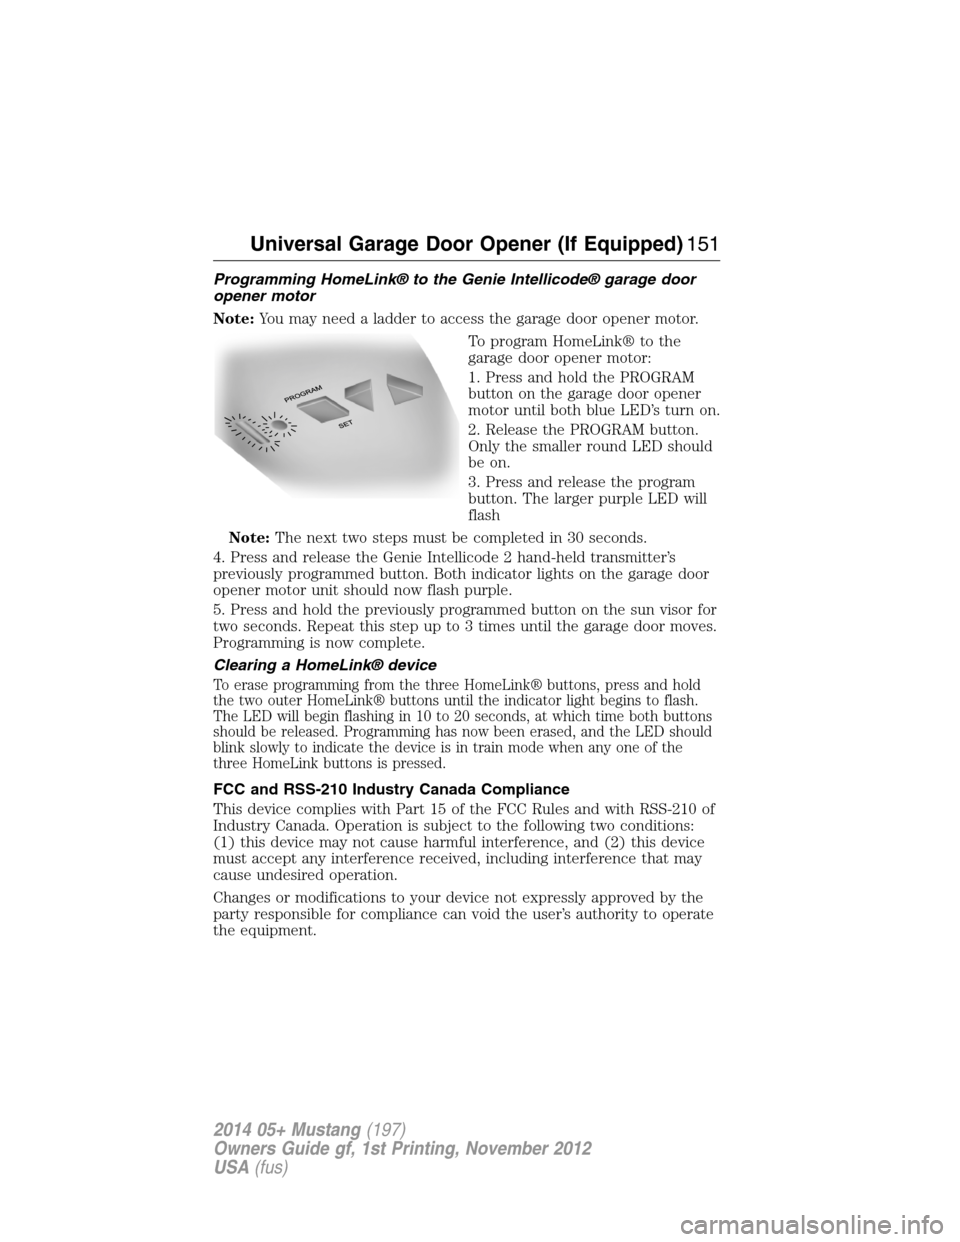
Programming HomeLink® to the Genie Intellicode® garage door
opener motor
Note:You may need a ladder to access the garage door opener motor.
To program HomeLink® to the
garage door opener motor:
1. Press and hold the PROGRAM
button on the garage door opener
motor until both blue LED’s turn on.
2. Release the PROGRAM button.
Only the smaller round LED should
be on.
3. Press and release the program
button. The larger purple LED will
flash
Note:The next two steps must be completed in 30 seconds.
4. Press and release the Genie Intellicode 2 hand-held transmitter’s
previously programmed button. Both indicator lights on the garage door
opener motor unit should now flash purple.
5. Press and hold the previously programmed button on the sun visor for
two seconds. Repeat this step up to 3 times until the garage door moves.
Programming is now complete.
Clearing a HomeLink® device
To erase programming from the three HomeLink® buttons, press and hold
the two outer HomeLink® buttons until the indicator light begins to flash.
The LED will begin flashing in 10 to 20 seconds, at which time both buttons
should be released. Programming has now been erased, and the LED should
blink slowly to indicate the device is in train mode when any one of the
three HomeLink buttons is pressed.
FCC and RSS-210 Industry Canada Compliance
This device complies with Part 15 of the FCC Rules and with RSS-210 of
Industry Canada. Operation is subject to the following two conditions:
(1) this device may not cause harmful interference, and (2) this device
must accept any interference received, including interference that may
cause undesired operation.
Changes or modifications to your device not expressly approved by the
party responsible for compliance can void the user’s authority to operate
the equipment.
Universal Garage Door Opener (If Equipped)151
2014 05+ Mustang(197)
Owners Guide gf, 1st Printing, November 2012
USA(fus)
Page 156 of 461

IGNITION SWITCH
A.Off:The ignition is off.
Note:When you switch the ignition off and leave your vehicle, do not
leave your key in the ignition. This could cause your vehicle battery to
lose charge.
B.Accessory:Allows the electrical accessories such as the radio to
operate while the engine is not running.
Note:Do not leave the ignition key in this position for too long.
This could cause your vehicle battery to lose charge.
C.On:All electrical circuits are operational and the warning lamps and
indicators illuminate.
D.Start:Cranks the engine.
STARTING A GASOLINE ENGINE
When you start the engine, the idle speed increases, this helps to warm
up the engine. If the engine idle speed does not slow down automatically,
have your vehicle checked by an authorized dealer.
Before starting the engine:
•Make sure all occupants have fastened their safety belts.
•Make sure the headlamps and electrical accessories are off.
•Make sure the parking brake is on.
•Move the transmission selector lever to positionP(automatic
transmission) or neutral (manual transmission).
•Turn the ignition key to the on position.
Some warning lights briefly illuminate.
C
D
B
A
Starting and Stopping the Engine155
2014 05+ Mustang(197)
Owners Guide gf, 1st Printing, November 2012
USA(fus)
Page 178 of 461

This feature makes it easier to pull away when the vehicle is on a slope
without the need to use the parking brake. When this feature is active, the
vehicle will remain stationary on the slope for two to three seconds after
you release the brake pedal. This allows you time to move your foot from
the brake to the accelerator pedal. The brakes are released automatically
once the engine has developed sufficient drive to prevent the vehicle from
rolling down the slope. This is an advantage when pulling away on a slope,
(for example from a car park ramp, traffic lights or when reversing uphill
into a parking space).
This feature is activated automatically on any slope that can result in
significant vehicle rollback. This feature will not operate if the parking
brake is activated.
Using Hill Start Assist
Note:If the engine is revved excessively, hill start assist will be
deactivated.
1. Press the brake pedal to bring the vehicle to a complete standstill.
Keep the brake pedal pressed.
2. If the sensors detect that the vehicle is on a slope, the hill start assist
feature will be activated automatically.
3. When you remove your foot from the brake pedal, the vehicle will
remain on the slope without rolling away for approximately two or
three seconds. This hold time will automatically be extended if you are
in the process of driving off.
4. Drive off in the normal manner. The brakes will be released
automatically.
Disabling and Enabling the Hill Start Assist Feature
Your vehicle comes with hill start assist already enabled. If desired, you
can disable the feature by following the procedure below.
The following procedure must be completed within 45 seconds or the
process will have to be repeated. Begin this procedure with the ignition
turned off. This procedure is for both disabling and enabling the hill start
assist system.
1. Apply the parking brake to make sure the vehicle is not moving.
2. Turn the ignition on.
3. Place the vehicle in neutral gear.
4. Slowly press and release the brake pedal five times – make sure the
brake pedal is completely released each time.
Transmission177
2014 05+ Mustang(197)
Owners Guide gf, 1st Printing, November 2012
USA(fus)
Page 182 of 461
PRINCIPLES OF OPERATION
The traction control system helps avoid drive wheel spin and loss of
traction.
If your vehicle begins to slide, the system applies the brakes to individual
wheels and, when needed, reduces engine power at the same time. If the
wheels spin when accelerating on slippery or loose surfaces, the system
reduces engine power in order to increase traction.
USING TRACTION CONTROL
In certain situations (for example, stuck in snow or mud),
turning the traction control off may be beneficial as this allows
the wheels to spin with full engine power. Turn the traction
control system off by pressing the stability control button
located on the center console.
System Indicator Lights and Messages
WARNING:If a failure has been detected within the
AdvanceTrac® system, the stability control light and the stability
control off light will illuminate steadily. Verify that the traction control
system was not manually disabled through the information display. If
the stability control light still illuminates steadily, have the system
serviced by an authorized dealer immediately. Operating your vehicle
with AdvanceTrac® disabled could lead to an increased risk of loss of
vehicle control, vehicle rollover, personal injury and death.
The stability control light temporarily illuminates on engine
start-up and flashes when a driving condition activates the
stability system.
The stability control off light temporarily illuminates on engine
start-up and stays on when the system is in sport mode, the
traction control system is turned off, or AdvanceTrac® is
turned off.
When the traction control system is turned off or on, a message appears
in the information display showing system status.
OFF
Traction Control181
2014 05+ Mustang(197)
Owners Guide gf, 1st Printing, November 2012
USA(fus)
Page 204 of 461
Hitches
Do not use a hitch that either clamps onto the bumper or attaches to the
axle.
Distribute the trailer load so 10-15% of the total trailer weight is on the
tongue.
Safety Chains
Note:Never attach safety chains to the bumper.
Always connect the safety chains to the hook retainers of your vehicle
hitch.
To connect the safety chains, cross them under the trailer tongue and
allow enough slack for turning tight corners. Do not allow the chains to
drag on the ground.
Trailer Brakes
WARNING:Do not connect a trailer’s hydraulic brake system
directly to your vehicle’s brake system. Your vehicle may not have
enough braking power and your chances of having a collision greatly
increase.
Electric brakes and manual, automatic or surge-type trailer brakes are
safe if you install them properly and adjust them to the manufacturer’s
specifications. The trailer brakes must meet local and federal regulations.
The rating for the tow vehicle’s braking system operation is at
the gross vehicle weight rating, not the gross combined weight
rating.
Trailer Lamps
WARNING:Never connect any trailer lamp wiring to the
vehicle’s tail lamp wiring; this may damage the electrical system
resulting in a fire. Contact an authorized dealer as soon as possible for
assistance in proper trailer tow wiring installation. Additional electrical
equipment may be required.
Trailer lamps are required on most towed vehicles. Make sure all running
lights, brake lights, turn signals and hazard lights are working.
Before Towing a Trailer
Practice turning, stopping and backing up to get the feel of your
vehicle-trailer combination before starting on a trip. When turning, make
wider turns so the trailer wheels clear curbs and other obstacles.
Towing203
2014 05+ Mustang(197)
Owners Guide gf, 1st Printing, November 2012
USA(fus)
Page 237 of 461

Fuse or relay
numberFuse amp
ratingProtected components
6 20A Turn signals, Hazard flashers
7 10A Left low beam headlamp
8 10A Right low beam headlamp
9 15A Courtesy lamps
10 15A Switch illumination, Pony
projection lights
11 10A Security module
12 7.5A Power mirrors
13 5A Not used (spare)
14 10A Center information display,
Electronic finish panel, Global
position system
15 10A Climate control
16 15A Not used (spare)
17 20A Power door locks, Trunk release
18 20A Not used (spare)
19 25A Not used (spare)
20 15A Diagnostic connector
21 15A Fog lamps
22 15A Park lamps, License lamps
23 15A High beam headlamps
24 20A Horn
25 10A Demand lighting (battery saver),
Visor vanity lamps
26 10A Cluster (battery)
27 20A Ignition switch feed
28 5A Audio mute (start)
29 5A Camera (run/start)
30 5A Temperature sensor motor
31 10A Restraints control module
236Fuses
2014 05+ Mustang(197)
Owners Guide gf, 1st Printing, November 2012
USA(fus)
Page 260 of 461
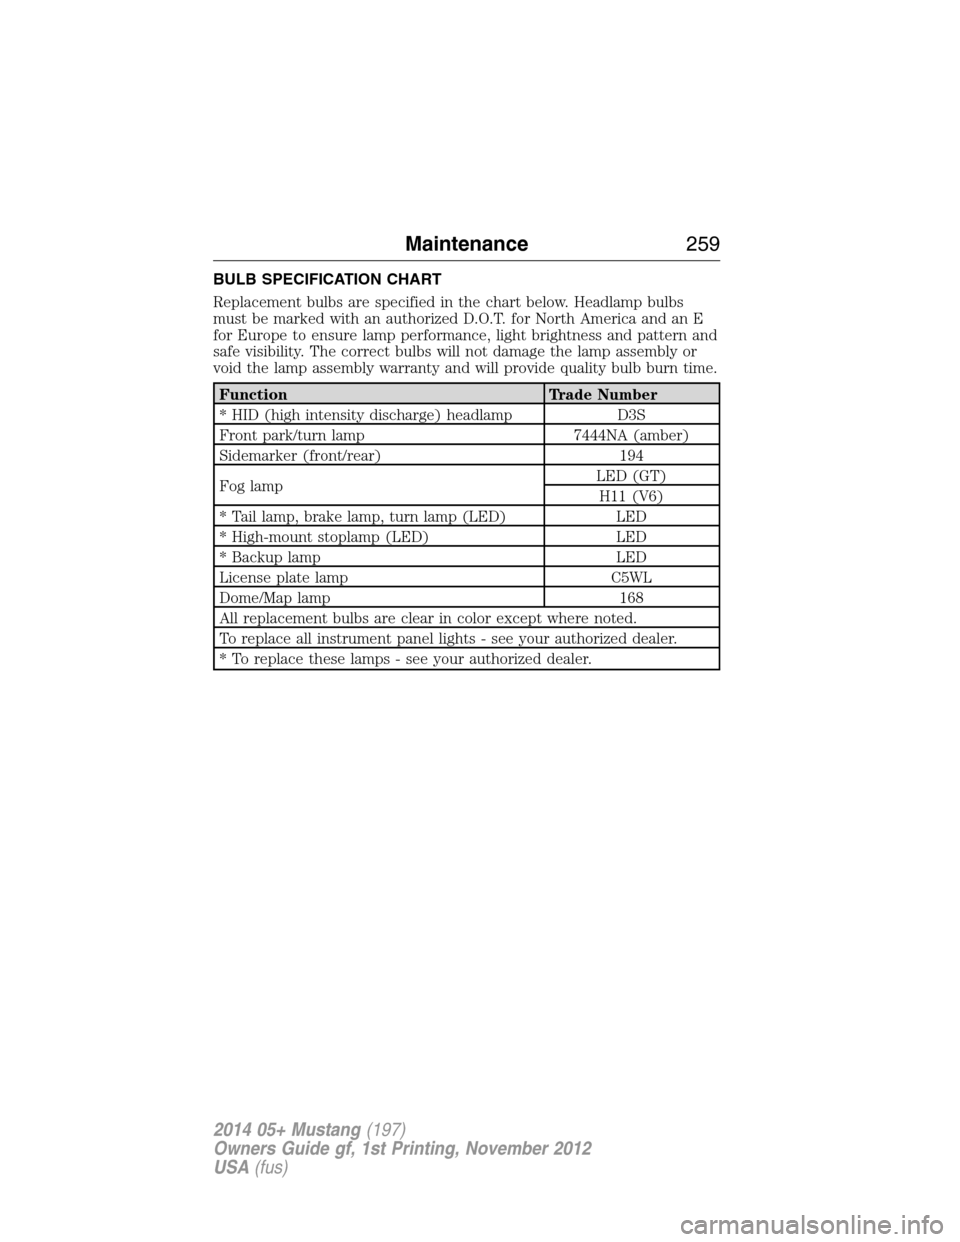
BULB SPECIFICATION CHART
Replacement bulbs are specified in the chart below. Headlamp bulbs
must be marked with an authorized D.O.T. for North America and an E
for Europe to ensure lamp performance, light brightness and pattern and
safe visibility. The correct bulbs will not damage the lamp assembly or
void the lamp assembly warranty and will provide quality bulb burn time.
Function Trade Number
* HID (high intensity discharge) headlamp D3S
Front park/turn lamp 7444NA (amber)
Sidemarker (front/rear) 194
Fog lampLED (GT)
H11 (V6)
* Tail lamp, brake lamp, turn lamp (LED) LED
* High-mount stoplamp (LED) LED
* Backup lamp LED
License plate lamp C5WL
Dome/Map lamp 168
All replacement bulbs are clear in color except where noted.
To replace all instrument panel lights - see your authorized dealer.
* To replace these lamps - see your authorized dealer.
Maintenance259
2014 05+ Mustang(197)
Owners Guide gf, 1st Printing, November 2012
USA(fus)