2014 FORD MUSTANG instrument panel
[x] Cancel search: instrument panelPage 145 of 461
Power Lumbar (If Equipped)
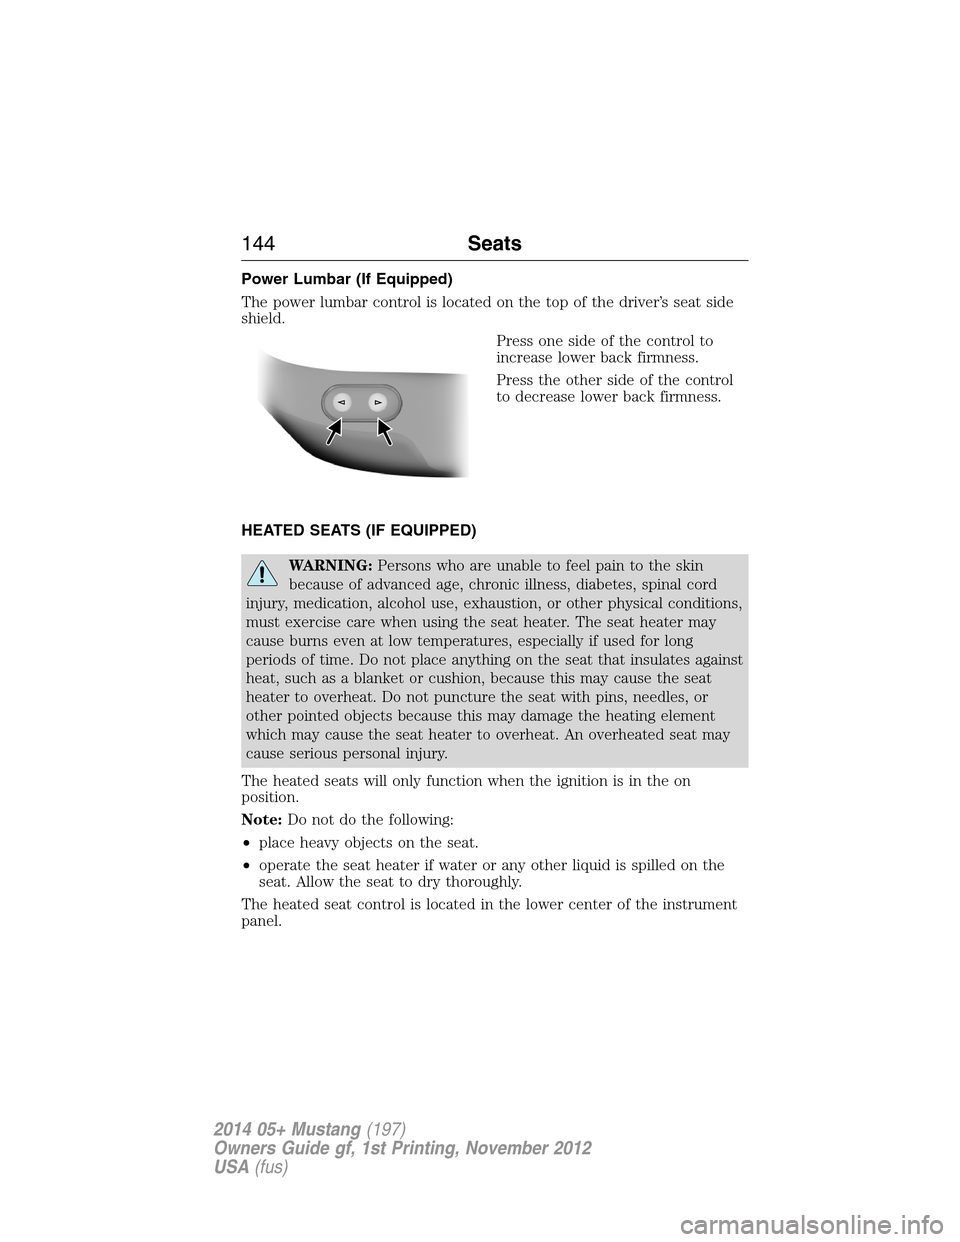
The power lumbar control is located on the top of the driver’s seat side
shield.
Press one side of the control to
increase lower back firmness.
Press the other side of the control
to decrease lower back firmness.
HEATED SEATS (IF EQUIPPED)
WARNING:Persons who are unable to feel pain to the skin
because of advanced age, chronic illness, diabetes, spinal cord
injury, medication, alcohol use, exhaustion, or other physical conditions,
must exercise care when using the seat heater. The seat heater may
cause burns even at low temperatures, especially if used for long
periods of time. Do not place anything on the seat that insulates against
heat, such as a blanket or cushion, because this may cause the seat
heater to overheat. Do not puncture the seat with pins, needles, or
other pointed objects because this may damage the heating element
which may cause the seat heater to overheat. An overheated seat may
cause serious personal injury.
The heated seats will only function when the ignition is in the on
position.
Note:Do not do the following:
•place heavy objects on the seat.
•operate the seat heater if water or any other liquid is spilled on the
seat. Allow the seat to dry thoroughly.
The heated seat control is located in the lower center of the instrument
panel.
144Seats
2014 05+ Mustang(197)
Owners Guide gf, 1st Printing, November 2012
USA(fus)
Page 153 of 461
AUXILIARY POWER POINTS
WARNING:Do not plug optional electrical accessories into the
cigarette lighter socket (if equipped). Improper use of the lighter
can cause damage not covered by your warranty, and can result in fire
or serious injury.
Note:If used when the engine is not running, the battery will discharge.
There may be insufficient power to restart your engine.
Note:Do not insert objects other than an accessory plug into the power
point. This will damage the outlet and blow the fuse.
Note:Do not hang any type of accessory or accessory bracket from the
plug.
Note:Do not use the power point over the vehicle capacity of 12 volt
DC 180 watts or a fuse may blow.
Note:Do not use the power point for operating a cigarette lighter
element.
Note:Improper use of the power outlet can cause damage not covered
by your warranty.
Note:Always keep the power point caps closed when not in use.
Run the engine for full capacity use of the power point. To prevent the
battery from being discharged:
•Do not use the power point longer than necessary when the engine is
not running.
•Do not leave devices plugged in overnight or when the vehicle is
parked for extended periods.
Locations
Power points may be found:
•on the instrument panel
•in the center console storage compartment.
152Auxiliary Power Points
2014 05+ Mustang(197)
Owners Guide gf, 1st Printing, November 2012
USA(fus)
Page 233 of 461

Fuse or relay
numberFuse amp
ratingProtected components
3 — Not used
4 30A* Blower motor relay
5 20A* Power point (body)
6 40A* Rear defroster relay
7 40A* Cooling fan relay
8 40A* Anti-lock brake system pump
9 30A* Wipers
10 30A* Anti-lock brake system valve
11 — Not used
12 20A* Differential fluid pump
(Shelby only)
13 20A** Fuel pump relay (non-Shelby)
25A** Fuel pump relay (Shelby only)
14 20A** Fuel pump relay #2 (Shelby only)
15 10A** Intercooler pump relay
(Shelby only)
16 20A** Heated seats
17 10A** Alternator sense
18 20A* Auxiliary body module
19 30A* Starter relay
20 30A* Rear amplifier (Shaker Pro radio)
21 30A* Powertrain relay
22 20A* Power point (instrument panel)
23 10A** Powertrain control module
keep-alive power
24 10A** Brake on/off power
25 10A** A/C compressor relay
26 20A** Left high intensity discharge
headlamp relay
27 20A** Right high intensity discharge
headlamp relay
28 — Not used
232Fuses
2014 05+ Mustang(197)
Owners Guide gf, 1st Printing, November 2012
USA(fus)
Page 260 of 461
BULB SPECIFICATION CHART
Replacement bulbs are specified in the chart below. Headlamp bulbs
must be marked with an authorized D.O.T. for North America and an E
for Europe to ensure lamp performance, light brightness and pattern and
safe visibility. The correct bulbs will not damage the lamp assembly or
void the lamp assembly warranty and will provide quality bulb burn time.
Function Trade Number
* HID (high intensity discharge) headlamp D3S
Front park/turn lamp 7444NA (amber)
Sidemarker (front/rear) 194
Fog lampLED (GT)
H11 (V6)
* Tail lamp, brake lamp, turn lamp (LED) LED
* High-mount stoplamp (LED) LED
* Backup lamp LED
License plate lamp C5WL
Dome/Map lamp 168
All replacement bulbs are clear in color except where noted.
To replace all instrument panel lights - see your authorized dealer.
* To replace these lamps - see your authorized dealer.
Maintenance259
2014 05+ Mustang(197)
Owners Guide gf, 1st Printing, November 2012
USA(fus)
Page 265 of 461
CLEANING THE INTERIOR
WARNING:Do not use cleaning solvents, bleach or dye on the
vehicle’s safety belts, as these actions may weaken the belt
webbing.
WARNING:On vehicles equipped with seat-mounted airbags, do
not use chemical solvents or strong detergents. Such products
could contaminate the side airbag system and affect performance of the
side airbag in a crash.
For fabric, carpets, cloth seats, safety belts and seats equipped with side
airbags:
•Remove dust and loose dirt with a vacuum cleaner.
•Remove light stains and soil with Motorcraft® Professional Strength
Carpet & Upholstery Cleaner.
•If grease or tar is present on the material, spot-clean the area first
with Motorcraft® Spot and Stain Remover. In Canada, use
Motorcraft® Multi-Purpose Cleaner.
•If a ring forms on the fabric after spot cleaning, clean the entire area
immediately (but do not oversaturate) or the ring will set.
•Do not use household cleaning products or glass cleaners, which can
stain and discolor the fabric and affect the flame retardant abilities of
the seat materials.
CLEANING THE INSTRUMENT PANEL AND INSTRUMENT
CLUSTER LENS
WARNING:Do not use chemical solvents or strong detergents
when cleaning the steering wheel or instrument panel to avoid
contamination of the airbag system.
Clean the instrument panel and cluster lens with a clean, damp, white,
cotton cloth, then use a clean and dry, white, cotton cloth to dry these
areas.
•Avoid cleaners or polishes that increase the gloss of the upper portion
of the instrument panel. The dull finish in this area helps protect the
driver from undesirable windshield reflection.
264Vehicle Care
2014 05+ Mustang(197)
Owners Guide gf, 1st Printing, November 2012
USA(fus)
Page 266 of 461
•Be certain to wash or wipe your hands clean if you have been in
contact with certain products, such as insect repellent and suntan
lotion, in order to avoid possible damage to the interior painted
surfaces.
•Do not use household or glass cleaners as these may damage the
finish of the instrument panel, interior trim and cluster lens.
•Do not allow air fresheners and hand sanitizers to spill on interior
surfaces. If a spill occurs, wipe off immediately. Damage may not be
covered by your warranty.
If a staining liquid like coffee or juice has been spilled on the instrument
panel or on interior trim surfaces, clean as follows:
1. Wipe up spilled liquid using a clean, white, cotton cloth.
2.
Wipe the surface with a damp, clean, white, cotton cloth. For more
thorough cleaning, use a mild soap and water solution. If the spot cannot
be completely cleaned by this method, the area may be cleaned using a
commercially available cleaning product designed for automotive interiors.
3. If necessary, apply more soap and water solution or cleaning product
to a clean, white, cotton cloth and press the cloth onto the soiled area;
allow this to set at room temperature for 30 minutes.
4. Remove the soaked cloth, and if it is not soiled badly, use this cloth to
clean the area by using a rubbing motion for 60 seconds.
5. Following this, wipe area dry with a clean, white, cotton cloth.
CLEANING LEATHER SEATS (IF EQUIPPED)
•Remove dust and loose dirt with a vacuum cleaner.
•Clean spills and stains as quickly as possible.
•For routine cleaning, wipe the surface with a soft, damp cloth. For
more thorough cleaning, wipe the surface with a mild soap and water
solution. In Canada, use Motorcraft® Vinyl Cleaner. Dry the area with
a soft cloth.
•If the leather cannot be completely cleaned using a mild soap and
water solution, the leather may be cleaned using a commercially
available leather cleaning product designed for automotive interiors.
•To check for compatibility, first test any cleaner or stain remover on
an inconspicuous part of the leather.
•Do not use household cleaning products, alcohol solutions, solvents or
cleaners intended for rubber, vinyl and plastics or petroleum-based
leather conditioners. These products may cause premature wearing or
damage to the leather.
Vehicle Care265
2014 05+ Mustang(197)
Owners Guide gf, 1st Printing, November 2012
USA(fus)
Page 299 of 461

First Stage: Reinflating the Tire with Sealing Compound and Air
WARNING:Do not stand directly over the temporary mobility
kit while inflating the tire. If you notice any unusual bulges or
deformations in the tire’s sidewall during inflation, stop and call
roadside assistance.
WARNING:If the tire does not inflate to the recommended tire
pressure within 15 minutes, stop and call roadside assistance.
Preparation
Park the vehicle in a safe, level and secure area, away from moving
traffic. Turn the hazard lights on. Apply the parking brake and turn the
engine off. Inspect the flat tire for visible damage.
Sealant compound contains latex. To avoid any allergic reactions, use the
non-latex gloves located in the accessory box on the underside of the
temporary mobility kit housing.
Do not remove any foreign object that has pierced the tire. If a puncture
is located in the tire sidewall, stop and call roadside assistance.
1. Remove the valve cap from the tire valve.
2. Unwrap the clear tube from the compressor housing.
3. Remove the tube cap and fasten the metal connector of the tube to
the tire valve, turning clockwise. Make sure the connection is tightly
fastened.
4. Plug the power cable into the
12-volt power point in the vehicle.
5. Remove the warning sticker found on the canister and place it on the
top of the instrument panel or the center of the dash.
6.Note:Start the engine only if the vehicle is outdoors or in a
well-ventilated area.
298Wheels and Tires
2014 05+ Mustang(197)
Owners Guide gf, 1st Printing, November 2012
USA(fus)
Page 311 of 461

MOTORCRAFT PART NUMBERS
Component 3.7L V6 engine 5.0L V8 engine
Air filter element FA-1897 FA-1897
Battery BXT-96R-590 BXT-96R-590
Oil filter FL-500-S FL-500-S
Spark plugs
1SP520 SP519
Cabin air filter FP53 FP53
Windshield wiper
bladeWW-2201-PF (driver side)
WW-2001-PF (passenger side)
1For spark plug replacement, see your authorized dealer. SeeScheduled
Maintenance Informationfor the appropriate intervals for changing the
spark plugs.
Replace the spark plugs with ones that meet Ford material and
design specifications for your vehicle, such as Motorcraft® or
equivalent replacement parts. The customer warranty may be
void for any damage to the engine if such spark plugs are not
used.
VEHICLE IDENTIFICATION NUMBER
The vehicle identification number
is located on the driver’s side
instrument panel.
Please note that in the graphic,
XXXX is representative of your
vehicle identification number.
XXXXXXXXXXXXXXXXX
310Capacities and Specifications
2014 05+ Mustang(197)
Owners Guide gf, 1st Printing, November 2012
USA(fus)