Page 221 of 403
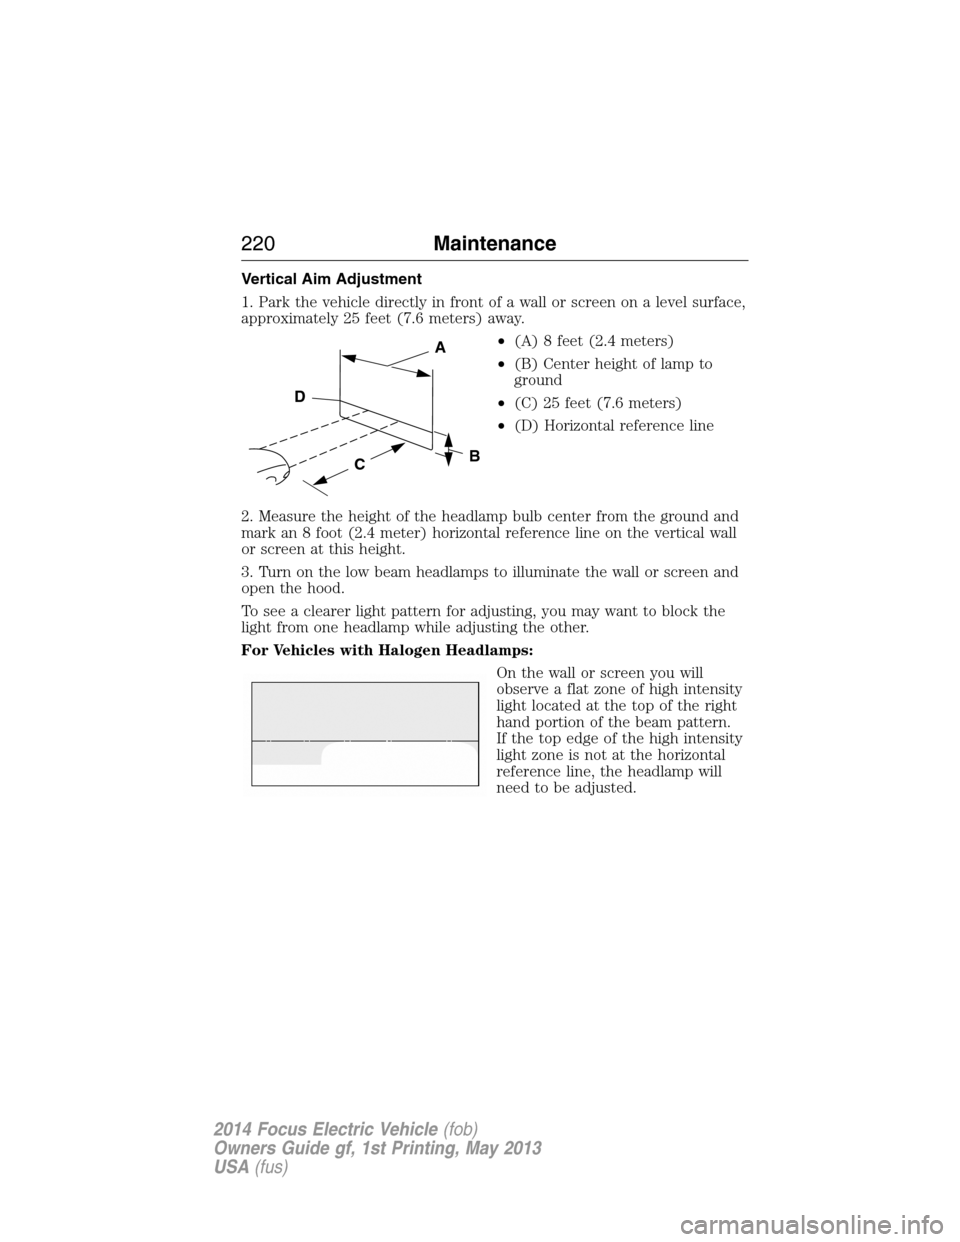
Vertical Aim Adjustment
1. Park the vehicle directly in front of a wall or screen on a level surface,
approximately 25 feet (7.6 meters) away.
•(A) 8 feet (2.4 meters)
•(B) Center height of lamp to
ground
•(C) 25 feet (7.6 meters)
•(D) Horizontal reference line
2. Measure the height of the headlamp bulb center from the ground and
mark an 8 foot (2.4 meter) horizontal reference line on the vertical wall
or screen at this height.
3. Turn on the low beam headlamps to illuminate the wall or screen and
open the hood.
To see a clearer light pattern for adjusting, you may want to block the
light from one headlamp while adjusting the other.
For Vehicles with Halogen Headlamps:
On the wall or screen you will
observe a flat zone of high intensity
light located at the top of the right
hand portion of the beam pattern.
If the top edge of the high intensity
light zone is not at the horizontal
reference line, the headlamp will
need to be adjusted.
C
A
B
D
220Maintenance
2014 Focus Electric Vehicle(fob)
Owners Guide gf, 1st Printing, May 2013
USA(fus)
Page 222 of 403
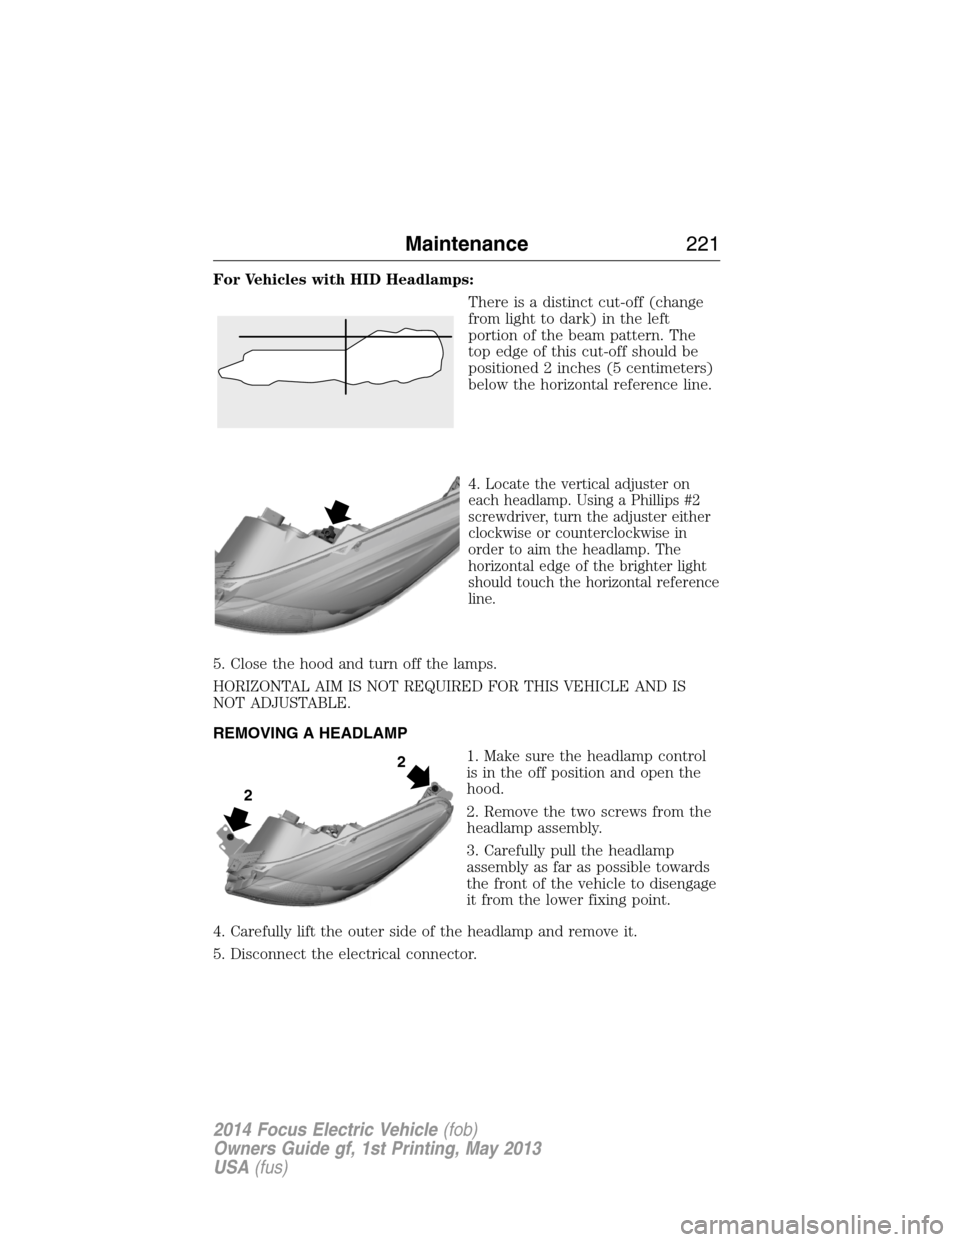
For Vehicles with HID Headlamps:
There is a distinct cut-off (change
from light to dark) in the left
portion of the beam pattern. The
top edge of this cut-off should be
positioned 2 inches (5 centimeters)
below the horizontal reference line.
4.
Locate the vertical adjuster on
each headlamp. Using a Phillips #2
screwdriver, turn the adjuster either
clockwise or counterclockwise in
order to aim the headlamp. The
horizontal edge of the brighter light
should touch the horizontal reference
line.
5. Close the hood and turn off the lamps.
HORIZONTAL AIM IS NOT REQUIRED FOR THIS VEHICLE AND IS
NOT ADJUSTABLE.
REMOVING A HEADLAMP
1. Make sure the headlamp control
is in the off position and open the
hood.
2. Remove the two screws from the
headlamp assembly.
3. Carefully pull the headlamp
assembly as far as possible towards
the front of the vehicle to disengage
it from the lower fixing point.
4. Carefully lift the outer side of the headlamp and remove it.
5. Disconnect the electrical connector.
2
2
Maintenance221
2014 Focus Electric Vehicle(fob)
Owners Guide gf, 1st Printing, May 2013
USA(fus)
Page 223 of 403
CHANGING A BULB
Lamp Assembly Condensation
Exterior lamps are vented to accommodate normal changes in pressure.
Condensation can be a natural by-product of this design. When moist air
enters the lamp assembly through the vents, there is a possibility that
condensation can occur when the temperature is cold. When normal
condensation occurs, a thin film of mist can form on the interior of the
lens. The thin mist eventually clears and exits through the vents during
normal operation. Clearing time may take as long as 48 hours under dry
weather conditions.
These are examples of acceptable condensation:
•Presence of thin mist (no streaks, drip marks or droplets).
•Fine mist covers less than 50% of the lens.
These are examples of unacceptable moisture (usually caused by a lamp
water leak):
•Water puddle inside the lamp.
•Large water droplets, drip marks or streaks present on the interior of
the lens.
Take your vehicle to a dealer for service if any of the above conditions of
unacceptable moisture are present.
Replacing Headlamp Bulbs
WARNING:Handle a halogen headlamp bulb carefully and keep
out of children’s reach. Grasp the bulb by only its plastic base
and do not touch the glass. The oil from your hand could cause the
bulb to break the next time the headlamps are operated.
Note:If the bulb is accidentally touched, it should be cleaned with
rubbing alcohol before being used.
222Maintenance
2014 Focus Electric Vehicle(fob)
Owners Guide gf, 1st Printing, May 2013
USA(fus)
Page 224 of 403
Headlamp assembly:
A. High beam headlamp bulb
B. Side marker bulb
C. Low beam headlamp bulb
D. Front parking lamp and turn
signal bulb
High beam headlamp bulb:
1. Remove the headlamp assembly.
2. Remove the service cap.
3. Disconnect the electrical
connector.
4. Remove the bulb from the
headlamp assembly by turning it
counterclockwise, then pull it
straight out.
Install the new bulb in reverse order.
Low beam headlamp bulb:
1. Remove the headlamp assembly.
2. Remove the service cap.
3. Disconnect the electrical
connector.
4. Remove the bulb from the
headlamp assembly by turning it
counterclockwise, then pull it
straight out.
Install the new bulb in reverse order.
Note:Be sure that the spring clip is not damaged or detached from the
headlamp assembly during the replacement procedure.BA
CD
Maintenance223
2014 Focus Electric Vehicle(fob)
Owners Guide gf, 1st Printing, May 2013
USA(fus)
Page 225 of 403
Replacing HID Headlamp Bulbs (If Equipped)
The low beam headlamps on your vehicle use a high intensity discharge
source. These lamps operate at a high voltage. When the bulb is burned
out, the bulb and starter capsule assembly must be replaced by your
authorized dealer.
Replacing Front Parking Lamp and Turn Signal Bulbs
1. Remove the service cap by
turning it counterclockwise.
2. Remove the bulb socket from the
headlamp assembly by turning it
counterclockwise.
3. Remove the bulb by gently
pulling the bulb straight out of the
socket
Install the new bulb in reverse
order.
Replacing Side Marker Bulbs
1. Remove the service cap.
2. Remove the bulb socket from the
headlamp assembly by turning it
counterclockwise.
3. Remove the bulb by gently
pulling the bulb straight out of the
socket
Install the new bulb in reverse
order.
224Maintenance
2014 Focus Electric Vehicle(fob)
Owners Guide gf, 1st Printing, May 2013
USA(fus)
Page 226 of 403
Replacing Fog Lamp Bulbs (If Equipped)
1. Make sure the lighting control
switch is in the off position.
2. Reach under the front fender and
remove the aero shield.
3. Remove the harness/bulb
assembly from the fog lamp by
turning it counterclockwise.
4. Disconnect the harness from the
bulb by pulling it straight out.
Install the new bulb in reverse order.
Replacing Rear Lamps
1. Make sure the headlamp control
is in the off position and open the
trunk.
2. Remove the trim panel from
inside the luggage compartment.
3. Remove the two nuts from the
lamp assembly
4. Gently pull the lamp assembly away from the vehicle
5. Remove the bulb by turning the bulb socket counterclockwise. Gently
pull the bulb straight out of the socket.
A. Brake lamp bulb
B. Reverse lamp bulb
C. Tail lamp and side marker lamp
bulb
D. Turn signal bulb
Install the new bulb in reverse order.
A
C
D
B
Maintenance225
2014 Focus Electric Vehicle(fob)
Owners Guide gf, 1st Printing, May 2013
USA(fus)
Page 227 of 403
Note:The reverse lamp bulb is located in the luggage compartment lid.
If replacement is required, it is recommended that you see your
authorized dealer.
Replacing License Plate Lamp Assembly
Your vehicle is equipped with an LED license plate lamp assembly. It is
designed to last the life of the vehicle. If replacement is required, it is
recommended that you see your authorized dealer.
Replacing High-Mount Brake Lamp Assembly
Your vehicle is equipped with an LED center high-mount stop lamp. It is
designed to last the life of the vehicle. If replacement is required, it is
recommended that you see your authorized dealer.
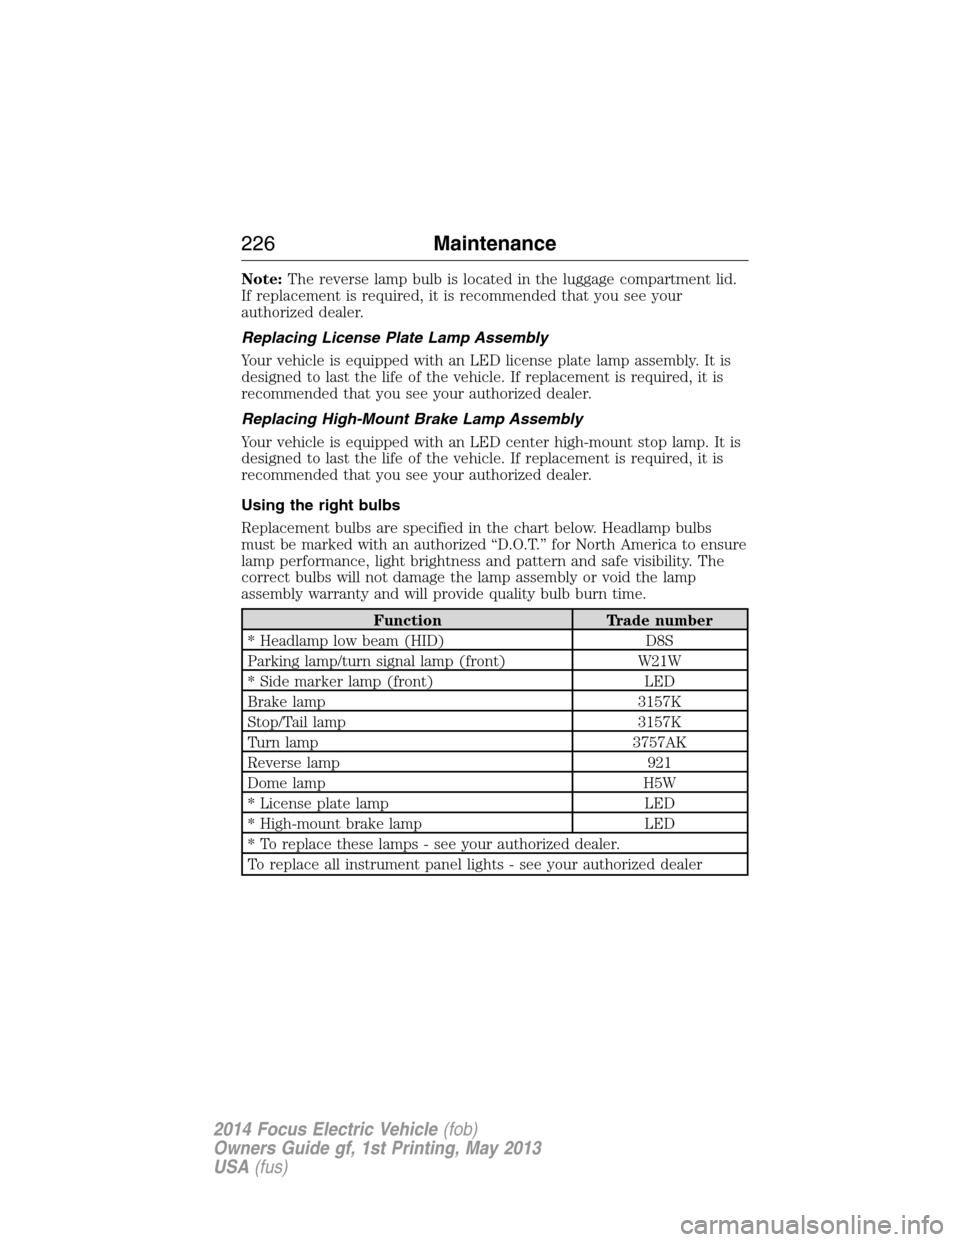
Using the right bulbs
Replacement bulbs are specified in the chart below. Headlamp bulbs
must be marked with an authorized “D.O.T.” for North America to ensure
lamp performance, light brightness and pattern and safe visibility. The
correct bulbs will not damage the lamp assembly or void the lamp
assembly warranty and will provide quality bulb burn time.
Function Trade number
* Headlamp low beam (HID) D8S
Parking lamp/turn signal lamp (front) W21W
* Side marker lamp (front) LED
Brake lamp 3157K
Stop/Tail lamp 3157K
Turn lamp 3757AK
Reverse lamp 921
Dome lamp H5W
* License plate lamp LED
* High-mount brake lamp LED
* To replace these lamps - see your authorized dealer.
To replace all instrument panel lights - see your authorized dealer
226Maintenance
2014 Focus Electric Vehicle(fob)
Owners Guide gf, 1st Printing, May 2013
USA(fus)
Page 234 of 403
•To check for compatibility, first test any cleaner or stain remover on
an inconspicuous part of the leather.
•Do not use household cleaning products, alcohol solutions,
oil/petroleum-based leather conditioners, or solvents or cleaners
intended specifically for rubber, vinyl and plastics. These products
may cause premature wearing or damage to the leather.
CLEANING THE ALLOY WHEELS
Note:Do not use chrome cleaner, metal cleaner or polish on wheels and
wheel covers.
A clearcoat paint finish coats aluminum wheels and wheel covers.
In order to maintain their condition:
•Clean weekly with Motorcraft Wheel and Tire Cleaner. Use a sponge to
remove heavy deposits of dirt and brake dust accumulation. Rinse
thoroughly with a strong stream of water when you have completed
the cleaning process.
•To remove tar and grease, use Motorcraft Bug and Tar Remover.
•Never apply any cleaning chemical to hot or warm wheel rims or
covers.
•Some automatic car washes may cause damage to the finish on your
wheel rims or covers.
•Industrial-strength (heavy-duty) cleaners, or cleaning chemicals, in
combination with brush agitation to remove brake dust and dirt, could
wear away the clearcoat finish over time.
•Do not use hydrofluoric acid-based or high caustic-based wheel
cleaners, steel wool, fuels or strong household detergent.
•If you intend on parking your vehicle for an extended period after
cleaning the wheels with a wheel cleaner, drive your vehicle for a few
minutes before doing so. This reduces the risk of increased corrosion
of the brake discs.
VEHICLE STORAGE
If you plan on storing your vehicle for an extended period of time
(30 days or more), refer to the following maintenance recommendations
to ensure your vehicle stays in good operating condition.
All motor vehicles and their components were engineered and tested for
reliable, regular driving. Long term storage under various conditions may
lead to component degradation or failure unless specific precautions are
taken to preserve the components.
Vehicle Care233
2014 Focus Electric Vehicle(fob)
Owners Guide gf, 1st Printing, May 2013
USA(fus)