2014 FORD F250 SUPER DUTY oil dipstick
[x] Cancel search: oil dipstickPage 7 of 460

Fuse Specification Chart............................215
Maintenance
General Information....................................223
Opening and Closing the Hood..............223
Under Hood Overview - 6.2L...................224
Under Hood Overview - 6.8L...................225
Engine Oil Dipstick......................................226
Engine Oil Check..........................................226
Engine Coolant Check................................227
Automatic Transmission FluidCheck.............................................................231
Transfer Case Fluid Check........................234
Brake Fluid Check........................................234
Power Steering Fluid Check.....................234
Washer Fluid Check....................................235
Fuel Filter........................................................235
Changing the 12V Battery.........................235
Checking the Wiper Blades......................237
Changing the Wiper Blades......................237
Adjusting the Headlamps.........................238
Removing a Headlamp..............................239
Changing a Bulb............................................241
Bulb Specification Chart...........................243
Changing the Engine Air Filter................245
Vehicle Care
General Information....................................247
Cleaning Products.......................................247
Cleaning the Exterior..................................247
Waxing.............................................................248
Cleaning the Engine...................................248
Cleaning the Exhaust.................................249
Cleaning the Windows and WiperBlades..........................................................249
Cleaning the Interior...................................250
Cleaning the Instrument Panel andInstrument Cluster Lens.......................250
Cleaning Leather Seats..............................251
Repairing Minor Paint Damage................251
Cleaning the Alloy Wheels........................251
Vehicle Storage.............................................252
Wheels and Tires
General Information...................................254
Tire Care..........................................................256
Using Snow Chains......................................273
Tire Pressure Monitoring System...........273
Changing a Road Wheel............................279
Technical Specifications..........................290
Capacities and Specific-ations
Engine Specifications................................292
Motorcraft Parts...........................................293
Vehicle Identification Number................294
Vehicle Certification Label.......................294
Transmission Code Designation............295
Technical Specifications..........................296
Audio System
General Information....................................301
Audio unit - Vehicles With: AM/FM......302
Audio unit - Vehicles With: AM/FM/CD/SYNC............................................................303
Audio unit - Vehicles With: Sony AM/FM/CD.................................................................305
Digital Radio..................................................306
Satellite Radio..............................................309
Audio Input Jack.............................................311
USB Port...........................................................312
Media Hub.......................................................312
SYNC™
General Information....................................313
Using Voice Recognition............................315
Using SYNC™ With Your Phone.............317
SYNC™ Applications and Services......328
Using SYNC™ With Your MediaPlayer...........................................................335
4
Super Duty (TFA)
Table of Contents
Page 227 of 460

2. Go to the front of the vehicle andlocate the secondary release lever,which is located under the front of thehood, to your right of the center of thevehicle (driver's side), toward theheadlight.
3. Release the hood latch by pushing thesecondary release lever to your left,toward the center of the vehicle.
4. Raise the hood.
5.To close the hood, lower the hood andallow it to drop the last 8 to 11 inches(20 to 30 centimeters).
Note:Make sure that the hood is closedproperly.
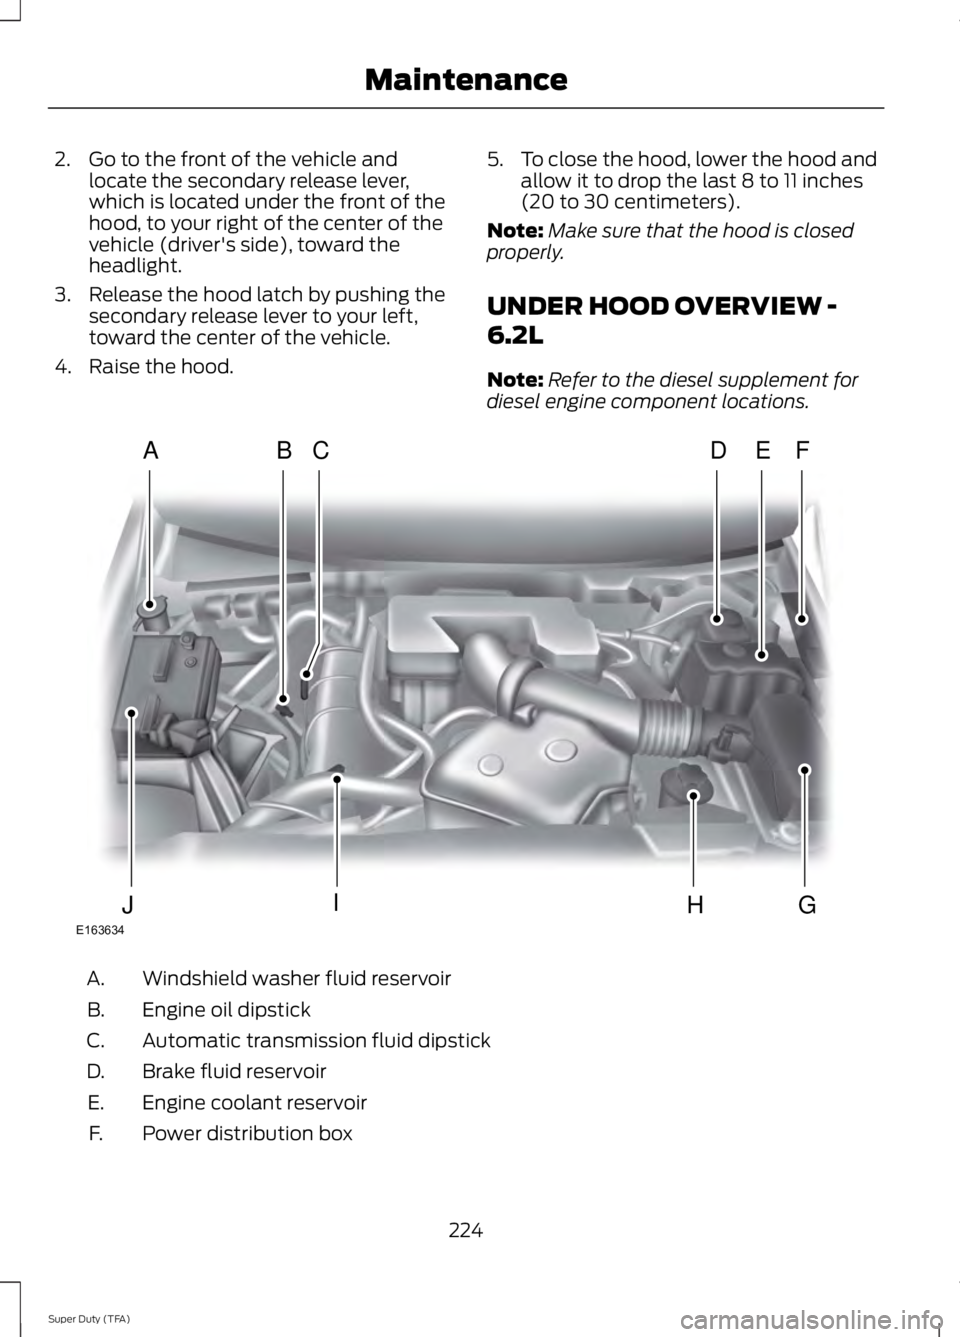
UNDER HOOD OVERVIEW -
6.2L
Note:Refer to the diesel supplement fordiesel engine component locations.
Windshield washer fluid reservoirA.
Engine oil dipstickB.
Automatic transmission fluid dipstickC.
Brake fluid reservoirD.
Engine coolant reservoirE.
Power distribution boxF.
224
Super Duty (TFA)
MaintenanceE163634
ADFEBC
GHIJ
Page 228 of 460

Air filter assemblyG.
Power steering fluid reservoirH.
Engine oil filler capI.
BatteryJ.
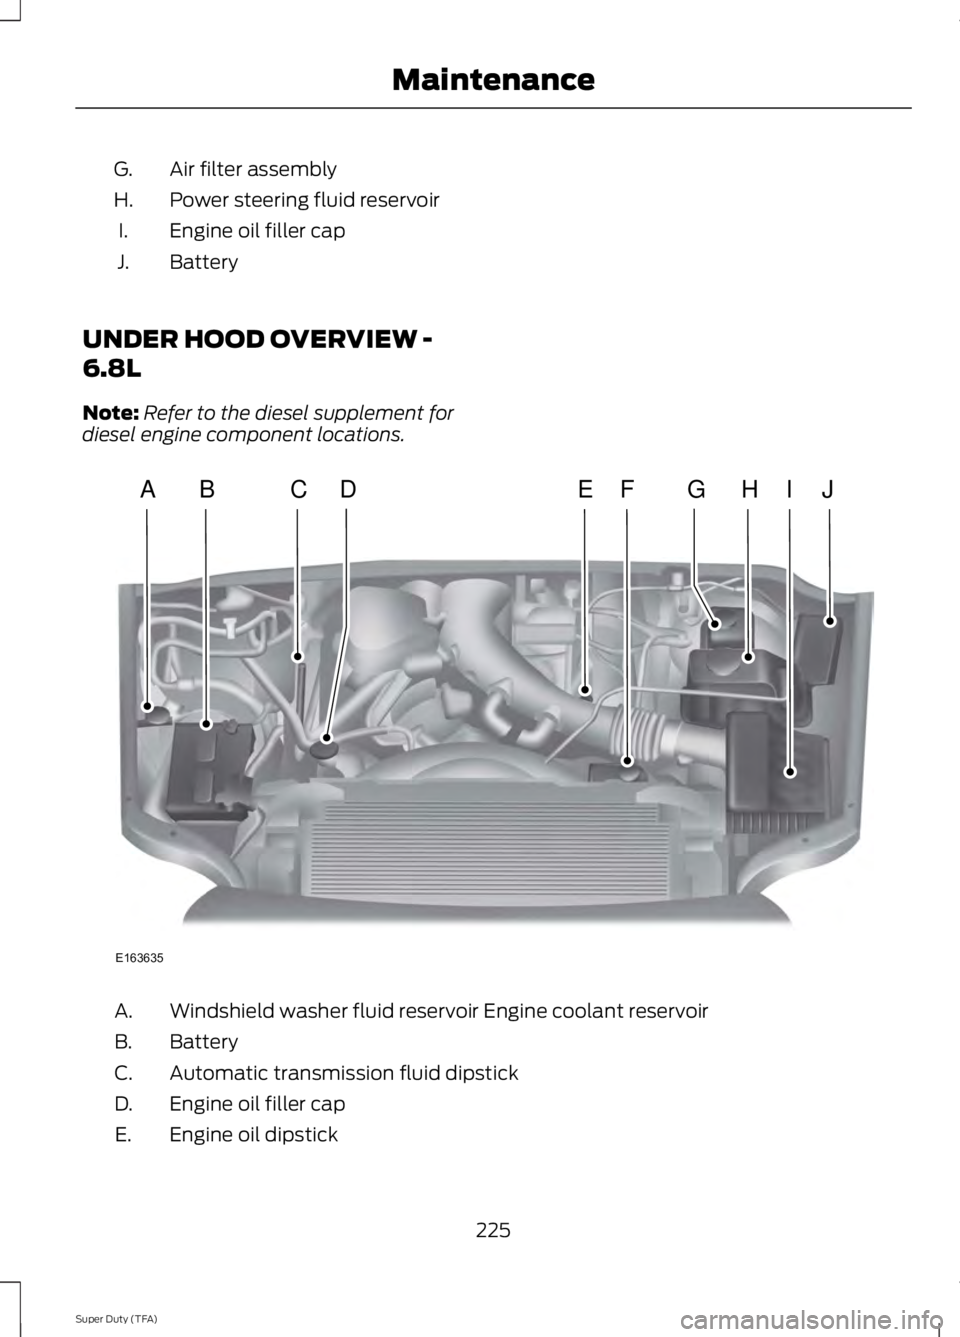
UNDER HOOD OVERVIEW -
6.8L
Note:Refer to the diesel supplement fordiesel engine component locations.
Windshield washer fluid reservoir Engine coolant reservoirA.
BatteryB.
Automatic transmission fluid dipstickC.
Engine oil filler capD.
Engine oil dipstickE.
225
Super Duty (TFA)
MaintenanceE163635
ABCEHIJFDG
Page 229 of 460

Power steering fluid reservoirF.
Brake fluid reservoirG.
Engine coolant reservoirH.
Air filter assemblyI.
Power distribution boxJ.
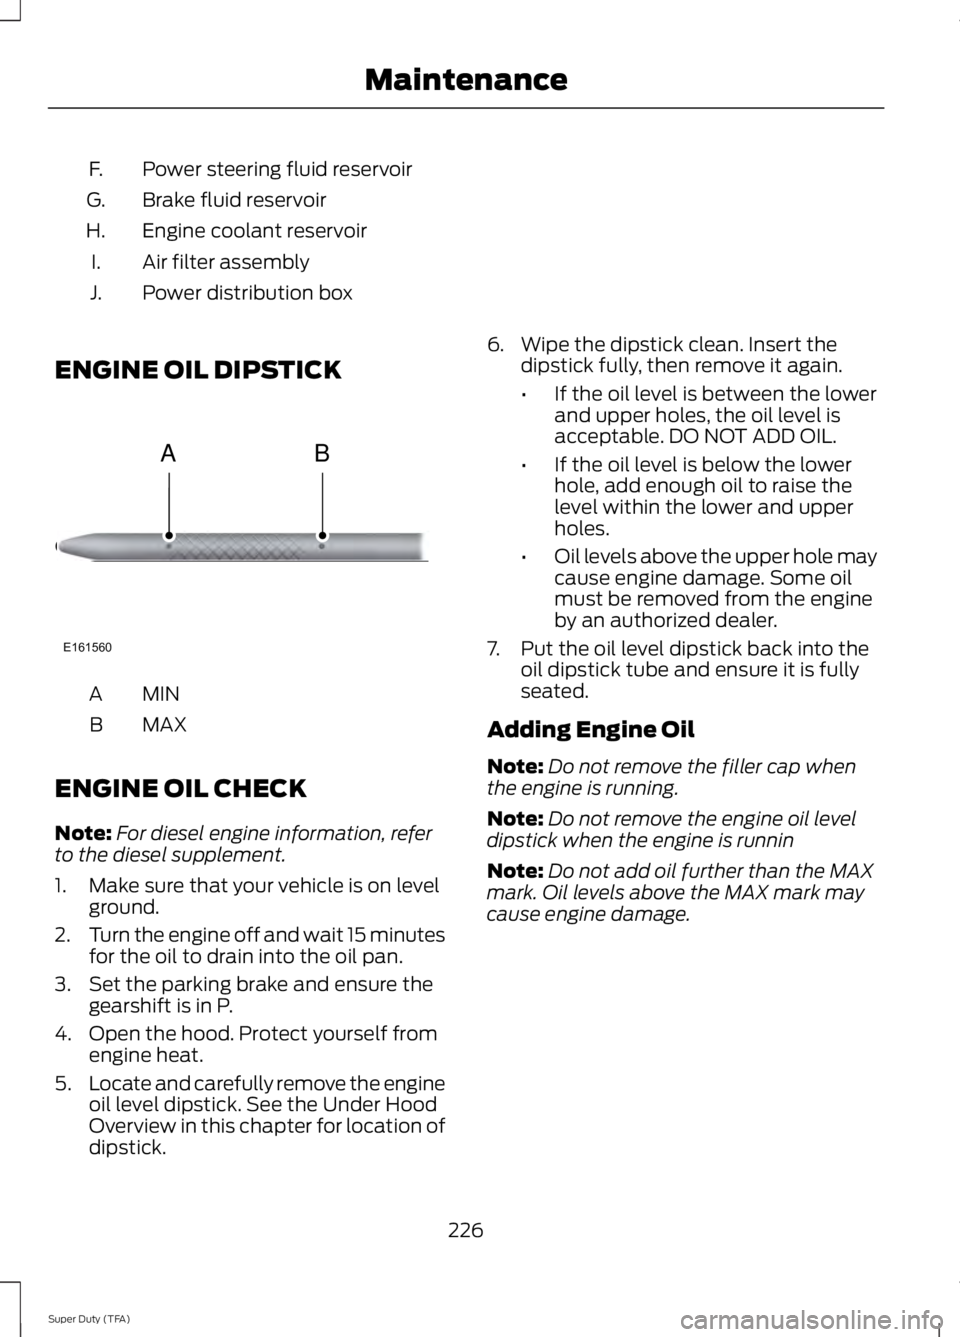
ENGINE OIL DIPSTICK
MINA
MAXB
ENGINE OIL CHECK
Note:For diesel engine information, referto the diesel supplement.
1. Make sure that your vehicle is on levelground.
2.Turn the engine off and wait 15 minutesfor the oil to drain into the oil pan.
3. Set the parking brake and ensure thegearshift is in P.
4. Open the hood. Protect yourself fromengine heat.
5.Locate and carefully remove the engineoil level dipstick. See the Under HoodOverview in this chapter for location ofdipstick.
6. Wipe the dipstick clean. Insert thedipstick fully, then remove it again.
•If the oil level is between the lowerand upper holes, the oil level isacceptable. DO NOT ADD OIL.
•If the oil level is below the lowerhole, add enough oil to raise thelevel within the lower and upperholes.
•Oil levels above the upper hole maycause engine damage. Some oilmust be removed from the engineby an authorized dealer.
7. Put the oil level dipstick back into theoil dipstick tube and ensure it is fullyseated.
Adding Engine Oil
Note:Do not remove the filler cap whenthe engine is running.
Note:Do not remove the engine oil leveldipstick when the engine is runnin
Note:Do not add oil further than the MAXmark. Oil levels above the MAX mark maycause engine damage.
226
Super Duty (TFA)
MaintenanceE161560
AB
Page 230 of 460

Only use oils certified for gasoline enginesby the American Petroleum Institute (API).An oil with this trademark symbolconforms to the current engine andemission system protection standards andfuel economy requirements of theInternational Lubricants SpecificationAdvisory Council (ILSAC), comprised ofU.S. and Japanese automobilemanufacturers.
1. Check the engine oil level.
2. If the engine oil level is not within thenormal range, add engine oil thatmeets Ford specifications. SeeCapacities and Specifications for moreinformation.
3. Remove the engine oil filler cap anduse a funnel to pour the engine oil intothe opening.
4.Recheck the engine oil level. Make surethe oil level is not above the normaloperating range on the engine oil leveldipstick.
5. Install the engine oil level dipstick andensure it is fully seated.
6. Fully install the engine oil filler cap byturning the filler cap clockwise untilthree clicks are heard or until the capis fully seated.
ENGINE COOLANT CHECK
Checking the Engine Coolant
Note:If your vehicle is equipped with adiesel engine, refer to the DieselSupplement.
When the engine is cold, check theconcentration and level of the enginecoolant at the intervals listed in thescheduled maintenance information. SeeScheduled Maintenance (page 430).
Note:Make sure that the level is betweenthe MIN and MAX marks on the coolantreservoir.
Note:Coolant expands when it is hot. Thelevel may extend beyond the MAX mark
Note:If the level is at the MIN mark, belowthe MIN mark, or empty, add coolantimmediately. See Adding Engine Coolantin this chapter.
The coolant concentration should bemaintained within 48% to 50%, whichequates to a freeze point between -29°F(-34°C) and -35°F (-37°C).
Note:For best results, coolantconcentration should be tested with arefractometer such as Rotunda tool300-ROB75240 available from yourauthorized dealer. Ford does notrecommend the use of hydrometers orcoolant test strips for measuring coolantconcentrations.
Note:Automotive fluids are notinterchangeable. Do not use engine coolantor antifreeze or windshield washer fluidoutside of its specified function and vehiclelocation.
227
Super Duty (TFA)
MaintenanceE142732
Page 303 of 460

1Add 8 oz. (236 ml) of Additive Friction Modifier XL-3 or equivalent meeting FordSpecification EST-M2C118–A for complete refill of limited slip Ford axles. Ford designrear axles contain a synthetic lubricant that does not require changing unless you submergethe axle in water.2Ford recommends using Motorcraft (Ford) DOT 3 LV High Performance Motor VehicleBrake Fluid, Motorcraft (Ford) DOT 4 LV High Performance Motor Vehicle Brake Fluid orequivalent meeting WSS-M6C65-A1 or WSS-M6C65-A2. Use of any fluid other than therecommended fluid may cause degraded brake performance and not meet the Fordperformance standards. Keep brake fluid clean and dry. Contamination with dirt, water,petroleum products or other materials may result in brake system damage and possiblefailure.3Add the coolant type originally equipped in your vehicle.4Ford has designed your engine to use Motorcraft engine oils or equivalent oils that meetFord’s specification. It is also acceptable to use an engine oil of recommended viscositygrade that meets API SN requirements and displays the API Certification Mark for gasolineengines.5Do not use oils labeled as API SN unless the label also display the API certification mark.These oils do not meet the requirements of your vehicles engine and emissions system.6Do not use supplemental engine oil additives. They are unnecessary and could lead toengine damage not covered by your Ford warranty.7Use the correct automatic transmission fluid. Transmission fluid requirements areindicated on the dipstick blade or the dipstick handle. Check the container to verify thefluid you are adding is of the correct type. Refer to your scheduled maintenance informationto determine the correct service interval.
Note:Automatic transmissions that require MERCON LV should only use MERCON LV fluid.Use of any fluid other than the recommended fluid may cause transmission damage.8Indicates only approximate dry-fill capacity. Some applications may vary based on coolersize and if equipped with an in-tank cooler. You should set the amount of transmissionfluid and fluid level by the indication on the dipstick’s normal operating range.9Fill to the proper capacity according to dipstick Type A. For correct dipstick type, SeeAutomatic Transmission Fluid Check (page 231).9Fill to the proper capacity according to dipstick Type B. For correct dipstick type, SeeAutomatic Transmission Fluid Check (page 231).10See the Warning below:
WARNING
The air conditioning refrigerant system contains refrigerant R-134a under highpressure. Opening the air conditioning refrigerant system can cause personal injury.Have the air conditioning refrigerant system serviced only by qualified personnel.
300
Super Duty (TFA)
Capacities and Specifications
Page 452 of 460

E
Economical Driving....................................200Electronic Locking Differential................158Activating the Electronic LockingDifferential.......................................................158Emission Control System..........................139On-Board Diagnostics (OBD-II)...................140Readiness for Inspection/Maintenance(I/M) Testing...................................................140End User License Agreement...................412SYNC® End User License Agreement(EULA)...............................................................412Engine Block Heater.....................................132Using the Engine Block Heater......................133Engine Coolant Check................................227Adding Engine Coolant....................................228Checking the Engine Coolant........................227Recycled Engine Coolant................................229Severe Climates.................................................229What You Should Know About Fail-SafeCooling..............................................................229Engine ImmobilizerSee: Passive Anti-Theft System.....................58Engine Oil Check..........................................226Adding Engine Oil..............................................226Engine Oil Dipstick......................................226Engine Specifications.................................292Drivebelt Routing...............................................292Entertainment..............................................366A/V Inputs............................................................382AM/FM Radio......................................................368Bluetooth Audio..................................................381Browsing Device Content...............................366CD.............................................................................377SD Card Slot and USB Port............................378SIRIUS® Satellite Radio (IfActivated)........................................................373Supported Media Players, Formats andMetadata Information.................................381
Essential Towing Checks...........................189Before Towing a Trailer.....................................195Hitches...................................................................190Launching or Retrieving a Boat or PersonalWatercraft (PWC).........................................196Safety Chains........................................................191Trailer Brakes.........................................................191Trailer Lamps.......................................................195Trailer Towing Connector................................190Using a Step Bumper (If Equipped)............195When Towing a Trailer......................................195Event Data RecordingSee: Data Recording..............................................9Export Unique Options..................................13Exterior Mirrors................................................70Clearance Lamps...................................................71Fold-Away Exterior Mirrors.................................71Heated Exterior Mirrors........................................71Memory Mirrors......................................................71Power Exterior Mirrors........................................70Telescoping Mirrors..............................................72
F
Fastening the Safety Belts..........................29Fastening the Cinch Tongue............................30Restraint of Pregnant Women........................30Safety Belt Extension Assembly......................31Safety Belt Locking Modes...............................30Using the Safety Belt with Cinch Tongue(Front Center and Rear Center SeatsOnly)....................................................................29Floor Mats.......................................................201Fog Lamps - FrontSee: Front Fog Lamps.........................................67Foot PedalsSee: Adjusting the Pedals.................................63Ford Credit..........................................................11(U.S. Only).................................................................11Ford Extended Service Plan (ESP).......427SERVICE PLANS (CANADA ONLY)............429SERVICE PLANS (U.S. Only).........................427Four-Wheel Drive.........................................149Front Fog Lamps............................................67Front Seat Armrest........................................117Fuel and Refueling.......................................134
449
Super Duty (TFA)
Index