2014 FORD F250 SUPER DUTY jump cable
[x] Cancel search: jump cablePage 208 of 460

HAZARD WARNING FLASHERS
Note:The hazard warning flashers willoperate when the ignition is in any positionor if the key is not in the ignition. If usedwhen the engine is not running, the batterywill lose charge. As a result, there may beinsufficient power to restart your engine.
In some models, the hazardflasher control is located on theinstrument panel.
In other models, this feature is located onthe steering column, just behind thesteering wheel.
Use your hazard warning flashers whenyour vehicle is creating a safety hazard forother motorists.
•Press the flasher control and all frontand rear direction indicators flash.
•Press the flasher control again to turnthem off.
FUEL SHUTOFF
WARNING
Failure to inspect and, if necessary,repair fuel leaks after a collision mayincrease the risk of fire and seriousinjury. Ford Motor Company recommendsthat the fuel system be inspected by anauthorized dealer after any collision.
In the event of a moderate to severecollision, this vehicle is equipped with afuel pump shut-off feature that stops theflow of fuel to the engine. Not every impactwill cause a shut-off.
Should your vehicle shut off after acollision, you may restart your vehicle bydoing the following:
1. Turn the ignition off.
2. Turn the ignition to crank.
3. Turn the ignition off.
4.Turn the ignition on again to re-enablethe fuel pump.
JUMP-STARTING THE VEHICLE
WARNINGS
The gases around the battery canexplode if exposed to flames, sparks,or lit cigarettes. An explosion couldresult in injury or vehicle damage.
Batteries contain sulfuric acid whichcan burn skin, eyes and clothing, ifcontacted.
Use only an adequate-sized cablewith insulated clamps.
Preparing Your Vehicle
Note:Do not attempt to push-start yourautomatic transmission vehicle. Automatictransmissions do not have push-startcapability. Attempting to push-start avehicle with an automatic transmission maycause transmission damage.
Note:Use only a 12-volt supply to start yourvehicle.
Note:Do not disconnect the battery of thedisabled vehicle as this could damage thevehicle's electrical system.
205
Super Duty (TFA)
Roadside EmergenciesE142663 E161463
Page 209 of 460

Park the booster vehicle close to the hoodof the disabled vehicle, making sure thetwo vehicles do not touch. Turn allaccessories off.
Connecting the Jumper Cables
WARNING
Do not attach the cables to fuel lines,engine rocker covers, the intakemanifold or electrical componentsas grounding points. Stay clear of movingparts. To avoid reverse polarityconnections, make sure that you correctlyidentify the positive (+) and negative (-)terminals on both the disabled and boostervehicles before connecting the cables.
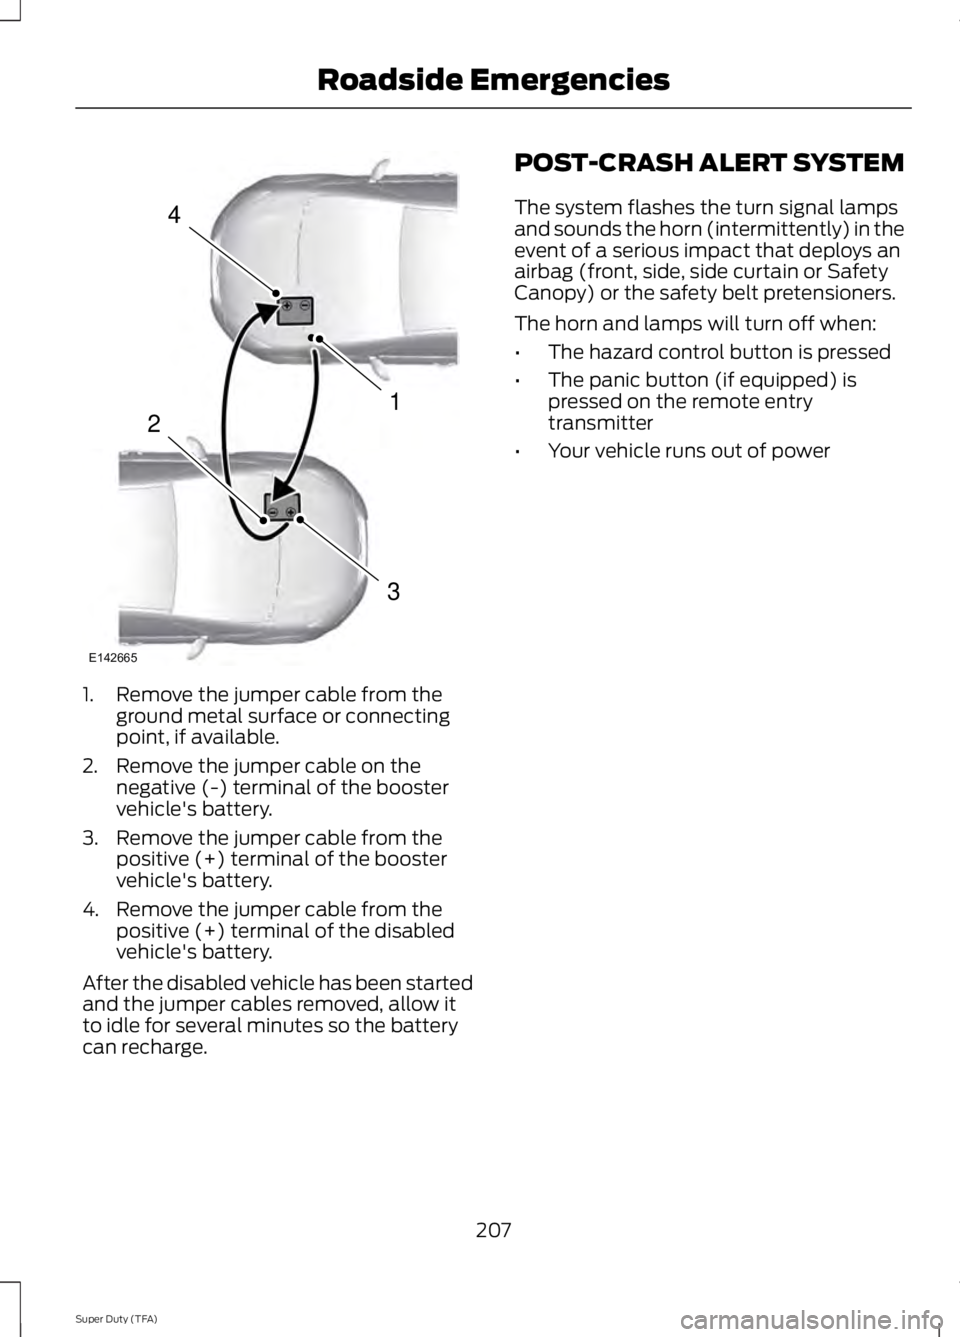
Note:In the illustration, the bottom vehiclerepresents the booster vehicle.
1.Connect the positive (+) jumper cableto the positive (+) terminal of thedischarged battery.
2. Connect the other end of the positive(+) cable to the positive (+) terminalof the assisting battery.
3. Connect the negative (-) cable to thenegative (-) terminal of the assistingbattery.
4. Make the final connection of thenegative (-) cable to an exposed metalpart of the stalled vehicle's engine, orconnect the negative (-) cable to aground connection point if available.
WARNING
Do not connect the end of thesecond cable to the negative (-)terminal of the battery to be jumped.A spark may cause an explosion of thegases that surround the battery.
Jump Starting
1.Start the engine of the booster vehicleand rev the engine moderately, or pressthe accelerator gently to keep yourengine speed between 2000 and 3000rpms, as shown in your tachometer.
2.Start the engine of the disabled vehicle.
3. Once the disabled vehicle has beenstarted, run both vehicle engines for anadditional three minutes beforedisconnecting the jumper cables.
Removing the Jumper Cables
Remove the jumper cables in the reverseorder that they were connected.
206
Super Duty (TFA)
Roadside Emergencies4
2
1
3
E142664
Page 210 of 460

1. Remove the jumper cable from theground metal surface or connectingpoint, if available.
2. Remove the jumper cable on thenegative (-) terminal of the boostervehicle's battery.
3. Remove the jumper cable from thepositive (+) terminal of the boostervehicle's battery.
4. Remove the jumper cable from thepositive (+) terminal of the disabledvehicle's battery.
After the disabled vehicle has been startedand the jumper cables removed, allow itto idle for several minutes so the batterycan recharge.
POST-CRASH ALERT SYSTEM
The system flashes the turn signal lampsand sounds the horn (intermittently) in theevent of a serious impact that deploys anairbag (front, side, side curtain or SafetyCanopy) or the safety belt pretensioners.
The horn and lamps will turn off when:
•The hazard control button is pressed
•The panic button (if equipped) ispressed on the remote entrytransmitter
•Your vehicle runs out of power
207
Super Duty (TFA)
Roadside Emergencies4
1
3
2
E142665
Page 454 of 460

Information Messages..................................924WD.........................................................................101AdvanceTrac™......................................................92Alarm........................................................................92Diesel Messages...................................................93Doors and Locks...................................................96Drivetrain.................................................................96Engine.......................................................................97Fuel............................................................................97Key.............................................................................98Maintenance..........................................................98MyKey®...................................................................98Off Road................................................................100Park Aid...................................................................99Park Brake...............................................................99Power Steering.....................................................99Tire Pressure Monitoring System.................100Trailer.......................................................................101Installing Child Seats.....................................16Child Seats...............................................................16Tether Strap Attachment..................................22Tether Strap Attachment (Rear SuperCabOnly).....................................................................23Using Cinch Tongue Lap and Shoulder Belts(All Front Center, Super Cab and CrewCab Rear Center Positions)..........................19Using Lap and Shoulder Belts..........................17Using Lower Anchors and Tethers forCHildren (LATCH).............................................21Using Tether Straps..............................................21Instrument Cluster.........................................75Instrument Lighting Dimmer.....................66Interior Lamps..................................................67Front Map Lamps (If equipped)....................68Rear Dome and Map Lamps............................68Interior Mirror....................................................72Auto-Dimming Mirror..........................................72Introduction.........................................................7
J
Jump-Starting the Vehicle.......................205Connecting the Jumper Cables....................206Jump Starting.....................................................206Preparing Your Vehicle....................................205Removing the Jumper Cables......................206
K
Keyless Entry....................................................55SECURICODE™ KEYLESS ENTRYKEYPAD...............................................................55Keys and Remote Controls........................46
L
Lighting Control..............................................65Headlamp Flasher...............................................65High Beams............................................................65Lighting..............................................................65Limited Slip Differential.............................158Load Carrying.................................................176Load Limit........................................................176Special Loading Instructions for Owners ofPick-up Trucks and Utility-typeVehicles.............................................................183Vehicle Loading - with and without aTrailer..................................................................176Locking and Unlocking.................................54Autolock and Autounlock.................................54Battery Saver.........................................................55Illuminated Entry..................................................55Power Door Locks................................................54Remote Control....................................................54Smart Unlocks......................................................54Locks...................................................................54Lug NutsSee: Changing a Road Wheel........................279
M
Maintenance..................................................223General Information..........................................223Manual Climate Control............................103Manual Seats..................................................110Manual Lumbar ....................................................111Moving the Seat Backward andForward..............................................................110Recline Adjustment............................................110Media Hub.......................................................312Memory Function............................................111Easy Entry and Exit Feature.............................112Message CenterSee: Information Displays..................................81
451
Super Duty (TFA)
Index