2014 FORD F250 SUPER DUTY brakes
[x] Cancel search: brakesPage 6 of 460

Rear Axle
Limited Slip Differential.............................158
Electronic Locking Differential................158
Brakes
General Information....................................160
Hints on Driving With Anti-LockBrakes...........................................................160
Parking Brake..................................................161
Hill Start Assist...............................................161
Traction Control
Principle of Operation.................................163
Using Traction Control................................163
Stability Control
Principle of Operation.................................165
Using Stability Control...............................165
Terrain Response
Principle of Operation................................168
Using Hill Descent Control........................168
Parking Aids
Parking Aid......................................................170
Rear View Camera.........................................171
Cruise Control
Principle of Operation.................................174
Using Cruise Control....................................174
Driving Aids
Steering.............................................................175
Load Carrying
Load Limit........................................................176
Tailgate.............................................................183
Towing
Towing a Trailer..............................................187
Trailer Sway Control....................................188
Recommended Towing Weights............188
Essential Towing Checks...........................189
Towing Points................................................196
Transporting the Vehicle............................197
Towing the Vehicle on Four Wheels......198
Driving Hints
Breaking-In....................................................200
Economical Driving....................................200
Driving Through Water................................201
Floor Mats.......................................................201
Snowplowing................................................202
Roadside Emergencies
Roadside Assistance.................................204
Hazard Warning Flashers.........................205
Fuel Shutoff..................................................205
Jump-Starting the Vehicle.......................205
Post-Crash Alert System..........................207
Customer Assistance
Getting the Services You Need..............208
In California (U.S. Only)............................209
The Better Business Bureau (BBB) AutoLine Program (U.S. Only)......................210
Utilizing the Mediation/ArbitrationProgram (Canada Only)........................210
Getting Assistance Outside the U.S. andCanada..........................................................211
Ordering Additional Owner'sLiterature......................................................212
Reporting Safety Defects (U.S.Only)..............................................................212
Reporting Safety Defects (CanadaOnly)..............................................................213
Fuses
Changing a Fuse............................................214
3
Super Duty (TFA)
Table of Contents
Page 12 of 460

Jack
Keep out of reach of children
Lighting control
Low tire pressure warning
Maintain correct fluid level
Note operating instructions
Panic alarm
Parking aid
Parking brake
Power steering fluid
Power windows front/rear
Power window lockout
Service engine soon
Side airbag
Shield the eyes
Stability control
Windshield wash and wipe
DATA RECORDING
Service Data Recording
Service data recorders in your vehicle arecapable of collecting and storingdiagnostic information about your vehicle.This potentially includes information aboutthe performance or status of varioussystems and modules in the vehicle, suchas engine, throttle, steering or brakesystems. In order to properly diagnose andservice your vehicle, Ford Motor Company,Ford of Canada, and service and repairfacilities may access or share among themvehicle diagnostic information receivedthrough a direct connection to your vehiclewhen diagnosing or servicing your vehicle.Additionally, when your vehicle is in forservice or repair, Ford Motor Company,Ford of Canada, and service and repairfacilities may access or share among themdata for vehicle improvement purposes.For U.S. only (if equipped), if you chooseto use the SYNC Vehicle Health Report,you consent that certain diagnosticinformation may also be accessedelectronically by Ford Motor Company andFord authorized service facilities, and thatthe diagnostic information may be usedfor any purpose. See SYNC™ (page 313).
9
Super Duty (TFA)
Introduction E161353 E139213 E167012
Page 34 of 460

All safety restraints in the vehicle arecombination lap and shoulder belts. Thedriver safety belt has the first type oflocking mode. The front outboardpassenger and rear outboard seat safetybelts have both types of locking modesdescribed as follows:
Vehicle Sensitive Mode
This is the normal retractor mode, whichallows free shoulder belt lengthadjustment to your movements andlocking in response to vehicle movement.For example, if the driver brakes suddenlyor turns a corner sharply, or the vehiclereceives an impact of approximately 5 mph(8 km/h) or more, the combination safetybelts will lock to help reduce forwardmovement of the driver and passengers.
In addition, the retractor is designed to lockif the webbing is pulled out too quickly. Ifthis occurs, let the belt retract slightly andpull webbing out again in a slow andcontrolled manner.
Automatic Locking Mode
In this mode, the shoulder belt isautomatically pre-locked. The belt will stillretract to remove any slack in the shoulderbelt. The automatic locking mode is notavailable on the driver safety belt.
When to Use the Automatic LockingMode
Use this mode any time a child safety seat,except a booster, is installed in passengerfront or rear seating positions. You shouldproperly restrain children 12 years old andunder in a rear seating position wheneverpossible. See Child Safety (page 15).
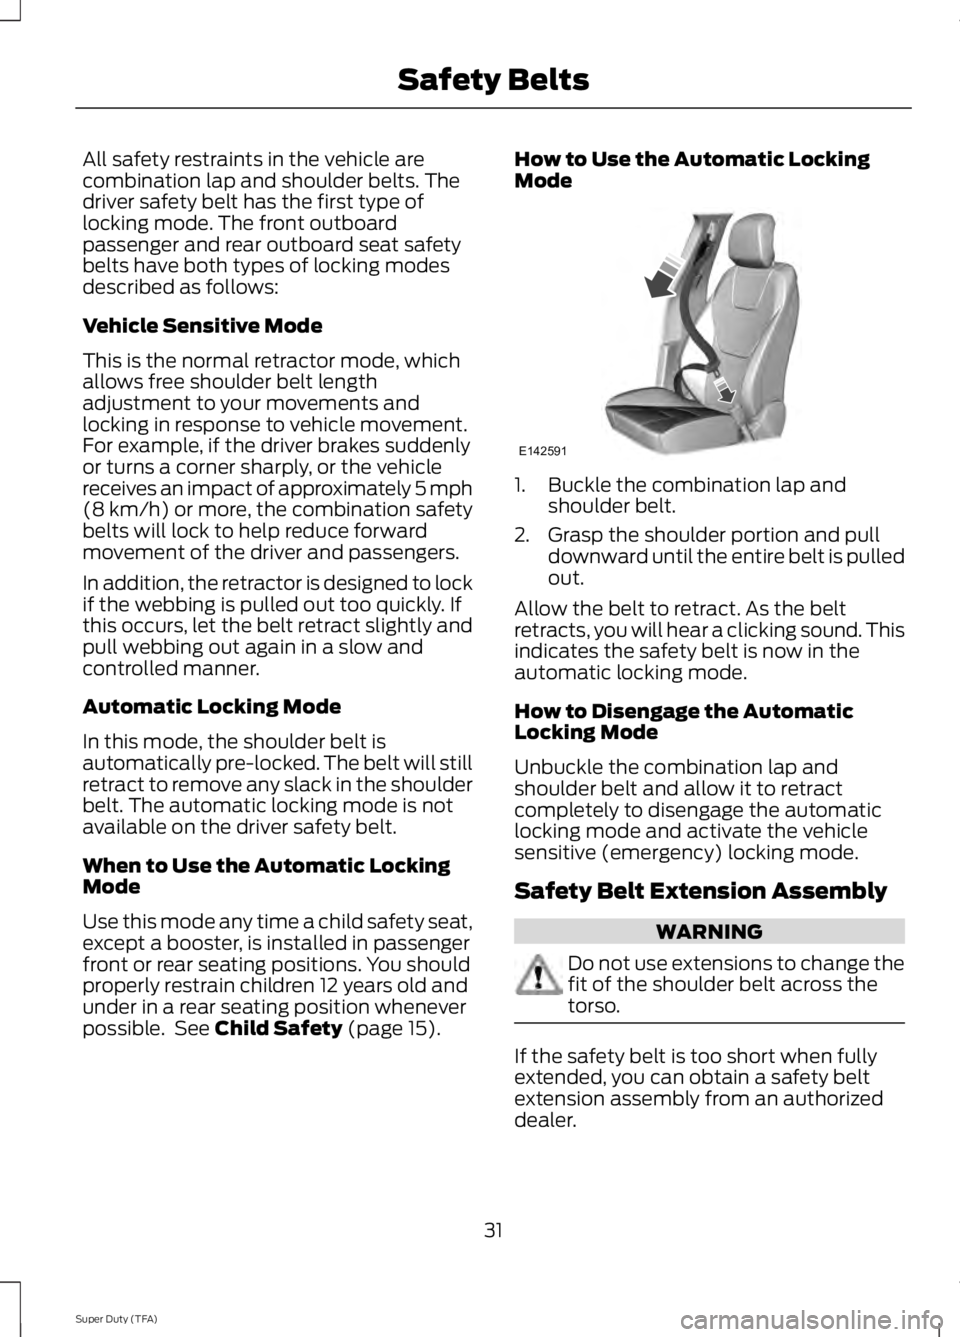
How to Use the Automatic LockingMode
1. Buckle the combination lap andshoulder belt.
2. Grasp the shoulder portion and pulldownward until the entire belt is pulledout.
Allow the belt to retract. As the beltretracts, you will hear a clicking sound. Thisindicates the safety belt is now in theautomatic locking mode.
How to Disengage the AutomaticLocking Mode
Unbuckle the combination lap andshoulder belt and allow it to retractcompletely to disengage the automaticlocking mode and activate the vehiclesensitive (emergency) locking mode.
Safety Belt Extension Assembly
WARNING
Do not use extensions to change thefit of the shoulder belt across thetorso.
If the safety belt is too short when fullyextended, you can obtain a safety beltextension assembly from an authorizeddealer.
31
Super Duty (TFA)
Safety BeltsE142591
Page 80 of 460

Variations:
Distance-to-emptyFuel gauge positionDriving type (fuel economyconditions)
35 miles to 80 miles (56 kmto 129 km)1/16thHighway driving
35 miles (56km)1/16thSevere duty driving (trailertowing, extended idle)
Information Display
Odometer
Located in the bottom of the informationdisplay Registers the accumulateddistance your vehicle has traveled.
Trip Computer
See General Information (page 81).
Vehicle Settings and Personalization
See General Information (page 81).
WARNING LAMPS AND
INDICATORS
The following warning lamps andindicators will alert you to a vehiclecondition that may become serious. Somelamps will illuminate when you start yourvehicle to make sure they work. If anylamps remain on after starting your vehicle,refer to the respective system warninglamp for further information.
Note:Some warning indicators appear inthe information display and function thesame as a warning lamp but do not displaywhen you start your vehicle.
Anti-Lock Braking System
If it illuminates when you aredriving, this indicates amalfunction. You will continueto have the normal braking system(without ABS) unless the brake systemwarning lamp is also illuminated. Have thesystem checked by your authorized dealer.
Battery
If it illuminates while driving, itindicates a malfunction. Switchoff all unnecessary electricalequipment and have the system checkedby your authorized dealer immediately.
Brake System
Illuminates when you engage theparking brake with the ignitionon.
If it illuminates when you are driving, checkthat the parking brake is not engaged. Ifthe parking brake is not engaged, thisindicates low brake fluid level or a brakesystem malfunction. Have the systemchecked immediately by your authorizeddealer.
77
Super Duty (TFA)
Instrument Cluster E144522
Page 104 of 460
![FORD F250 SUPER DUTY 2014 Owners Manual Trailer
ActionMessage
The current gain setting for the trailer brake.TRAILER BRAKE GAIN: XX.X[OUTPUT]
The current gain setting for the trailer brake when atrailer is not connected.TRAILER BRAKE GAIN: FORD F250 SUPER DUTY 2014 Owners Manual Trailer
ActionMessage
The current gain setting for the trailer brake.TRAILER BRAKE GAIN: XX.X[OUTPUT]
The current gain setting for the trailer brake when atrailer is not connected.TRAILER BRAKE GAIN:](/manual-img/11/58784/w960_58784-103.png)
Trailer
ActionMessage
The current gain setting for the trailer brake.TRAILER BRAKE GAIN: XX.X[OUTPUT]
The current gain setting for the trailer brake when atrailer is not connected.TRAILER BRAKE GAIN: XX.X NOTRAILER
Accompanied by a single chime, in response to faultssensed by the TBC. See Trailer Sway Control (page188).
TRAILER BRAKE MODULEFAULT
A correct trailer connection (a trailer with electric trailerbrakes) is sensed during a given ignition cycle.TRAILER CONNECTED
A trailer connection becomes disconnected, eitherintentionally or unintentionally, and has been sensedduring a given ignition cycle. Disregard this status ifyour vehicle is not equipped with a factory installedtrailer brake controller. This message may appear whenan aftermarket TBC is used even when the trailer isconnected.
TRAILER DISCONNECTED
Your trailer sway control has detected trailer sway soyou need to reduce your speed.TRAILER SWAY REDUCESPEED
Faults with your vehicle wiring and trailer wiring orbrake system. See Towing a Trailer (page 187).WIRING FAULT ON TRAILER
4WD
ActionMessage
A fault is present in your 4X4 system. See UsingFour-Wheel Drive (page 149).CHECK 4X4
Your 4X4 system is making a shift.4X4 SHIFT IN PROGRESS
You need to apply the brake in order to shift into4X4 LOW.FOR 4X4 LOW APPLY BRAKE
When your vehicle is at a stop and you need to shiftinto Neutral before you select 4X4 LOW.FOR 4X4 LOW SHIFT TO N
When your vehicle is moving and you need toreduce your speed to select 4X4 LOW.FOR 4X4 LOW SLOW TO 3 MPH
101
Super Duty (TFA)
Information Displays
Page 105 of 460

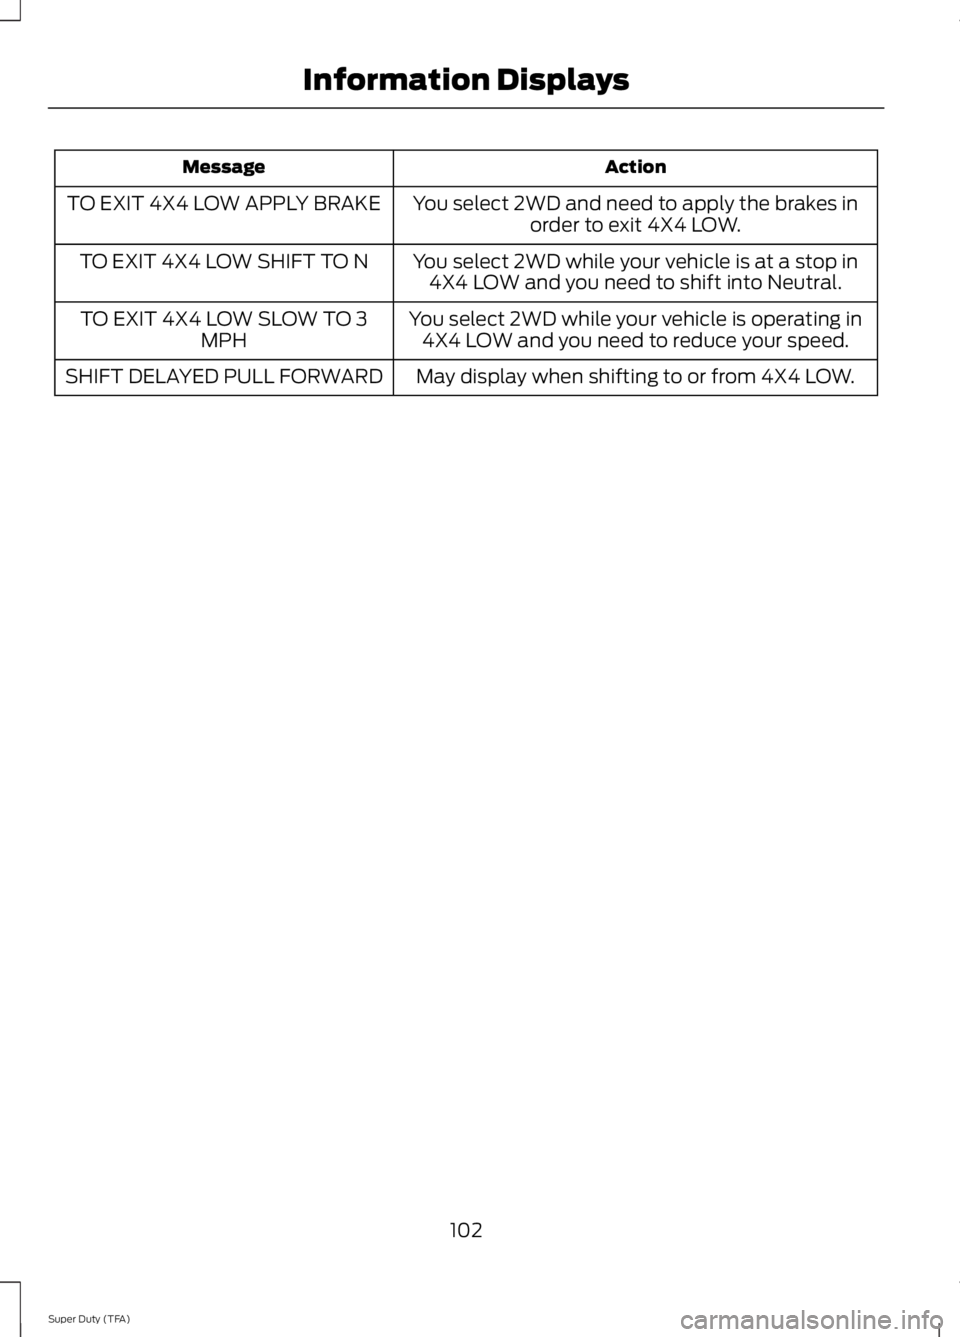
ActionMessage
You select 2WD and need to apply the brakes inorder to exit 4X4 LOW.TO EXIT 4X4 LOW APPLY BRAKE
You select 2WD while your vehicle is at a stop in4X4 LOW and you need to shift into Neutral.TO EXIT 4X4 LOW SHIFT TO N
You select 2WD while your vehicle is operating in4X4 LOW and you need to reduce your speed.TO EXIT 4X4 LOW SLOW TO 3MPH
May display when shifting to or from 4X4 LOW.SHIFT DELAYED PULL FORWARD
102
Super Duty (TFA)
Information Displays
Page 134 of 460

STARTING A GASOLINE
ENGINE
When you start the engine, the idle speedincreases, this helps to warm up theengine. If the engine idle speed does notslow down automatically, have yourvehicle checked by an authorized dealer.
Before starting the engine check thefollowing:
•Make sure all occupants have fastenedtheir safety belts.
•Make sure the headlamps andelectrical accessories are off.
•Make sure the parking brake is on.
•Move the transmission selector leverto position P.
•Turn the ignition key to the on position.
Note:Do not touch the accelerator pedal.
1. Fully press the brake pedal.
2. Turn the key to the start position tostart the engine. Release the key whenthe engine starts.
Note:The engine may continue crankingfor up to 15 seconds or until it starts.
Note:If you cannot start the engine on thefirst try, wait for a short period and try again.
Failure to Start
If you cannot start the engine after threeattempts, wait 10 seconds and follow thisprocedure:
1. Fully press the brake pedal.
2. Fully press the accelerator pedal andhold it there.
3. Start the engine.
Stopping the Engine When YourVehicle is Stationary
1. Move the transmission selector leverto position P.
2. Turn the key to the off position.
3. Apply the parking brake.
Stopping the Engine When YourVehicle is Moving
WARNING
Switching off the engine when thevehicle is still moving will result in aloss of brake and steering assistance.The steering will not lock, but higher effortwill be required. When the ignition isswitched off, some electrical circuits,warning lamps and indicators may also beoff.
1. Move the transmission selector leverto position N and use the brakes tobring your vehicle to a safe stop.
2. When your vehicle has stopped, movethe transmission selector lever toposition P and turn the key to the offposition.
3. Apply the parking brake.
Cold Weather Starting (FlexibleFuel Vehicles Only)
The starting characteristics of all gradesof E85 ethanol make it unsuitable for usewhen ambient temperatures fall below0°F (-18°C). Consult your fuel distributorfor the availability of winter grade ethanol.As the outside temperature approachesfreezing, ethanol fuel distributors shouldsupply winter grade ethanol (same as withunleaded gasoline). If summer gradeethanol is used in cold weather conditions,0°F to 32°F (-18°C to 0°C), you mayexperience increased cranking times, roughidle or hesitation until the engine haswarmed up.
You may experience a decrease in peakperformance when the engine is cold whenoperating on E85 ethanol.
131
Super Duty (TFA)
Starting and Stopping the Engine
Page 150 of 460

WARNINGS
When doing this procedure, you willbe taking the vehicle out of parkwhich means the vehicle can rollfreely. To avoid unwanted vehiclemovement, always fully set the parkingbrake prior to doing this procedure. Usewheel chocks if appropriate.
If the parking brake is fully released,but the brake warning lamp remainsilluminated, the brakes may not beworking properly. See your authorizeddealer.
Your vehicle is equipped with a brake-shiftinterlock feature that prevents thegearshift lever from being moved from P(Park) when the ignition is in the 3 (on)position and the brake pedal is not pressed.
If you cannot move the gearshift lever outof P (Park) position with the ignition in the4 (on) position and the brake pedalpressed, a malfunction may have occurred.It is possible that a fuse has blown or thevehicle’s brake lamps are not operatingproperly. See Fuse Specification Chart(page 215).
If the fuse is not blown and the brakelamps are working properly, the followingprocedure will allow you to move thegearshift lever from P (Park):
1. Apply the parking brake. Turn theignition key to 1 (off), then remove thekey.
2. Move the steering column to the fulldown and full rearward position(toward the driver’s seat).
3. Remove the gearshift lever boot.
4. Place fingers into hole where thegearshift lever boot was removed fromand pull top half of shroud up andforward to separate it from the lowerhalf of the shroud. There is a hinge atthe forward edge of the top shroud.Roll the top half of the shroud upwardon the hinge point to clear the hazardflasher button, then pull straightrearward toward the driver’s seat toremove.
5. Remove the top half of the shroud.
6. Remove the three fasteners under thecolumn that secure the lower shroudhalf to the column.
7.Pull the lock lever into the full unlockedposition and remove the lower shroudcover by pulling the lever handlethrough the slot in the cover.
8.Apply the brake and move the gearshiftlever into N (Neutral).
147
Super Duty (TFA)
TransmissionE163185 E163186