2014 FORD F250 interior lights
[x] Cancel search: interior lightsPage 58 of 460

The autolock feature will unlock all the
doors when:
•
autolock has locked the doors
• you stop the vehicle and switch the
ignition off or to accessory mode, and
• you open the driver door within 10
minutes.
Note: The doors will not autounlock if you
have electronically locked them before
opening the driver door.
Enabling or Disabling
You can enable or disable these features
in the information display or your
authorized dealer can do it for you. See
General Information (page 81).
Note: You can enable or disable the
autolock and autounlock features
independently of each other.
Illuminated Entry
The interior lamps and select exterior
lamps will illuminate when you unlock the
doors with the remote entry system.
The illuminated entry system will turn off
the lights if:
• the ignition is on
• you press the remote control lock
button, or
• after 25 seconds of illumination.
The dome lamp will not turn on if the
control is set to the off position.
The lights will not turn off if:
• you turn them on with the dimmer
control, or
• any door is open. Battery Saver
The battery saver turns off the interior
lamps 30 minutes after you switch the
ignition off if a door is open and the dome
lamp switch is on. It turns off the interior
lamps after 10 minutes if the dome lamp
switch is off.
KEYLESS ENTRY
(IF EQUIPPED)
SECURICODE™ KEYLESS ENTRY
KEYPAD
The keypad is located near the driver
window.
Note: If you enter your entry code too fast
on the keypad, the unlock function may not
work. Re-enter your entry code more slowly. You can use the keypad to lock or unlock
the doors without using a key.
You can operate the keypad with the
factory-set 5-digit entry code. The code is
located on the owner
’s wallet card in the
glove box and is available from an
authorized dealer. You can also create up
to five of your own 5-digit personal entry
codes.
Programming a Personal Entry Code
To create your own personal entry code:
1. Enter the factory-set code.
2. Press
1·2 on the keypad within five
seconds.
55
Super Duty (TFA) LocksE163050
Page 69 of 460

Note:
If the vehicle is equipped with
autolamps, it will have the headlamps on
with windshield wipers feature. If the
windshield wipers are turned on, the exterior
lamps will turn on with the headlamp
control in the autolamp position.
The autolamp system also keeps the lights
on for a predetermined amount of time after
the ignition switch is turned to off. You can
change the amount of time the lamps stay
on by using the programming procedure that
follows:
Autolamps - Programmable Exit
Delay
Programmable exit delay allows the length
of the autolamp exit delay to be changed.
To program the auto lamp exit time delay:
1. Start with the ignition in the off position
and the headlamp control in the
autolamp position.
2. Turn the headlamp control to off.
3. Turn the ignition switch to on and then
back to off.
4. Turn the headlamp control to the autolamp position. The headlamps will
turn on.
5. Wait the desired amount of time for the exit delay you want (up to three
minutes), then turn the headlamps off. INSTRUMENT LIGHTING
DIMMER Use to adjust the brightness of the
instrument panel and all applicable lit
components in the vehicle during
headlamp and parking lamp operation.
•
Tap the top or bottom of the control
to brighten/dim all interior lit
components incrementally, or
• Press and hold at the first position the
top or bottom of the control until the
desired lighting level is reached.
• Press and hold the top of the control
to the full on position to activate the
“dome on ” feature. This will turn on the
interior courtesy lights. The lights will
remain on until the bottom of the
control is pressed.
DAYTIME RUNNING LAMPS (IF
EQUIPPED) WARNING
Always remember to switch your
headlamps on in low light situations
or during inclement weather. The
system does not activate the tail lamps
and may not provide adequate lighting
during these conditions. Failure to activate
your headlamps under these conditions
may result in a collision. 66
Super Duty (TFA) LightingE163270
Page 75 of 460

Telescoping Mirrors (If Equipped)
This feature lets you extend the mirror
about 3 inches (75 millimeters). It is useful
when towing a trailer. You can manually
pull out or push in the mirrors to the desired
position.
PowerScope
™ Power Telescoping
Mirrors (If Equipped)
This feature lets you position both mirrors
in or out at the same time. The control is
on the door trim panel. Telescope Out
A
Telescope In
B To adjust the mirrors:
•
Press and hold the control.
• When you position the mirrors in or out,
the motors will run as long as you hold
the control. The running motors allow
you to make adjustments as needed.
• After positioning the mirrors, return the
control to the center position to help
protect the motors from overheating.
INTERIOR MIRROR WARNING
Do not adjust the mirror when your
vehicle is moving.
Note:
Do not clean the housing or glass of
any mirror with harsh abrasives, fuel or other
petroleum or ammonia-based cleaning
products.
You can adjust the interior mirror to your
preference. Some mirrors also have a
second pivot point. This lets you move the
mirror head up or down and from side to
side.
Pull the tab below the mirror toward you
to reduce glare at night.
Auto-Dimming Mirror
(If Equipped)
Note: Do not block the sensors on the front
and back of the mirror. Mirror performance
may be affected. A rear center passenger or
raised rear center head restraint may also
block light from reaching the sensor.
The mirror will dim automatically to reduce
glare when bright lights are detected from
behind your vehicle. It will automatically
return to normal reflection when you select
reverse gear to make sure you have a clear
view when backing up.
72
Super Duty (TFA) Windows and MirrorsE163061 E163062BA
Page 223 of 460

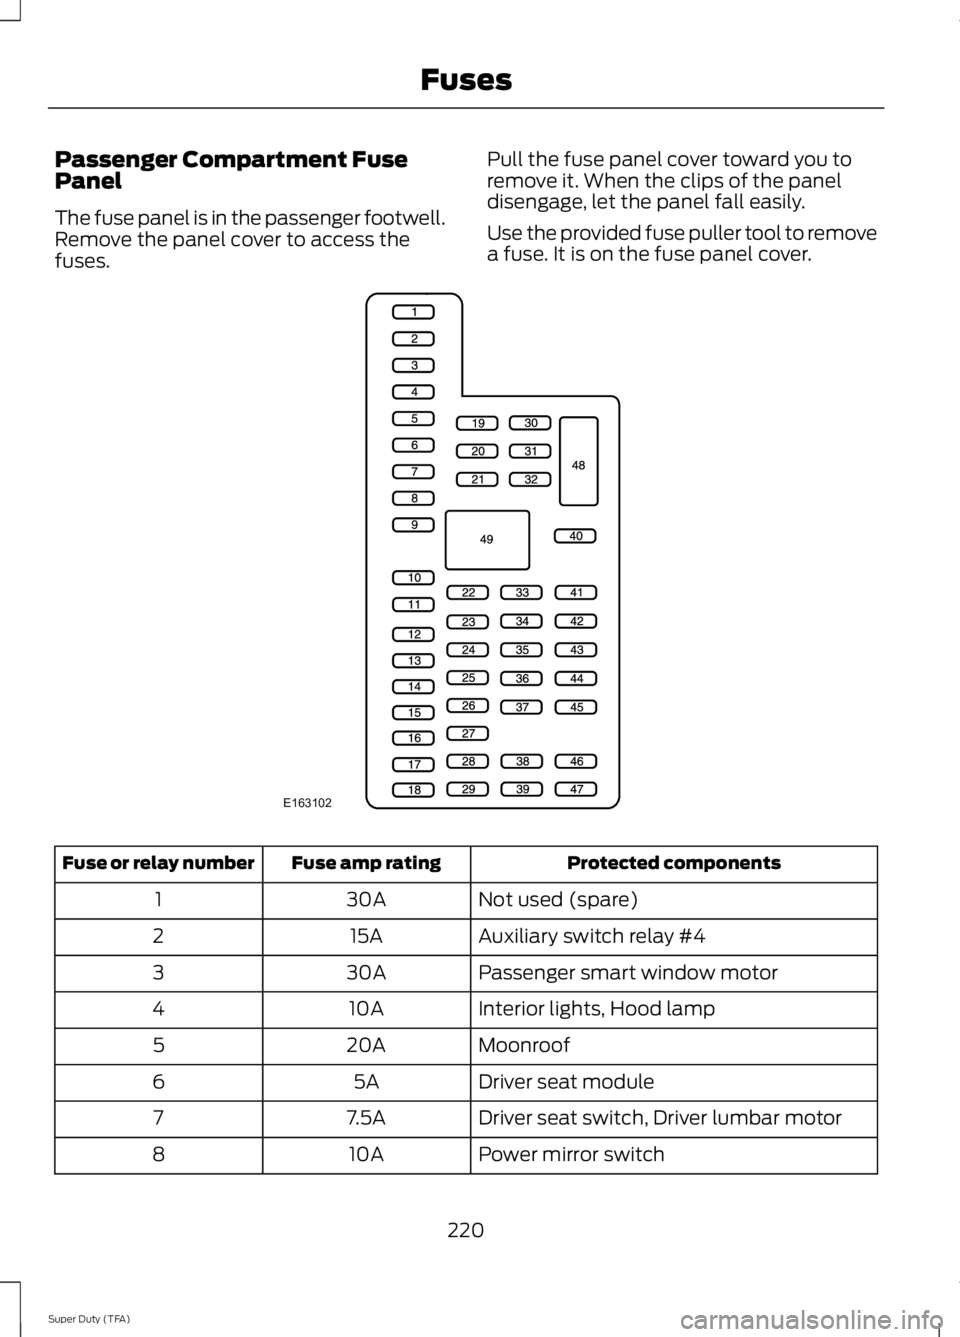
Passenger Compartment Fuse
Panel
The fuse panel is in the passenger footwell.
Remove the panel cover to access the
fuses.
Pull the fuse panel cover toward you to
remove it. When the clips of the panel
disengage, let the panel fall easily.
Use the provided fuse puller tool to remove
a fuse. It is on the fuse panel cover. Protected components
Fuse amp rating
Fuse or relay number
Not used (spare)
30A
1
Auxiliary switch relay #4
15A
2
Passenger smart window motor
30A
3
Interior lights, Hood lamp
10A
4
Moonroof
20A
5
Driver seat module
5A
6
Driver seat switch, Driver lumbar motor
7.5A
7
Power mirror switch
10A
8
220
Super Duty (TFA) FusesE163102
Page 247 of 460

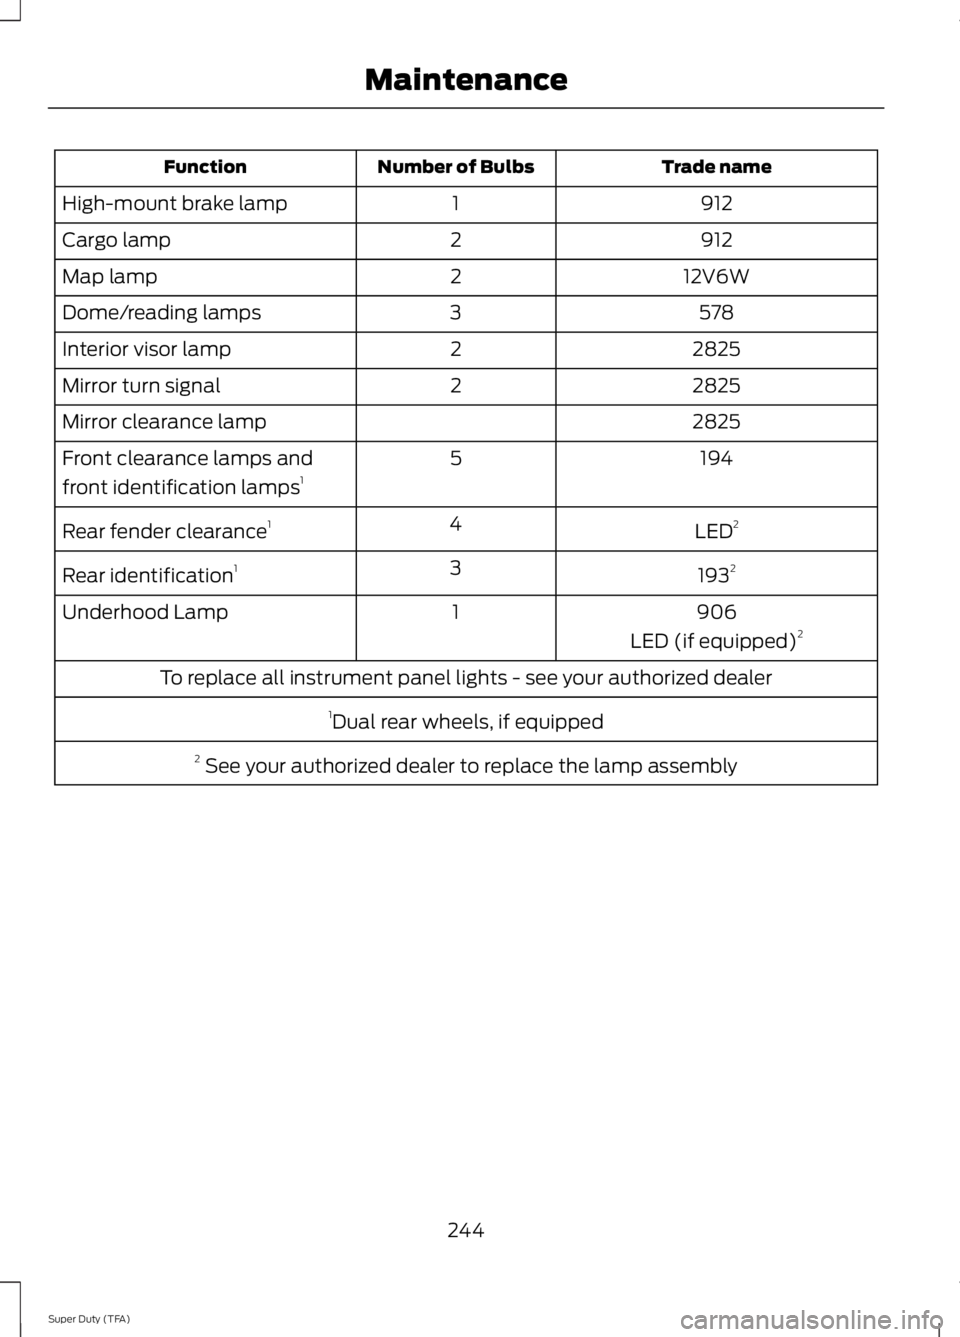
Trade name
Number of Bulbs
Function
912
1
High-mount brake lamp
912
2
Cargo lamp
12V6W
2
Map lamp
578
3
Dome/reading lamps
2825
2
Interior visor lamp
2825
2
Mirror turn signal
2825
Mirror clearance lamp
194
5
Front clearance lamps and
front identification lamps 1
LED2
4
Rear fender clearance 1
1932
3
Rear identification 1
906
1
Underhood Lamp
LED (if equipped)2
To replace all instrument panel lights - see your authorized dealer 1Dual rear wheels, if equipped
2 See your authorized dealer to replace the lamp assembly
244
Super Duty (TFA) Maintenance
Page 434 of 460

Ford Motor Company has recommended
maintenance intervals for various parts
and component systems based upon
engineering testing. Ford Motor Company
relies upon this testing to determine the
most appropriate mileage for replacement
of oils and fluids to protect your vehicle at
the lowest overall cost to you and
recommends against maintenance
schedules that deviate from the scheduled
maintenance information.
We strongly recommend the use of only
genuine Ford, Motorcraft or
Ford-authorized re-manufactured
replacement parts engineered for your
vehicle.
Additives and Chemicals
This owner's manual and the Ford
Workshop Manual list the recommended
additives and chemicals for your vehicle.
We do not recommend using chemicals or
additives not approved by us as part of
your vehicle
’s normal maintenance. Please
consult your warranty information. Oils, Fluids and Flushing
In many cases, fluid discoloration is a
normal operating characteristic and, by
itself, does not necessarily indicate a
concern or that the fluid needs to be
changed. However, a qualified expert, such
as the factory-trained technicians at your
dealership, should inspect discolored fluids
that also show signs of overheating or
foreign material contamination
immediately.
Make sure to change your vehicle
’s oils and
fluids at the specified intervals or in
conjunction with a repair. Flushing is a
viable way to change fluid for many vehicle
sub-systems during scheduled
maintenance. It is critical that systems are
flushed only with new fluid that is the same
as that required to fill and operate the
system or using a Ford-approved flushing
chemical.
Owner Checks and Services
Make sure you perform the following basic
maintenance checks and inspections every
month or at six-month intervals. Check every month
Engine oil level.
Function of all interior and exterior lights.
Tires (including spare) for wear and proper pressure. Windshield washer fluid level. Check every six months
Battery connections. Clean if necessary.
Body and door drain holes for obstructions. Clean if necessary. Cooling system fluid level and coolant strength.
Door weatherstrips for wear. Lubricate if necessary.
431
Super Duty (TFA) Scheduled Maintenance