2014 FORD F250 engine oil
[x] Cancel search: engine oilPage 227 of 460

2. Go to the front of the vehicle and
locate the secondary release lever,
which is located under the front of the
hood, to your right of the center of the
vehicle (driver's side), toward the
headlight.
3. Release the hood latch by pushing the secondary release lever to your left,
toward the center of the vehicle.
4. Raise the hood. 5.
To close the hood, lower the hood and
allow it to drop the last 8 to 11 inches
(20 to 30 centimeters).
Note: Make sure that the hood is closed
properly.
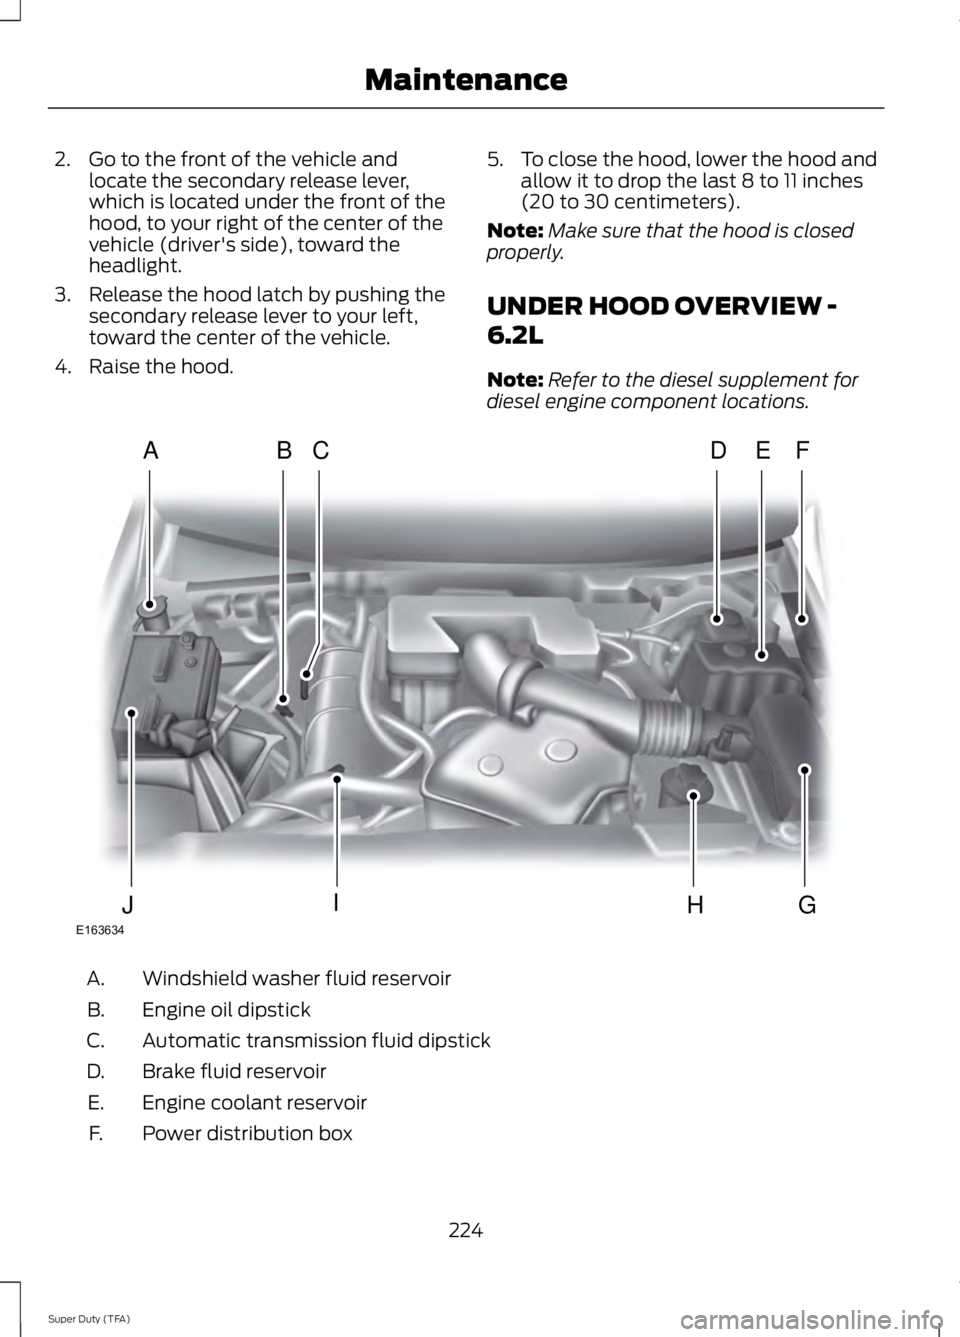
UNDER HOOD OVERVIEW -
6.2L
Note: Refer to the diesel supplement for
diesel engine component locations. Windshield washer fluid reservoir
A.
Engine oil dipstick
B.
Automatic transmission fluid dipstick
C.
Brake fluid reservoir
D.
Engine coolant reservoir
E.
Power distribution box
F.
224
Super Duty (TFA) MaintenanceE163634
ADFEBC
GHIJ
Page 228 of 460

Air filter assembly
G.
Power steering fluid reservoir
H.
Engine oil filler cap
I.
Battery
J.
UNDER HOOD OVERVIEW -
6.8L
Note: Refer to the diesel supplement for
diesel engine component locations. Windshield washer fluid reservoir Engine coolant reservoir
A.
Battery
B.
Automatic transmission fluid dipstick
C.
Engine oil filler cap
D.
Engine oil dipstick
E.
225
Super Duty (TFA) MaintenanceE163635
ABCEHIJFDG
Page 229 of 460

Power steering fluid reservoir
F.
Brake fluid reservoir
G.
Engine coolant reservoir
H.
Air filter assembly
I.
Power distribution box
J.
ENGINE OIL DIPSTICK MINA
MAX
B
ENGINE OIL CHECK
Note: For diesel engine information, refer
to the diesel supplement.
1. Make sure that your vehicle is on level ground.
2. Turn the engine off and wait 15 minutes
for the oil to drain into the oil pan.
3. Set the parking brake and ensure the gearshift is in P.
4. Open the hood. Protect yourself from engine heat.
5. Locate and carefully remove the engine
oil level dipstick. See the Under Hood
Overview in this chapter for location of
dipstick. 6. Wipe the dipstick clean. Insert the
dipstick fully, then remove it again.
•If the oil level is between the lower
and upper holes, the oil level is
acceptable. DO NOT ADD OIL.
• If the oil level is below the lower
hole, add enough oil to raise the
level within the lower and upper
holes.
• Oil levels above the upper hole may
cause engine damage. Some oil
must be removed from the engine
by an authorized dealer.
7. Put the oil level dipstick back into the oil dipstick tube and ensure it is fully
seated.
Adding Engine Oil
Note: Do not remove the filler cap when
the engine is running.
Note: Do not remove the engine oil level
dipstick when the engine is runnin
Note: Do not add oil further than the MAX
mark. Oil levels above the MAX mark may
cause engine damage.
226
Super Duty (TFA) MaintenanceE161560
AB
Page 230 of 460

Only use oils certified for gasoline engines
by the American Petroleum Institute (API).
An oil with this trademark symbol
conforms to the current engine and
emission system protection standards and
fuel economy requirements of the
International Lubricants Specification
Advisory Council (ILSAC), comprised of
U.S. and Japanese automobile
manufacturers.
1. Check the engine oil level.
2. If the engine oil level is not within the
normal range, add engine oil that
meets Ford specifications. See
Capacities and Specifications for more
information.
3. Remove the engine oil filler cap and use a funnel to pour the engine oil into
the opening.
4. Recheck the engine oil level. Make sure
the oil level is not above the normal
operating range on the engine oil level
dipstick.
5. Install the engine oil level dipstick and ensure it is fully seated.
6. Fully install the engine oil filler cap by turning the filler cap clockwise until
three clicks are heard or until the cap
is fully seated. ENGINE COOLANT CHECK
Checking the Engine Coolant
Note:
If your vehicle is equipped with a
diesel engine, refer to the Diesel
Supplement.
When the engine is cold, check the
concentration and level of the engine
coolant at the intervals listed in the
scheduled maintenance information. See
Scheduled Maintenance (page 430).
Note: Make sure that the level is between
the MIN and MAX marks on the coolant
reservoir.
Note: Coolant expands when it is hot. The
level may extend beyond the MAX mark
Note: If the level is at the MIN mark, below
the MIN mark, or empty, add coolant
immediately. See
Adding Engine Coolant
in this chapter.
The coolant concentration should be
maintained within 48% to 50%, which
equates to a freeze point between
-29°F
(-34°C) and -35°F (-37°C).
Note: For best results, coolant
concentration should be tested with a
refractometer such as Rotunda tool
300-ROB75240 available from your
authorized dealer. Ford does not
recommend the use of hydrometers or
coolant test strips for measuring coolant
concentrations.
Note: Automotive fluids are not
interchangeable. Do not use engine coolant
or antifreeze or windshield washer fluid
outside of its specified function and vehicle
location.
227
Super Duty (TFA) MaintenanceE142732
Page 252 of 460

•
Never wash or rinse any ignition coil,
spark plug wire or spark plug well, or
the area in and around these locations.
• Cover the battery, power distribution
box, and air filter assembly to prevent
water damage when cleaning the
engine.
CLEANING THE EXHAUST WARNINGS
Failure to maintain the functional
holes, in the tailpipe section of the
exhaust, clean and free of debris or
foreign material may result in the holes
becoming blocked or plugged. Do not
modify or remove the tail-pipe section.
Blocked or plugged holes or
removal/modification of the system could
result in elevated exhaust gas
temperatures which may result in
vehicle/property damage or personal
injury. The normal operating temperature
of the exhaust system is very high.
Never work around or attempt to
repair any part of the exhaust system until
it has cooled. Use special care when
working around the diesel oxidation
catalytic converter and/or the diesel
particulate filter (DPF). The diesel
oxidation catalytic converter and/or the
DPF heats up to a high temperature after
only a short period of engine operation and
can stay hot even after the engine is turned
off. Failure to follow these instructions may
result in personal injury. The visible holes in the exhaust tip and the
holes under the shield just inboard of the
right rear tire(s) are functional. The holes
need to be kept clear of mud/debris or
foreign material to maintain proper
function of the exhaust system. Clean and
remove debris or foreign material if present
as needed. Spraying with a hose during
regular washing of vehicle should help
keep holes clean and clear of debris or
foreign material.
CLEANING THE WINDOWS AND
WIPER BLADES
Car wash chemicals and environmental
fallout can result in windshield and wiper
blade contamination. Dirty windshield and
wipers will result in poor windshield wiper
operation. Keep the windshield and wiper
blades clean to maintain windshield wiper
performance.
To clean the windshield and wiper blades:
•
Clean the windshield with a
non-abrasive glass cleaner.
• For windshields contaminated with
tree sap, chemicals, wax or bugs, clean
the entire windshield using steel wool
(no greater than 0000 grade) in a
circular motion and rinse with water.
• Clean the wiper blades with isopropyl
rubbing alcohol or windshield washer
fluid.
249
Super Duty (TFA) Vehicle CareE163380
Page 255 of 460

Note:
Industrial-strength or heavy-duty
cleaners in combination with brush agitation
to remove brake dust and dirt, could wear
away the clear coat finish over a period time.
Note: Do not use hydrofluoric acid-based
or high caustic-based wheel cleaners, steel
wool, fuels or strong household detergents.
Note: If you intend parking your vehicle for
an extended period after cleaning the
wheels with a wheel cleaner, drive your
vehicle for a few minutes before doing so.
This will reduce the risk of increased
corrosion of the brake discs.
Alloy wheels and wheel covers are coated
with a clear coat paint finish. To maintain
their condition we recommend that you:
• Clean the wheels weekly using
Motorcraft Wheel and Tire Cleaner.
Apply using manufacturer's
instructions.
• Use a sponge to remove heavy
deposits of dirt and brake dust
accumulation.
• Rinse thoroughly with a strong stream
of water when you have completed the
cleaning process.
• To remove tar and grease, use
Motorcraft Bug and Tar Remover.
VEHICLE STORAGE
If you plan on storing your vehicle for an
extended period of time (30 days or more),
read the following maintenance
recommendations to make sure your
vehicle stays in good operating condition.
All motor vehicles and their components
were engineered and tested for reliable,
regular driving. Long term storage under
various conditions may lead to component
degradation or failure unless specific
precautions are taken to preserve the
components. General
•
Store all vehicles in a dry, ventilated
place.
• Protect from sunlight, if possible.
• If vehicles are stored outside, they
require regular maintenance to protect
against rust and damage.
Body
• Wash your vehicle thoroughly to
remove dirt, grease, oil, tar or mud from
exterior surfaces, rear-wheel housing
and underside of front fenders.
• Periodically wash your vehicle stored
in exposed locations.
• Touch-up exposed or primed metal to
prevent rust.
• Cover chrome and stainless steel parts
with a thick coat of auto wax to prevent
discoloration. Re-wax as necessary
when your vehicle is washed.
• Lubricate all hood, door and trunk lid
hinges, and latches with a light grade
oil.
• Cover interior trim to prevent fading.
• Keep all rubber parts free from oil and
solvents.
Engine
• The engine oil and filter should be
changed prior to storage, as used
engine oil contain contaminates that
may cause engine damage.
• Start the engine every 15 days. Run at
fast idle until it reaches normal
operating temperature
• With your foot on the brake, shift
through all the gears while the engine
is running.
252
Super Duty (TFA) Vehicle Care
Page 295 of 460

ENGINE SPECIFICATIONS
6.8L V10 Engine
6.2L V8 Engine
Engine
413
378
Cubic inches
Minimum 87 octane
Minimum 87 octane
Required fuel
1-6-5-10-2-7-3-8-4-9
1-5-4-8-6-3-7-2
Firing order
Coil on plug
Coil on plug
Ignition system
0.039-0.043 inch (1.00-1.10mm)
0.041-0.047 inch (1.04-1.20
mm)
Spark plug gap
9.2:1
9.8:1
Compression ratio
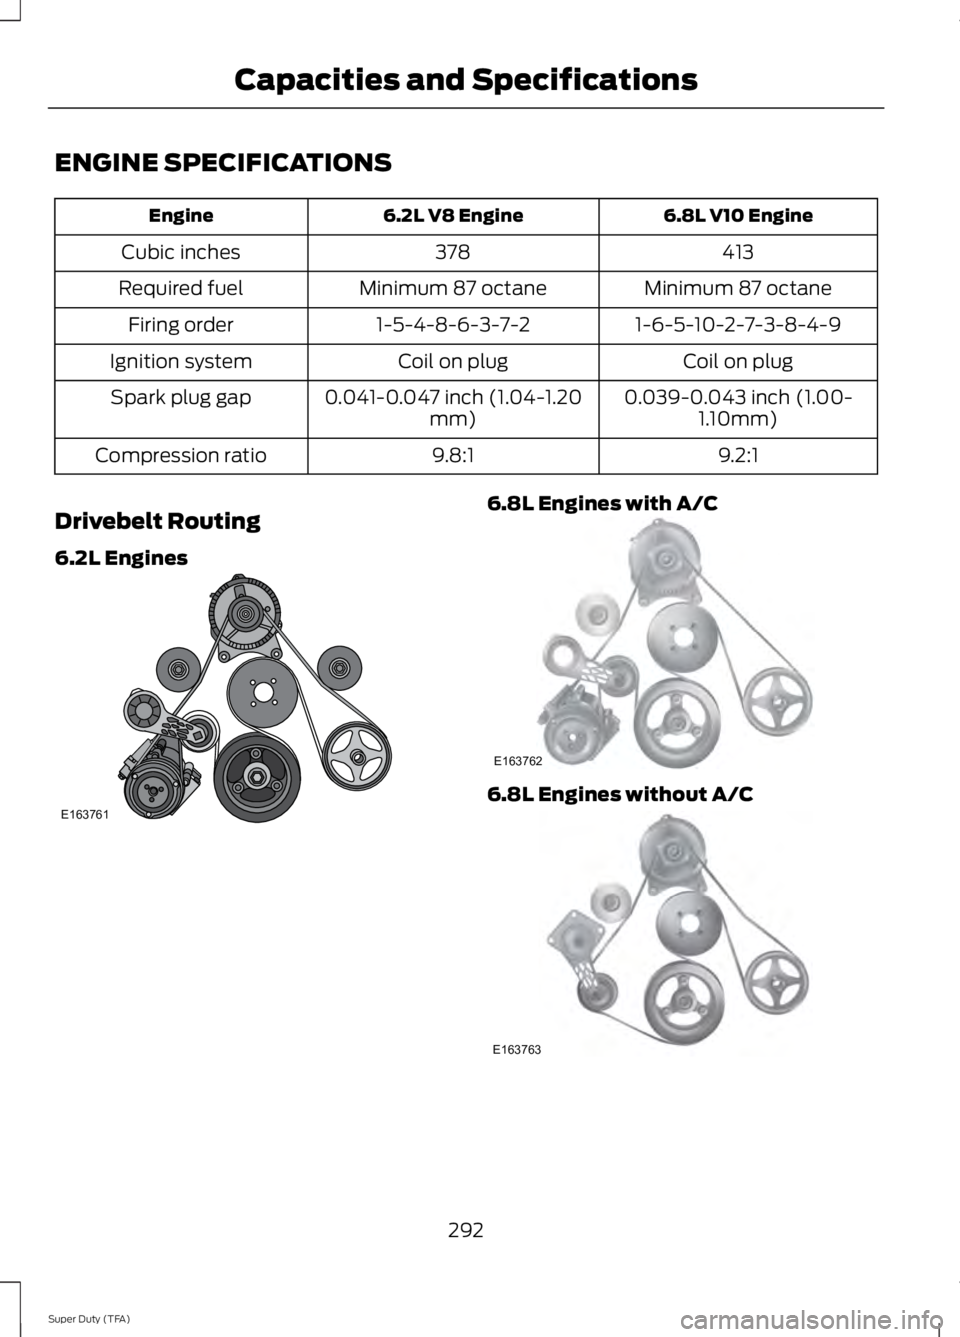
Drivebelt Routing
6.2L Engines 6.8L Engines with A/C
6.8L Engines without A/C
292
Super Duty (TFA) Capacities and SpecificationsE163761 E163762 E163763
Page 296 of 460

MOTORCRAFT PARTS
6.8L V10 engine
6.2L V8 engine
Component
FA-1883
FA-1883
Air filter element
FL-820-S
FL-820-S
Oil filter
BXT-65-650
BXT-65-650
Battery (standard)
BXT-65-750
BXT-65-750
Battery (optional)
HJFS-24FP/SP-509
CYFS12FP/SP-526
Spark plugs-platinum 1
FS-104
FS-104
Seat filter
WW-2201-P
WW-2201-P
Windshield wiper blade
1 For spark plug replacement, see an authorized dealer. Replace the spark plugs at the
appropriate intervals. See Scheduled Maintenance (page 430).
Note: Replace the spark plugs with ones that meet Ford material and design specifications
for your vehicle, such as Motorcraft or equivalent replacement parts. The customer warranty
may be void for any damage to the engine if such spark plugs are not used.
293
Super Duty (TFA) Capacities and Specifications