2014 FORD F150 transmission
[x] Cancel search: transmissionPage 248 of 472
5. If the coolant is low, add coolant, and
restart the engine. See Adding Engine
Coolant or How Fail-Safe Cooling
Works in this chapter for more
information.
AUTOMATIC TRANSMISSION
FLUID CHECK
Note: Transmission fluid should be checked
by an authorized dealer. If required, fluid
should be added by an authorized dealer.
The automatic transmission does not have
a transmission fluid dipstick.
Refer to your scheduled maintenance
information for scheduled intervals for fluid
checks and changes. Your transmission
does not consume fluid. However, the fluid
level should be checked if the transmission
is not working properly, (i.e., if the
transmission slips or shifts slowly) or if you
notice some sign of fluid leakage.
Do not use supplemental transmission
fluid additives, treatments or cleaning
agents. The use of these materials may
affect transmission operation and result
in damage to internal transmission
components. TRANSFER CASE FLUID
CHECK
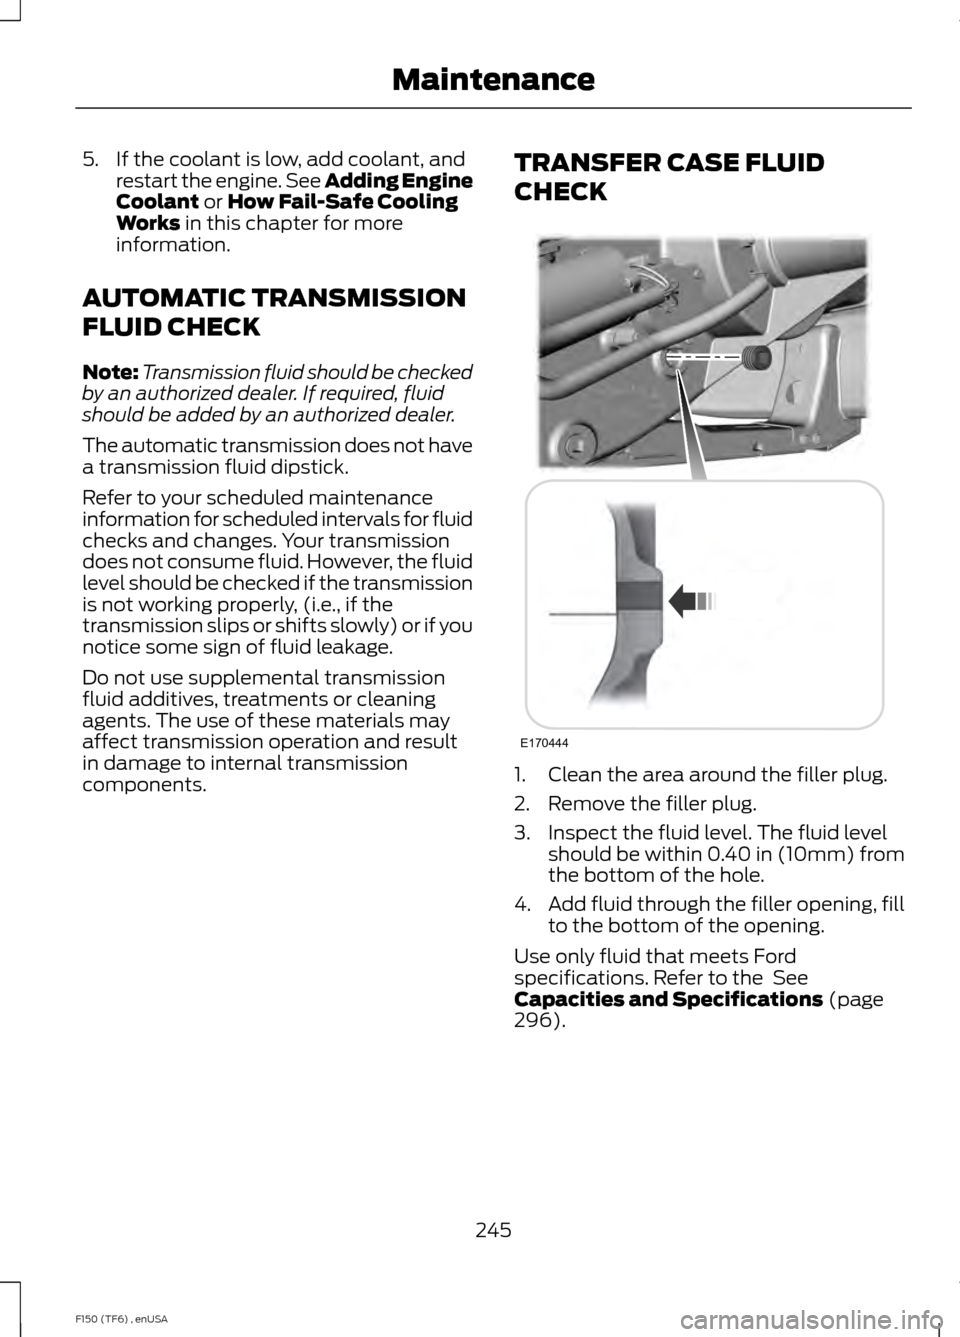
1. Clean the area around the filler plug.
2. Remove the filler plug.
3. Inspect the fluid level. The fluid level
should be within 0.40 in (10mm) from
the bottom of the hole.
4. Add fluid through the filler opening, fill
to the bottom of the opening.
Use only fluid that meets Ford
specifications. Refer to the
See
Capacities and Specifications (page
296).
245
F150 (TF6) , enUSA MaintenanceE170444
Page 294 of 472
Tire Change Procedure
WARNINGS
When one of the front wheels is off
the ground, the transmission alone
will not prevent the vehicle from
moving or slipping off the jack, even if the
transmission selector lever is in position P. To help prevent the vehicle from
moving when you change a tire, be
sure to place the transmission
selector lever in position P, set the parking
brake and block (in both directions) the
wheel that is diagonally opposite (other
side and end of the vehicle) to the tire
being changed. Never get underneath a vehicle that
is supported only by a jack. If the
vehicle slips off the jack, you or
someone else could be seriously injured. Do not attempt to change a tire on
the side of the vehicle close to
moving traffic. Pull far enough off the
road to avoid the danger of being hit when
operating the jack or changing the wheel. Always use the jack provided as
original equipment with your vehicle.
If using a jack other than the one
provided as original equipment with your
vehicle, make sure the jack capacity is
adequate for the vehicle weight, including
any vehicle cargo or modifications. Disable the power running boards
before jacking, lifting, or placing any
object under the vehicle. Never place
your hand between the power running
board and the vehicle as extended power
running boards will retract when the doors
are closed. Failure to follow these
instructions may result in personal injury. Note:
Passengers should not remain in the
vehicle when the vehicle is being jacked. Park on a level surface, activate the hazard
flashers and set the parking brake. Then,
place the transmission selector lever in
position P and turn the engine off.
To remove the jack on Regular Cab and
SuperCab models:
Remove the wing nut and turn the jack
screw counterclockwise to release
pressure before removing the jack from the
bracket.
To remove the jack on SuperCrew
models:
1. Lift both rear seat cushions.
2. Remove the insert containing the Easy
Fuel funnel from the driver's side.
3. Remove the two small wing nuts on the passenger side.
4. Slide the plastic box toward the driver's
side and remove.
See the instruction sheet (located with the
jack) for detailed tire change instructions.
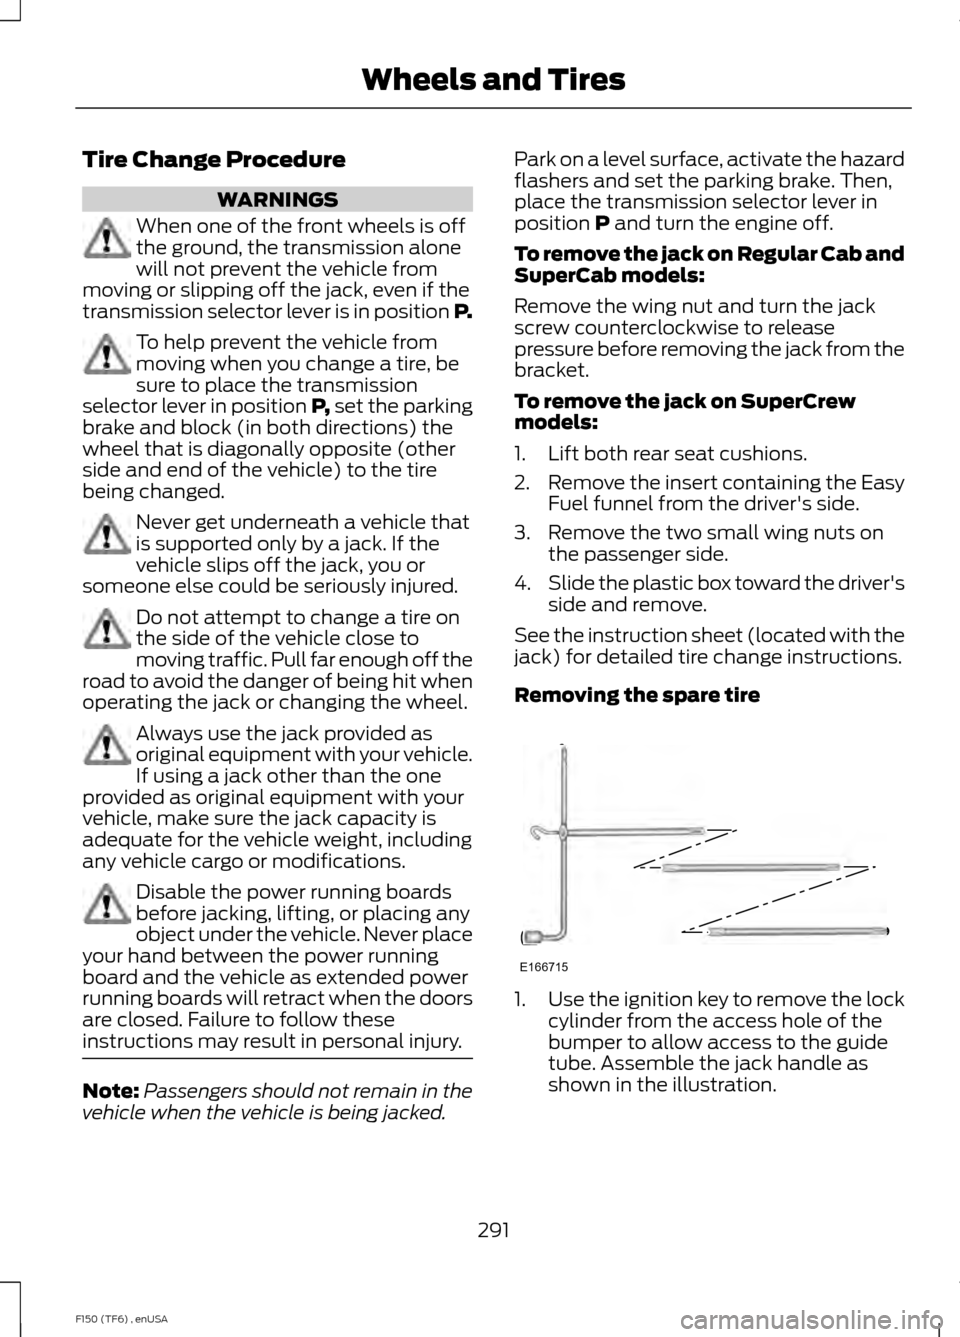
Removing the spare tire 1.
Use the ignition key to remove the lock
cylinder from the access hole of the
bumper to allow access to the guide
tube. Assemble the jack handle as
shown in the illustration.
291
F150 (TF6) , enUSA Wheels and TiresE166715
Page 301 of 472
MOTORCRAFT PARTS
6.2L V8 engine
5.0L V8 engine
3.7L V6 engine
3.5L V6 Ecoboost
Component
FA-1883
Air filter
element
FL-820-S
FL-500-S
FL-500-S
FL-500-S
Oil filter
BXT-65-750
Battery
SP-526/CYFS-12-FP
SP-519/CYFS-
12Y
SP-520/CYFS-
12F-5
SP-534/CYFS-
12-YT3
Spark plugs
1
WW-2201-PF
Windshield
wiper blade
FS-104
Seat air filter
2
Automatic
transmission fluid filter
1 For spark plug replacement, see your
authorized dealer. See Scheduled
Maintenance (page 438). for the
appropriate intervals for changing the
spark plugs.
Note: Replace the spark plugs with ones
that meet Ford material and design
specifications for your vehicle, such as
Motorcraft or equivalent replacement parts.
The customer warranty may be void for any
damage to the engine if such spark plugs
are not used.
2 For Automatic transmission fluid filter
replacement, see your authorized dealer.
VEHICLE IDENTIFICATION
NUMBER
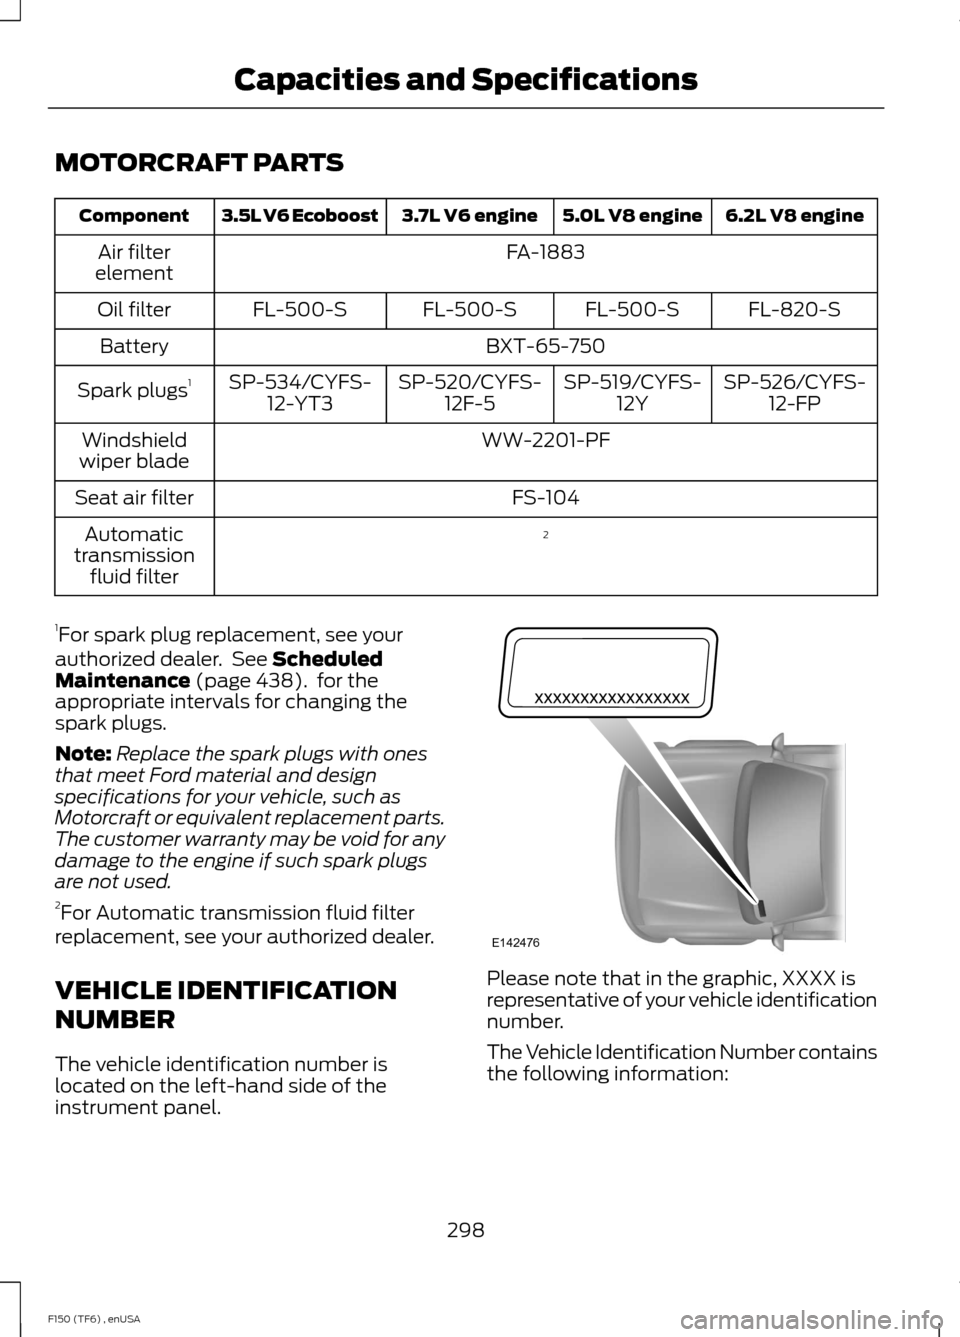
The vehicle identification number is
located on the left-hand side of the
instrument panel. Please note that in the graphic, XXXX is
representative of your vehicle identification
number.
The Vehicle Identification Number contains
the following information:
298
F150 (TF6) , enUSA Capacities and SpecificationsE142476
Page 303 of 472
TRANSMISSION CODE
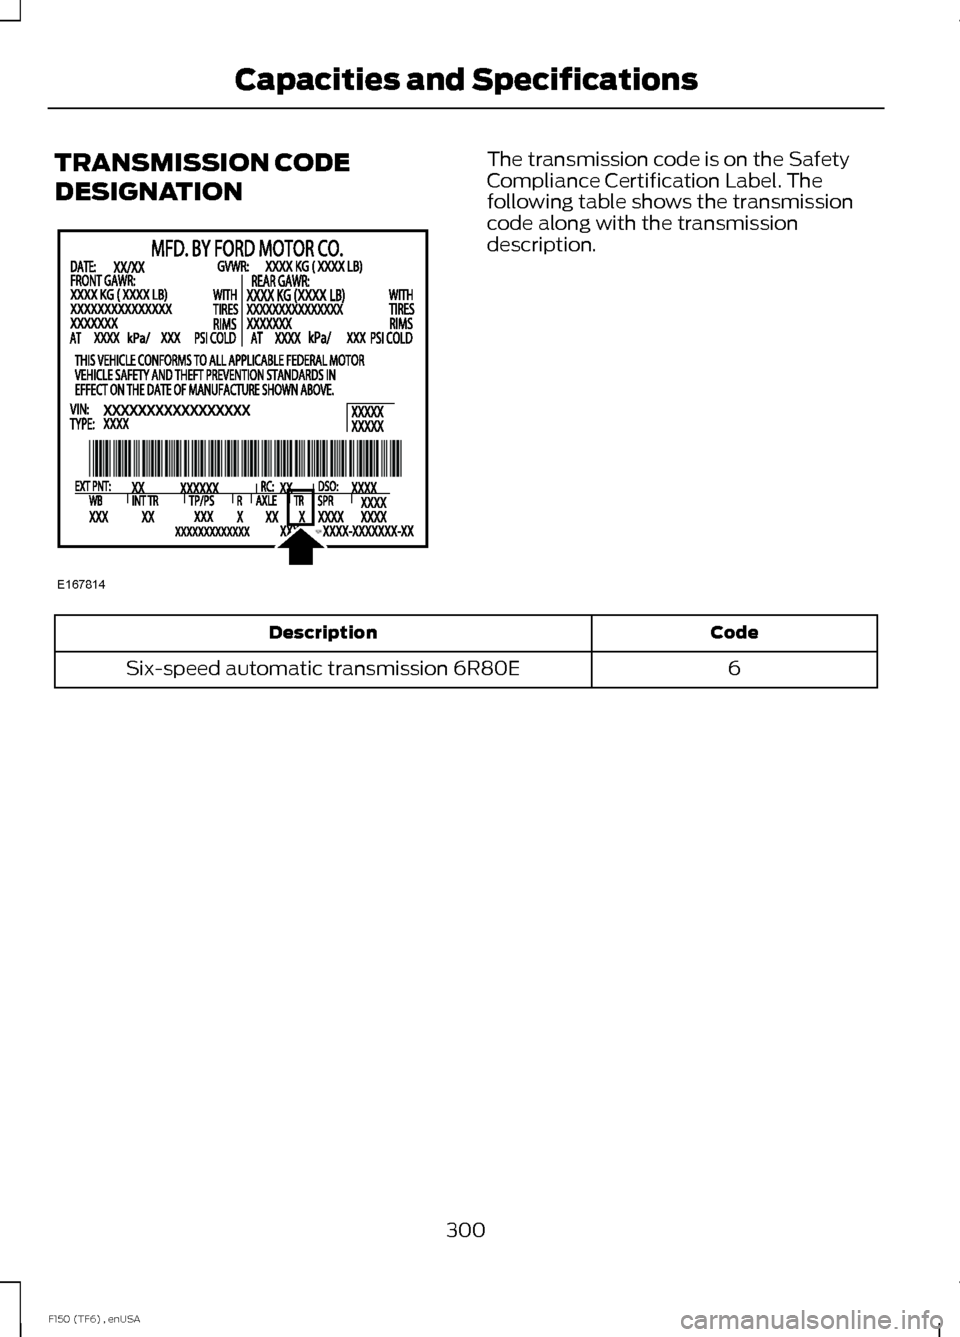
DESIGNATION The transmission code is on the Safety
Compliance Certification Label. The
following table shows the transmission
code along with the transmission
description.
Code
Description
6
Six-speed automatic transmission 6R80E
300
F150 (TF6) , enUSA Capacities and SpecificationsE167814
Page 305 of 472
Ford part number / Ford
specification
Ford part name or
equivalent
Capacity
Item
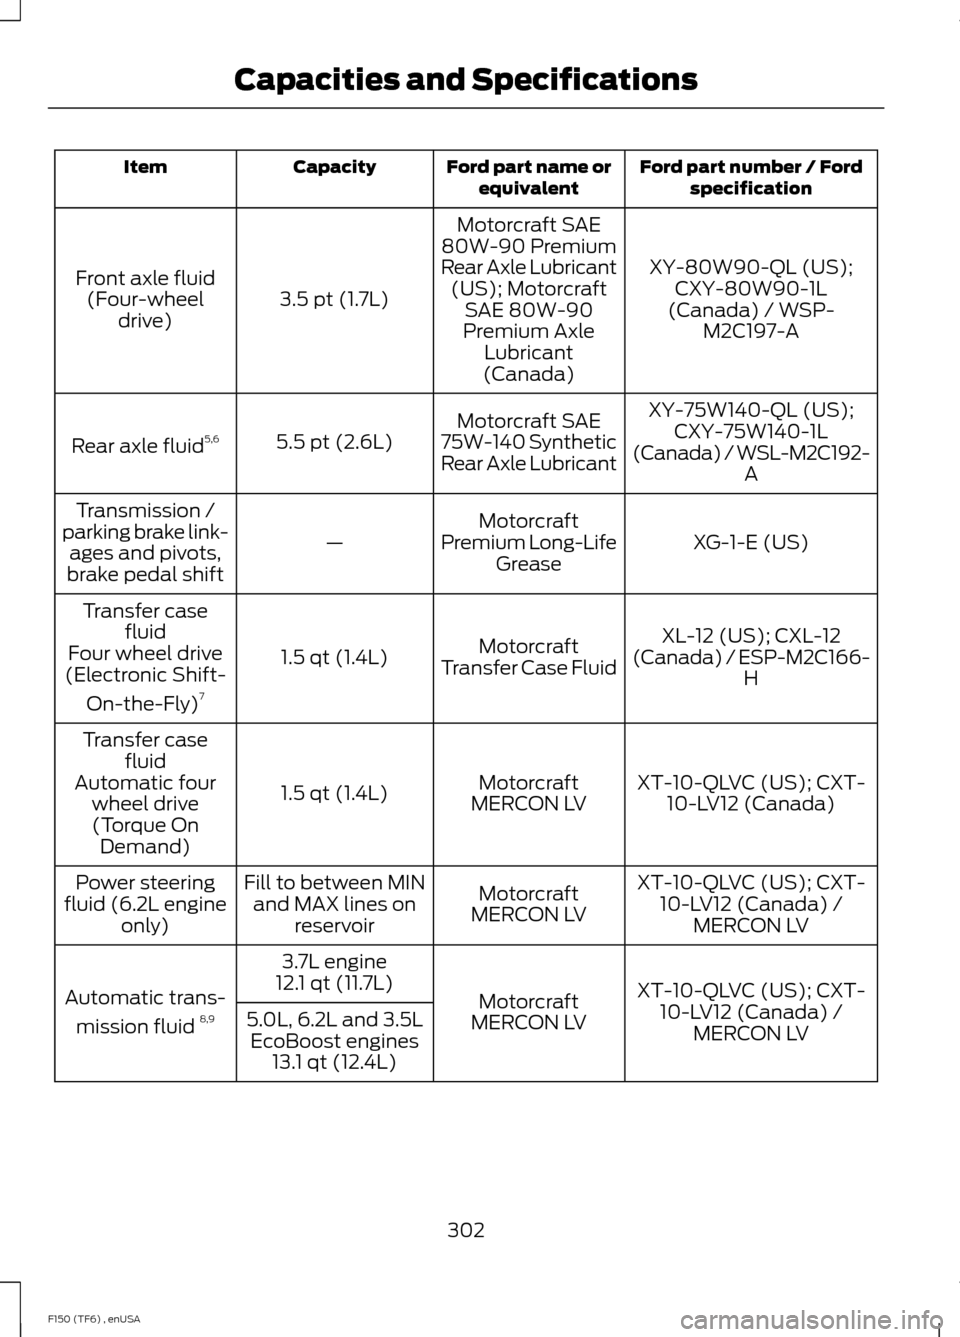
XY-80W90-QL (US);CXY-80W90-1L
(Canada) / WSP- M2C197-A
Motorcraft SAE
80W-90 Premium
Rear Axle Lubricant (US); Motorcraft SAE 80W-90
Premium Axle Lubricant
(Canada)
3.5 pt (1.7L)
Front axle fluid
(Four-wheel drive)
XY-75W140-QL (US);CXY-75W140-1L
(Canada) / WSL-M2C192- A
Motorcraft SAE
75W-140 Synthetic
Rear Axle Lubricant
5.5 pt (2.6L)
Rear axle fluid 5,6
XG-1-E (US)
Motorcraft
Premium Long-Life Grease
—
Transmission /
parking brake link- ages and pivots,
brake pedal shift
XL-12 (US); CXL-12
(Canada) / ESP-M2C166- H
Motorcraft
Transfer Case Fluid
1.5 qt (1.4L)
Transfer case
fluid
Four wheel drive
(Electronic Shift-
On-the-Fly) 7
XT-10-QLVC (US); CXT-10-LV12 (Canada)
Motorcraft
MERCON LV
1.5 qt (1.4L)
Transfer case
fluid
Automatic four wheel drive(Torque On Demand)
XT-10-QLVC (US); CXT-10-LV12 (Canada) / MERCON LV
Motorcraft
MERCON LV
Fill to between MIN
and MAX lines on reservoir
Power steering
fluid (6.2L engine only)
XT-10-QLVC (US); CXT-10-LV12 (Canada) / MERCON LV
Motorcraft
MERCON LV
3.7L engine
12.1 qt (11.7L)
Automatic trans-
mission fluid 8,9
5.0L, 6.2L and 3.5L
EcoBoost engines 13.1 qt (12.4L)
302
F150 (TF6) , enUSA Capacities and Specifications
Page 308 of 472
1
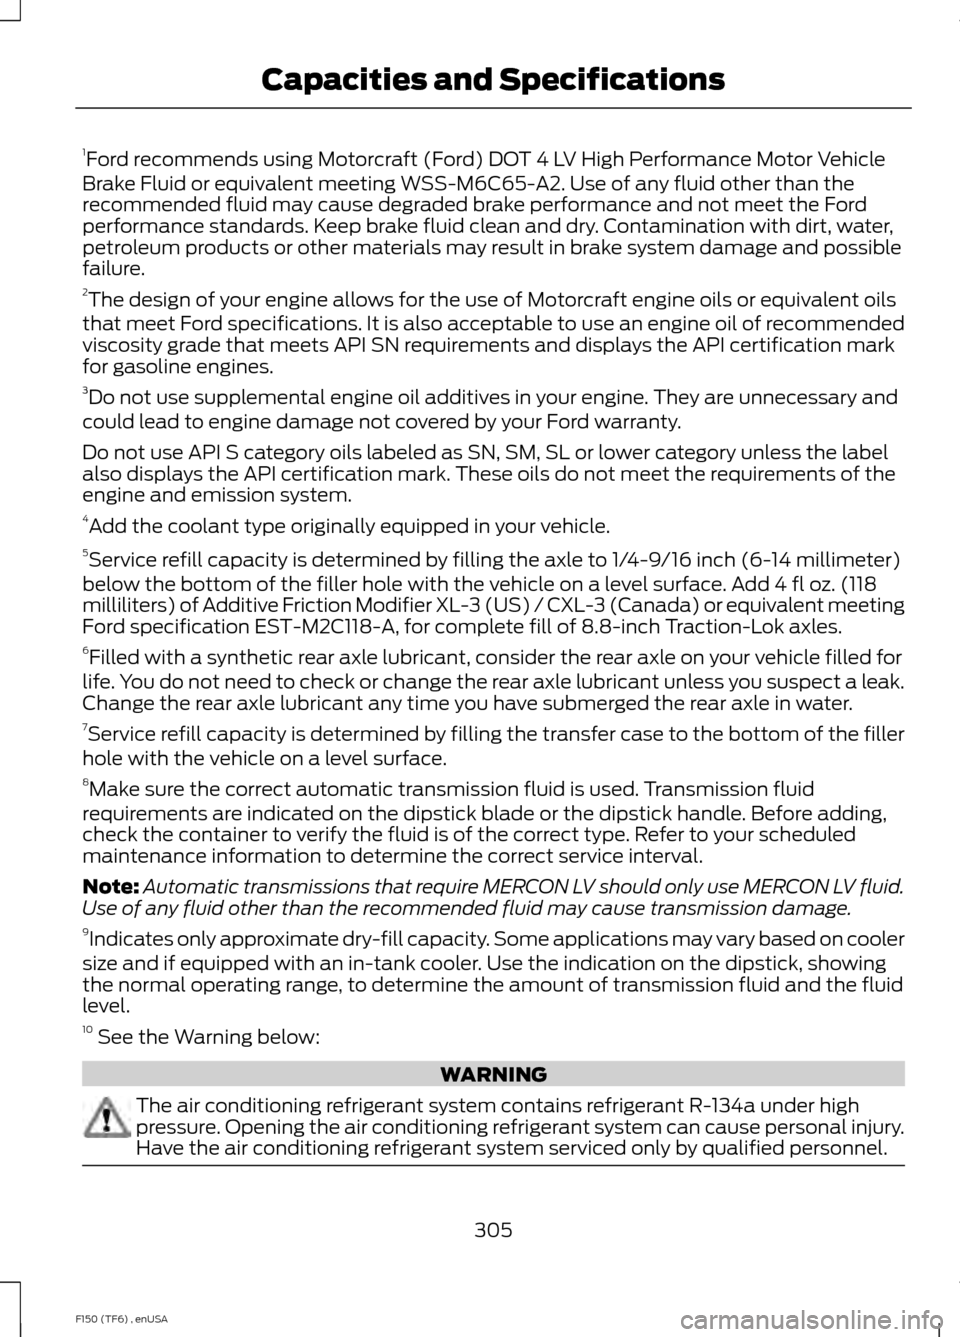
Ford recommends using Motorcraft (Ford) DOT 4 LV High Performance Motor Vehicle
Brake Fluid or equivalent meeting WSS-M6C65-A2. Use of any fluid other than the
recommended fluid may cause degraded brake performance and not meet the Ford
performance standards. Keep brake fluid clean and dry. Contamination with dirt, water,
petroleum products or other materials may result in brake system damage and possible
failure.
2 The design of your engine allows for the use of Motorcraft engine oils or equivalent oils
that meet Ford specifications. It is also acceptable to use an engine oil of recommended
viscosity grade that meets API SN requirements and displays the API certification mark
for gasoline engines.
3 Do not use supplemental engine oil additives in your engine. They are unnecessary and
could lead to engine damage not covered by your Ford warranty.
Do not use API S category oils labeled as SN, SM, SL or lower category unless the label
also displays the API certification mark. These oils do not meet the requirements of the
engine and emission system.
4 Add the coolant type originally equipped in your vehicle.
5 Service refill capacity is determined by filling the axle to 1/4-9/16 inch (6-14 millimeter)
below the bottom of the filler hole with the vehicle on a level surface. Add 4 fl oz. (118
milliliters) of Additive Friction Modifier XL-3 (US) / CXL-3 (Canada) or equivalent meeting
Ford specification EST-M2C118-A, for complete fill of 8.8-inch Traction-Lok axles.
6 Filled with a synthetic rear axle lubricant, consider the rear axle on your vehicle filled for
life. You do not need to check or change the rear axle lubricant unless you suspect a leak.
Change the rear axle lubricant any time you have submerged the rear axle in water.
7 Service refill capacity is determined by filling the transfer case to the bottom of the filler
hole with the vehicle on a level surface.
8 Make sure the correct automatic transmission fluid is used. Transmission fluid
requirements are indicated on the dipstick blade or the dipstick handle. Before adding,
check the container to verify the fluid is of the correct type. Refer to your scheduled
maintenance information to determine the correct service interval.
Note: Automatic transmissions that require MERCON LV should only use MERCON LV fluid.
Use of any fluid other than the recommended fluid may cause transmission damage.
9 Indicates only approximate dry-fill capacity. Some applications may vary based on cooler
size and if equipped with an in-tank cooler. Use the indication on the dipstick, showing
the normal operating range, to determine the amount of transmission fluid and the fluid
level.
10 See the Warning below: WARNING
The air conditioning refrigerant system contains refrigerant R-134a under high
pressure. Opening the air conditioning refrigerant system can cause personal injury.
Have the air conditioning refrigerant system serviced only by qualified personnel.
305
F150 (TF6) , enUSA Capacities and Specifications
Page 324 of 472
AUDIO INPUT JACK
WARNINGS
Driving while distracted can result in
loss of vehicle control, crash and
injury. We strongly recommend that
you use extreme caution when using any
device that may take your focus off the
road. Your primary responsibility is the safe
operation of your vehicle. We recommend
against the use of any hand-held device
while driving and encourage the use of
voice-operated systems when possible.
Make sure you are aware of all applicable
local laws that may affect the use of
electronic devices while driving. For safety reasons, do not connect
or adjust the settings on your
portable music player while your
vehicle is moving. Store the portable music player in a
secure location, such as the center
console or the glove box, when your
vehicle is moving. Hard objects may
become projectiles in a collision or sudden
stop, which may increase the risk of serious
injury. The audio extension cable must be
long enough to allow the portable music
player to be safely stored while your
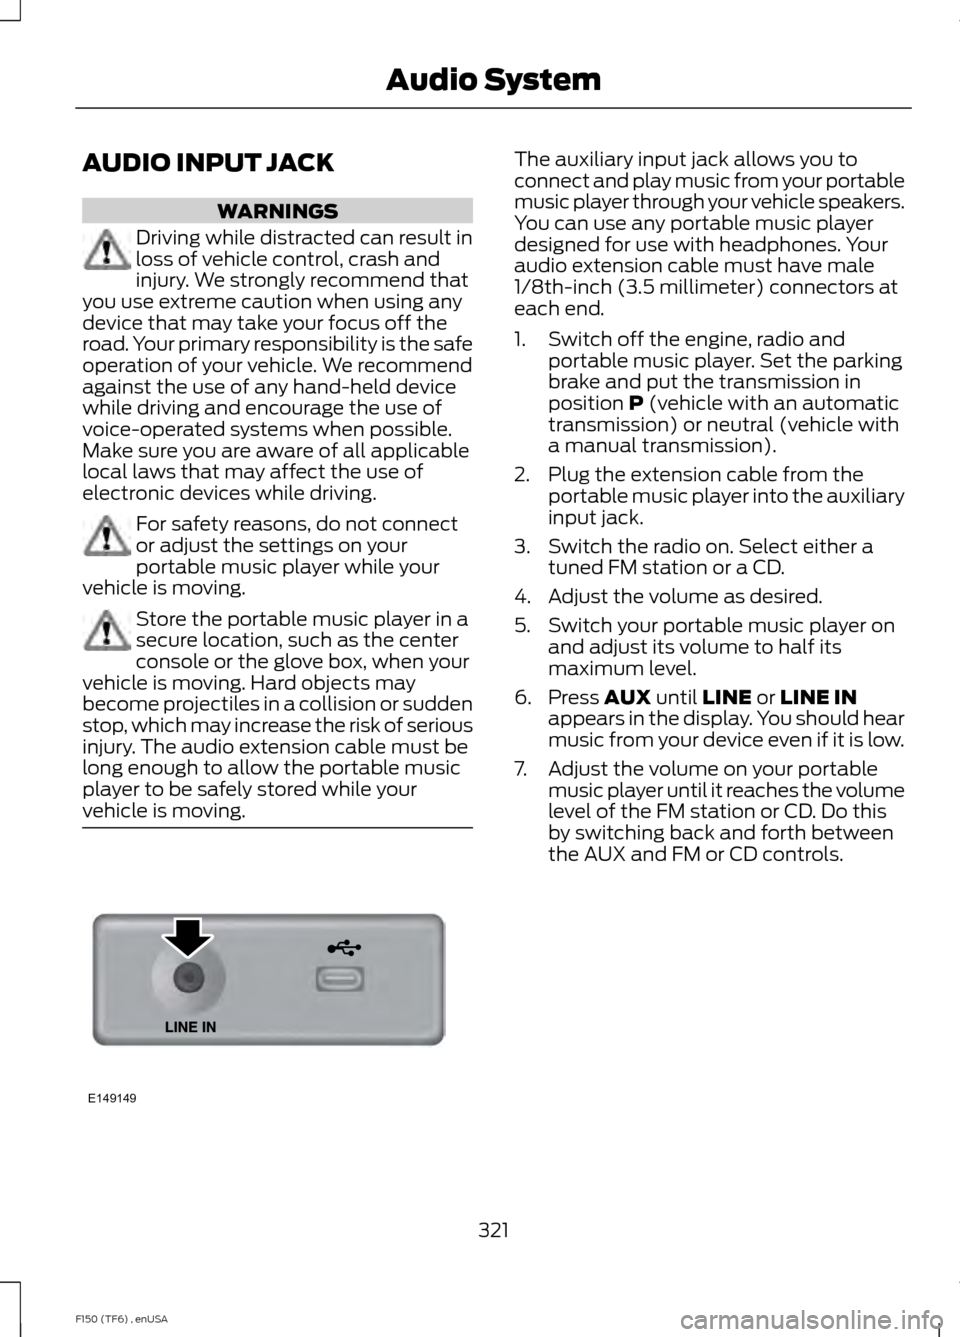
vehicle is moving. The auxiliary input jack allows you to
connect and play music from your portable
music player through your vehicle speakers.
You can use any portable music player
designed for use with headphones. Your
audio extension cable must have male
1/8th-inch (3.5 millimeter) connectors at
each end.
1. Switch off the engine, radio and
portable music player. Set the parking
brake and put the transmission in
position P (vehicle with an automatic
transmission) or neutral (vehicle with
a manual transmission).
2. Plug the extension cable from the portable music player into the auxiliary
input jack.
3. Switch the radio on. Select either a tuned FM station or a CD.
4. Adjust the volume as desired.
5. Switch your portable music player on and adjust its volume to half its
maximum level.
6. Press
AUX until LINE or LINE IN
appears in the display. You should hear
music from your device even if it is low.
7. Adjust the volume on your portable music player until it reaches the volume
level of the FM station or CD. Do this
by switching back and forth between
the AUX and FM or CD controls.
321
F150 (TF6) , enUSA Audio SystemE149149
Page 331 of 472
Pairing a Phone for the First Time
Note:
SYNC can support downloading up
to approximately 1000 entries per
Bluetooth-enabled cellular phone.
Note: Make sure to switch on the ignition
and the radio. Put the transmission in
position P.
Note: To scroll through the menus, press
the up and down arrows on your audio
system.
Wirelessly pairing your phone with SYNC
allows you to make and receive hands-free
calls.
1. Press the phone button. When the display indicates there is no phone
paired, press
OK.
2. When
Find SYNC appears in the
display, press OK.
3. Put your phone into Bluetooth discovery mode. See your device's
manual if necessary.
4. When prompted on your phone's display, enter the six-digit PIN provided
by SYNC in the radio display. The
display indicates when the pairing is
successful.
Depending on your phone's capability and
your market, the system may prompt you
with questions, such as setting the current
phone as the primary phone (the phone
SYNC automatically tries to connect with
first upon vehicle start-up) and
downloading your phonebook.
Pairing Subsequent Phones
Note: Make sure to switch on the ignition
and the radio. Put the transmission in
position
P.
Note: To scroll through the menus, press
the up and down arrows on your audio
system. 1.
Press the phone button, and then scroll
to System Settings. Press
OK.
2. Scroll to Bluetooth Devices. Press
OK.
3. Scroll to Add Bluetooth Device. Press OK
.
4. When
Find SYNC appears in the
display, press OK.
5. Put your phone into Bluetooth discovery mode. See your phone's
manual if necessary.
6. When prompted on your phone's display, enter the six-digit PIN provided
by SYNC in the radio display. The
display indicates when the pairing is
successful.
The system then prompts with questions,
such as if you would like to set the current
phone as the primary phone (the phone
SYNC automatically tries to connect with
first upon vehicle start-up) and download
your phone book.
Phone Voice Commands
Press the voice icon and say "Phone". Say
any of the following: "PHONE"
"Call
"Call
"Call
"Call
"Call
"Call
"Call history incoming" 2
"Call history missed" 2
328
F150 (TF6) , enUSA SYNC™