Page 3 of 519

Locks 67
Locking and unlocking..................................67
SecuriCode™ keyless entry keypad.........................76
Security 78
SecuriLock® passive anti-theft system.......................78
Anti-theft alarm.......................................80
Steering Wheel 82
Adjusting the steering wheel..............................82
Steering wheel controls.................................82
Pedals 84
Adjustable pedals......................................84
Wipers and Washers 85
Windshield wipers.....................................85
Rain-sensing wipers....................................85
Windshield washers....................................86
Rear-window wiper and washer............................86
Lighting 87
Lighting control.......................................87
Autolamps...........................................88
Instrument lighting dimmer...............................88
Daytime running lamps..................................89
Front fog lamps.......................................89
Directionindicators ....................................89
Interior lamps........................................90
2Table of Contents
2014 Expedition(exd)
Owners Guide gf, 1st Printing, June 2013
USA(fus)
Page 12 of 519

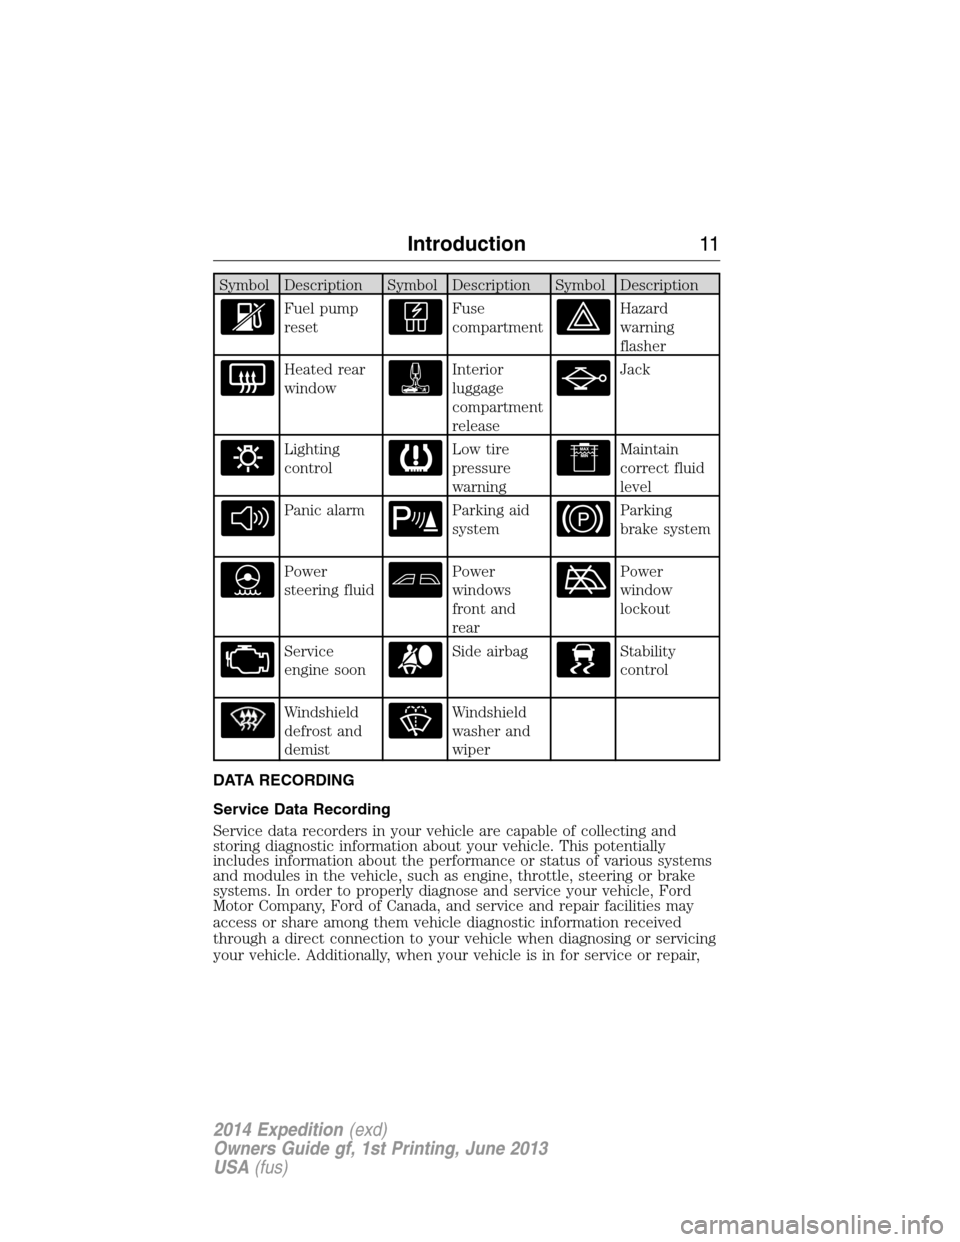
Symbol Description Symbol Description Symbol Description
Fuel pump
resetFuse
compartmentHazard
warning
flasher
Heated rear
windowInterior
luggage
compartment
releaseJack
Lighting
controlLow tire
pressure
warningMaintain
correct fluid
level
Panic alarmParking aid
systemParking
brake system
Power
steering fluidPower
windows
front and
rearPower
window
lockout
Service
engine soonSide airbagStability
control
Windshield
defrost and
demistWindshield
washer and
wiper
DATA RECORDING
Service Data Recording
Service data recorders in your vehicle are capable of collecting and
storing diagnostic information about your vehicle. This potentially
includes information about the performance or status of various systems
and modules in the vehicle, such as engine, throttle, steering or brake
systems. In order to properly diagnose and service your vehicle, Ford
Motor Company, Ford of Canada, and service and repair facilities may
access or share among them vehicle diagnostic information received
through a direct connection to your vehicle when diagnosing or servicing
your vehicle. Additionally, when your vehicle is in for service or repair,
Introduction11
2014 Expedition(exd)
Owners Guide gf, 1st Printing, June 2013
USA(fus)
Page 89 of 519

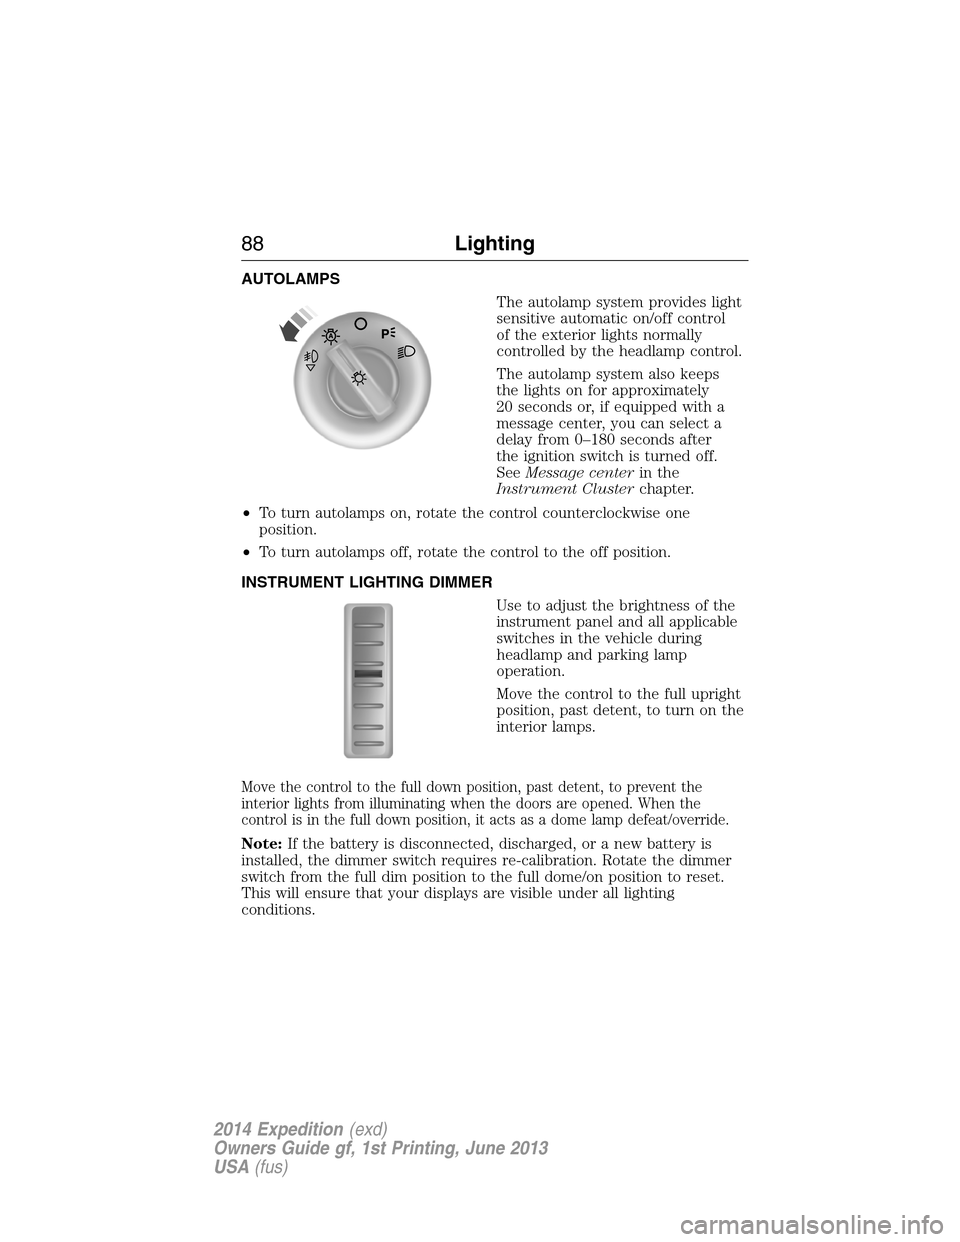
AUTOLAMPS
The autolamp system provides light
sensitive automatic on/off control
of the exterior lights normally
controlled by the headlamp control.
The autolamp system also keeps
the lights on for approximately
20 seconds or, if equipped with a
message center, you can select a
delay from 0–180 seconds after
the ignition switch is turned off.
SeeMessage centerin the
Instrument Clusterchapter.
•To turn autolamps on, rotate the control counterclockwise one
position.
•To turn autolamps off, rotate the control to the off position.
INSTRUMENT LIGHTING DIMMER
Use to adjust the brightness of the
instrument panel and all applicable
switches in the vehicle during
headlamp and parking lamp
operation.
Move the control to the full upright
position, past detent, to turn on the
interior lamps.
Move the control to the full down position, past detent, to prevent the
interior lights from illuminating when the doors are opened. When the
control is in the full down position, it acts as a dome lamp defeat/override.
Note:If the battery is disconnected, discharged, or a new battery is
installed, the dimmer switch requires re-calibration. Rotate the dimmer
switch from the full dim position to the full dome/on position to reset.
This will ensure that your displays are visible under all lighting
conditions.
88Lighting
2014 Expedition(exd)
Owners Guide gf, 1st Printing, June 2013
USA(fus)
Page 91 of 519

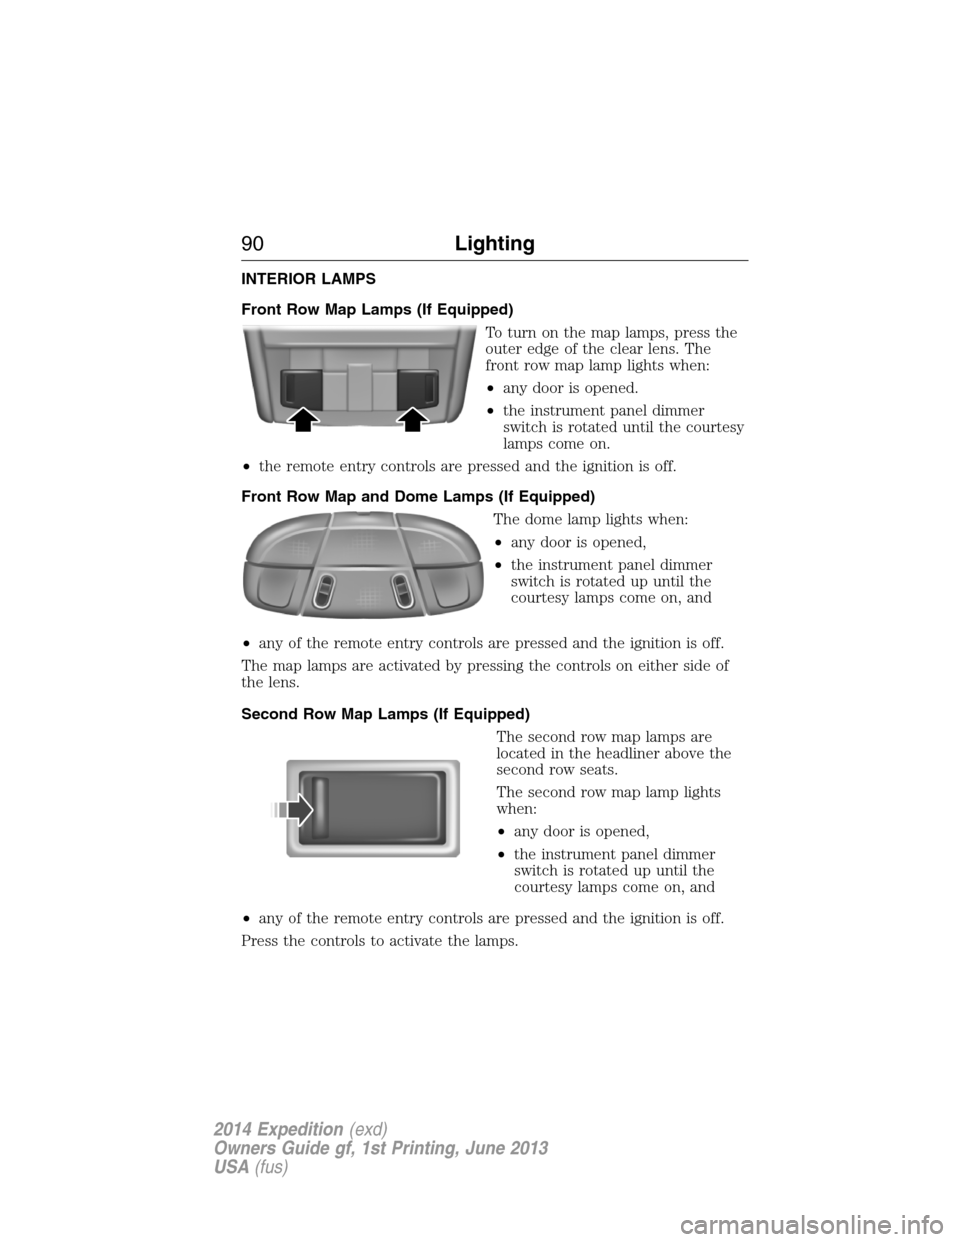
INTERIOR LAMPS
Front Row Map Lamps (If Equipped)
To turn on the map lamps, press the
outer edge of the clear lens. The
front row map lamp lights when:
•any door is opened.
•the instrument panel dimmer
switch is rotated until the courtesy
lamps come on.
•the remote entry controls are pressed and the ignition is off.
Front Row Map and Dome Lamps (If Equipped)
The dome lamp lights when:
•any door is opened,
•the instrument panel dimmer
switch is rotated up until the
courtesy lamps come on, and
•any of the remote entry controls are pressed and the ignition is off.
The map lamps are activated by pressing the controls on either side of
the lens.
Second Row Map Lamps (If Equipped)
The second row map lamps are
located in the headliner above the
second row seats.
The second row map lamp lights
when:
•any door is opened,
•the instrument panel dimmer
switch is rotated up until the
courtesy lamps come on, and
•any of the remote entry controls are pressed and the ignition is off.
Press the controls to activate the lamps.
90Lighting
2014 Expedition(exd)
Owners Guide gf, 1st Printing, June 2013
USA(fus)
Page 92 of 519
Rear Cargo Lamp
The rear cargo lamp lights when:
•any door is opened, and the
switch is in the middle position.
•the instrument panel dimmer
switch is rotated until the
courtesy lamps come on.
•any of the remote entry controls
are pressed and ignition is off
(and switch is in the middle
position).
With the ignition key in the accessory or on position, the rear cargo lamp
can be turned on or off by sliding the control.
Battery saver
The battery saver will shut off the exterior lamps and interior lamps,
except the hazard warning lamps if activated, 10 minutes after the
ignition control has been turned off. The system will not turn off the
parking lamps if the lighting control is in the parking lamps on position.
Lighting91
2014 Expedition(exd)
Owners Guide gf, 1st Printing, June 2013
USA(fus)
Page 233 of 519

Once the trailer is level or slightly nose down toward the vehicle:
•Lock the bar tension adjuster in place.
•Check that the trailer tongue securely attaches and locks onto the
hitch.
•Install safety chains, lighting, and trailer brake controls as required by
law or the trailer manufacturer.
Weight-distributing Hitch – Vehicles with Automatic Leveling
Suspension
WARNING:Do not adjust a weight-distributing hitch to any
position where the rear bumper of the vehicle is higher than it
was before attaching the trailer. Doing so will defeat the function of the
weight-distributing hitch, which may cause unpredictable handling, and
could result in serious personal injury.
Note:If you do not move the loaded vehicle for approximately 12 hours,
the leveling system may bleed down to a lower height. This can be
especially apparent if you leave a trailer attached to the parked vehicle
for long periods. You must drive your vehicle in order to re-level the
suspension.
When connecting a trailer to a vehicle with automatic leveling suspension
using a weight-distributing hitch, always use the following procedure:
1. Load the interior of the vehicle to a weight similar to that which you
intend to carry when towing. This includes things such as passenger
weight and cargo.
2. Drive the vehicle for approximately 2 miles (3 kilometers) to re-level
the suspension.
3. Park your vehicle, without the trailer, on a level surface.
4. Measure the height to the top of your vehicle’s front wheel opening
on the fender. This is H1.
5. Attach the trailer to your vehicle without the weight-distributing bars
connected.
6. Make sure you securely attach and lock the trailer tongue to the
hitch.
7. Install safety chains, lighting, and trailer brake controls as required
by law or the trailer manufacturer.
8. Drive the vehicle and trailer at 20–25 mph (32–40 km/h) for
approximately 2 miles (3 kilometers) to re-level the suspension.
9. Park your vehicle and trailer on a level surface.
10. Measure the height to the top of your vehicles front wheel opening
on the fender a second time. This is H2.
232Towing
2014 Expedition(exd)
Owners Guide gf, 1st Printing, June 2013
USA(fus)
Page 267 of 519
The fuses are coded as follows:
Fuse or relay
locationFuse amp
ratingProtected circuits
1 30A Driver window
2 15A Driver side memory module
3 15A Audio rear seat controls, Satellite
radio, SYNC
4 30A Not used (spare)
5 10A Keypad illumination, 3rd row seat
enable, Brake shift interlock,
Smart fuse panel logic power
6 20A Turn signals
7 10A Low beam headlamps (left)
8 10A Low beam headlamps (right)
9 15A Interior lights
10 15A Switch backlighting, Puddle lamps
266Fuses
2014 Expedition(exd)
Owners Guide gf, 1st Printing, June 2013
USA(fus)
Page 345 of 519

ACCESSORIES
For a complete listing of the accessories that are available for your
vehicle, please contact an authorized dealer or visit our online store at
www.Accessories.Ford.com(United States only).
Ford Motor Company will repair or replace any properly authorized
dealer-installed Ford Genuine Accessories found to be defective in
factory-supplied materials or workmanship during the warranty period, as
well as any component damaged by the defective accessories.
Ford Motor Company will warrant your vehicle through the warranty that
provides the greatest benefit:
•12 months or 12000 miles (20000 kilometers) (whichever occurs first).
•The remainder of your new vehicle limited warranty.
Contact an authorized dealer for details and a copy of the warranty.
Exterior style
•Bug shields•Splash guards
•Deflectors•Chrome exhaust tips
Interior style
•Ambient lighting•Floor mats
•Illuminated door sill plates•Cargo area protector
•Electrochromatic compass/temperature interior mirrors
Lifestyle
•Rear seat entertainment*•Roof crossbars
•Cargo organization and
management•SUV camping tent*
•Racks and carriers*•Towing accessories
Peace of mind
•Remote start•Vehicle security systems
•Back up alarm*•Wheel locks
•Locking gas plug for capless fuel
system•Warning sensors
•Vehicle cover
*The accessory manufacturer designs, develops and therefore warrants
Ford Licensed Accessories, and does not design or test these accessories
344Accessories
2014 Expedition(exd)
Owners Guide gf, 1st Printing, June 2013
USA(fus)