2014 FORD EXPEDITION remote control
[x] Cancel search: remote controlPage 365 of 519

Wired Headphones
You can use any standard stereo headphones by plugging them into the
1/8–inch (3.5 millimeter) headphone jack on each of the headrest DVD
systems. Remove and save the protective plastic cover to access the
jacks. Remember to replace the cover when the jacks are not in use.
A/V Input
You can connect an external audio/video device that uses common RCA
interface cables to the Ford DVD system, such as a video game device or
VCR. Connect the device RCA cables to the AV RCA INPUT jacks
according to color: yellow for video, red for right audio and white for left
audio. The signal from the external audio/video source overrides other
video sources for that monitor.
Wireless FM Transmitter
Your device has an internal FM transmitter. This allows you to listen to
the DVD player audio signal by tuning your vehicle FM radio to a radio
frequency that you select, then accessing the SOUND-AROUND feature
by using the remote control. SOUND-AROUND allows the user to choose
from a number of pre-programmed frequencies to play back the rear-seat
entertainment system audio over the radio. When you engage
SOUND-AROUND, as long as the DVD player is active, it adversely
affects the FM radio reception of other stations, especially neighboring
stations nearest to whichever station is in use for the DVD player.
Performance of SOUND-AROUND varies based on geographic location.
You may need to change the SOUND-AROUND frequency periodically
when travelling long distances. This helps maintain the best performance
when listening to DVD system content over the radio. Audio heard
through wireless headphones remains unaffected by SOUND-AROUND.
There may also be a reduction in AM radio performance as well. AM and
FM radio performance can be expected to return to normal when the
DVD system is turned off.
How to use the FM Transmitter
1. Switch on the system and place a disc in Monitor A.
2. Point the remote control at the monitor, and then press DVD A.
3. PressSOUND AROUND ON/OFFto turn FM transmission off and
on.
4. Select a radio frequency (88.3, 88.7, 89.1, 89.5, 89.9, and 90.3MHz)
by pressingSOUND AROUND SELECT.
5. Select a frequency, and then tune your radio to the corresponding
frequency. Try each station frequency until you achieve a clear audio
signal.
364Audio System
2014 Expedition(exd)
Owners Guide gf, 1st Printing, June 2013
USA(fus)
Page 367 of 519

D.STOP*:Press this button to stop playing the disc.
E.PLAY*:Press this button to play the disc.
F.Headphone jack:Plug in your wired headphones with a 1/8-inch
(3.5 millimeter) stereo connector plug to listen to audio from the
program.
G.Video input jack (red):Connect an RCA cable to this port.
H.Video input jack (white):Connect an RCA cable to this port.
I.Video input jack (yellow):Connect an RCA cable to this port.
J.USB port (optional):Listen to music or view images you stored on a
USB device such as a USB memory stick or a memory card reader.
K.SOURCE:Press this button to select Monitor A, Monitor B, AUX/TV
(if available), and AUX 2 (if available).
L.POWER:Press this button to turn the system off and on.
M.TFT LCD panel:Seven-inch TFT LCD panel.
N.Level lock and release latch:Use this latch to change the viewing
angle of the LCD panel or lock the panel into the secured position.
O.Infrared sensor - forward sensor eye:This allows the remote
control to navigate the on-screen display.
Remote Control
Note:The remote control uses infrared light to send commands to the
DVD player, just as many home video systems do. Just point the remote
control at the DVD player infrared window located above each screen in
order to control that DVD player. While you can connect a second device
such as a VCR through the auxiliary inputs, and view the playback on
the screen, you cannot control that device by aiming its remote control
at the Ford DVD player. The Ford DVD system remote control is the
only remote control you can use with the system. For example, if you
connect a VCR to the DVD system, you must point the VCR remote
control at the VCR to control it.
Installing the Battery
Before using your remote control, install the batteries as follows:
1. Turn the remote control face down. Press down on the ridged area of
the battery cover and slide it off.
2. Install two AAA batteries. Make sure you install the batteries
properly, with the + and – facing the correct way, as shown in the
battery compartment.
3. Slide the cover back until it clicks.
366Audio System
2014 Expedition(exd)
Owners Guide gf, 1st Printing, June 2013
USA(fus)
Page 368 of 519
Note:Different types of batteries have different characteristics. Do not
mix different types.
Note:Do not mix old and new batteries. Mixing old and new batteries
can shorten battery life and cause chemical leaks from the old batteries.
Note:Keep the batteries out of the reach of children. If someone
swallows a battery, immediately consult a doctor. When you dispose of
used batteries, keep to governmental regulations or environmental public
institution rules that apply in your area.
Note:Remove the batteries if the remote control is not used for a month
or longer.
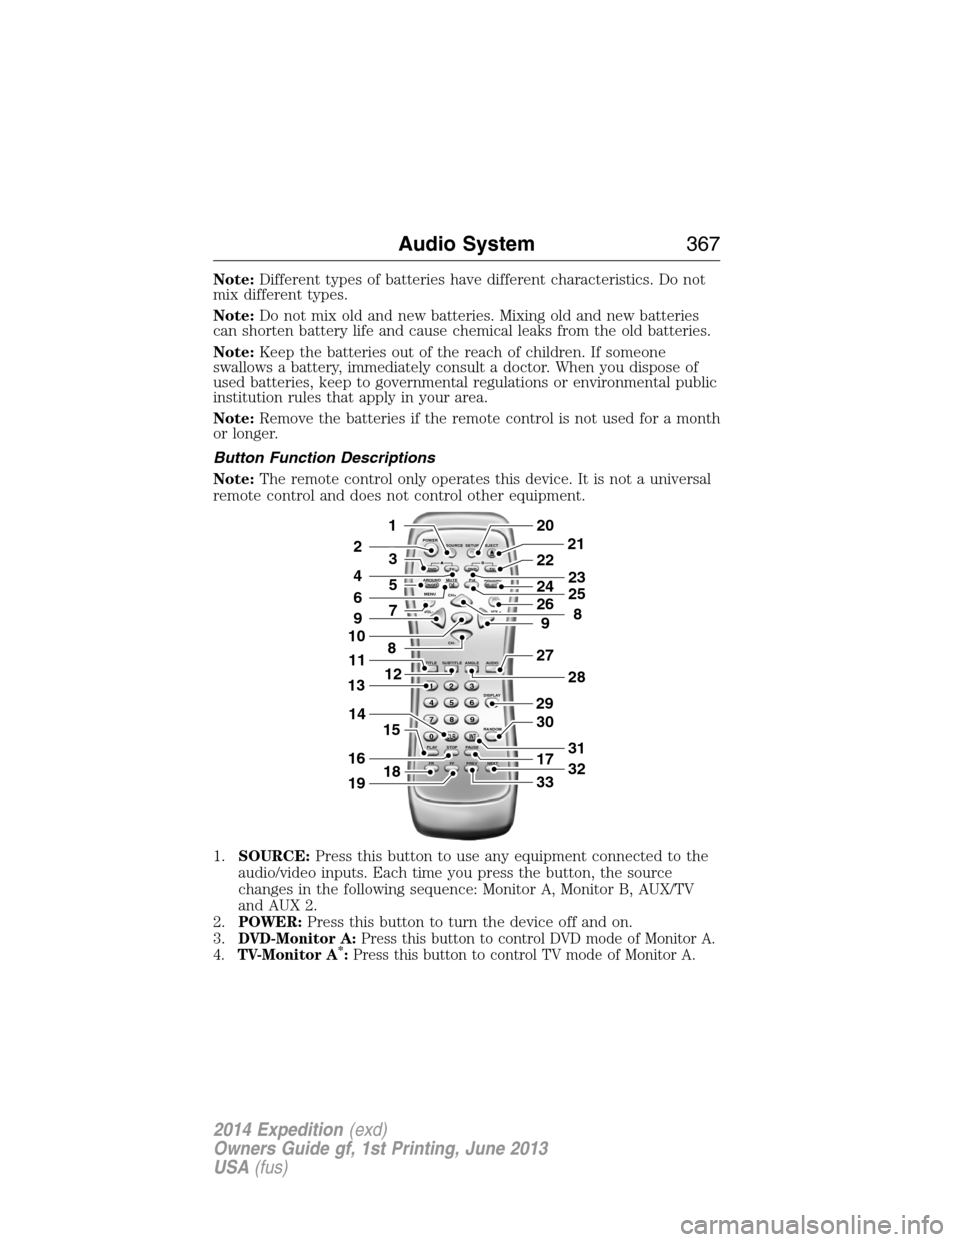
Button Function Descriptions
Note:The remote control only operates this device. It is not a universal
remote control and does not control other equipment.
1.SOURCE:Press this button to use any equipment connected to the
audio/video inputs. Each time you press the button, the source
changes in the following sequence: Monitor A, Monitor B, AUX/TV
and AUX 2.
2.POWER:Press this button to turn the device off and on.
3.
DVD-Monitor A:Press this button to control DVD mode of Monitor A.
4.TV-Monitor A*:Press this button to control TV mode of Monitor A.
POWER
SOURCE
A
SOUND
AROUNDSOUND
AROUND MUTE
MENU REPEAT
CH+
CH-
TITLESUBTITLE ANGLE AUDIO
DISPLAY
RANDOM
PLAY
123
6 5 4
789
0
CLR INT
FR FF PREV NEXTSTOP PAUSE VOL- VOL+PIX A
D
VD
ON/OFFSELECT
TV DVD TVSETUP EJECTB
5
9
29
27
30
17
33
28
32
31
201
2
7
8
12
4
3
15
21
22
24
2625
8
23
6
9
10
16
13
18
11
14
19
Audio System367
2014 Expedition(exd)
Owners Guide gf, 1st Printing, June 2013
USA(fus)
Page 371 of 519
Turning the Device On and Off
1. Pivot the screen downward until you reach a comfortable viewing
angle.
2. PressPOWERon the lower-left corner of the front panel or on the
remote control. The controls illuminate when the system is in use.
3. When the device is on and is displaying a picture, pivot the screen to
change the viewing angle to optimize the picture quality.
4. Remember to turn the device off and pivot the LCD panel to the
locked position when not in use.
DVD Basics
To get the most use out of each DVD, make sure you read this section
completely.
Regional Coding
Both the DVD player and disc have specific region codes. These regional
codes must match in order for the disc to play. If the codes do not
match, the disc does not play. The system is set to the region code
designated for your area by the DVD Copy Control Association. Other
regions do not play in this system.
Loading and Playing Discs
When you pressPOWER,the system turns on in DVD mode. Place the
disc about halfway into the disc compartment slot, with the disc’s label
facing the rear of your vehicle. Insert the disc straight into the player; do
not insert the disc at an angle.
The disc loads automatically and begins to play. Some discs start at the
root menu, where you have to select disc play manually.
Depending on the disc and playback location on the disc, the icon may
display in the upper-left corner of the screen indicating that still
playback is not possible.
Notes
•To keep a disc clean, do not touch its surface. Handle the disc by its
edge.
•Keep your discs in their cases or disc magazines when not in use.
Also, do not subject a disc to heat or high temperatures. Avoid
leaving them in a parked vehicle, on a dashboard or on a rear tray.
•Do not attach labels, or use discs with sticky ink or residue. Such
discs may stop spinning, causing a system malfunction, or ruining the
disc.
370Audio System
2014 Expedition(exd)
Owners Guide gf, 1st Printing, June 2013
USA(fus)
Page 372 of 519
•Do not use any discs with labels or stickers attached. The following
malfunctions may result from using such discs:
•The system cannot eject a disc due to a label or sticker peeling off
and jamming the eject mechanism.
•The system cannot read audio data correctly, such as playback
skipping or no playback at all, due to heat shrinking of a sticker or
label causing the disc to warp.
•Before playing a disc, clean it with a commercially available cleaning
cloth. Wipe each disc from the center out. Do not use solvents such
as benzene, thinner, commercially available cleaners, or antistatic
spray intended for analog discs.
•Do not use any irregularly shaped discs. If you insert an irregular,
non-round, shaped disc, it may jam in the DVD player or not play
properly.
How to Use the DVD On-screen Display Menus
You can use the on-screen display menu screen to adjust all the settings
on your screen.
General Setup
PressSETUPon the remote control, and then useCH +, CH -, VOL +
andVOL -to navigate the Setup Page. PressENTERto make a
selection, and thenVOL -to return to the submenu.
To exit the Setup Display, pressSETUPagain.
OSD Language
The OSD Lang submenu allows the user to select the language for the
on-screen display. PressVOL +,and then useCH +andCH -on the
remote control to select the desired language. The user can select
English, Simple/Traditional Chinese, French, German, Italian, Spanish,
Portuguese or Korean. PressENTERto make a selection, and thenVOL
-to return to the submenu.
Angle Mark
The angle mark is an option for different viewing angles on the DVD.
PressVOL +andVOL -to turn the angle mark setting off and on. Press
ENTERto make a selection, and thenVOL -to return to the submenu.
Audio Setup
PressSETUPon the remote control, and then useCH +, CH -, VOL +
andVOL -to navigate the Setup Page. PressENTERto make a
selection, and thenVOL -to return to the submenu.
Audio System371
2014 Expedition(exd)
Owners Guide gf, 1st Printing, June 2013
USA(fus)
Page 373 of 519
Speaker Setup
PressSETUPon the remote control and then useVOL +to navigate to
the Audio Setup Page. PressENTERto navigate to the submenu. Use
CH +, CH -, VOL +andVOL -to navigate the submenus. PressENTER
orVOL +to make a selection, and thenVOL +andVOL -to see the
selection items. PressENTERto make a selection, and thenVOL -to
return to the submenu.
The Speaker Setup menu has the following options:
•LT/RT
•Stereo
•V SURR
•OFF
The Dolby Digital Setup menu has the following options:
•Stereo
•L-Mono
•R-Mono
•Mix-Mono
Quality Setup
PressSETUPon the remote control, and then useCH +, CH -, VOL +
andVOL -to navigate the Setup Page. PressENTERto make a
selection, and thenVOL -to return to the submenu.
Video Quality Setup
PressSETUPon the remote control and then pressVOL +to navigate
to the Video Setup Page. PressENTERtwice to enter the submenu. Use
CH +, CH -, VOL +andVOL -to navigate the submenus. PressENTER
orVOL +to select an item, and thenVOL +andVOL -to see the
selection items. PressENTERto make a selection, and thenVOL -to
return to the submenu.
Video Quality
You can adjust the following features:
•SHARPNESSsoftens or sharpens the picture. You can select Low,
Med. or High.
•BRIGHTNESSbrightens or darkens the picture. The setting ranges
from -20 to +20.
•CONTRASTallows you to increase or decrease the picture contrast.
The setting ranges from -16 to +16.
•HUE
allows you to increase or decrease the color hue. The setting
ranges from -9 to +9.
•SATURATIONallows you to increase or decrease the color intensity.
The setting ranges from -9 to +9.
372Audio System
2014 Expedition(exd)
Owners Guide gf, 1st Printing, June 2013
USA(fus)
Page 374 of 519
How to Use the Device On-screen Display Menus
PressSETUPon the remote control, and then useCH +, CH -, VOL +
andVOL -to navigate the Setup Page. PressENTERto make a
selection, and thenVOL -to return to the submenu.
Audio
This allows the user to control the audio stream in the selected language
for playback automatically.
Subtitle
This allows the user to turn the subtitles on and off in the selected
language for playback automatically.
Disc Menu
This allows the user to control the DVD disc menu in the selected language.
Parental
This section of the Setup Menu allows user to control the content of
movie playback from G to ADULT. The parental control function allows
you to limit viewing to your preference. The rating levels are 1 through 8
and are country-dependent.
After navigating to the Parental submenu, useVOL +and theCH +and
CH -buttons to select:
•KID SAFE (Children)
•G
•PG
•PG 13
•PGR
•R
•NC 17
•ADULT
Note:The lower you make the value, the stricter the limitation is.
Password
PressSETUPand navigate to the Password submenu under the
Password Setup Page.
1. PressVOL +,and then pressENTERon the remote control to enter
the submenu.
2. Input the old six-digit password or the default password. The default
password is 136900.
3. Input a new six-digit password using the numeric buttons.
4. Confirm the new password by entering the same new password again.
5. Scroll to OK, and then pressENTERto finish.
Audio System373
2014 Expedition(exd)
Owners Guide gf, 1st Printing, June 2013
USA(fus)
Page 375 of 519
Default
PressSETUPon the remote control, and then navigate to the Default
submenu under the Preference page usingCH +, CH -andVOL +.
PressVOL +,and then pressENTERto carry out the reset. This
function does not affect the parental settings.
Playing an Audio CD
When playing an audio CD, the DISPLAY banner appears automatically.
It displays the current track and the amount of time the track has been
playing, the total amount of time on the disc and the current time
running on the disc.
PressDISPLAYon the remote control to see the DISPLAY banner.
•PressDISPLAYonce: Single Elapsed appears along with the current
track playing and the time of that track.
•PressDISPLAYtwice: Single Remain appears along with the current
track playing and the amount of time left.
•PressDISPLAYthree times: Total Elapsed appears along with the
current track playing and the total time playing on CD.
•PressDISPLAYfour times: Total Remain appears along with the
current track playing and the amount of time left on CD.
Press theREPEATon the remote control to repeat either the currently
playing track or the entire CD.
Playing an MP3 Disc
MP3 is a format for storing digital audio. An audio CD-quality song
compressed into the MP3 format has very little loss of quality, while
taking up much less space. You can play CD-R discs encoded in MP3
format in your DVD player.
Selecting Folders and Songs
When you insert an MP3 disc in the player, an MP3 audio-navigation
screen appears automatically. You can change folders and songs by
navigating the file system. The DVD player plays the songs in the order
you burned them to the disc.
1. If a disc is playing, pressDISPLAYon the remote control, and then
pressCH +andCH -to go through the folder list on the left side of
the navigation screen.
2. Highlight the folder you want, and then pressENTER.
3. PressCH +andCH -to go through the song list and highlight the
song you want. PressENTERto begin playing the highlighted song.
374Audio System
2014 Expedition(exd)
Owners Guide gf, 1st Printing, June 2013
USA(fus)