2014 FORD EXPEDITION door lock
[x] Cancel search: door lockPage 97 of 519
INTERIOR MIRROR
WARNING:Do not adjust the mirror when your vehicle is
moving.
Note:Do not clean the housing or glass of any mirror with harsh
abrasives, fuel or other petroleum or ammonia based cleaning products.
You can adjust the interior mirror to your preference. Some mirrors also
have a second pivot point. This lets you move the mirror head up or
down and from side to side.
Auto-Dimming Mirror
Note:Do not block the sensors on the front and back of the mirror.
Mirror performance may be affected. A rear center passenger or raised
rear center head restraint may also block light from reaching the sensor.
The mirror will dim automatically to reduce glare when bright lights are
detected from behind your vehicle. It will automatically return to normal
reflection when you select reverse gear to make sure you have a clear
view when backing up.
CHILDMINDER MIRROR (IF EQUIPPED)
On double bin overhead consoles, the conversation mirror allows the
driver to view the rear seating area.
WARNING:Do not use the childminder mirror to view rearward
traffic, do not allow rear passengers to distract you from the
driving task, and make sure the rear view mirror has a clear view of
rearward traffic. Failure to do so could increase the risk of a crash from
an unseen vehicle, which may result in serious injury.
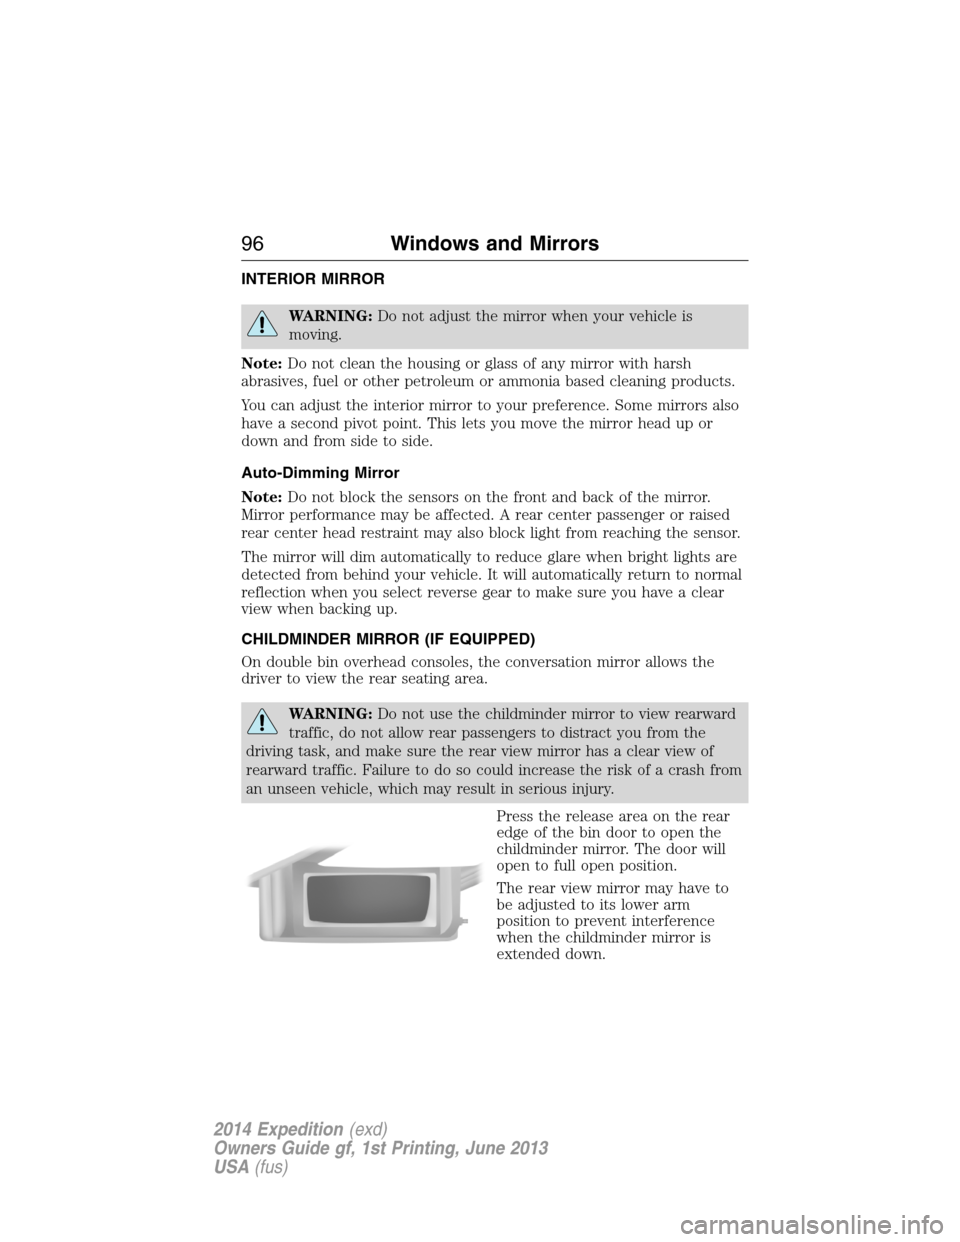
Press the release area on the rear
edge of the bin door to open the
childminder mirror. The door will
open to full open position.
The rear view mirror may have to
be adjusted to its lower arm
position to prevent interference
when the childminder mirror is
extended down.
96Windows and Mirrors
2014 Expedition(exd)
Owners Guide gf, 1st Printing, June 2013
USA(fus)
Page 110 of 519
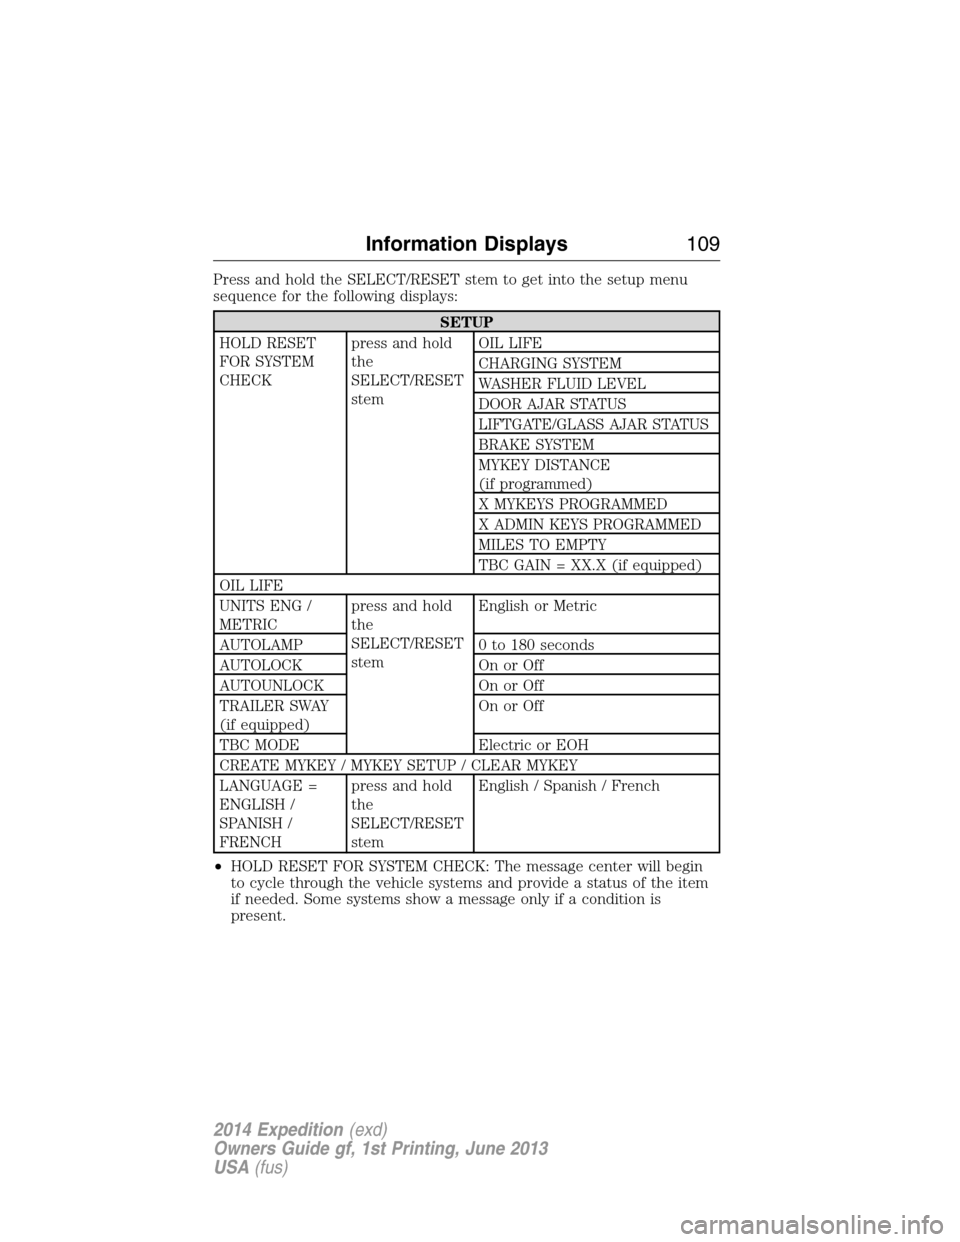
Press and hold the SELECT/RESET stem to get into the setup menu
sequence for the following displays:
SETUP
HOLD RESET
FOR SYSTEM
CHECKpress and hold
the
SELECT/RESET
stemOIL LIFE
CHARGING SYSTEM
WASHER FLUID LEVEL
DOOR AJAR STATUS
LIFTGATE/GLASS AJAR STATUS
BRAKE SYSTEM
MYKEY DISTANCE
(if programmed)
X MYKEYS PROGRAMMED
X ADMIN KEYS PROGRAMMED
MILES TO EMPTY
TBC GAIN = XX.X (if equipped)
OIL LIFE
UNITS ENG /
METRICpress and hold
the
SELECT/RESET
stemEnglish or Metric
AUTOLAMP 0 to 180 seconds
AUTOLOCK On or Off
AUTOUNLOCK On or Off
TRAILER SWAY
(if equipped)On or Off
TBC MODE Electric or EOH
CREATE MYKEY / MYKEY SETUP / CLEAR MYKEY
LANGUAGE =
ENGLISH /
SPANISH /
FRENCHpress and hold
the
SELECT/RESET
stemEnglish / Spanish / French
•HOLD RESET FOR SYSTEM CHECK: The message center will begin
to cycle through the vehicle systems and provide a status of the item
if needed. Some systems show a message only if a condition is
present.
Information Displays109
2014 Expedition(exd)
Owners Guide gf, 1st Printing, June 2013
USA(fus)
Page 111 of 519
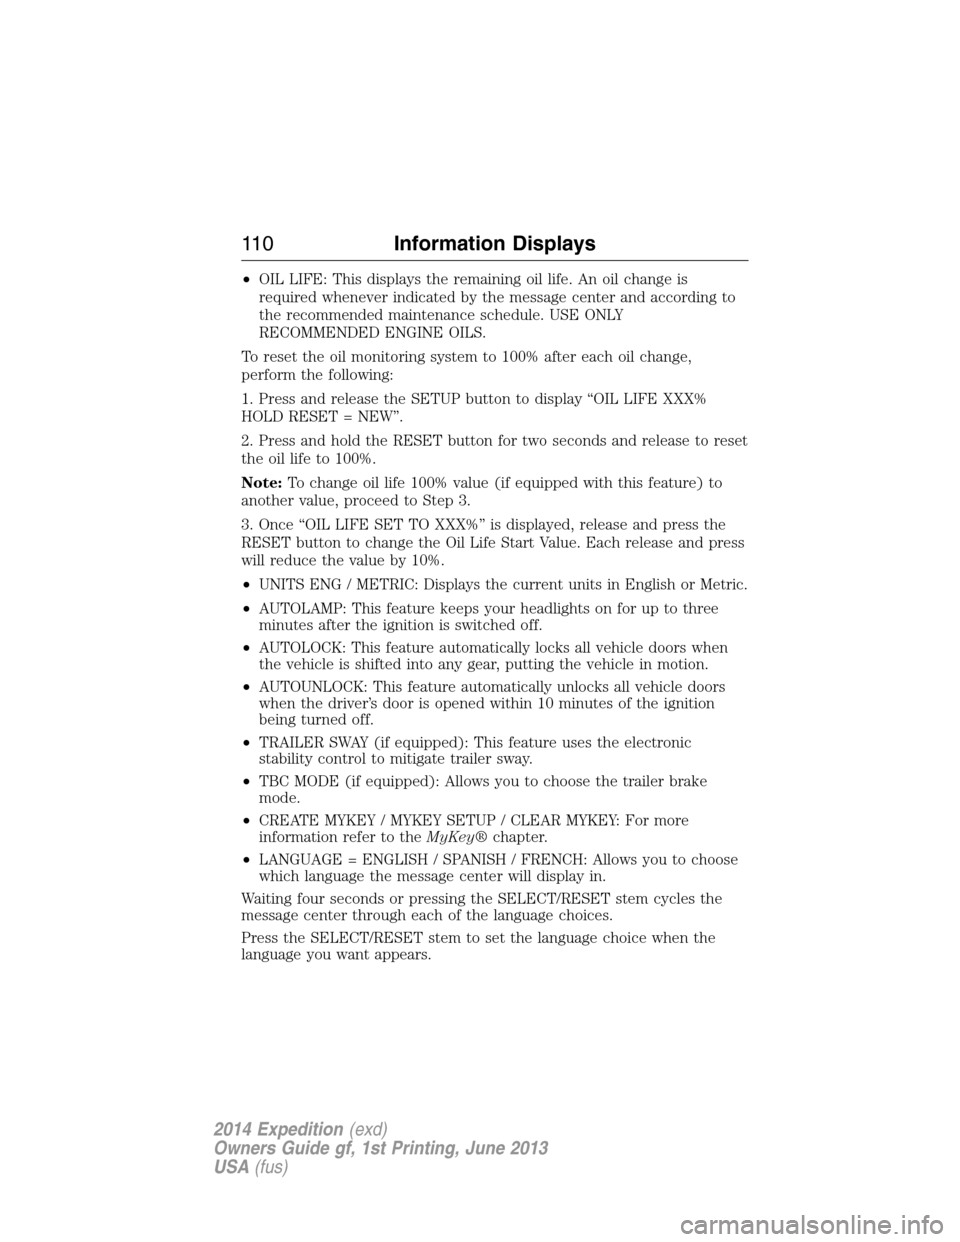
•OIL LIFE: This displays the remaining oil life. An oil change is
required whenever indicated by the message center and according to
the recommended maintenance schedule. USE ONLY
RECOMMENDED ENGINE OILS.
To reset the oil monitoring system to 100% after each oil change,
perform the following:
1. Press and release the SETUP button to display “OIL LIFE XXX%
HOLD RESET = NEW”.
2. Press and hold the RESET button for two seconds and release to reset
the oil life to 100%.
Note:To change oil life 100% value (if equipped with this feature) to
another value, proceed to Step 3.
3. Once “OIL LIFE SET TO XXX%” is displayed, release and press the
RESET button to change the Oil Life Start Value. Each release and press
will reduce the value by 10%.
•UNITS ENG / METRIC: Displays the current units in English or Metric.
•AUTOLAMP: This feature keeps your headlights on for up to three
minutes after the ignition is switched off.
•AUTOLOCK: This feature automatically locks all vehicle doors when
the vehicle is shifted into any gear, putting the vehicle in motion.
•AUTOUNLOCK: This feature automatically unlocks all vehicle doors
when the driver’s door is opened within 10 minutes of the ignition
being turned off.
•TRAILER SWAY (if equipped): This feature uses the electronic
stability control to mitigate trailer sway.
•TBC MODE (if equipped): Allows you to choose the trailer brake
mode.
•CREATE MYKEY / MYKEY SETUP / CLEAR MYKEY: For more
information refer to theMyKey®chapter.
•LANGUAGE = ENGLISH / SPANISH / FRENCH: Allows you to choose
which language the message center will display in.
Waiting four seconds or pressing the SELECT/RESET stem cycles the
message center through each of the language choices.
Press the SELECT/RESET stem to set the language choice when the
language you want appears.
11 0Information Displays
2014 Expedition(exd)
Owners Guide gf, 1st Printing, June 2013
USA(fus)
Page 115 of 519
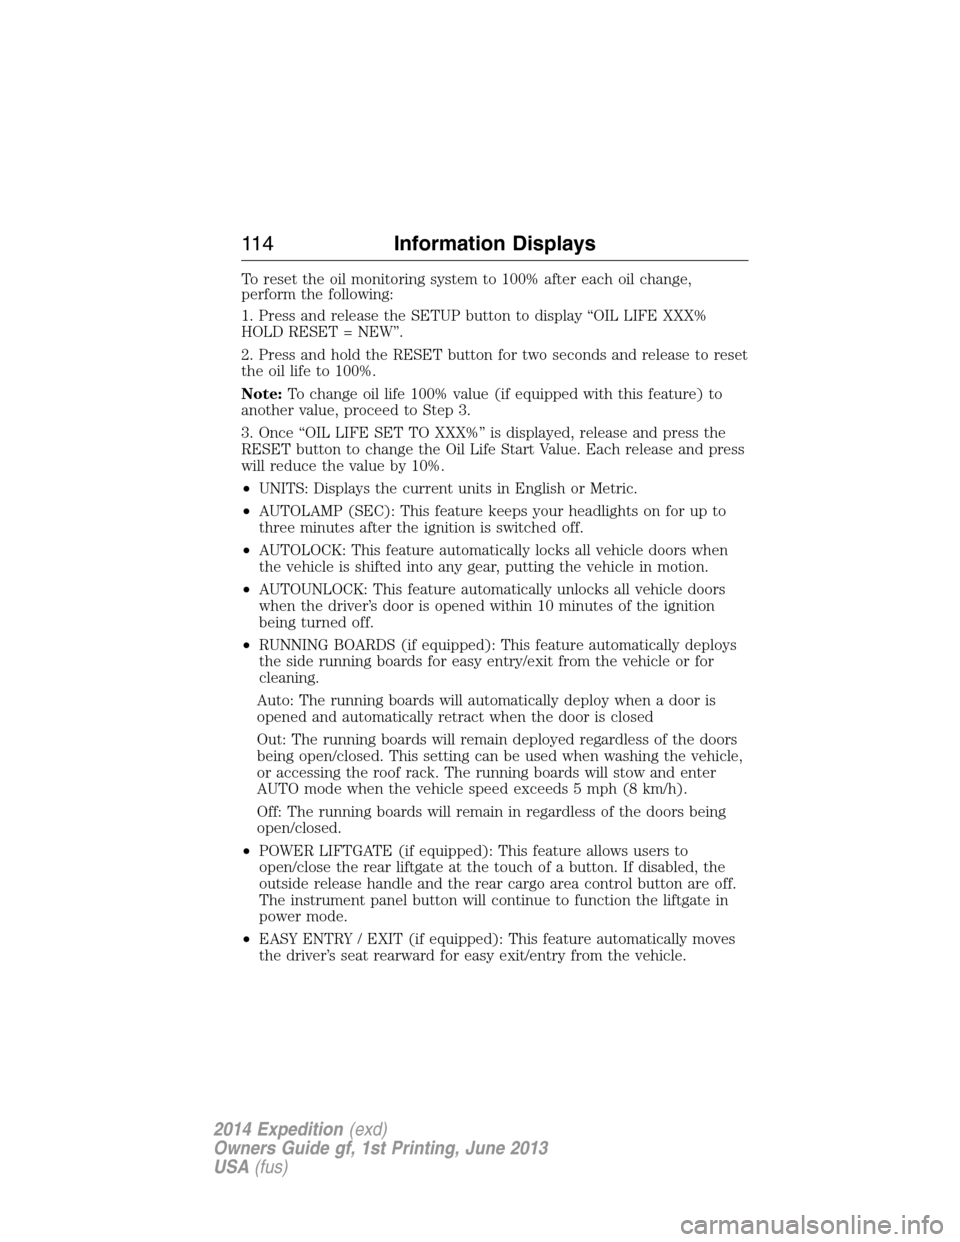
To reset the oil monitoring system to 100% after each oil change,
perform the following:
1. Press and release the SETUP button to display “OIL LIFE XXX%
HOLD RESET = NEW”.
2. Press and hold the RESET button for two seconds and release to reset
the oil life to 100%.
Note:To change oil life 100% value (if equipped with this feature) to
another value, proceed to Step 3.
3. Once “OIL LIFE SET TO XXX%” is displayed, release and press the
RESET button to change the Oil Life Start Value. Each release and press
will reduce the value by 10%.
•UNITS: Displays the current units in English or Metric.
•AUTOLAMP (SEC): This feature keeps your headlights on for up to
three minutes after the ignition is switched off.
•AUTOLOCK: This feature automatically locks all vehicle doors when
the vehicle is shifted into any gear, putting the vehicle in motion.
•AUTOUNLOCK: This feature automatically unlocks all vehicle doors
when the driver’s door is opened within 10 minutes of the ignition
being turned off.
•RUNNING BOARDS (if equipped): This feature automatically deploys
the side running boards for easy entry/exit from the vehicle or for
cleaning.
Auto: The running boards will automatically deploy when a door is
opened and automatically retract when the door is closed
Out: The running boards will remain deployed regardless of the doors
being open/closed. This setting can be used when washing the vehicle,
or accessing the roof rack. The running boards will stow and enter
AUTO mode when the vehicle speed exceeds 5 mph (8 km/h).
Off: The running boards will remain in regardless of the doors being
open/closed.
•POWER LIFTGATE (if equipped): This feature allows users to
open/close the rear liftgate at the touch of a button. If disabled, the
outside release handle and the rear cargo area control button are off.
The instrument panel button will continue to function the liftgate in
power mode.
•EASY ENTRY / EXIT (if equipped): This feature automatically moves
the driver’s seat rearward for easy exit/entry from the vehicle.
11 4Information Displays
2014 Expedition(exd)
Owners Guide gf, 1st Printing, June 2013
USA(fus)
Page 145 of 519
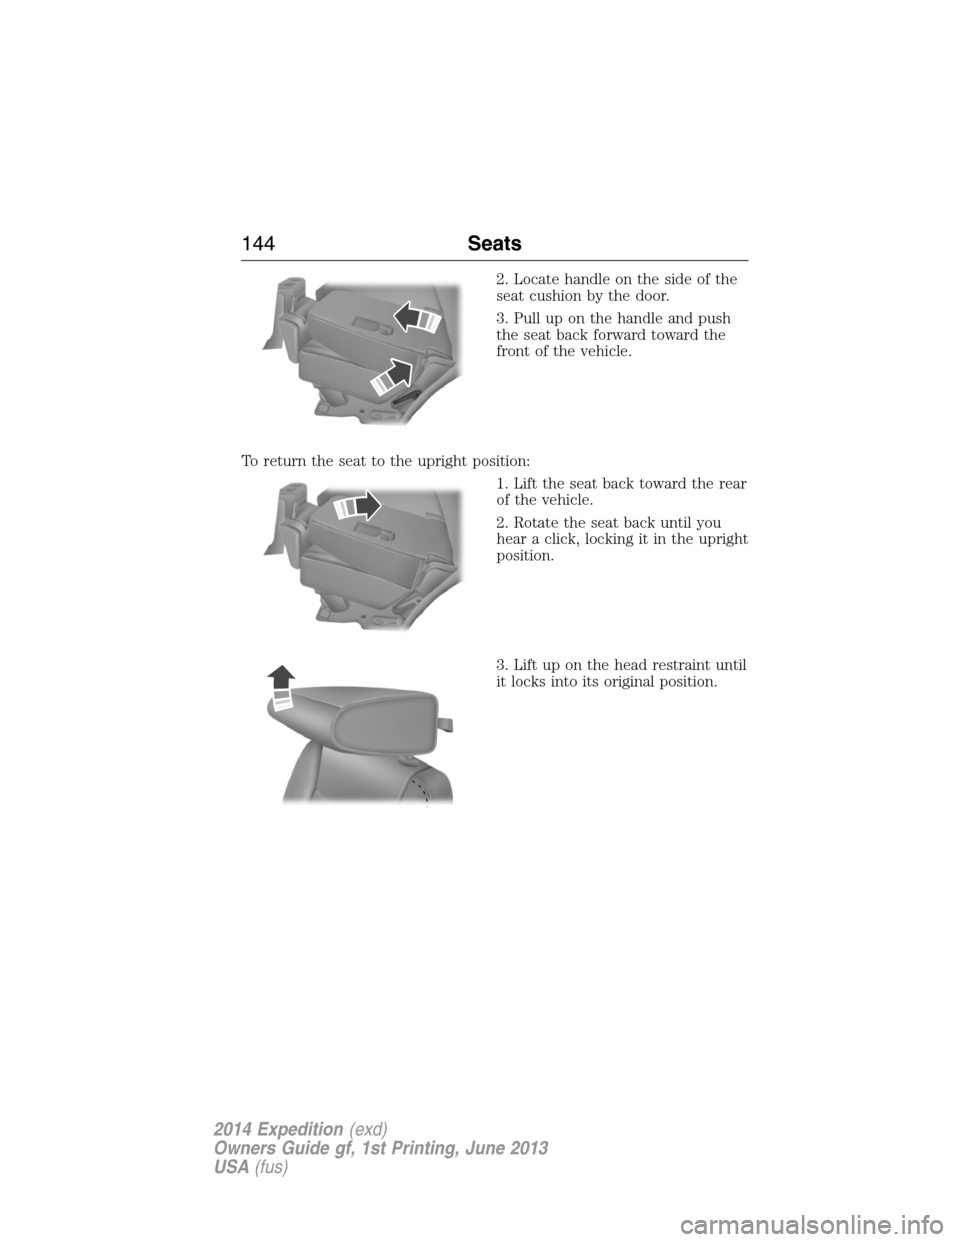
2. Locate handle on the side of the
seat cushion by the door.
3. Pull up on the handle and push
the seat back forward toward the
front of the vehicle.
To return the seat to the upright position:
1. Lift the seat back toward the rear
of the vehicle.
2. Rotate the seat back until you
hear a click, locking it in the upright
position.
3. Lift up on the head restraint until
it locks into its original position.
144Seats
2014 Expedition(exd)
Owners Guide gf, 1st Printing, June 2013
USA(fus)
Page 154 of 519
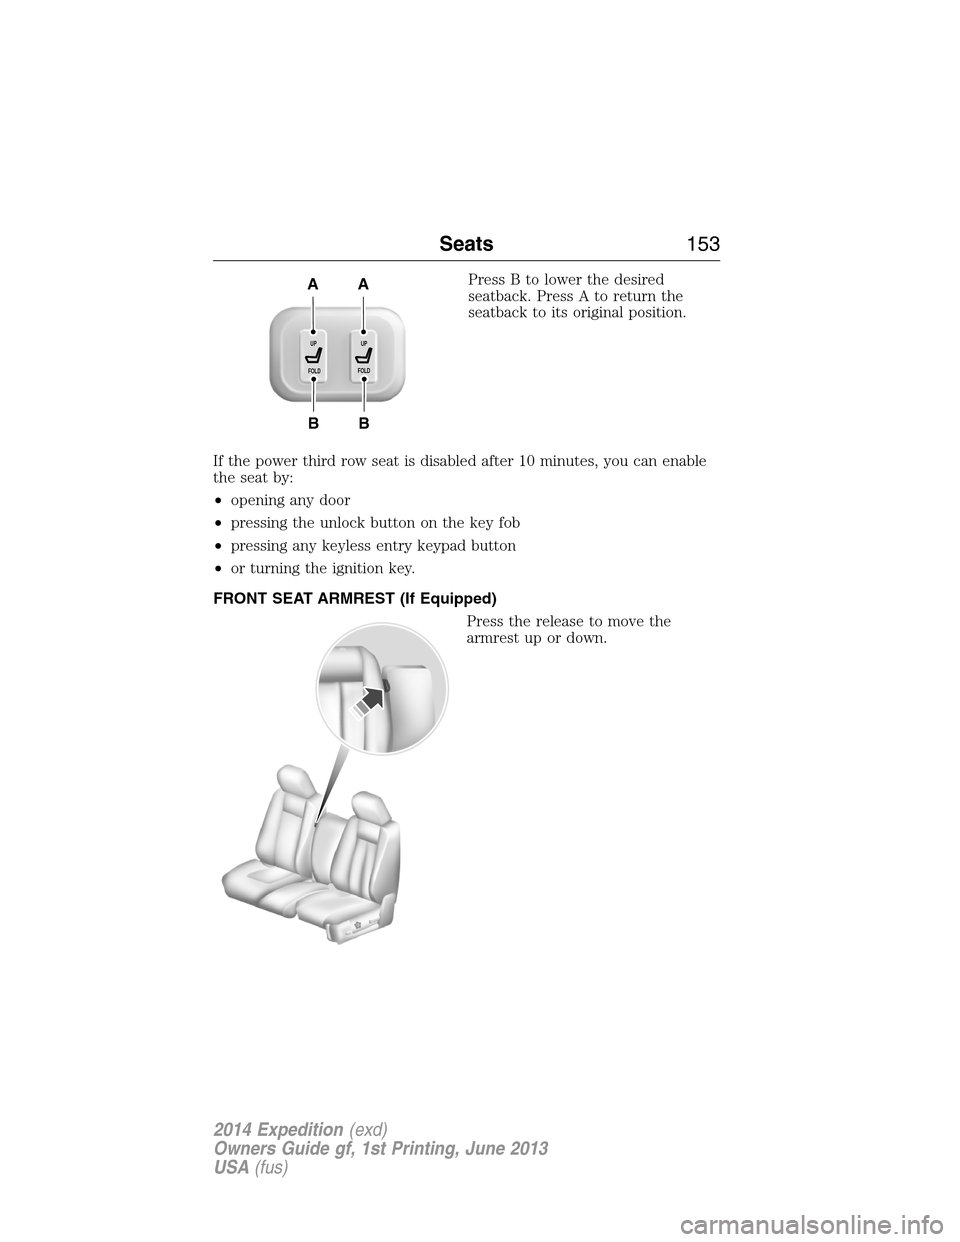
Press B to lower the desired
seatback. Press A to return the
seatback to its original position.
If the power third row seat is disabled after 10 minutes, you can enable
the seat by:
•opening any door
•pressing the unlock button on the key fob
•pressing any keyless entry keypad button
•or turning the ignition key.
FRONT SEAT ARMREST (If Equipped)
Press the release to move the
armrest up or down.
B
AA
B
UP
FOLDUP
FOLD
Seats153
2014 Expedition(exd)
Owners Guide gf, 1st Printing, June 2013
USA(fus)
Page 160 of 519
Note:We recommend that upon the sale or lease termination of your
vehicle, you erase the programmed function buttons for security reasons.
SeeErasing the function button codeslater in this section.
Note:You can program a maximum of three devices. To change or
replace any of the three devices after it has been initially programmed,
you must first erase the current settings. SeeErasing the function
button codeslater in this section.
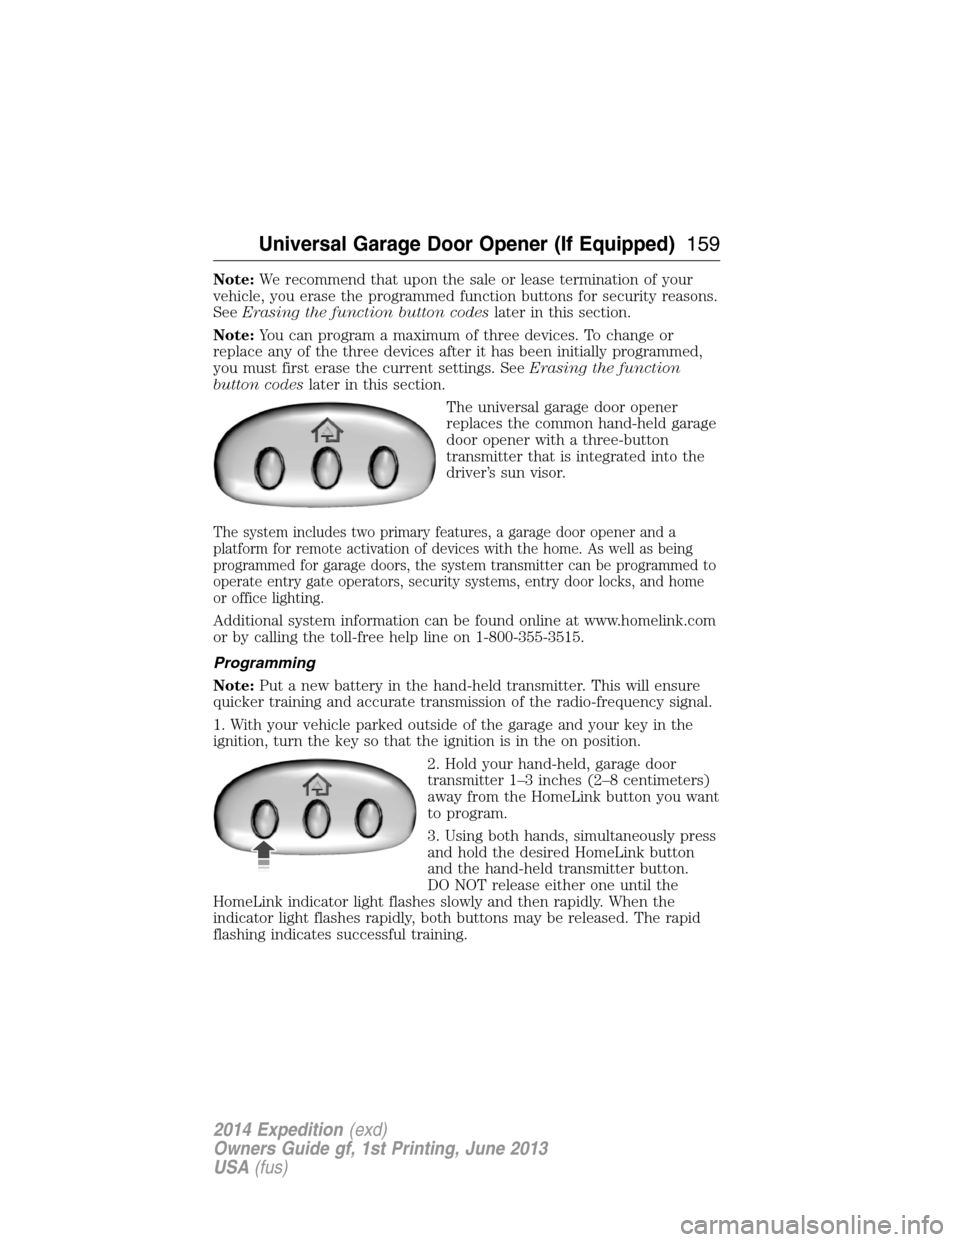
The universal garage door opener
replaces the common hand-held garage
door opener with a three-button
transmitter that is integrated into the
driver’s sun visor.
The system includes two primary features, a garage door opener and a
platform for remote activation of devices with the home. As well as being
programmed for garage doors, the system transmitter can be programmed to
operate entry gate operators, security systems, entry door locks, and home
or office lighting.
Additional system information can be found online at www.homelink.com
or by calling the toll-free help line on 1-800-355-3515.
Programming
Note:Put a new battery in the hand-held transmitter. This will ensure
quicker training and accurate transmission of the radio-frequency signal.
1. With your vehicle parked outside of the garage and your key in the
ignition, turn the key so that the ignition is in the on position.
2. Hold your hand-held, garage door
transmitter 1–3 inches (2–8 centimeters)
away from the HomeLink button you want
to program.
3. Using both hands, simultaneously press
and hold the desired HomeLink button
and the hand-held transmitter button.
DO NOT release either one until the
HomeLink indicator light flashes slowly and then rapidly. When the
indicator light flashes rapidly, both buttons may be released. The rapid
flashing indicates successful training.
Universal Garage Door Opener (If Equipped)159
2014 Expedition(exd)
Owners Guide gf, 1st Printing, June 2013
USA(fus)
Page 173 of 519
If you should experience cold weather starting problems on E-85 ethanol,
and neither an alternative brand of E-85 ethanol nor an engine block
heater is available, the addition of unleaded gasoline to your tank improves
cold starting performance. Your vehicle is designed to operate on E-85
ethanol alone, unleaded gasoline alone, or any mixture of the two.
If the Engine Fails to Start Using the Preceding Instructions
(Flexible Fuel Vehicles Only)
1. Press and hold down the accelerator 1/3 to 1/2 way to floor, then
crank the engine.
2. When the engine starts, release the key, then gradually release the
accelerator pedal as the engine speeds up. If the engine still fails to
start, repeat Step 1.
Guarding Against Exhaust Fumes
WARNING:If you smell exhaust fumes inside your vehicle, have
this checked immediately. Do not drive your vehicle if you smell
exhaust fumes. Carbon monoxide is present in exhaust fumes. Take
precautions to avoid its dangerous effects.
Important Ventilating Information
If you stop your vehicle and leave the engine idling for long periods, we
recommend that you do one of the following:
•Open the windows at least 1 inch (2.5 centimeters).
•Set your climate control to outside air.
ENGINE BLOCK HEATER (IF EQUIPPED)
WARNING:Failure to follow engine block heater instructions
could result in property damage or physical injury.
WARNING:Do not use your heater with ungrounded electrical
systems or two-pronged (cheater) adapters. There is a risk of
electrical shock.
Note:The heater is most effective when outdoor temperatures are below
0°F (-18°C).
172Starting and Stopping the Engine
2014 Expedition(exd)
Owners Guide gf, 1st Printing, June 2013
USA(fus)