2014 FORD EXPEDITION ESP
[x] Cancel search: ESPPage 175 of 519
SAFETY PRECAUTIONS
WARNING:Do not overfill the fuel tank. The pressure in an
overfilled tank may cause leakage and lead to fuel spray and fire.
WARNING:The fuel system may be under pressure. If you hear
a hissing sound near the fuel filler inlet, do not refuel until the
sound stops. Otherwise, fuel may spray out, which could cause serious
personal injury.
WARNING:Automotive fuels can cause serious injury or death if
misused or mishandled.
WARNING:The flow of fuel through a fuel pump nozzle can
produce static electricity, which can cause a fire if fuel is pumped
into an ungrounded fuel container.
WARNING:Fuel ethanol and gasoline may contain benzene,
which is a cancer-causing agent.
WARNING:When refueling always shut the engine off and never
allow sparks or open flames near the filler neck. Never smoke
while refueling. Fuel vapor is extremely hazardous under certain
conditions. Care should be taken to avoid inhaling excess fumes.
Observe the following guidelines when handling automotive fuel:
•Extinguish all smoking materials and any open flames before refueling
your vehicle.
•Always turn off the vehicle before refueling.
•Automotive fuels can be harmful or fatal if swallowed. Fuel, such as
gasoline, is highly toxic and if swallowed can cause death or
permanent injury. If fuel is swallowed, call a physician immediately,
even if no symptoms are immediately apparent. The toxic effects of
fuel may not be visible for hours.
•Avoid inhaling fuel vapors. Inhaling too much fuel vapor of any kind
can lead to eye and respiratory tract irritation. In severe cases,
excessive or prolonged breathing of fuel vapor can cause serious
illness and permanent injury.
174Fuel and Refueling
2014 Expedition(exd)
Owners Guide gf, 1st Printing, June 2013
USA(fus)
Page 182 of 519

EMISSION CONTROL SYSTEM
WARNING:Do not park, idle, or drive your vehicle in dry grass
or other dry ground cover. The emission system heats up the
engine compartment and exhaust system, which can start a fire.
WARNING:Exhaust leaks may result in entry of harmful and
potentially lethal fumes into the passenger compartment. If you
smell exhaust fumes inside your vehicle, have your dealer inspect your
vehicle immediately. Do not drive if you smell exhaust fumes.
Your vehicle is equipped with various emission control components and a
catalytic converter which will enable your vehicle to comply with
applicable exhaust emission standards. To make sure that the catalytic
converter and other emission control components continue to work
properly:
•Use only the specified fuel listed.
•Avoid running out of fuel.
•Do not turn off the ignition while your vehicle is moving, especially at
high speeds.
•Have the items listed inScheduled Maintenance Information
performed according to the specified schedule.
The scheduled maintenance items listed inScheduled Maintenance
Informationare essential to the life and performance of your vehicle
and to its emissions system.
If other than Ford, Motorcraft® or Ford-authorized parts are used for
maintenance replacements or for service of components affecting
emission control, such non-Ford parts should be equivalent to genuine
Ford Motor Company parts in performance and durability.
Illumination of the service engine soon indicator, charging system
warning light or the temperature warning light, fluid leaks, strange odors,
smoke or loss of engine power could indicate that the emission control
system is not working properly.
An improperly operating or damaged exhaust system may allow exhaust
to enter the vehicle. Have a damaged or improperly operating exhaust
system inspected and repaired immediately.
Fuel and Refueling181
2014 Expedition(exd)
Owners Guide gf, 1st Printing, June 2013
USA(fus)
Page 194 of 519
How Your Vehicle Differs From Other Vehicles
WARNING:Vehicles with a higher center of gravity such as
utility and four-wheel drive vehicles handle differently than
vehicles with a lower center of gravity. Utility and four-wheel drive
vehicles arenotdesigned for cornering at speeds as high as passenger
cars any more than low-slung sports cars are designed to perform
satisfactorily under off-road conditions. Avoid sharp turns, excessive
speed and abrupt maneuvers in these vehicles. Failure to drive
cautiously could result in an increased risk of loss of vehicle control,
vehicle rollover, personal injury and death.
Truck and utility vehicles can differ from some other vehicles. Your
vehicle may be higher to allow it to travel over rough terrain without
getting hung up or damaging underbody components.
The differences that make your vehicle so versatile also make it handle
differently than an ordinary passenger car.
Maintain steering wheel control at all times, especially in rough terrain.
Since sudden changes in terrain can result in abrupt steering wheel
motion, make sure you grip the steering wheel from the outside. Do not
grip the spokes.
Drive cautiously to avoid vehicle damage from concealed objects such as
rocks and stumps.
You should either know the terrain or examine maps of the area before
driving. Map out your route before driving in the area. To maintain
steering and braking control of your vehicle, you must have all four
wheels on the ground and they must be rolling, not sliding or spinning.
Driving Off-Road With Truck and Utility Vehicles
Note:On some 4WD models, the initial shift from two-wheel drive to
four-wheel drive while the vehicle is moving can cause some momentary
clunk and ratcheting sounds. This is the front drivetrain coming up to
speed and the automatic locking hubs engaging and is not cause for
concern.
Note:Your vehicle may be equipped with a front air dam that can
become damaged (due to reduced ground clearance) when taking your
vehicle off-road. This air dam can be taken off by removing two bolts.
4WD vehicles are specially equipped for driving on sand, snow, mud and
rough terrain and have operating characteristics that are somewhat
different from conventional vehicles, both on and off the road.
Four-Wheel Drive (If Equipped)193
2014 Expedition(exd)
Owners Guide gf, 1st Printing, June 2013
USA(fus)
Page 196 of 519
If your vehicle gets stuck
WARNING:Do not spin the wheels at over 35 mph (56 km/h).
The tires may fail and injure a passenger or bystander.
Note:Do not rock the vehicle if the engine is not at normal operating
temperature or damage to the transmission may occur.
Note:Do not rock the vehicle for more than a few minutes or damage to
the transmission and tires may occur or the engine may overheat.
If your vehicle gets stuck in mud or snow it may be rocked out by
shifting between forward and reverse gears, stopping between shifts, in a
steady pattern. Press lightly on the accelerator in each gear.
Emergency maneuvers
•In an unavoidable emergency situation where a sudden sharp turn
must be made, remember to avoid over-driving your vehicle, i.e., turn
the steering wheel only as rapidly and as far as required to avoid the
emergency. Excessive steering will result in less vehicle control, not
more. Additionally, smooth variations of the accelerator and/or brake
pedal pressure should be utilized if changes in vehicle speed are called
for. Avoid abrupt steering, acceleration or braking which could result
in an increased risk of loss of vehicle control, vehicle rollover and/or
personal injury. Use all available road surface to return the vehicle to a
safe direction of travel.
•In the event of an emergency stop, avoid skidding the tires and do not
attempt any sharp steering wheel movements.
•If the vehicle goes from one type of surface to another (i.e., from
concrete to gravel) there will be a change in the way the vehicle
responds to a maneuver (steering, acceleration or braking). Again,
avoid these abrupt inputs.
Sand
When driving over sand, try to keep all four wheels on the most solid
area of the trail. Avoid reducing the tire pressures but shift to a lower
gear and drive steadily through the terrain. Apply the accelerator slowly
and avoid spinning the wheels.
Avoid excessive speed because vehicle momentum can work against you
and cause the vehicle to become stuck to the point that assistance may
be required from another vehicle. Remember, you may be able to back
out the way you came if you proceed with caution.
Four-Wheel Drive (If Equipped)195
2014 Expedition(exd)
Owners Guide gf, 1st Printing, June 2013
USA(fus)
Page 197 of 519
Mud and water
Note:Driving through deep water may damage the vehicle.
If you must drive through high water, drive slowly. Traction or brake
capability may be limited.
When driving through water, determine the depth; avoid water higher
than the bottom of the hubs (if possible) and proceed slowly. If the
ignition system gets wet, the vehicle may stall.
Once through water, always try the brakes. Wet brakes do not stop the
vehicle as effectively as dry brakes. Drying can be improved by moving
your vehicle slowly while applying light pressure on the brake pedal.
Be cautious of sudden changes in vehicle speed or direction when you
are driving in mud. Even 4WD vehicles can lose traction in slick mud. As
when you are driving over sand, apply the accelerator slowly and avoid
spinning your wheels. If the vehicle does slide, steer in the direction of
the slide until you regain control of the vehicle.
If the transmission, transfer case or front axle are submerged in water,
their fluids should be checked and changed, if necessary.
If the front or rear axle is submerged in water, the axle lubricant should
be replaced.
After driving through mud, clean off residue stuck to rotating driveshafts
and tires. Excess mud stuck on tires and rotating driveshafts causes an
imbalance that could damage drive components.
“Tread Lightly” is an educational
program designed to increase public
awareness of land-use regulations
and responsibilities in our nations
wilderness areas. Ford Motor
Company joins the U.S. Forest
Service and the Bureau of Land Management in encouraging you to help
preserve our national forest and other public and private lands by
“treading lightly.”
196Four-Wheel Drive (If Equipped)
2014 Expedition(exd)
Owners Guide gf, 1st Printing, June 2013
USA(fus)
Page 215 of 519
AUTO LEVELING SUSPENSION SYSTEM (if equipped)
The automatic leveling suspension system is designed to improve ride,
handling and general vehicle performance during:
•Certain road conditions
•Steering maneuvers
•Braking
•Acceleration
•Towing
This system keeps the rear of your vehicle at a constant level through a
hydraulic pump inside each rear shock. Depending on the payload or
road surface conditions it will take approximately 2 miles (3.2 km) for
the leveling to complete.
If the loaded vehicle is not moved for approximately 12 hours, the
leveling system may bleed down to a lower height. This can be especially
apparent if a trailer is left attached to the parked vehicle for long periods
of time. You must drive your vehicle in order to re-level the suspension.
If a self-equalizing hitch is being used, your vehicle should be drive
approximately 2 miles (3.2 km) with the trailer prior to adjusting
(leveling) the hitch.
214Driving Aids
2014 Expedition(exd)
Owners Guide gf, 1st Printing, June 2013
USA(fus)
Page 233 of 519
Once the trailer is level or slightly nose down toward the vehicle:
•Lock the bar tension adjuster in place.
•Check that the trailer tongue securely attaches and locks onto the
hitch.
•Install safety chains, lighting, and trailer brake controls as required by
law or the trailer manufacturer.
Weight-distributing Hitch – Vehicles with Automatic Leveling
Suspension
WARNING:Do not adjust a weight-distributing hitch to any
position where the rear bumper of the vehicle is higher than it
was before attaching the trailer. Doing so will defeat the function of the
weight-distributing hitch, which may cause unpredictable handling, and
could result in serious personal injury.
Note:If you do not move the loaded vehicle for approximately 12 hours,
the leveling system may bleed down to a lower height. This can be
especially apparent if you leave a trailer attached to the parked vehicle
for long periods. You must drive your vehicle in order to re-level the
suspension.
When connecting a trailer to a vehicle with automatic leveling suspension
using a weight-distributing hitch, always use the following procedure:
1. Load the interior of the vehicle to a weight similar to that which you
intend to carry when towing. This includes things such as passenger
weight and cargo.
2. Drive the vehicle for approximately 2 miles (3 kilometers) to re-level
the suspension.
3. Park your vehicle, without the trailer, on a level surface.
4. Measure the height to the top of your vehicle’s front wheel opening
on the fender. This is H1.
5. Attach the trailer to your vehicle without the weight-distributing bars
connected.
6. Make sure you securely attach and lock the trailer tongue to the
hitch.
7. Install safety chains, lighting, and trailer brake controls as required
by law or the trailer manufacturer.
8. Drive the vehicle and trailer at 20–25 mph (32–40 km/h) for
approximately 2 miles (3 kilometers) to re-level the suspension.
9. Park your vehicle and trailer on a level surface.
10. Measure the height to the top of your vehicles front wheel opening
on the fender a second time. This is H2.
232Towing
2014 Expedition(exd)
Owners Guide gf, 1st Printing, June 2013
USA(fus)
Page 235 of 519
Integrated Trailer Brake Controller (If Equipped)
WARNING:The Ford TBC has been verified to be compatible
with trailers having electric-actuated drum brakes (one to four
axles) and some electric-over-hydraulic (EOH) brakes. It will not
activate hydraulic surge-style trailer brakes. It is the responsibility
of the customer to ensure that the trailer brakes are adjusted
appropriately, functioning normally and all electric connections are
properly made. Failure to do so may result in loss of vehicle control,
crash or serious injury.
When used properly, the trailer brake controller assists in smooth
and effective trailer braking by powering the trailer’s electric or
electric-over-hydraulic brakes with a proportional output based on the
towing vehicle’s brake pressure.
Ford has tested the trailer brake controller to be compatible with several
major brands of electric-over-hydraulic trailer brakes. Contact an
authorized dealer for information on which brands you can use.
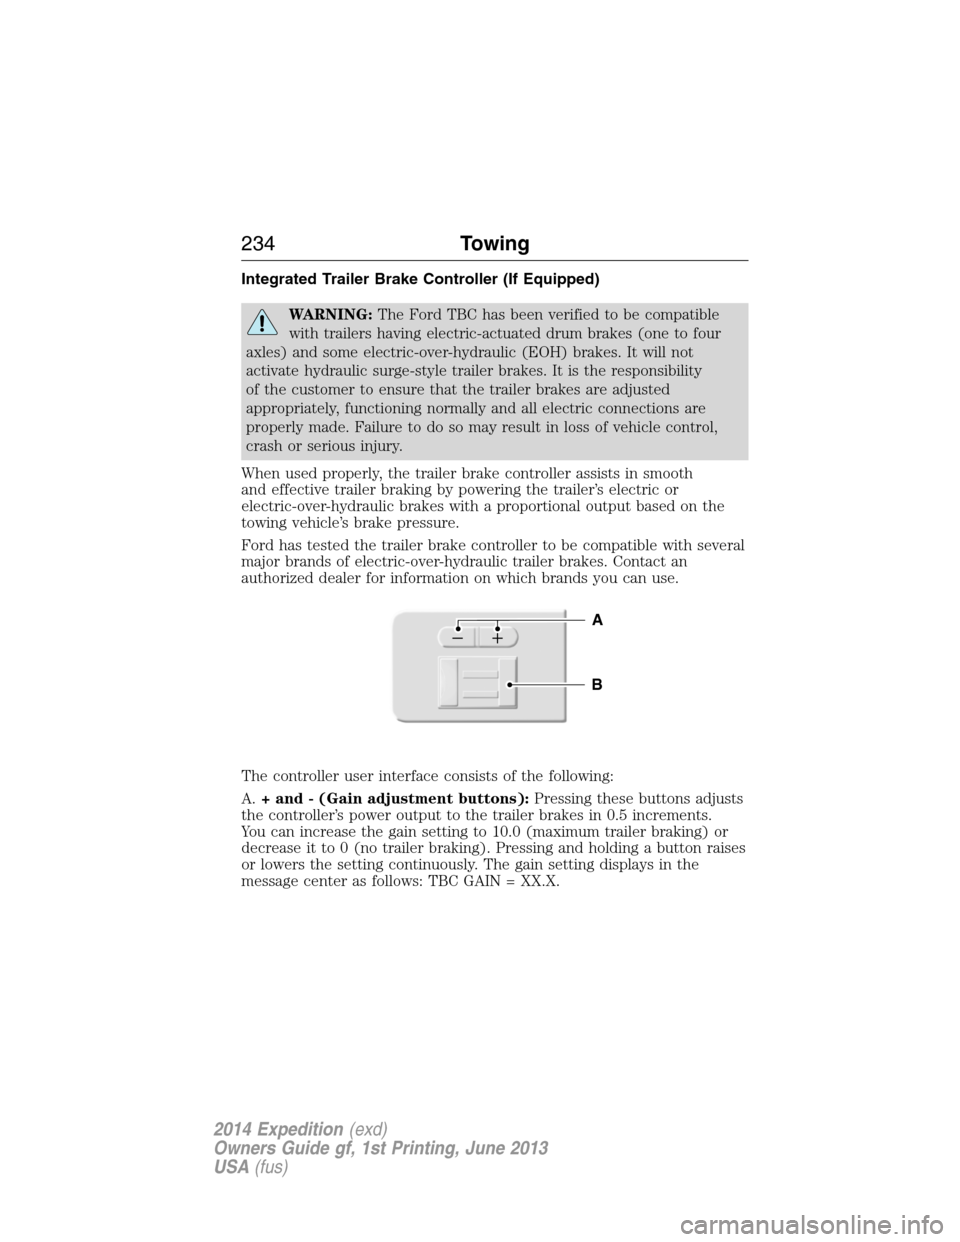
The controller user interface consists of the following:
A.+ and - (Gain adjustment buttons):Pressing these buttons adjusts
the controller’s power output to the trailer brakes in 0.5 increments.
You can increase the gain setting to 10.0 (maximum trailer braking) or
decrease it to 0 (no trailer braking). Pressing and holding a button raises
or lowers the setting continuously. The gain setting displays in the
message center as follows: TBC GAIN = XX.X.
B
A
234Towing
2014 Expedition(exd)
Owners Guide gf, 1st Printing, June 2013
USA(fus)