2014 FORD EXPEDITION engine
[x] Cancel search: enginePage 80 of 519
Automatic Disarming
Your vehicle disarms when you switch the ignition on with a coded key.
Replacement Keys
Note:Your vehicle may come with two integrated keyhead transmitters.
The integrated keyhead transmitter functions as a programmed ignition
key that operates all the locks and starts the vehicle, as well as a remote
control.
If your programmed transmitters or standard SecuriLock coded keys are
lost or stolen and you do not have an extra coded key, you will need to
have your vehicle towed to an authorized dealer. The key codes need
to be erased from your vehicle and new coded keys will need to be
programmed.
Store an extra programmed key away from the vehicle in a safe place to
help prevent any inconveniences. See an authorized dealer to purchase
additional spare or replacement keys.
Programming a Spare Key
Note:A maximum of eight coded keys can be programmed to your
vehicle. Only four of these eight can be integrated keyhead transmitters.
You can program your own integrated keyhead transmitters or standard
SecuriLock coded keys to your vehicle. This procedure will program both
the engine immobilizer key code and the remote entry portion of the
remote control to your vehicle.
Only use integrated keyhead transmitters or standard SecuriLock keys.
You must have two previously programmed coded keys and the new
unprogrammed key readily accessible. See your authorized dealer to have
the spare key programmed if two previously programmed coded keys are
not available.
Read and understand the entire procedure before you begin.
1. Insert the first previously programmed coded key into the ignition.
2. Turn the ignition from off to on. Keep the ignition on for at least three
seconds, but no more than 10 seconds.
3. Turn the ignition off and remove the first coded key from the ignition.
4. After three seconds but within 10 seconds of turning the ignition off,
insert the second previously coded key into the ignition.
5. Turn the ignition from off to on. Keep the ignition on for at least three
seconds, but no more than 10 seconds.
Security79
2014 Expedition(exd)
Owners Guide gf, 1st Printing, June 2013
USA(fus)
Page 81 of 519
6. Turn the ignition off and remove the second previously programmed
coded key from the ignition.
7. After three seconds but within 20 seconds of turning the ignition off
and removing the previously programmed coded key, insert the new
unprogrammed key into the ignition.
8. Turn the ignition from off to on. Keep the ignition on for at least six
seconds.
9. Remove the newly programmed coded key from the ignition.
The key will start the vehicle’s engine and will operate the remote entry
system (if the new key is an integrated keyhead transmitter) if it has
been successfully programmed. The theft indicator light will illuminate
for three seconds and then go out to indicate successful programming.
If the key was not successfully programmed, the theft indicator light may
flash on and off. Wait 20 seconds and repeat Steps 1 through 8. Take
your vehicle to your authorized dealer to have the new key programmed
if you are still unsuccessful.
Wait 20 seconds and then repeat this procedure from Step 1 to program
an additional key.
ANTI-THEFT ALARM
The system will warn you of unauthorized entry to your vehicle.
The turn signal lamps will flash and the horn will sound when:
•any door or the hood is opened without using the key or the remote
control
•the ignition is turned on with an invalid key.
Take all keys and remote controls to your authorized dealer if there is
any potential alarm problem with your vehicle.
Arming the Alarm
The system is ready to arm whenever the ignition is off. Lock the vehicle
to arm the alarm.
The turn signal lamps will flash once after locking the vehicle to indicate
the alarm is in the pre-armed mode and will become fully armed in
20 seconds.
80Security
2014 Expedition(exd)
Owners Guide gf, 1st Printing, June 2013
USA(fus)
Page 100 of 519
GAUGES
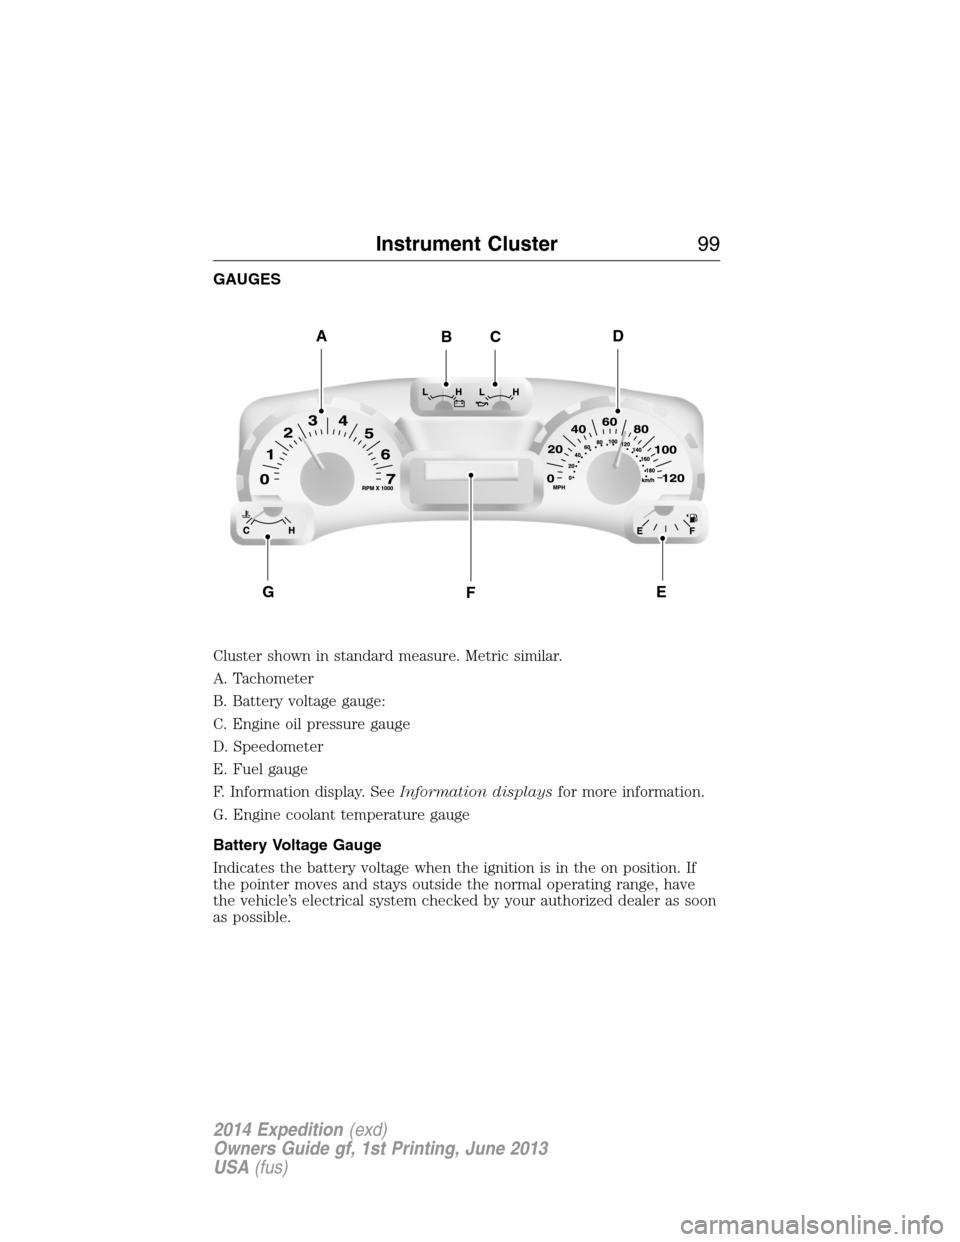
Cluster shown in standard measure. Metric similar.
A. Tachometer
B. Battery voltage gauge:
C. Engine oil pressure gauge
D. Speedometer
E. Fuel gauge
F. Information display. SeeInformation displaysfor more information.
G. Engine coolant temperature gauge
Battery Voltage Gauge
Indicates the battery voltage when the ignition is in the on position. If
the pointer moves and stays outside the normal operating range, have
the vehicle’s electrical system checked by your authorized dealer as soon
as possible.
ADBC
FGE
Instrument Cluster99
2014 Expedition(exd)
Owners Guide gf, 1st Printing, June 2013
USA(fus)
Page 101 of 519
Engine Oil Pressure Gauge
Indicates engine oil pressure. The needle should stay in the normal
operating range. If the needle falls below the normal range, stop the
vehicle, turn off the engine and check the engine oil level. Add oil if
needed. If the oil level is correct, have your vehicle checked at your
authorized dealer.
Fuel Gauge
Indicates approximately how much fuel is left in the fuel tank (when the
ignition is on). The fuel gauge may vary slightly when the vehicle is in
motion or on a grade. The fuel icon and arrow indicates which side of
the vehicle the fuel filler door is located.
Information Display
Odometer
Located in the bottom of the information display Registers the
accumulated distance your vehicle has travelled.
Trip Computer
SeeTrip A/BinInformation Displays.
Vehicle Settings and Personalization
SeeInformation Displays.
Engine Coolant Temperature Gauge
Indicates engine coolant temperature. At normal operating temperature,
the level indicator will be in the normal range. If the engine coolant
temperature exceeds the normal range, stop the vehicle as soon as safely
possible, switch off the engine and let the engine cool.
WARNING:Never remove the coolant reservoir cap while the
engine is running or hot.
100Instrument Cluster
2014 Expedition(exd)
Owners Guide gf, 1st Printing, June 2013
USA(fus)
Page 103 of 519
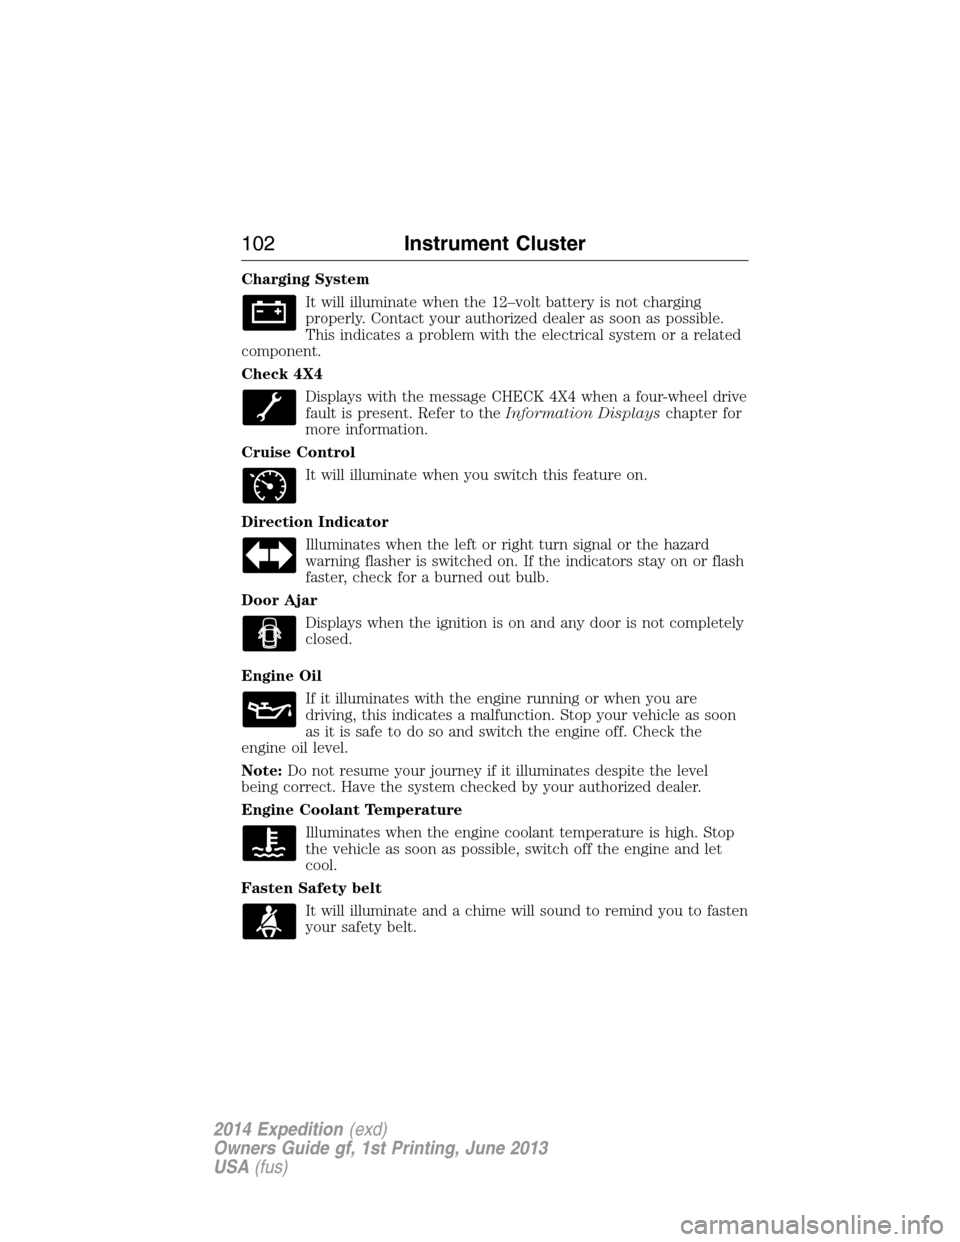
Charging System
It will illuminate when the 12–volt battery is not charging
properly. Contact your authorized dealer as soon as possible.
This indicates a problem with the electrical system or a related
component.
Check 4X4
Displays with the message CHECK 4X4 when a four-wheel drive
fault is present. Refer to theInformation Displayschapter for
more information.
Cruise Control
It will illuminate when you switch this feature on.
Direction Indicator
Illuminates when the left or right turn signal or the hazard
warning flasher is switched on. If the indicators stay on or flash
faster, check for a burned out bulb.
Door Ajar
Displays when the ignition is on and any door is not completely
closed.
Engine Oil
If it illuminates with the engine running or when you are
driving, this indicates a malfunction. Stop your vehicle as soon
as it is safe to do so and switch the engine off. Check the
engine oil level.
Note:Do not resume your journey if it illuminates despite the level
being correct. Have the system checked by your authorized dealer.
Engine Coolant Temperature
Illuminates when the engine coolant temperature is high. Stop
the vehicle as soon as possible, switch off the engine and let
cool.
Fasten Safety belt
It will illuminate and a chime will sound to remind you to fasten
your safety belt.
102Instrument Cluster
2014 Expedition(exd)
Owners Guide gf, 1st Printing, June 2013
USA(fus)
Page 104 of 519
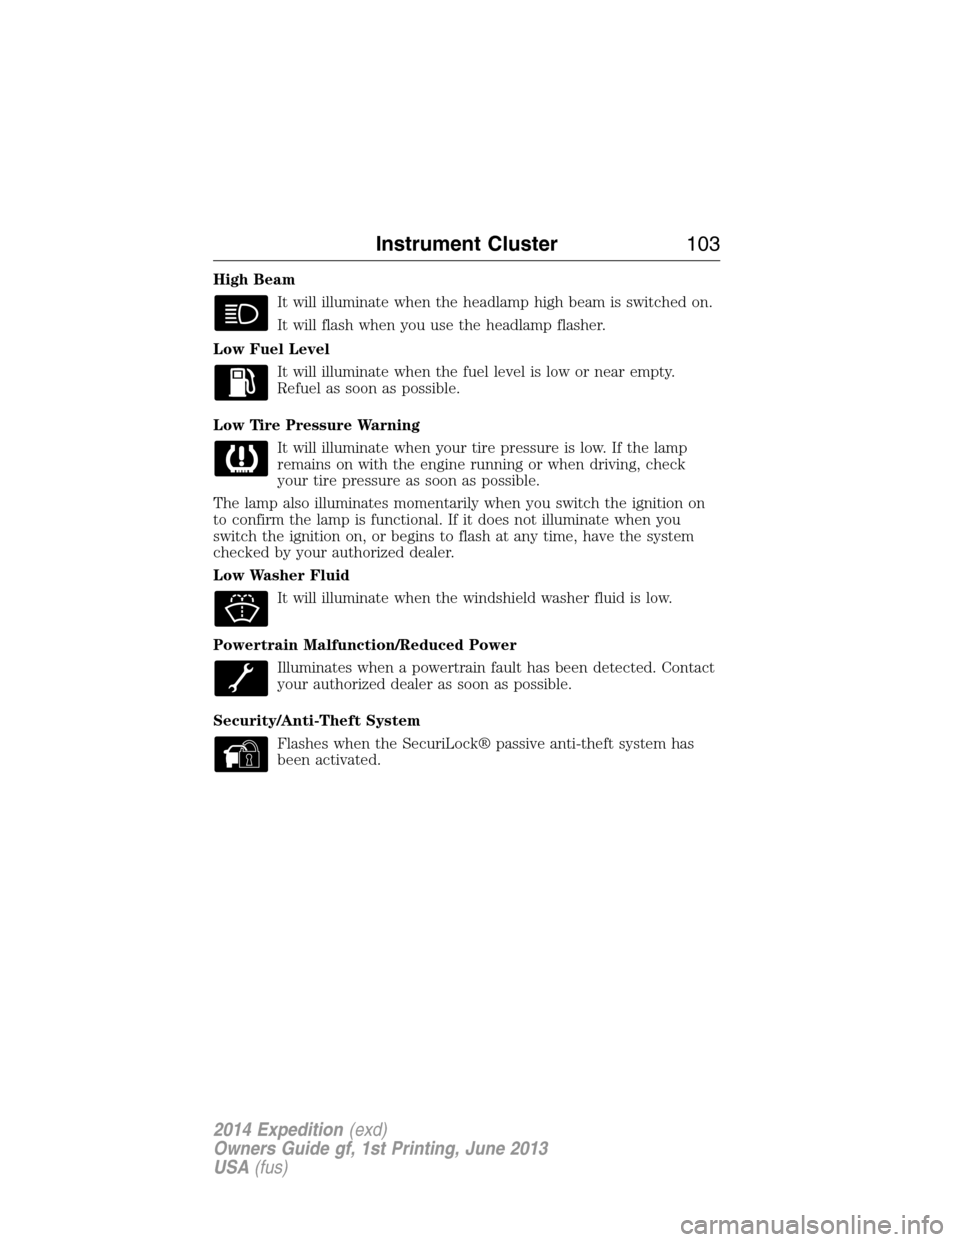
High Beam
It will illuminate when the headlamp high beam is switched on.
It will flash when you use the headlamp flasher.
Low Fuel Level
It will illuminate when the fuel level is low or near empty.
Refuel as soon as possible.
Low Tire Pressure Warning
It will illuminate when your tire pressure is low. If the lamp
remains on with the engine running or when driving, check
your tire pressure as soon as possible.
The lamp also illuminates momentarily when you switch the ignition on
to confirm the lamp is functional. If it does not illuminate when you
switch the ignition on, or begins to flash at any time, have the system
checked by your authorized dealer.
Low Washer Fluid
It will illuminate when the windshield washer fluid is low.
Powertrain Malfunction/Reduced Power
Illuminates when a powertrain fault has been detected. Contact
your authorized dealer as soon as possible.
Security/Anti-Theft System
Flashes when the SecuriLock® passive anti-theft system has
been activated.
Instrument Cluster103
2014 Expedition(exd)
Owners Guide gf, 1st Printing, June 2013
USA(fus)
Page 105 of 519

Service Engine Soon
Theservice engine soonindicator light illuminates when the
ignition is first turned to the on position to check the bulb and to
indicate whether the vehicle is ready for Inspection/Maintenance
(I/M) testing. Normally, the “service engine soon” light will stay on until the
engine is cranked, then turn itself off if no malfunctions are present.
However, if after 15 seconds the “service engine soon” light blinks eight
times, it means that the vehicle is not ready for I/M testing. See the
Readiness for inspection/maintenance (I/M) testingin theFuel and
Refuelingchapter.
Solid illumination after the engine is started indicates the on-board
diagnostics system (OBD-II) has detected a malfunction. Refer to
On-board diagnostics (OBD-II)in theFuel and Refuelingchapter.
If the light is blinking, engine misfire is occurring which could damage
your catalytic converter. Drive in a moderate fashion (avoid heavy
acceleration and deceleration) and have your vehicle serviced
immediately by your authorized dealer.
WARNING:Under engine misfire conditions, excessive exhaust
temperatures could damage the catalytic converter, the fuel
system, interior floor coverings or other vehicle components, possibly
causing a fire.
Stability Control System
Displays when the AdvanceTrac®/Traction control is active.
If the light remains on, have the system serviced immediately.
Stability Control System Off
Illuminates when AdvanceTrac®/Traction control has been
disabled by the driver.
Transmission Tow/Haul
Illuminates when the Tow/Haul feature has been activated.
Refer to theTransmissionchapter for transmission function
and operation. If the light flashes steadily, have the system
serviced immediately, damage to the transmission could occur.
104Instrument Cluster
2014 Expedition(exd)
Owners Guide gf, 1st Printing, June 2013
USA(fus)
Page 111 of 519
•OIL LIFE: This displays the remaining oil life. An oil change is
required whenever indicated by the message center and according to
the recommended maintenance schedule. USE ONLY
RECOMMENDED ENGINE OILS.
To reset the oil monitoring system to 100% after each oil change,
perform the following:
1. Press and release the SETUP button to display “OIL LIFE XXX%
HOLD RESET = NEW”.
2. Press and hold the RESET button for two seconds and release to reset
the oil life to 100%.
Note:To change oil life 100% value (if equipped with this feature) to
another value, proceed to Step 3.
3. Once “OIL LIFE SET TO XXX%” is displayed, release and press the
RESET button to change the Oil Life Start Value. Each release and press
will reduce the value by 10%.
•UNITS ENG / METRIC: Displays the current units in English or Metric.
•AUTOLAMP: This feature keeps your headlights on for up to three
minutes after the ignition is switched off.
•AUTOLOCK: This feature automatically locks all vehicle doors when
the vehicle is shifted into any gear, putting the vehicle in motion.
•AUTOUNLOCK: This feature automatically unlocks all vehicle doors
when the driver’s door is opened within 10 minutes of the ignition
being turned off.
•TRAILER SWAY (if equipped): This feature uses the electronic
stability control to mitigate trailer sway.
•TBC MODE (if equipped): Allows you to choose the trailer brake
mode.
•CREATE MYKEY / MYKEY SETUP / CLEAR MYKEY: For more
information refer to theMyKey®chapter.
•LANGUAGE = ENGLISH / SPANISH / FRENCH: Allows you to choose
which language the message center will display in.
Waiting four seconds or pressing the SELECT/RESET stem cycles the
message center through each of the language choices.
Press the SELECT/RESET stem to set the language choice when the
language you want appears.
11 0Information Displays
2014 Expedition(exd)
Owners Guide gf, 1st Printing, June 2013
USA(fus)