2014 FORD EXPEDITION CD player
[x] Cancel search: CD playerPage 367 of 519

D.STOP*:Press this button to stop playing the disc.
E.PLAY*:Press this button to play the disc.
F.Headphone jack:Plug in your wired headphones with a 1/8-inch
(3.5 millimeter) stereo connector plug to listen to audio from the
program.
G.Video input jack (red):Connect an RCA cable to this port.
H.Video input jack (white):Connect an RCA cable to this port.
I.Video input jack (yellow):Connect an RCA cable to this port.
J.USB port (optional):Listen to music or view images you stored on a
USB device such as a USB memory stick or a memory card reader.
K.SOURCE:Press this button to select Monitor A, Monitor B, AUX/TV
(if available), and AUX 2 (if available).
L.POWER:Press this button to turn the system off and on.
M.TFT LCD panel:Seven-inch TFT LCD panel.
N.Level lock and release latch:Use this latch to change the viewing
angle of the LCD panel or lock the panel into the secured position.
O.Infrared sensor - forward sensor eye:This allows the remote
control to navigate the on-screen display.
Remote Control
Note:The remote control uses infrared light to send commands to the
DVD player, just as many home video systems do. Just point the remote
control at the DVD player infrared window located above each screen in
order to control that DVD player. While you can connect a second device
such as a VCR through the auxiliary inputs, and view the playback on
the screen, you cannot control that device by aiming its remote control
at the Ford DVD player. The Ford DVD system remote control is the
only remote control you can use with the system. For example, if you
connect a VCR to the DVD system, you must point the VCR remote
control at the VCR to control it.
Installing the Battery
Before using your remote control, install the batteries as follows:
1. Turn the remote control face down. Press down on the ridged area of
the battery cover and slide it off.
2. Install two AAA batteries. Make sure you install the batteries
properly, with the + and – facing the correct way, as shown in the
battery compartment.
3. Slide the cover back until it clicks.
366Audio System
2014 Expedition(exd)
Owners Guide gf, 1st Printing, June 2013
USA(fus)
Page 369 of 519
5.SOUND AROUND ON/OFF*:Press this button to turn the FM
transmitter off and on.
6.MUTE:Press this button to turn off the sound sent to the headphones.
The screen displays that the sound is muted. Pressing the button again
restores sound to the previously set level. This feature is only
functional in DVD mode.
7.MENU:Press this button to go to the disc’s root menu.
8.CH + and CH -:
•In DVD mode, press these buttons to move the select bar to items
among the menu or file list.
•In TV mode, press these buttons to go to the next channel or
previous channel.
•In on-screen display mode, press these buttons to change the
setting of a selected item.
9.VOL + and VOL -:
•In DVD mode, press these buttons to move the select bar to items
to one of the items in the menu or file list.
•When not in on-screen display mode, press these buttons to change
the volume of the playing media.
10.ENTER:Press this button to select from the on-screen display, or
begin disc playback.
11.TITLE:Press this button to go to a disc’s title menu.
12.SUBTITLE:If a disc has subtitle options, press this button to display
the subtitle menu. Keep pressing the button until you reach your
desired option.
13.Numbers:Decimal numbers: 0 to 9.
14.CLR:Press this button to clear any numeric input from the number
keypad.
15.P L AY:Press this button to play a disc in the DVD player.
16.STOP:Press this button to stop the playing media.
•Pressing STOP once, then PLAY, resumes disc playback from where
it left off.
•Pressing STOP twice, then PLAY, resumes disc playback from the
beginning.
17.PAUSE:Press this button to pause the disc.
18.FR (Fast Rewind):Press this button to search the disc backward
continuously. There are five speed options to choose: 2X, 4X, 8X, 16X,
and 32X.
19.FF (Fast Forward):Press this button to search the disc forward
continuously. There are five speed options to choose: 2X, 4X, 8X, 16X,
and 32X.
20.SETUP:Press this button to navigate the Setup Menu. SeeHow to
use the DVD on-screen display (OSD) menufor more information.
368Audio System
2014 Expedition(exd)
Owners Guide gf, 1st Printing, June 2013
USA(fus)
Page 371 of 519
Turning the Device On and Off
1. Pivot the screen downward until you reach a comfortable viewing
angle.
2. PressPOWERon the lower-left corner of the front panel or on the
remote control. The controls illuminate when the system is in use.
3. When the device is on and is displaying a picture, pivot the screen to
change the viewing angle to optimize the picture quality.
4. Remember to turn the device off and pivot the LCD panel to the
locked position when not in use.
DVD Basics
To get the most use out of each DVD, make sure you read this section
completely.
Regional Coding
Both the DVD player and disc have specific region codes. These regional
codes must match in order for the disc to play. If the codes do not
match, the disc does not play. The system is set to the region code
designated for your area by the DVD Copy Control Association. Other
regions do not play in this system.
Loading and Playing Discs
When you pressPOWER,the system turns on in DVD mode. Place the
disc about halfway into the disc compartment slot, with the disc’s label
facing the rear of your vehicle. Insert the disc straight into the player; do
not insert the disc at an angle.
The disc loads automatically and begins to play. Some discs start at the
root menu, where you have to select disc play manually.
Depending on the disc and playback location on the disc, the icon may
display in the upper-left corner of the screen indicating that still
playback is not possible.
Notes
•To keep a disc clean, do not touch its surface. Handle the disc by its
edge.
•Keep your discs in their cases or disc magazines when not in use.
Also, do not subject a disc to heat or high temperatures. Avoid
leaving them in a parked vehicle, on a dashboard or on a rear tray.
•Do not attach labels, or use discs with sticky ink or residue. Such
discs may stop spinning, causing a system malfunction, or ruining the
disc.
370Audio System
2014 Expedition(exd)
Owners Guide gf, 1st Printing, June 2013
USA(fus)
Page 372 of 519
•Do not use any discs with labels or stickers attached. The following
malfunctions may result from using such discs:
•The system cannot eject a disc due to a label or sticker peeling off
and jamming the eject mechanism.
•The system cannot read audio data correctly, such as playback
skipping or no playback at all, due to heat shrinking of a sticker or
label causing the disc to warp.
•Before playing a disc, clean it with a commercially available cleaning
cloth. Wipe each disc from the center out. Do not use solvents such
as benzene, thinner, commercially available cleaners, or antistatic
spray intended for analog discs.
•Do not use any irregularly shaped discs. If you insert an irregular,
non-round, shaped disc, it may jam in the DVD player or not play
properly.
How to Use the DVD On-screen Display Menus
You can use the on-screen display menu screen to adjust all the settings
on your screen.
General Setup
PressSETUPon the remote control, and then useCH +, CH -, VOL +
andVOL -to navigate the Setup Page. PressENTERto make a
selection, and thenVOL -to return to the submenu.
To exit the Setup Display, pressSETUPagain.
OSD Language
The OSD Lang submenu allows the user to select the language for the
on-screen display. PressVOL +,and then useCH +andCH -on the
remote control to select the desired language. The user can select
English, Simple/Traditional Chinese, French, German, Italian, Spanish,
Portuguese or Korean. PressENTERto make a selection, and thenVOL
-to return to the submenu.
Angle Mark
The angle mark is an option for different viewing angles on the DVD.
PressVOL +andVOL -to turn the angle mark setting off and on. Press
ENTERto make a selection, and thenVOL -to return to the submenu.
Audio Setup
PressSETUPon the remote control, and then useCH +, CH -, VOL +
andVOL -to navigate the Setup Page. PressENTERto make a
selection, and thenVOL -to return to the submenu.
Audio System371
2014 Expedition(exd)
Owners Guide gf, 1st Printing, June 2013
USA(fus)
Page 375 of 519
Default
PressSETUPon the remote control, and then navigate to the Default
submenu under the Preference page usingCH +, CH -andVOL +.
PressVOL +,and then pressENTERto carry out the reset. This
function does not affect the parental settings.
Playing an Audio CD
When playing an audio CD, the DISPLAY banner appears automatically.
It displays the current track and the amount of time the track has been
playing, the total amount of time on the disc and the current time
running on the disc.
PressDISPLAYon the remote control to see the DISPLAY banner.
•PressDISPLAYonce: Single Elapsed appears along with the current
track playing and the time of that track.
•PressDISPLAYtwice: Single Remain appears along with the current
track playing and the amount of time left.
•PressDISPLAYthree times: Total Elapsed appears along with the
current track playing and the total time playing on CD.
•PressDISPLAYfour times: Total Remain appears along with the
current track playing and the amount of time left on CD.
Press theREPEATon the remote control to repeat either the currently
playing track or the entire CD.
Playing an MP3 Disc
MP3 is a format for storing digital audio. An audio CD-quality song
compressed into the MP3 format has very little loss of quality, while
taking up much less space. You can play CD-R discs encoded in MP3
format in your DVD player.
Selecting Folders and Songs
When you insert an MP3 disc in the player, an MP3 audio-navigation
screen appears automatically. You can change folders and songs by
navigating the file system. The DVD player plays the songs in the order
you burned them to the disc.
1. If a disc is playing, pressDISPLAYon the remote control, and then
pressCH +andCH -to go through the folder list on the left side of
the navigation screen.
2. Highlight the folder you want, and then pressENTER.
3. PressCH +andCH -to go through the song list and highlight the
song you want. PressENTERto begin playing the highlighted song.
374Audio System
2014 Expedition(exd)
Owners Guide gf, 1st Printing, June 2013
USA(fus)
Page 377 of 519

•FR (Fast Rewind):Press this button to reverse through the file
continuously. There are five speed options to choose: 2X, 4X, 8X,
16X, and 32X.
•FF (Fast Forward):Press this button to fast forward through the
file continuously. There are five speed options to choose: 2X, 4X, 8X,
16X, and 32X.
•PREV:Press this button to go to the previous file.
•NEXT:Press this button to go to the next file.
Connecting an MP3 Device
Using a USB Cable
Plug the MP3 Dock Connector to USB cable into a high-power USB port
on your DVD-headrest module, and then connect the other end to the
player.
See the documentation that came with your device for more information.
Charging the MP3 Player Battery
After you turn the DVD-headrest module on, connect the device to the
USB port on your DVD-headrest module
Note:Not all devices are able to charge when connected to the USB
port.
Using an A/V Cable
1. Connect the device to the headphone port using an A/V cable.Note:
Use the A/V cable made specifically for the device. Other similar
RCA-type cables might not work.
2. Connect the video and audio connectors to the AV-IN ports on your
DVD-headrest module, matching the yellow, red and white
connectors to the appropriate jacks.
Troubleshooting
Symptom Possible cause
The device does not
power on.Your vehicle ignition is not on.
The remote control does not have batteries
installed.
The infrared sensor is
inoperative.The batteries in the remote control are not
working.
The remote sensor eye is blocked.
The infrared transmitter is blocking the sensor
eye of the component to be controlled
376Audio System
2014 Expedition(exd)
Owners Guide gf, 1st Printing, June 2013
USA(fus)
Page 378 of 519
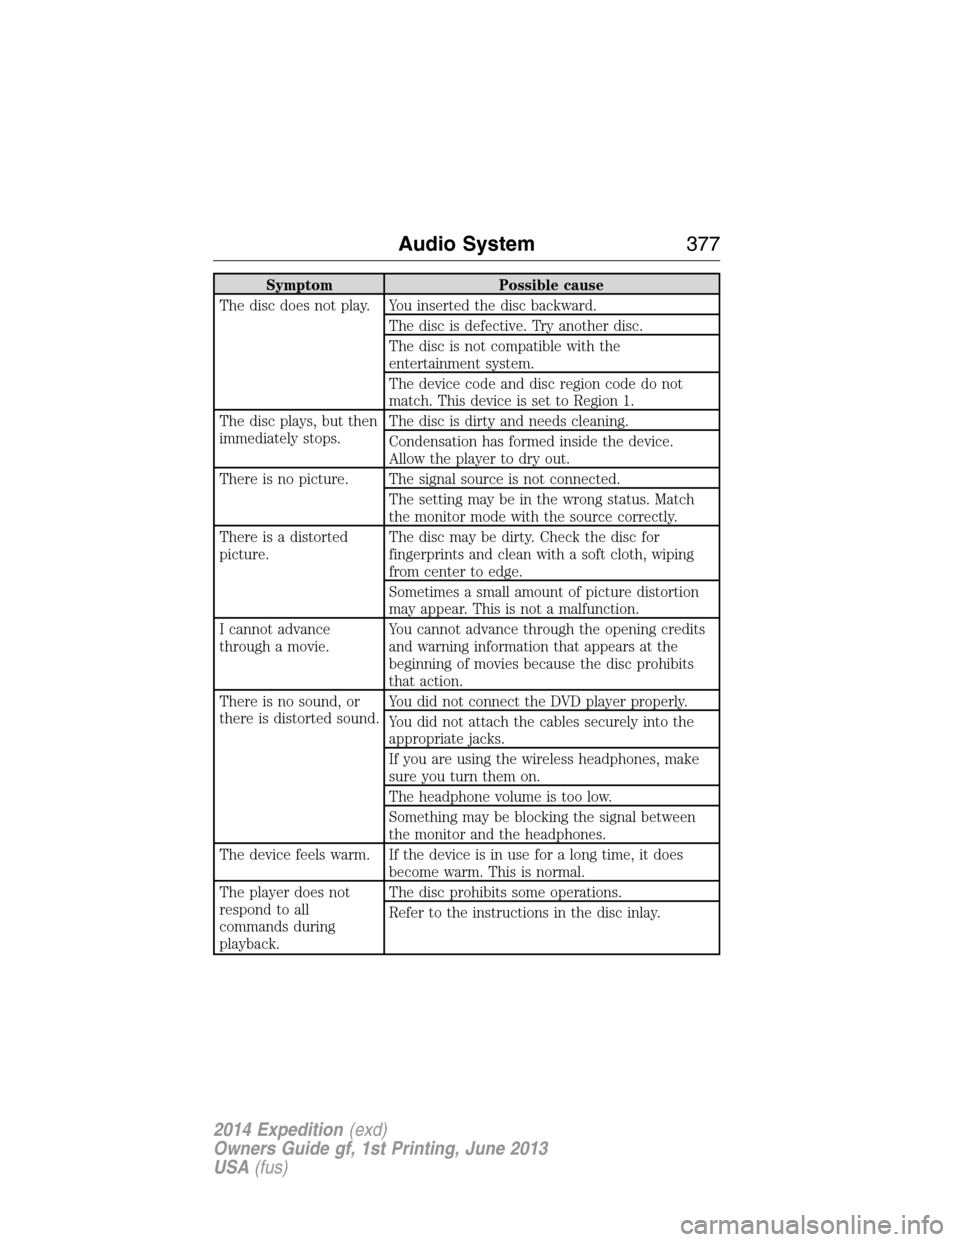
Symptom Possible cause
The disc does not play. You inserted the disc backward.
The disc is defective. Try another disc.
The disc is not compatible with the
entertainment system.
The device code and disc region code do not
match. This device is set to Region 1.
The disc plays, but then
immediately stops.The disc is dirty and needs cleaning.
Condensation has formed inside the device.
Allow the player to dry out.
There is no picture. The signal source is not connected.
The setting may be in the wrong status. Match
the monitor mode with the source correctly.
There is a distorted
picture.The disc may be dirty. Check the disc for
fingerprints and clean with a soft cloth, wiping
from center to edge.
Sometimes a small amount of picture distortion
may appear. This is not a malfunction.
I cannot advance
through a movie.You cannot advance through the opening credits
and warning information that appears at the
beginning of movies because the disc prohibits
that action.
There is no sound, or
there is distorted sound.You did not connect the DVD player properly.
You did not attach the cables securely into the
appropriate jacks.
If you are using the wireless headphones, make
sure you turn them on.
The headphone volume is too low.
Something may be blocking the signal between
the monitor and the headphones.
The device feels warm. If the device is in use for a long time, it does
become warm. This is normal.
The player does not
respond to all
commands during
playback.The disc prohibits some operations.
Refer to the instructions in the disc inlay.
Audio System377
2014 Expedition(exd)
Owners Guide gf, 1st Printing, June 2013
USA(fus)
Page 382 of 519
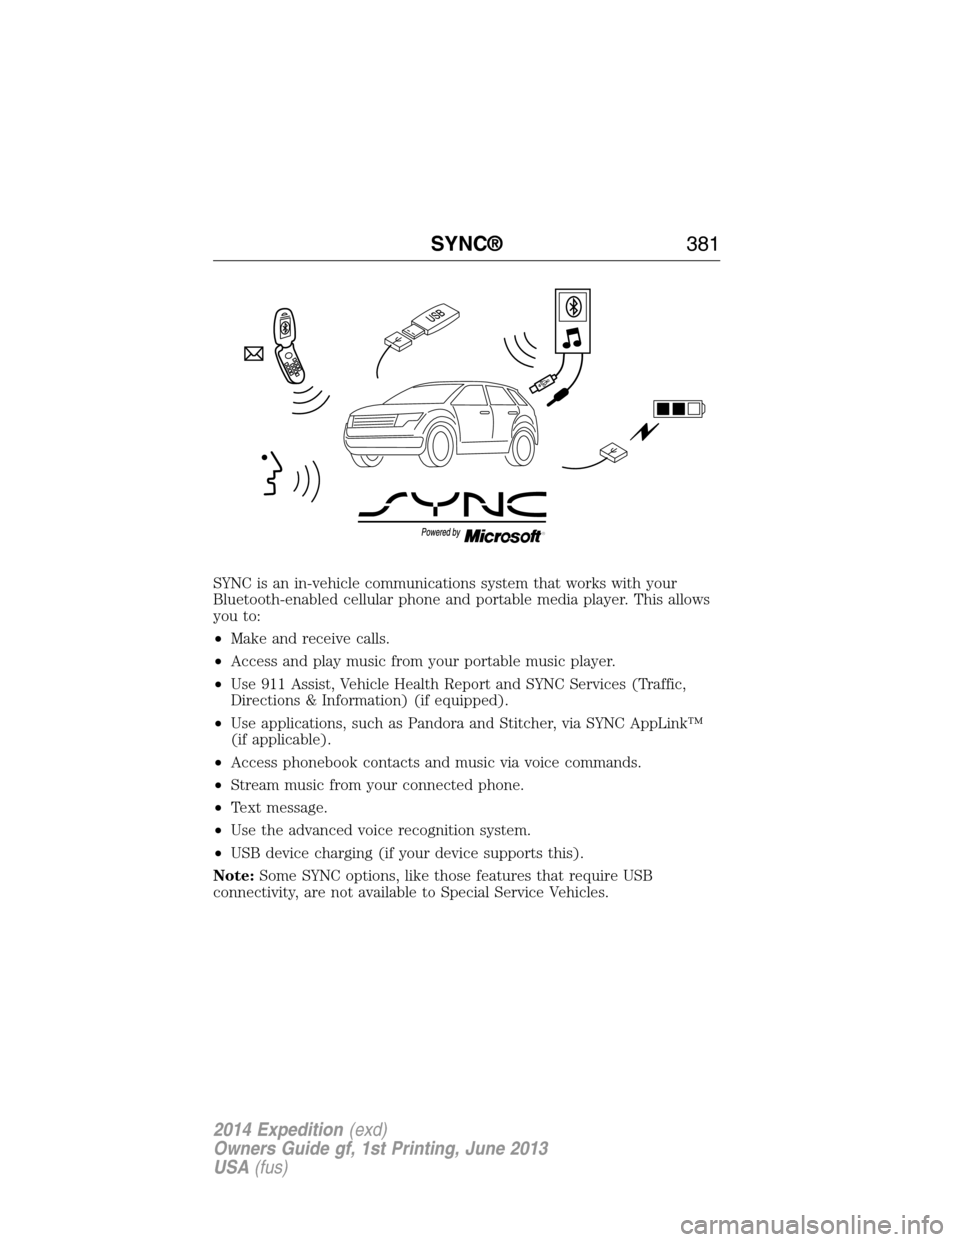
SYNC is an in-vehicle communications system that works with your
Bluetooth-enabled cellular phone and portable media player. This allows
you to:
•Make and receive calls.
•Access and play music from your portable music player.
•Use 911 Assist, Vehicle Health Report and SYNC Services (Traffic,
Directions & Information) (if equipped).
•Use applications, such as Pandora and Stitcher, via SYNC AppLink™
(if applicable).
•Access phonebook contacts and music via voice commands.
•Stream music from your connected phone.
•Text message.
•Use the advanced voice recognition system.
•USB device charging (if your device supports this).
Note:Some SYNC options, like those features that require USB
connectivity, are not available to Special Service Vehicles.
SYNC®381
2014 Expedition(exd)
Owners Guide gf, 1st Printing, June 2013
USA(fus)