2014 FORD ESCAPE high beam
[x] Cancel search: high beamPage 73 of 428

WINDSHIELD WIPERS
Note:Fully defrost the windshield before
switching on the windshield wipers.
Note:Make sure the windshield wipers are
switched off before entering a car wash.
Note:Clean the windshield and wiper
blades if they begin to leave streaks or
smears. If that does not resolve the issue,
install new wiper blades.
Note:Do not operate the wipers on a dry
windshield. This may scratch the glass,
damage the wiper blades or cause the wiper
motor to burn out. Always use the
windshield washers before wiping a dry
windshield.
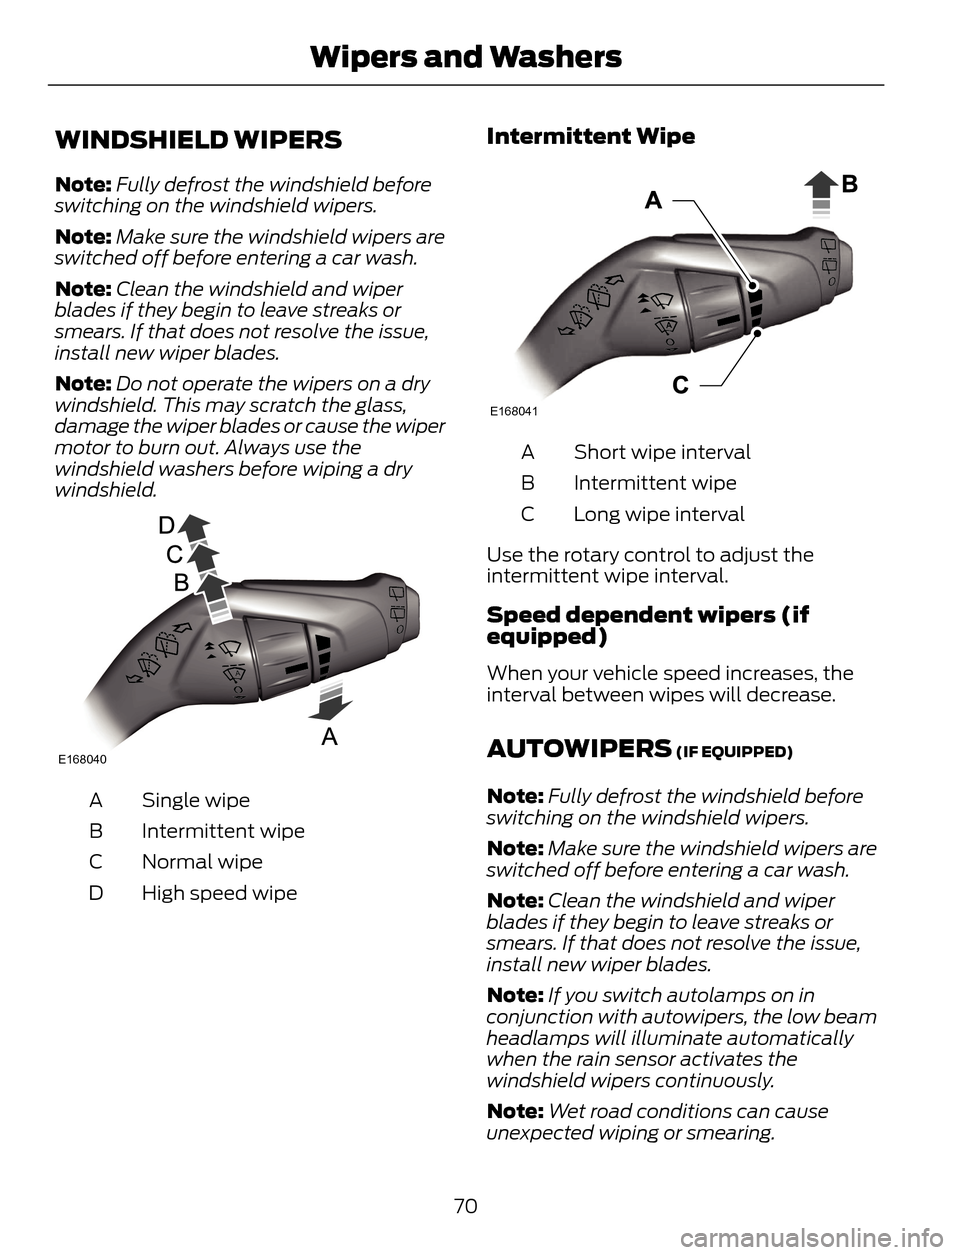
E168040
Single wipe A
Intermittent wipe B
Normal wipe C
High speed wipe D
Intermittent Wipe
E168041
Short wipe interval A
Intermittent wipe B
Long wipe interval C
Use the rotary control to adjust the
intermittent wipe interval.
Speed dependent wipers (if
equipped)
When your vehicle speed increases, the
interval between wipes will decrease.
AUTOWIPERS (IF EQUIPPED)
Note:Fully defrost the windshield before
switching on the windshield wipers.
Note:Make sure the windshield wipers are
switched off before entering a car wash.
Note:Clean the windshield and wiper
blades if they begin to leave streaks or
smears. If that does not resolve the issue,
install new wiper blades.
Note:If you switch autolamps on in
conjunction with autowipers, the low beam
headlamps will illuminate automatically
when the rain sensor activates the
windshield wipers continuously.
Note:Wet road conditions can cause
unexpected wiping or smearing.
70
Wipers and Washers
Page 76 of 428

LIGHTING CONTROL
E142449
Off A
Parking lamps, instrument panel
lamps, license plate lamps and
tail lamps B
Headlamps C
High Beams
E162679
Push the lever forward to switch the high
beams on.
Push the lever forward again or pull the
lever toward you to switch the high beams
off.
Headlamp Flasher
E162680
Pull the lever toward you slightly and
release it to flash the headlamps.
AUTOLAMPS (IF EQUIPPED)
Note:It may be necessary to switch your
headlamps on manually in severe weather
conditions.
E142451
The headlamps will switch on and off
automatically in low light situations or
during inclement weather.
The headlamps will remain on for a period
of time after you switch the ignition off.
You can adjust the time delay using the
information display controls. See
Information Displays (page 88).
73
Lighting
Page 78 of 428

DAYTIME RUNNING LAMPS (IF
EQUIPPED)
WARNING
Always remember to switch your
headlamps on in low light situations
or during inclement weather. The
Daytime Running Lamp system does not
activate the tail lamps and may not
provide adequate lighting during these
conditions. Failure to activate your
headlamps under these conditions may
result in a collision.
To switch the Daytime Running Lamp
system on:
1. Turn the ignition to the on position.
2. Switch the lighting control to the off,
autolamp or parking lamp position.
Vehicles With Halogen Headlamps
The Daytime Running Lamp system
switches the low beam headlamps on at
a reduced intensity in day light conditions.
Vehicle With High Intensity
Discharge Headlamps
The Daytime Running Lamp system
switches the fog lamps on in day light
conditions (Not available in all markets).
FRONT FOG LAMPS
E142453
Press the control to switch the fog lamps
on or off.
You can switch the fog lamps on when the
lighting control is in any position except
Off and the high beams are not on.
DIRECTION INDICATORS
E162681
Push the lever up or down to use the
direction indicators.
Note:Tap the lever up or down to make the
direction indicators flash three times to
indicate a lane change.
INTERIOR LAMPS
The lamps will switch on when one of the
following conditions have been met:
75
Lighting
Page 89 of 428

Fog Lamps - Front (If Equipped)
It will illuminate when you switch
the front fog lamps on.
High Beam
It will illuminate when you switch
the high beam headlamps on. It
will flash when you use the
headlamp flasher.
Information (If Equipped)
It will illuminate when a new
message is stored in the
information display. It will be red
or amber in color depending on the severity
of the message and will remain on until the
cause of the message has been rectified.
See Information Messages (page 91).
Low Fuel Level
It will illuminate when the fuel
level is low or the fuel tank is
nearly empty. Refuel as soon as
possible.
Low Tire Pressure Warning
It will illuminate when your tire
pressure is low. If the lamp
remains on with the engine
running or when driving, check
your tire pressure as soon as possible.
It will also illuminate momentarily when
you switch the ignition on to confirm the
lamp is functional. If it does not illuminate
when you switch the ignition on, or begins
to flash at any time, have the system
checked by your authorized dealer.
Parking Lamps
It will illuminate when you switch
the parking lamps on.
Service Engine Soon
If the service engine soon
indicator light stays illuminated
after the engine is started, it
indicates that the On-Board Diagnostics
(OBD-II) system has detected a
malfunction of the vehicle emissions
control system. Refer to On-Board
Diagnostics (OBD-II) in the Fuel and
Refueling chapter for more information
about having your vehicle serviced. See
Emission Control System (page 132).
If the light is blinking, engine misfire is
occurring which could damage your
catalytic converter. Drive in a moderate
fashion (avoid heavy acceleration and
deceleration) and have your vehicle
serviced immediately.
Note:Under engine misfire conditions,
excessive exhaust temperatures could
damage the catalytic converter or other
vehicle components.
The service engine soon indicator light
illuminates when the ignition is first turned
on prior to engine start to check the bulb
and to indicate whether the vehicle is ready
for Inspection/Maintenance (I/M) testing.
Normally, the service engine soon light will
stay on until the engine is cranked, then
turn itself off if no malfunctions are
present. However, if after 15 seconds the
service engine soon light blinks eight times,
it means that the vehicle is not ready for
I/M testing. See Emission Control
System (page 132).
86
Instrument Cluster
Page 205 of 428

Protected components Fuse amp rating Fuse or relay number
Rain sensor module, Auto-dimming mirror 5A F62
Not used (spare) 10A F63
Not used — F64
Liftgate release 10A F65
Driver door unlock supply 20A F66
SYNC, Multifunction display, Global posi-
tioning system module 7.5A F67
Not used — F68
Instrument cluster 5A F69
Central lock and unlock supply 20A F70
Heating control head (manual air condi-
tioner), Dual electronic automatic
temperature control 10A F71
Steering wheel module 7.5A F72
Data link connector 7.5A F73
High beam headlamp supply 15A F74
Fog lamp supply 15A F75
Reversing lamp supply 10A F76
Washer pump 20A F77
Ignition switch, Start button 5A F78
Radio, Navigation DVD player, Touch
screen, Hazard light switch, Door lock
switch 15A F79
Moonroof supply 20A F80
Radio frequency receiver 5A F81
Washer pump ground 20A F82
Central locking ground 20A F83
Drive door unlock ground 20A F84
Electronic 15 feed 7.5A F85
202
Fuses
Page 223 of 428

7. Wipe any dirt or debris from the air filter
housing and cover to make sure no dirt
gets in the engine and to make sure you
have a good seal.
8. Slide the open end of the air filter
element in first, below the tab. Then
push the closed end cap into the
bottom of the tray. The closed end cap
should fit inside the groove in the tray.
The tab at the end of the closed end
cap should be oriented down and fit
between the forks on the tray.
9. Replace the air filter housing cover and
secure the clips.
10. Reinstall the air cleaner assembly into
the vehicle.
11. Reinstall the clean air tube assembly
into the air cleaner assembly.
12. Tighten the air tube fastening screws.
ADJUSTING THE HEADLAMPS
Vertical Aim Adjustment
The headlamps on your vehicle are
properly aimed at the assembly plant. If
your vehicle has been in an accident, the
alignment of your headlamps should be
checked by your authorized dealer.
E142592
8 feet (2.4 meters) A
Center height of lamp to ground B25 feet (7.6 meters) C
Horizontal reference line D
Vehicles With Halogen Headlamps
1. Park the vehicle directly in front of a
wall or screen on a level surface,
approximately 25 feet (7.6 meters)
away.
2. Measure the height of the headlamp
bulb center from the ground and mark
an 8 foot (2.4 meter) horizontal
reference line on the vertical wall or
screen at this height.
Note:To see a clearer light pattern for
adjusting, you may want to block the light
from one headlamp while adjusting the
other.
3. Turn on the low beam headlamps to
illuminate the wall or screen and open
the hood.
E142465
4. On the wall or screen you will observe
a flat zone of high intensity light
located at the top of the right hand
portion of the beam pattern. If the top
edge of the high intensity light zone is
not at the horizontal reference line, the
headlamp will need to be adjusted.
220
Maintenance
Page 224 of 428

E142467
5. Locate the vertical adjuster on each
headlamp. Using a Phillips #2
screwdriver, turn the adjuster either
clockwise or counterclockwise in order
to aim the headlamp. The horizontal
edge of the brighter light should touch
the horizontal reference line.
6. Close the hood and turn off the lamps.
Vehicles With High Intensity Discharge
Headlamps
1. Park the vehicle directly in front of a
wall or screen on a level surface,
approximately 25 feet (7.6 meters)
away.
2. Measure the height of the headlamp
bulb center from the ground and mark
an 8 foot (2.4 meter) horizontal
reference line on the vertical wall or
screen at this height.
Note:To see a clearer light pattern for
adjusting, you may want to block the light
from one headlamp while adjusting the
other.
3. Turn on the low beam headlamps to
illuminate the wall or screen and open
the hood.
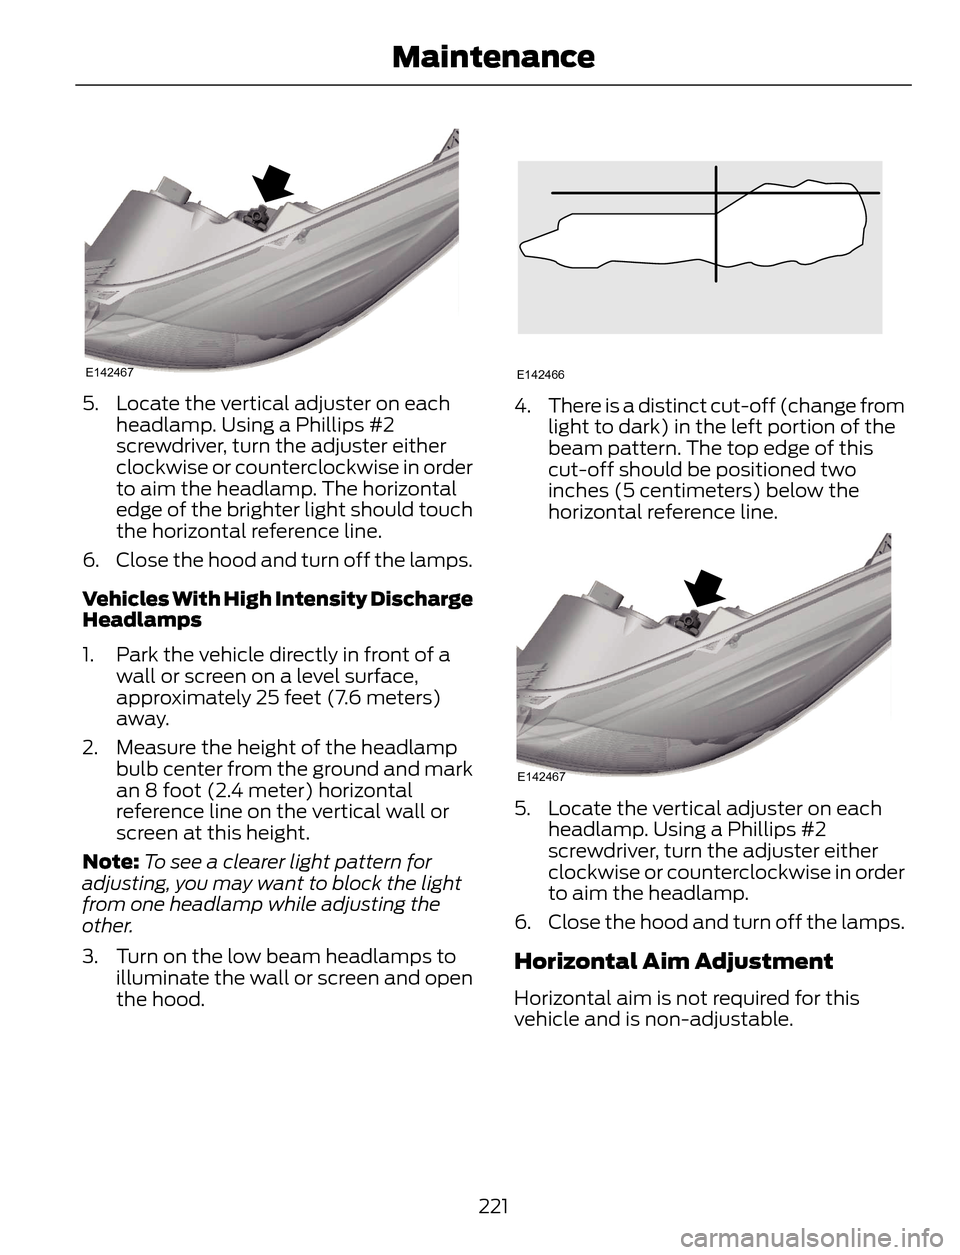
E142466
4. There is a distinct cut-off (change from
light to dark) in the left portion of the
beam pattern. The top edge of this
cut-off should be positioned two
inches (5 centimeters) below the
horizontal reference line.
E142467
5. Locate the vertical adjuster on each
headlamp. Using a Phillips #2
screwdriver, turn the adjuster either
clockwise or counterclockwise in order
to aim the headlamp.
6. Close the hood and turn off the lamps.
Horizontal Aim Adjustment
Horizontal aim is not required for this
vehicle and is non-adjustable.
221
Maintenance
Page 226 of 428

Headlamp:
ABC
E142469
Side marker A
Low beam headlamp B
High beam headlamp C
High beam headlamp:
24
E142470
1. Remove the headlamp.
2. Remove service cap.
3. Disconnect the electrical connector.
4. Remove bulb from the headlamp
assembly by turning it
counterclockwise, then pull it straight
out.
Low beam headlamp:
24
E142471
1. Remove the headlamp.
2. Remove service cap.
3. Disconnect the electrical connector.
4. Remove bulb from the headlamp
assembly by turning it
counterclockwise, then pull it straight
out.
Install the new bulbs in reverse order from
the steps above. Be sure that the spring
clip is not damaged or detached from the
headlamp assembly during the
replacement procedure.
Replacing HID Headlamp Bulbs (If
Equipped)
The low beam headlamps on your vehicle
use a high intensity discharge source.
These lamps operate at a high voltage.
When the bulb is burned out, the bulb and
starter capsule assembly must be replaced
by your authorized dealer.
223
Maintenance