2014 FIAT FIORINO technical specifications
[x] Cancel search: technical specificationsPage 29 of 210

28
SAFETY
STARTING
AND DRIVING
WARNING
LIGHTS AND
MESSAGES
IN AN
EMERGENCY
MAINTENANCE
AND CARE
TECHNICAL
SPECIFICATIONS
INDEX
DASHBOARD
AND CONTROLS
Adjust the button volume
(Button Vol.)
This function may be used to adjust the
volume of the beep accompanying the ac-
tivation of buttons MENU ESC, +and
–can be adjusted according to 8 levels.
To adjust the desired volume proceed as
follows:
– briefly press button MENU ESC: the
previously set volume “level” will flash on
the display;
– press button +or –for setting;
– briefly press button MENU ESCto go
back to the menu screen or press the but-
ton for long to go back to the standard
screen without storing settings.S.B.R. buzzer reactivation
(Belt Buzzer)
This function is only displayed after Fiat
Dealership has deactivated the S.B.R. sys-
tem (see paragraph “S.B.R. system” in sec-
tion “Safety devices”).
Scheduled Servicing (Service)
Through this function it is possible to dis-
play information connected to proper ve-
hicle servicing.
This information is consulted as follows:
– briefly press button MENU ESC: ser-
vice in km or mi, according to previous
setting, will be displayed (see paragraph
“Units”);
– briefly press button MENU ESCto go
back to the menu screen or press the but-
ton for long to go back to the standard
screen.NoteThe “Scheduled Service Plan” re-
quires the vehicle to be serviced every
30,000 km (or 18,000 mi). This indication
will appear automatically with the key at
MARstarting from 2,000 km (or 1240 mi)
and will be presented automatically every
200 km (or 124 mi). The indications will
appear more frequently when there are
200 km left. The indication will appear in
kilometres or miles depending on the unit
set. When the next scheduled servicing
is approaching, the message “Service” will
appear on the display followed by the
number of kilometres or miles left when
the key is turned to MAR. Go to the
Fiat Dealership where the “Scheduled Ser-
vice Plan” operations will be performed
and the message will be reset.
001-035 Fiorino GB 1ed:001-035 Fiorino GB 1ed 2-12-2009 16:14 Pagina 28
Page 30 of 210

29
SAFETY
STARTING
AND DRIVING
WARNING
LIGHTS AND
MESSAGES
IN AN
EMERGENCY
MAINTENANCE
AND CARE
TECHNICAL
SPECIFICATIONS
INDEX
DASHBOARD
AND CONTROLS
Passenger front and side airbag
activation/deactivation
(Passenger bag)
(for versions/markets, where provided)
This function is used to activate/deactivate
the airbag on the passenger’s side.
Proceed as follows:
❒briefly press button MENU ESCand,
after displaying the message “Bag pass:
Off) (to deactivate) or Bag pass: On) (to
activate) by pressing the buttons +and
–, press the button MENU ESC again;
❒the display will show the confirmation
message;
❒press buttons +or –to select either
Yes (to confirm activation/deactivation)
or No (to abort);
❒briefly press the button MENU ESC
to view a message confirming your se-
lection and go back to the menu screen.
Alternatively, press the button for a
prolonged time and go back to the stan-
dard screen without storing the set-
tings.
MODE
MODE
MODE
– +
– +
F0T1009g F0T1003g
F0T1004g F0T1008g
F0T1009g F0T1011g F0T1010g
F0T1012gF0T1013g
– +
– +
001-035 Fiorino GB 1ed:001-035 Fiorino GB 1ed 2-12-2009 16:14 Pagina 29
Page 31 of 210

30
SAFETY
STARTING
AND DRIVING
WARNING
LIGHTS AND
MESSAGES
IN AN
EMERGENCY
MAINTENANCE
AND CARE
TECHNICAL
SPECIFICATIONS
INDEX
DASHBOARD
AND CONTROLS
TRIP COMPUTER
General features
The “Trip computer” is used to display in-
formation on vehicle operation when the
key is turned to MAR. This function al-
lows to define two separate trips called
“Trip A” and “Trip B” for monitoring the
“complete mission” of the vehicle (trip) in
a reciprocally independent manner. Both
functions are resettable (reset - start of
new mission).
“Trip A” is used to display data relating to:
– Range
– Trip distance
– Average consumption
– Instant consumption
– Average speed
– Travel time (driving time).“Trip B” is supplied on versions having a
multifunctional display and is used to dis-
play data relating to:
– Trip distance B
– Average consumption B
– Average speed B
– Travel time B (driving time).
Note“Trip B” functions may be disabled
(see paragraph “Trip B on”). “Range” and
“Instant consumption” cannot be reset. Exit Menu
This is the last function that closes the set-
ting cycle listed in the initial menu screen.
Briefly press button MENU ESCto go
back to the standard screen without stor-
ing settings.
Press button –to return to the first menu
option (Speed Beep).
001-035 Fiorino GB 1ed:001-035 Fiorino GB 1ed 2-12-2009 16:14 Pagina 30
Page 32 of 210

31
SAFETY
STARTING
AND DRIVING
WARNING
LIGHTS AND
MESSAGES
IN AN
EMERGENCY
MAINTENANCE
AND CARE
TECHNICAL
SPECIFICATIONS
INDEX
DASHBOARD
AND CONTROLS
Values displayed
Range
Indicates the travel distance left before the
vehicle runs out of the fuel in the tank.
The message “----” will appear on the dis-
play in the following cases:
– value lower than 50 km (or 30 mi)
– vehicle left parked with engine running
for long.
IMPORTANT Changes of the range value
can be affected by many factors: driving
style (see paragraph “Driving style” in sec-
tion “Starting and driving”), type of route
(motorway, urban cycle, mountain roads,
etc…), conditions of use of the vehicle
(load, tyre pressure, etc…). Trip planning
must take into account the above notes.Trip distance
Indicates the distance covered from the
start of a new mission.
Average consumption
Represents the approximate average con-
sumption from the start of a new mission.
Instant consumption
Indicates the fuel consumption. The val-
ue is constantly updated. The message
“----” will appear on the display if the ve-
hicle is parked with the engine running.
Average speed
Represents the vehicle average speed as a
function of the overall time elapsed since
the start of a new mission.Trip time
Indicates the time elapsed since the start
of a new mission.
IMPORTANT If information is not avail-
able, the message “----” will appear instead
of the Trip Computer values. Counting of
the different values will be resumed reg-
ularly when normal operation is restored.
This will not cause any resetting of the val-
ues displayed before the failure nor start-
ing a new mission.
001-035 Fiorino GB 1ed:001-035 Fiorino GB 1ed 2-12-2009 16:14 Pagina 31
Page 33 of 210

32
SAFETY
STARTING
AND DRIVING
WARNING
LIGHTS AND
MESSAGES
IN AN
EMERGENCY
MAINTENANCE
AND CARE
TECHNICAL
SPECIFICATIONS
INDEX
DASHBOARD
AND CONTROLS
fig. 19F0T0038m
TRIP control button fig. 19
Button TRIPlocated on the top of the
right steering column stalk is used (with
ignition key at MAR) to display and re-
set the previously described values to start
a new mission:
– short pressing to display the different
values;
– prolonged pressing to reset and then
start a new mission.New mission
The new mission begins after:
– “manual” resetting by the user, by press-
ing the relevant button;
– “automatic” resetting, when the “Trip dis-
tance” reaches 3999.9 km or 9999.9 km
(according to the type of display) or when
the “Trip time” reaches 99.59 (99 hours
and 59 minutes);
– disconnection/reconnection of the bat-
tery.
IMPORTANT Value resetting from the
screens of “Trip A” makes it possible to
exclusively reset the data regarding this
function.
IMPORTANT Value resetting from the
screens of “Trip B” makes it possible to
exclusively reset the data regarding this
function.“Start trip” procedure
With ignition key on MAR, press and hold
button TRIPpressed for over 2 seconds
to reset.
Exit Trip
To exit the Trip function: hold MENU
ESCpressed for longer than 2 seconds.
001-035 Fiorino GB 1ed:001-035 Fiorino GB 1ed 2-12-2009 16:14 Pagina 32
Page 34 of 210

33
SAFETY
STARTING
AND DRIVING
WARNING
LIGHTS AND
MESSAGES
IN AN
EMERGENCY
MAINTENANCE
AND CARE
TECHNICAL
SPECIFICATIONS
INDEX
DASHBOARD
AND CONTROLS
fig. 20F0T0153m
SEATS
FRONT SEATS fig. 20
Longitudinal adjustment
Lift lever Aand push the seat forwards
and backwards: your arms should rest on
the steering wheel rim while you are dri-
ving.
All adjustments must be
made with the vehicle sta-
tionary.
WARNING
After releasing the adjust-
ment lever, always check
that the seat is locked on the runners
by trying to move it back and forth. If
it is not locked, the seat may move
unexpectedly and make you lose con-
trol of the vehicle.
WARNING
Adjustment of driver’s seat height
(for versions/markets, where provided)
Operate lever Cto lift or lower the rear
area of the cushion to achieve the most
comfortable driving position.
IMPORTANT Adjustment must be car-
ried out by the driver sitting in the rele-
vant seat.
Adjusting backrest tilting
Turn knob B.Lumbar adjustment of driver’s
seat
(for versions/markets, where provided)
Turn knob Dto customize the position of
the back against the backrest.
Seat warming
(for versions/markets, where provided)
Place the key in the position MARand
press button A-fig. 21to enable/disable
this function.
When the function is enabled, the LED on
the button turns on.
fig. 21
A
F0T0205m
001-035 Fiorino GB 1ed:001-035 Fiorino GB 1ed 2-12-2009 16:14 Pagina 33
Page 35 of 210

34
SAFETY
STARTING
AND DRIVING
WARNING
LIGHTS AND
MESSAGES
IN AN
EMERGENCY
MAINTENANCE
AND CARE
TECHNICAL
SPECIFICATIONS
INDEX
DASHBOARD
AND CONTROLS
RECESSING FOLDABLE
PASSENGER’S SEAT
(for versions/markets, where provided)
Some versions have the passenger’s seat
which folds into a recessed compartment.
IMPORTANT Only move the seat if there
are no passengers in the rear seats.
Folding the seat
To fold the seat proceed as follows:
❒open the door on the passenger’s side;
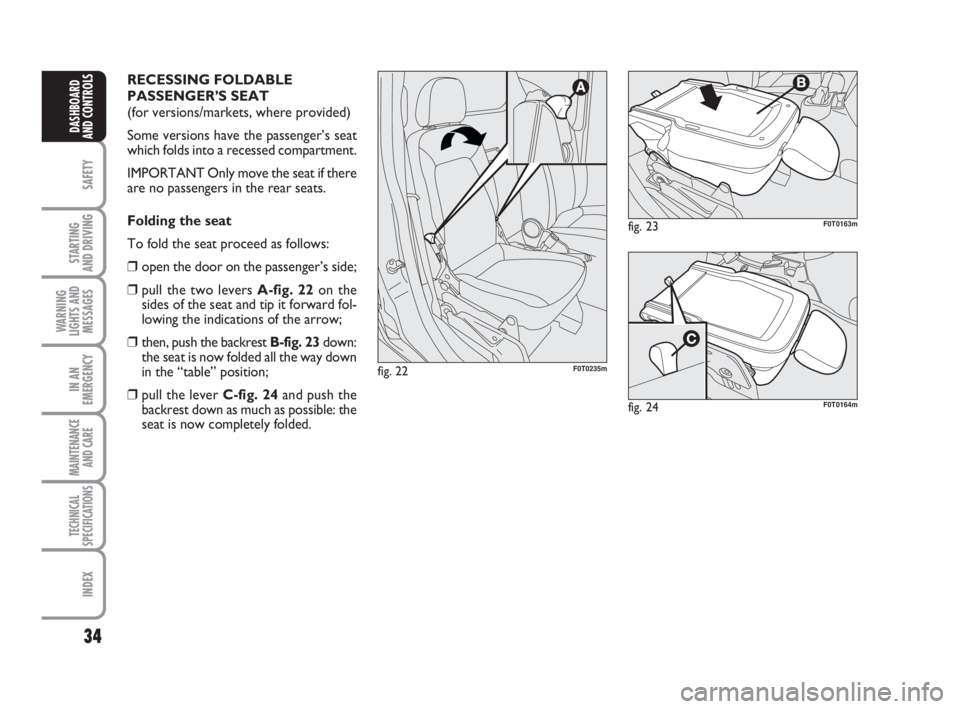
❒pull the two levers A-fig. 22on the
sides of the seat and tip it forward fol-
lowing the indications of the arrow;
❒then, push the backrest B-fig. 23down:
the seat is now folded all the way down
in the “table” position;
❒pull the lever C-fig. 24and push the
backrest down as much as possible: the
seat is now completely folded.
fig. 22F0T0235m
fig. 23F0T0163m
fig. 24F0T0164m
001-035 Fiorino GB 1ed:001-035 Fiorino GB 1ed 2-12-2009 16:14 Pagina 34
Page 36 of 210

35
SAFETY
STARTING
AND DRIVING
WARNING
LIGHTS AND
MESSAGES
IN AN
EMERGENCY
MAINTENANCE
AND CARE
TECHNICAL
SPECIFICATIONS
INDEX
DASHBOARD
AND CONTROLS
fig. 25F0T0165mfig. 26F0T0237m
Putting the seat back in position
To bring the seat back to the normal po-
sition proceed as follows:
❒grab the lever A-fig. 25and lift the
backrest;
❒grab the levers B-fig. 26and lift the back-
rest further more up.
When the passenger’s seat is
in recessed position, the re-
sulting space cannot be used as a
loading compartment. During vehicle
travel we recommend that all objects
be removed or secured so that they
do not become an obstacle or pose
a risk during driving.
If there is no partition between the
cabin and the loading compartment,
large objects or packs may partially
occupy the passenger compartment.
Make sure that these objects or packs
are secured by the supplied restraint
devices, therefore not being an ob-
stacle or posing risks during driving.
WARNING
ACCES TO REAR
SEATS (Combi versions)
Access to the rear seats is gained by open-
ing one of the rear sliding doors (see in-
structions provided in paragraph “Doors”
of this section).
001-035 Fiorino GB 1ed:001-035 Fiorino GB 1ed 2-12-2009 16:14 Pagina 35