2014 FIAT DUCATO red light
[x] Cancel search: red lightPage 191 of 367

SNOW CHAINSThe use of snow chains should be in
compliance with local regulations of
each country.
Snow chains can be fitted to the tyres
of the front wheels (drive wheels) only.
Use of Lineaccessori Fiat snow chains
is recommended. Check the tension
of the snow chains after the first few
metres have been driven.
42)
IMPORTANT With snow chains, use the
accelerator with extreme care to
prevent, or to limit as much as possible,
slipping of the drive wheels that could
cause chain breakage, resulting in
damage to the car body or mechanical
components.
IMPORTANT For versions fitted with
225/75 R16 tyre, use snow chains with
max. thickness 16 mm.
When travelling on snowy roads with
snow chains, it may be helpful to turn
the ASR off: in fact, in these conditions,
the driving wheels skidding when
moving off gives you better traction.
IMPORTANT
42) Keep your speed down when
snow chains are fitted; do not
exceed 50 km/h. Avoid potholes,
steps and pavements and avoid
driving for long distances on
roads not covered with snow to
prevent damaging the vehicle and
the roadbed.
PROLONGED
VEHICLE INACTIVITYIf the vehicle needs to be off the road
for longer than one month, the following
precautions must be taken:
❒park the vehicle indoors in a dry and,
if possible, well-ventilated place;
❒engage a gear;
❒check that the handbrake is not
engaged;
❒disconnect the negative battery
terminal; if the vehicle is equipped
with a battery disconnection function
(disconnector), see the description
of the procedure in the "Controls"
paragraph in the "Dashboard and
controls" section;
❒clean and protect the painted parts
using protective wax;
❒clean and protect the shiny metal
parts using special compounds
available commercially;
❒sprinkle talcum powder on the
windscreen and rear window wiper
rubber blades and lift them off the
glass;
❒slightly open the windows;
187
Page 195 of 367

BUMP STARTING
Never bump start the engine by
pushing, towing or driving downhill.
This could cause fuel to flow into the
catalytic converter and damage it
beyond repair.
WARNING
136) This procedure must be
performed by qualified personnel
as incorrect actions may cause
high-intensity electrical discharge.
Furthermore, battery fluid is
poisonous and corrosive: avoid
contact with skin and eyes. Keep
naked flames and lighted
cigarettes away from the battery
and do not cause sparks.
REPLACING A
WHEELGENERAL
INSTRUCTIONS
Wheel replacement and correct use of
the jack and spare wheel (for
versions/markets, where provided) call
for some precautions, which are listed
below.
137) 138) 139) 140) 141)
Please note that:
❒the jack weight is 4.5 kg;
❒the jack requires no adjustment;
❒the jack cannot be repaired: in the
event of a fault it must be replaced by
another original one;
❒no tool other than its cranking device
may be fitted on the jack.
142)
To change a wheel,
proceed as follows:
❒stop the vehicle in a position that is
not dangerous for oncoming traffic
where you can change the wheel
safely. The ground should be flat
if possible, and sufficiently firm;
❒stop the engine and pull the
handbrake;
❒engage first gear or reverse;
❒put on the reflective safety jacket
(compulsory by law in certain
countries) before getting out of the
vehicle;
❒indicate that the vehicle has broken
down using the devices required by
the law in the current country (e.g.
warning triangle, hazard lights, etc.);
❒take the extension arm and the
wrench from the tool box/bag under
the passenger seat (see
“Compartment under front passenger
seat” in the “Know your vehicle”
section);
❒for versions with alloy rims, remove
the press-fitted hub cap;
❒loosen the bolts on the wheel to be
replaced by one turn;
❒turn the ring nut to partly extend the
jack;
179
F1A0168
191
Page 205 of 367

CHANGING A BULBGENERAL
INSTRUCTIONS
44)158) 159)
❒When a light is not working, check
that the corresponding fuse is intact
before changing a bulb. For the
location of fuses, refer to the
paragraph "Replacing fuses" in this
chapter.
❒before changing a bulb check the
contacts for oxidation;
❒burnt bulbs must be replaced by
others of the same type and power;
❒always check the headlight beam
direction after changing a bulb;
IMPORTANT A slight misting may
appear on the internal surface of the
headlight: this does not indicate a fault
and is caused by low temperature
and the degree of humidity in the air.
Misting will rapidly disappear when the
headlights are switched on. The
presence of drops inside the headlights
indicates infiltration of water. Contact
a Fiat Dealership.
IMPORTANT
44) Halogen bulbs must be handled
by holding the metallic part only.
Touching the transparent part
of the bulb with your fingers may
reduce the intensity of the
emitted light and even reduce the
lifespan of the bulb. In the event
of accidental contact, wipe the
bulb with a cloth moistened with
alcohol and let the bulb dry.
WARNING
158) Modifications or repairs to the
electric system that are not
carried out properly or do not take
the system technical
specifications into account can
cause malfunctions leading to the
risk of fire.
159) Halogen bulbs contain
pressurised gas; in the case of
breakage they may burst.
201
Page 215 of 367

CHANGING AN
INTERIOR BULBFor the type of bulb and relevant power
rating, see paragraph “Changing a
bulb”.
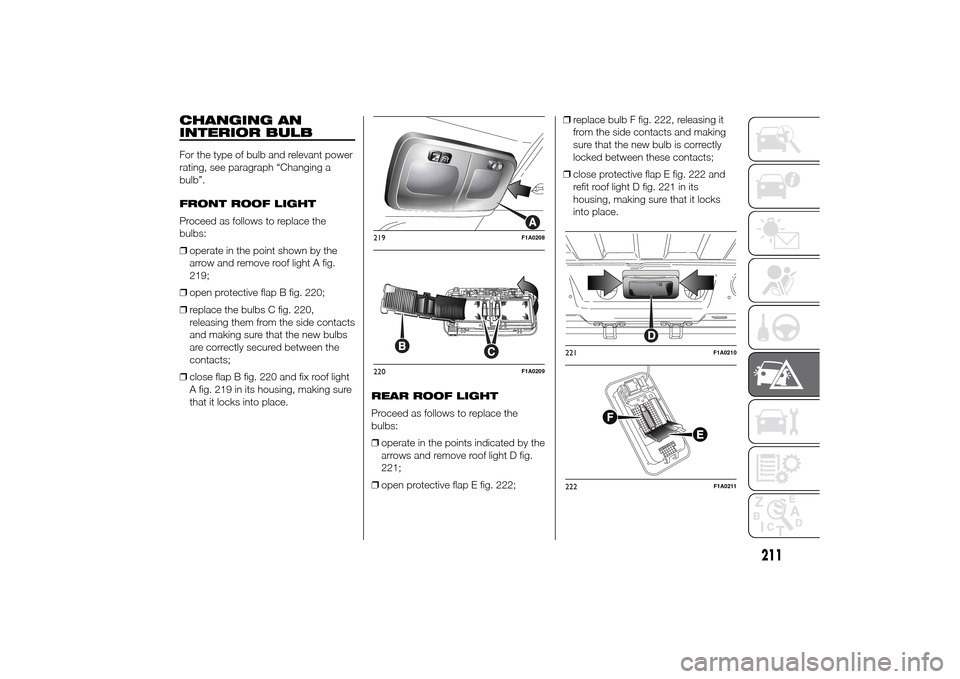
FRONT ROOF LIGHT
Proceed as follows to replace the
bulbs:
❒operate in the point shown by the
arrow and remove roof light A fig.
219;
❒open protective flap B fig. 220;
❒replace the bulbs C fig. 220,
releasing them from the side contacts
and making sure that the new bulbs
are correctly secured between the
contacts;
❒close flap B fig. 220 and fix roof light
A fig. 219 in its housing, making sure
that it locks into place.REAR ROOF LIGHT
Proceed as follows to replace the
bulbs:
❒operate in the points indicated by the
arrows and remove roof light D fig.
221;
❒open protective flap E fig. 222;❒replace bulb F fig. 222, releasing it
from the side contacts and making
sure that the new bulb is correctly
locked between these contacts;
❒close protective flap E fig. 222 and
refit roof light D fig. 221 in its
housing, making sure that it locks
into place.
219
F1A0208
220
F1A0209
221
F1A0210
222
F1A0211
211
Page 229 of 367

SCHEDULED SERVICING PLAN
Thousands of miles 30 60 90 120 150
Thousands of kilometres 48 96 144 192 240
Months 24 48 72 96 120
Check battery charge status and recharge if necessary●●●●●
Check tyre conditions/wear and adjust pressure, if required●●●●●
Check operation of lighting system (headlights, direction indicators, hazard
warning lights, luggage compartment, passenger compartment, glove
compartment, instrument panel warning lights, etc.)●●●●●
Check operation of windscreen wiper/washer system and adjust jets, if
necessary●●●●●
Check the position/wear of the windscreen/rear window wiper blades●●●●●
Check cleanliness of bonnet and luggage compartment locks, as well as
cleanliness and lubrication of linkages●●●●●
Visually inspect condition of: exterior bodywork, underbody protection,
pipes and hoses (exhaust, fuel system, brakes), rubber elements (boots,
sleeves, bushes, etc.)●●●●●
Check condition and wear of front disc brake pads and operation of pad
wear indicator●●●●●
Check condition and wear of rear disc brake pads and operation of pad
wear indicator (for versions/markets where provided)●●●●●
Check and, if necessary, top up fluid levels (engine coolant, hydraulic clutch/
brakes, windscreen washer, battery, etc.)●●●●●
225
Page 241 of 367

BATTERYThe battery is “limited maintenance”
type: under normal conditions of use,
the electrolyte does not need topping
up with distilled water.
It does, however, need to be checked
periodically at a Fiat Dealership or
by specialist personnel to make sure it
is working correctly.
The battery is located inside the
passenger compartment, in front of the
pedals. Remove the protective cover
to gain access to it.
184) 185)
REPLACING THE
BATTERY
If required, replace the battery with an
original spare part with the same
specifications.
If a battery with different specifications
is fitted, the service intervals given in
the “Scheduled Servicing Plan” will no
longer be valid.
Follow the battery manufacturer's
instructions for maintenance.
51) 52)186) 187)4)
USEFUL ADVICE FOR
EXTENDING THE LIFE OF
YOUR BATTERY
To avoid draining your battery and
make it last longer, observe the
following instructions:
❒when you park the vehicle, ensure
that the doors, tailgate and bonnet
are closed properly, to prevent any
roof lights from remaining on inside
the passenger's compartment;
❒switch off all roof lights inside the
vehicle: the vehicle is however
equipped with a system which
switches all internal lights off
automatically;
❒do not keep accessories (e.g. sound
system, hazard lights, etc.) switched
on for a long time when the engine
is not running;
❒before carrying out any operation on
the electrical system, disconnect the
negative battery cable through the
suitable terminal;
❒Completely tighten the battery
terminals.
237
Page 246 of 367

Replacing the
windscreen wiper
blades
53)
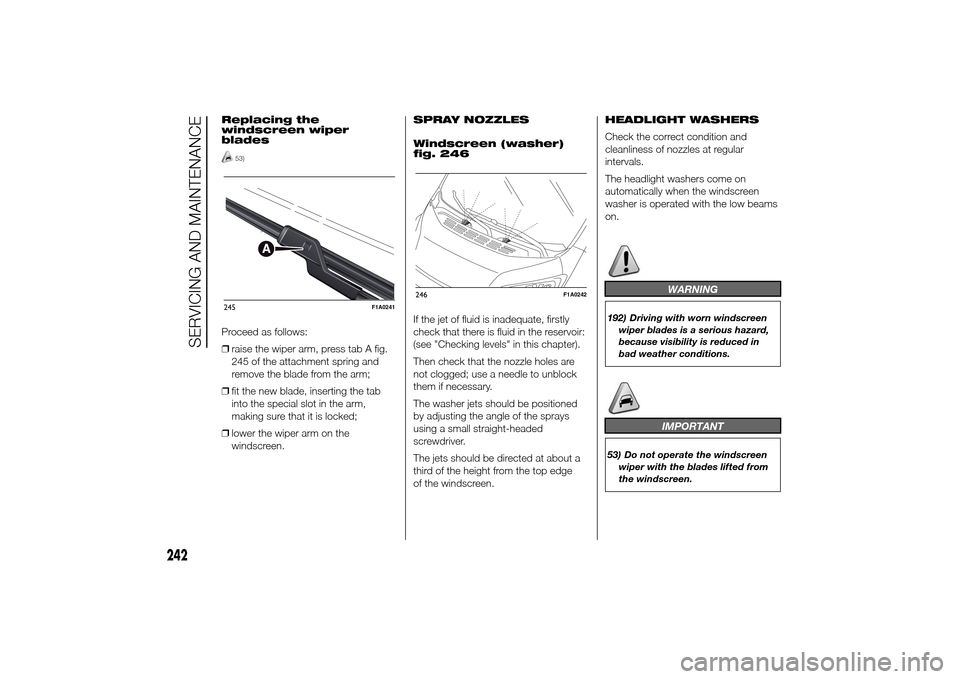
Proceed as follows:
❒raise the wiper arm, press tab A fig.
245 of the attachment spring and
remove the blade from the arm;
❒fit the new blade, inserting the tab
into the special slot in the arm,
making sure that it is locked;
❒lower the wiper arm on the
windscreen.SPRAY NOZZLES
Windscreen (washer)
fig. 246
If the jet of fluid is inadequate, firstly
check that there is fluid in the reservoir:
(see "Checking levels" in this chapter).
Then check that the nozzle holes are
not clogged; use a needle to unblock
them if necessary.
The washer jets should be positioned
by adjusting the angle of the sprays
using a small straight-headed
screwdriver.
The jets should be directed at about a
third of the height from the top edge
of the windscreen.HEADLIGHT WASHERS
Check the correct condition and
cleanliness of nozzles at regular
intervals.
The headlight washers come on
automatically when the windscreen
washer is operated with the low beams
on.
WARNING
192) Driving with worn windscreen
wiper blades is a serious hazard,
because visibility is reduced in
bad weather conditions.
IMPORTANT
53) Do not operate the windscreen
wiper with the blades lifted from
the windscreen.
245
F1A0241
246
F1A0242
242
SERVICING AND MAINTENANCE
Page 351 of 367

WHATTODOIF
Fault Possible solution
... A TYRE IS PUNCTURED.Use the Fix&Go tyre repair kit. See page 196.
Replace the tyre. See page 191
... A TYRE DEFLATES. Restore the correct pressure. See page 263.
... THE INTERNAL ROOF LIGHT DOES NOT
SWITCH ON.Replace the bulb.See page 211 or contact a
Fiat Dealership.
... AN EXTERNAL BULB (main beam, dipped
beam headlights...) DOES NOT COME ON.Replace the bulb.See page 205 or contact a
Fiat Dealership.
... THE REMOTE CONTROL DOES NOT
WORK.Replace the batteries inside the remote
control.See page 12 or contact a
Fiat Dealership.
... AN ELECTRIC WINDOW DOES NOT
WORK.Check the relevant protection fuse.See page 212 or contact a
Fiat Dealership.
Have the relevant window raising / lowering
motor checked.Contact a Fiat Dealership.
... THE ENGINE DOES NOT START OR
STOPS WHEN DRIVING.Check that there is sufficient fuel in the tank;
refuel if necessary.See page 100.
...DIESEL FUEL IS FROZEN.Use winter diesel fuel or a suitable additive. See page 320
In the case of VOR, warm up the diesel filter
area and the upstream/downstream circuits, if
possible.-
...INCORRECT FITTING OF THE AFTER
MARKET SYSTEMS.Carefully follow the instructions in the Owner
Handbook in order to prevent affecting the
correct operation of the vehicle.See page 99 or contact a
Fiat Dealership.