Page 168 of 275
JACK
Please note that:
❒the jack weight is 1.76 kg;
❒the jack requires no adjustment;
❒the jack cannot be repaired and in the event of a
fault it must be replaced by another original one;
❒no tool other than its cranking device may be
fitted on the jack.
To change a wheel proceed as follows:
❒stop the car in a position that is not dangerous for
on-coming traffic where you can change the wheel
safely. the ground must be flat and sufficiently
compact;
❒turn the engine off and pull up the handbrake;
engage first gear or reverse; use handle A to
remove the rigid preformed cover B fig. 123;❒loosen fastener E fig. 124;
fig. 123
F0Q0732
fig. 124
F0Q0392
164GETTING TO KNOW
YOUR CAR
SAFETY
STARTING AND
DRIVING
WARNING LIGHTS
AND MESSAGES
IN AN
EMERGENCY
SERVICING AND
MAINTENANCE
TECHNICAL
SPECIFICATIONS
INDEX
❒for versions equipped with the “Fix&Go
Automatic” kit, take the tool box from the luggage
compartment;
Page 169 of 275
❒for versions equipped with space-saver wheel,
loosen fastener E fig. 124, take tool box F, position
it near the wheel to be changed and then take
space-saver wheel G;
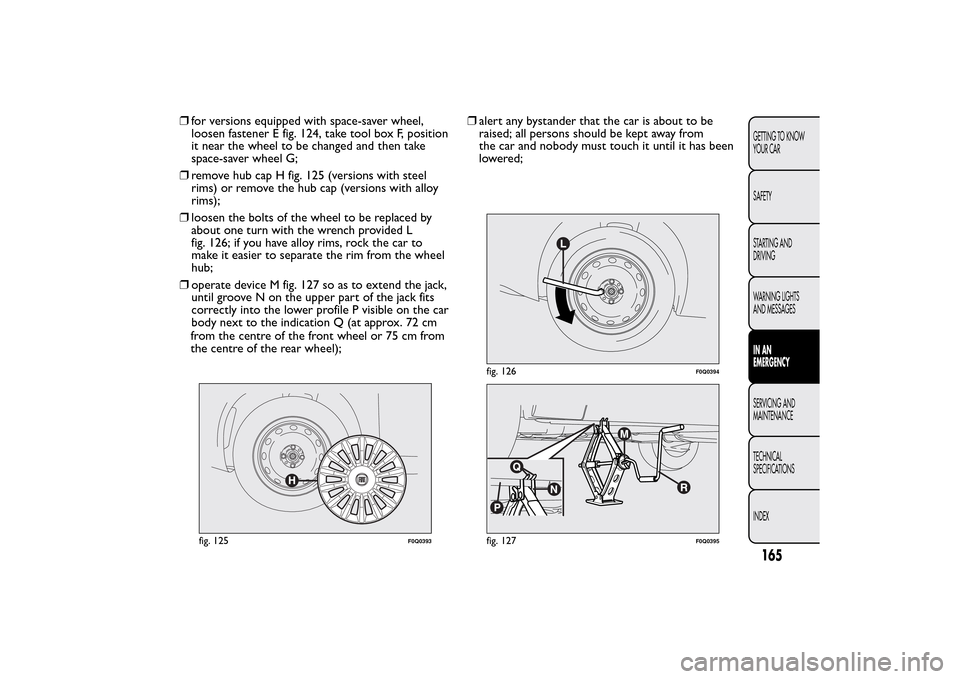
❒remove hub cap H fig. 125 (versions with steel
rims) or remove the hub cap (versions with alloy
rims);
❒loosen the bolts of the wheel to be replaced by
about one turn with the wrench provided L
fig. 126; if you have alloy rims, rock the car to
make it easier to separate the rim from the wheel
hub;
❒operate device M fig. 127 so as to extend the jack,
until groove N on the upper part of the jack fits
correctly into the lower profile P visible on the car
body next to the indication Q (at approx. 72 cm
from the centre of the front wheel or 75 cm from
the centre of the rear wheel);❒alert any bystander that the car is about to be
raised; all persons should be kept away from
the car and nobody must touch it until it has been
lowered;
fig. 125
F0Q0393
fig. 126
F0Q0394
fig. 127
F0Q0395
165GETTING TO KNOW
YOUR CAR
SAFETY
STARTING AND
DRIVING
WARNING LIGHTS
AND MESSAGESIN AN
EMERGENCYSERVICING AND
MAINTENANCE
TECHNICAL
SPECIFICATIONS
INDEX
Page 170 of 275
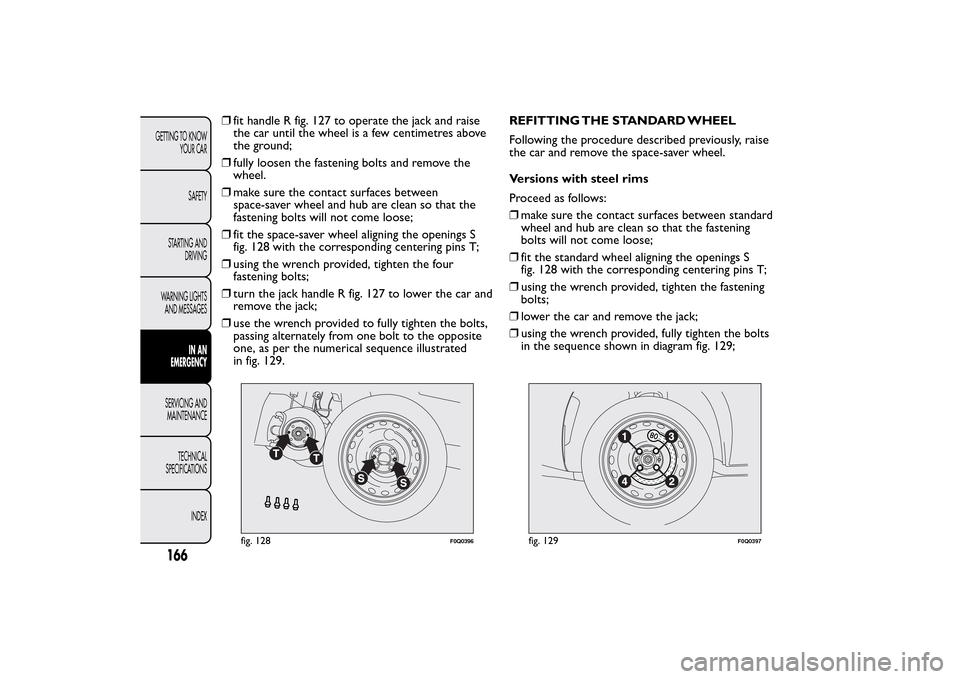
❒fit handle R fig. 127 to operate the jack and raise
the car until the wheel is a few centimetres above
the ground;
❒fully loosen the fastening bolts and remove the
wheel.
❒make sure the contact surfaces between
space-saver wheel and hub are clean so that the
fastening bolts will not come loose;
❒fit the space-saver wheel aligning the openings S
fig. 128 with the corresponding centering pins T;
❒using the wrench provided, tighten the four
fastening bolts;
❒turn the jack handle R fig. 127 to lower the car and
remove the jack;
❒use the wrench provided to fully tighten the bolts,
passing alternately from one bolt to the opposite
one, as per the numerical sequence illustrated
in fig. 129.REFITTING THE STANDARD WHEEL
Following the procedure described previously, raise
the car and remove the space-saver wheel.
Versions with steel rims
Proceed as follows:
❒make sure the contact surfaces between standard
wheel and hub are clean so that the fastening
bolts will not come loose;
❒fit the standard wheel aligning the openings S
fig. 128 with the corresponding centering pins T;
❒using the wrench provided, tighten the fastening
bolts;
❒lower the car and remove the jack;
❒using the wrench provided, fully tighten the bolts
in the sequence shown in diagram fig. 129;
fig. 128
F0Q0396
fig. 129
F0Q0397
166GETTING TO KNOW
YOUR CAR
SAFETY
STARTING AND
DRIVING
WARNING LIGHTS
AND MESSAGES
IN AN
EMERGENCY
SERVICING AND
MAINTENANCE
TECHNICAL
SPECIFICATIONS
INDEX
Page 171 of 275
❒fit the hub cap so that the inflation valve can exit
through the special slot visible on the cap itself;
❒pressure-fit the hub cap starting from the parts
nearest to the inflation valve and continue until
it is completely fitted.
IMPORTANT If it is not fitted properly, the hub cap
may detach itself when the car is running.Versions with alloy rims
Proceed as follows:
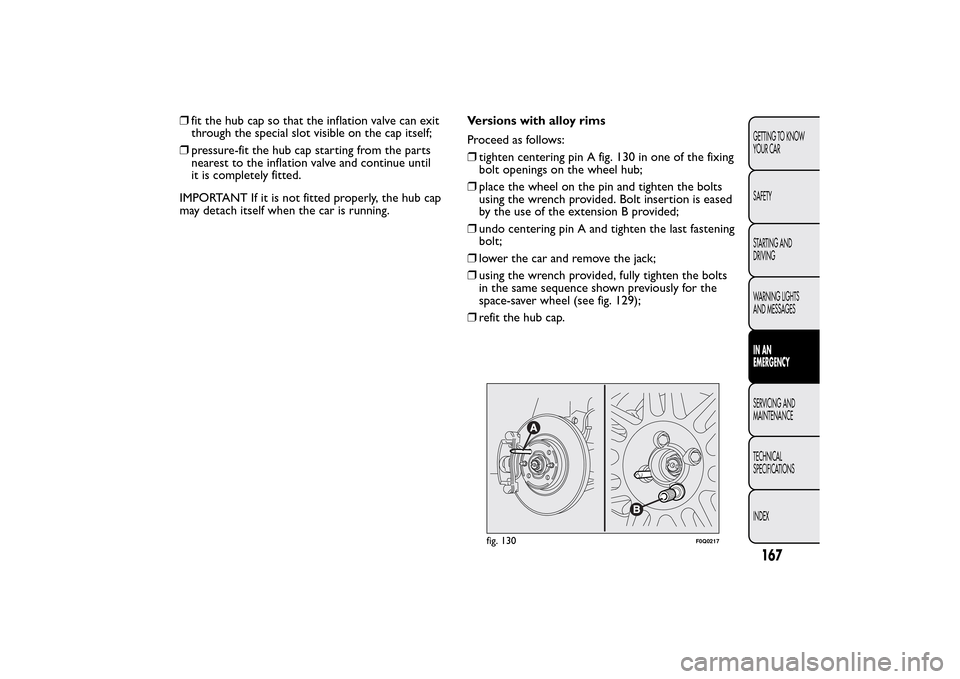
❒tighten centering pin A fig. 130 in one of the fixing
bolt openings on the wheel hub;
❒place the wheel on the pin and tighten the bolts
using the wrench provided. Bolt insertion is eased
by the use of the extension B provided;
❒undo centering pin A and tighten the last fastening
bolt;
❒lower the car and remove the jack;
❒using the wrench provided, fully tighten the bolts
in the same sequence shown previously for the
space-saver wheel (see fig. 129);
❒refit the hub cap.
fig. 130
F0Q0217
167GETTING TO KNOW
YOUR CAR
SAFETY
STARTING AND
DRIVING
WARNING LIGHTS
AND MESSAGESIN AN
EMERGENCYSERVICING AND
MAINTENANCE
TECHNICAL
SPECIFICATIONS
INDEX
Page 172 of 275
At the end of operation
Proceed as follows:
❒arrange the space-saver wheel G fig. 131 in the
specific compartment in the luggage compartment;
❒insert the partially open jack into container F
and force it slightly into its housing so that it does
not vibrate when the car is moving;
❒put the tools back into their places in the
container;
❒stow the container complete with tools on the
space-saver wheel and secure everything with
clamping device E;
❒correctly reposition the rigid preformed cover in
the luggage compartment.
fig. 131
F0Q0392
168GETTING TO KNOW
YOUR CAR
SAFETY
STARTING AND
DRIVING
WARNING LIGHTS
AND MESSAGES
IN AN
EMERGENCY
SERVICING AND
MAINTENANCE
TECHNICAL
SPECIFICATIONS
INDEX
Page 174 of 275
WARNING
If the wheel rim has been damaged
(bent so as to cause air to leak), the tyre
may not be repaired. Do not remove foreign
bodies (screws or nails) from the tyre.
IMPORTANT INFORMATION:
The sealing fluid of the quick tyre repair kit is
effective with external temperatures of between
−20°C and +50°C.
WARNING
Never operate the compressor for longer
than 20 consecutive minutes. Risk of
overheating.The kit is not suitable for definitive
repairs, so the repaired tyres may only be
used temporarily.Dispose of the cylinder and the sealing
fluid properly. Have the sealing fluid and
the cylinder disposed of in compliance
with national and local regulations.
WARNING
The cylinder contains ethylene glycol
and latex: it may cause an allergic
reaction. It is harmful if swallowed. It is irritant
for the eyes in case of contact . May cause
irritation if inhaled or on contact . Avoid contact
with the eyes, skin and clothes. In the event of
contact , rinse immediately with plenty of water.
If ingested, do not induce vomiting. Rinse out
your mouth, drink large quantities of water and
seek immediate medical attention. Keep away
from children.The product must not be used
by asthmatics. Do not inhale the vapours during
insertion and suction. Call a doctor immediately
if allergic reactions are noted. Store the
cylinder in the specific compartment , away
from sources of heat .The sealing fluid has an
expiry date. Replace the cylinder containing
out-of-date sealing fluid.
170GETTING TO KNOW
YOUR CAR
SAFETY
STARTING AND
DRIVING
WARNING LIGHTS
AND MESSAGES
IN AN
EMERGENCY
SERVICING AND
MAINTENANCE
TECHNICAL
SPECIFICATIONS
INDEX
Page 198 of 275
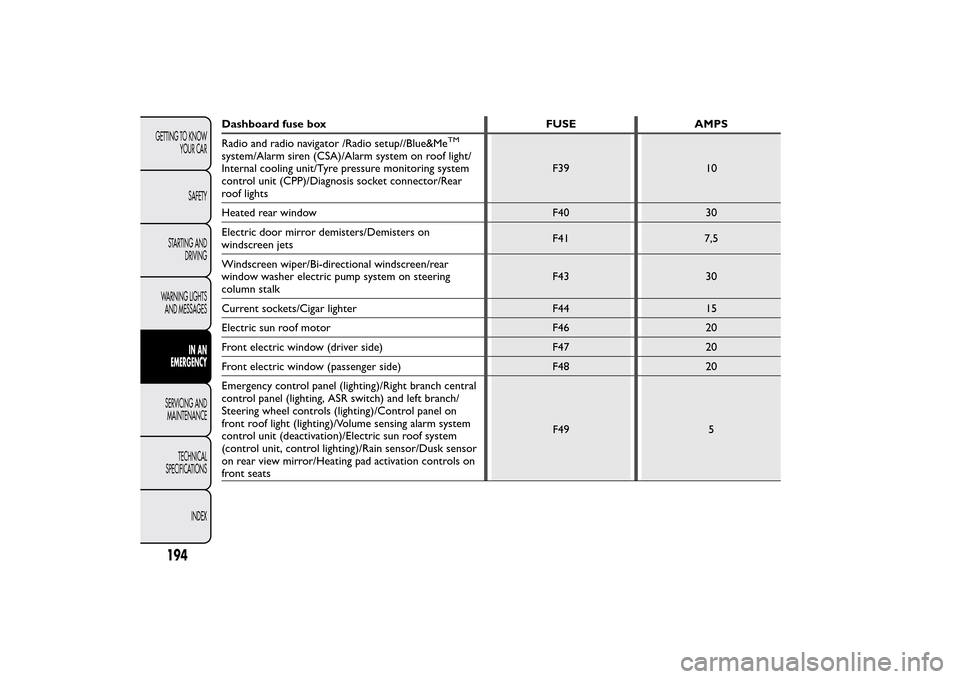
Dashboard fuse box FUSE AMPS
Radio and radio navigator /Radio setup//Blue&Me
TM
system/Alarm siren (CSA)/Alarm system on roof light/
Internal cooling unit/Tyre pressure monitoring system
control unit (CPP)/Diagnosis socket connector/Rear
roof lightsF39 10
Heated rear window F40 30
Electric door mirror demisters/Demisters on
windscreen jetsF41 7,5
Windscreen wiper/Bi-directional windscreen/rear
window washer electric pump system on steering
column stalkF43 30
Current sockets/Cigar lighter F44 15
Electric sun roof motor F46 20
Front electric window (driver side) F47 20
Front electric window (passenger side) F48 20
Emergency control panel (lighting)/Right branch central
control panel (lighting, ASR switch) and left branch/
Steering wheel controls (lighting)/Control panel on
front roof light (lighting)/Volume sensing alarm system
control unit (deactivation)/Electric sun roof system
(control unit, control lighting)/Rain sensor/Dusk sensor
on rear view mirror/Heating pad activation controls on
front seatsF49 5
194GETTING TO KNOW
YOUR CAR
SAFETY
STARTING AND
DRIVING
WARNING LIGHTS
AND MESSAGES
IN AN
EMERGENCY
SERVICING AND
MAINTENANCE
TECHNICAL
SPECIFICATIONS
INDEX
Page 204 of 275
WARNING
Before towing, turn the ignition key to
MAR-ON and then to STOP without
removing it .The steering column will
automatically lock when the key is removed and
the wheels cannot be steered.
WARNING
Whilst towing, remember that as the
assistance of the brake servo and the
electric power steering is not available, greater
force needs to be exerted on the brake pedal
and more effort is required on the steering
wheel. Do not use flexible cables when towing
and avoid jerky movements. During towing,
make sure that the trailer hitch does not
damage any components it is touching.When
towing the car, it is compulsor y to respect
specific highway code regulations relating to
the tow hook and procedures for towing on the
road.
WARNING
Do not star t the engine while towing the
car.
fig. 175
F0Q0731
200GETTING TO KNOW
YOUR CAR
SAFETY
STARTING AND
DRIVING
WARNING LIGHTS
AND MESSAGES
IN AN
EMERGENCY
SERVICING AND
MAINTENANCE
TECHNICAL
SPECIFICATIONS
INDEX