2014 FIAT BRAVO fuse
[x] Cancel search: fusePage 55 of 275
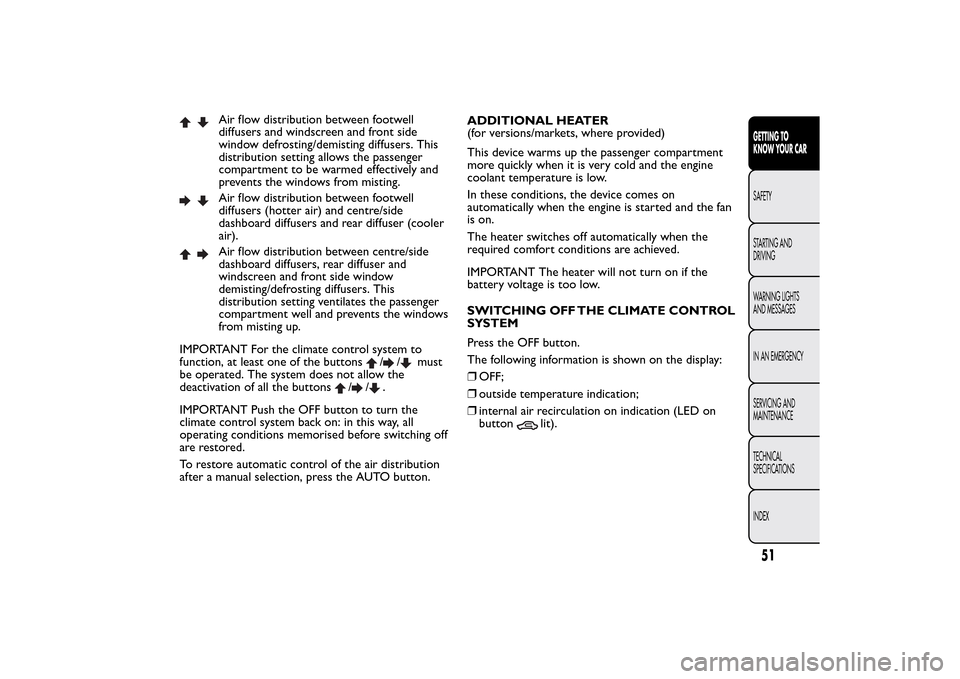
Air flow distribution between footwell
diffusers and windscreen and front side
window defrosting/demisting diffusers. This
distribution setting allows the passenger
compartment to be warmed effectively and
prevents the windows from misting.Air flow distribution between footwell
diffusers (hotter air) and centre/side
dashboard diffusers and rear diffuser (cooler
air).Air flow distribution between centre/side
dashboard diffusers, rear diffuser and
windscreen and front side window
demisting/defrosting diffusers. This
distribution setting ventilates the passenger
compartment well and prevents the windows
from misting up.
IMPORTANT For the climate control system to
function, at least one of the buttons
/
/
must
be operated. The system does not allow the
deactivation of all the buttons
/
/
.
IMPORTANT Push the OFF button to turn the
climate control system back on: in this way, all
operating conditions memorised before switching off
are restored.
To restore automatic control of the air distribution
after a manual selection, press the AUTO button.ADDITIONAL HEATER
(for versions/markets, where provided)
This device warms up the passenger compartment
more quickly when it is very cold and the engine
coolant temperature is low.
In these conditions, the device comes on
automatically when the engine is started and the fan
is on.
The heater switches off automatically when the
required comfort conditions are achieved.
IMPORTANT The heater will not turn on if the
battery voltage is too low.
SWITCHING OFF THE CLIMATE CONTROL
SYSTEM
Press the OFF button.
The following information is shown on the display:
❒OFF;
❒outside temperature indication;
❒internal air recirculation on indication (LED on
button
lit).
51GETTING TO
KNOW YOUR CARSAFETY
STARTING AND
DRIVING
WARNING LIGHTS
AND MESSAGES
IN AN EMERGENCY
SERVICING AND
MAINTENANCE
TECHNICAL
SPECIFICATIONS
INDEX
Page 64 of 275
INCREASING THE STORED SPEED
This can be done in two ways:
❒by pressing the accelerator and memorising the
new speed reached;
or
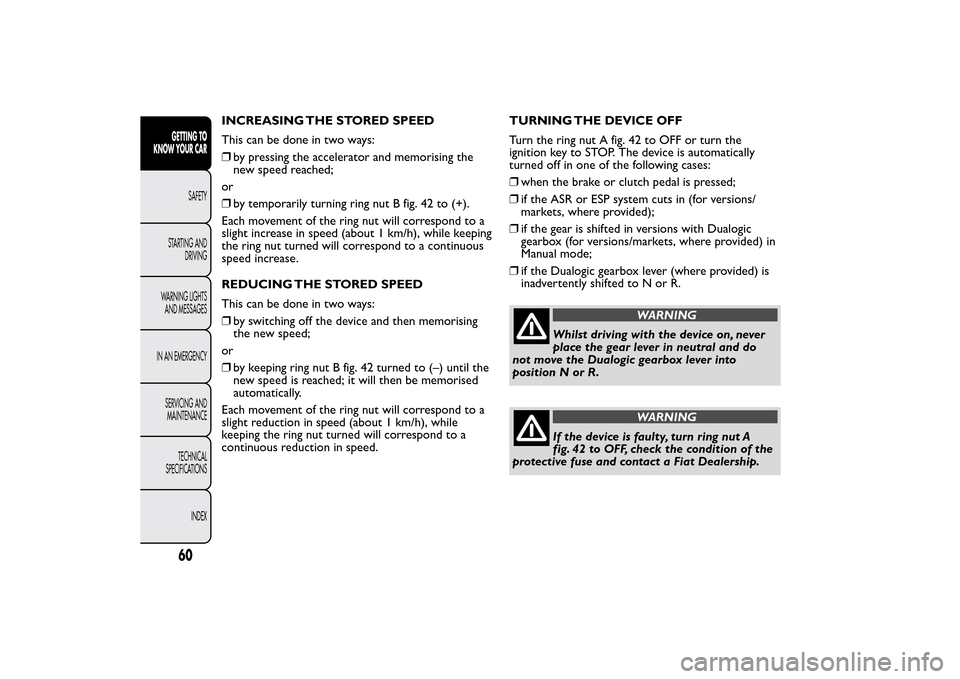
❒by temporarily turning ring nut B fig. 42 to (+).
Each movement of the ring nut will correspond to a
slight increase in speed (about 1 km/h), while keeping
the ring nut turned will correspond to a continuous
speed increase.
REDUCING THE STORED SPEED
This can be done in two ways:
❒by switching off the device and then memorising
the new speed;
or
❒by keeping ring nut B fig. 42 turned to (–) until the
new speed is reached; it will then be memorised
automatically.
Each movement of the ring nut will correspond to a
slight reduction in speed (about 1 km/h), while
keeping the ring nut turned will correspond to a
continuous reduction in speed.TURNING THE DEVICE OFF
Turn the ring nut A fig. 42 to OFF or turn the
ignition key to STOP. The device is automatically
turned off in one of the following cases:
❒when the brake or clutch pedal is pressed;
❒if the ASR or ESP system cuts in (for versions/
markets, where provided);
❒if the gear is shifted in versions with Dualogic
gearbox (for versions/markets, where provided) in
Manual mode;
❒if the Dualogic gearbox lever (where provided) is
inadvertently shifted to N or R.
WARNING
Whilst driving with the device on, never
place the gear lever in neutral and do
not move the Dualogic gearbox lever into
position N or R.
WARNING
If the device is faulty, turn ring nut A
fig. 42 to OFF, check the condition of the
protective fuse and contact a Fiat Dealership.
60GETTING TO
KNOW YOUR CAR
SAFETY
STARTING AND
DRIVING
WARNING LIGHTS
AND MESSAGES
IN AN EMERGENCY
SERVICING AND
MAINTENANCE
TECHNICAL
SPECIFICATIONS
INDEX
Page 78 of 275
ANTI-PINCH SAFETY DEVICE
The sun roof has an anti-pinch safety system capable
of detecting the presence of an obstacle whilst the
roof is closing: if this happens, the system intervenes
and the movement of the glass is immediately
reversed.
INITIALISATION PROCEDURE
After the battery has been disconnected or a fuse
has blown, the operation of the sun roof must be
initialised again.
Proceed as follows:
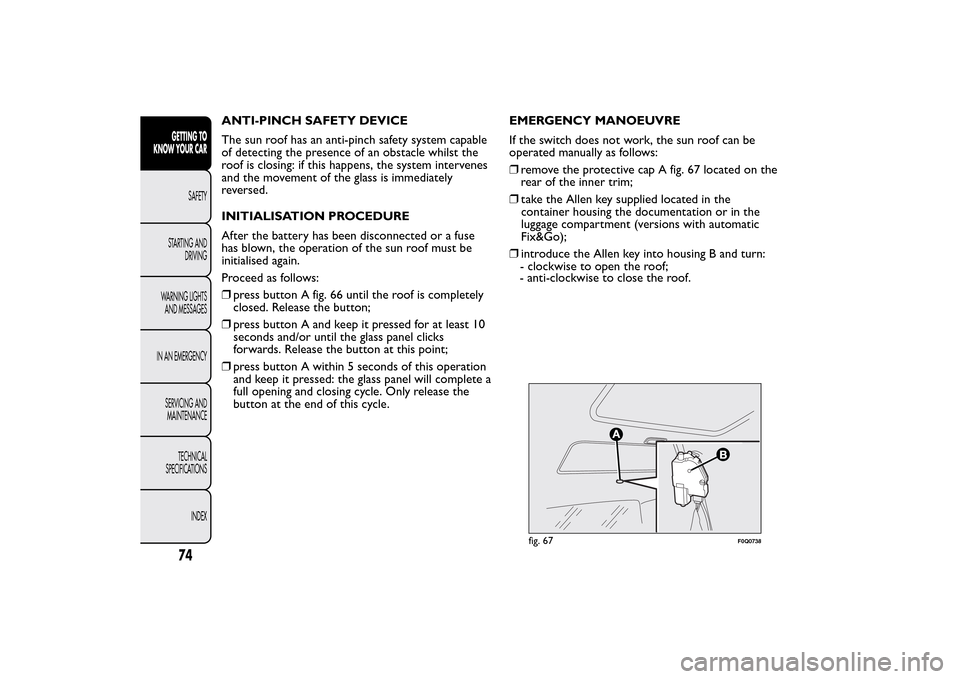
❒press button A fig. 66 until the roof is completely
closed. Release the button;
❒press button A and keep it pressed for at least 10
seconds and/or until the glass panel clicks
forwards. Release the button at this point;
❒press button A within 5 seconds of this operation
and keep it pressed: the glass panel will complete a
full opening and closing cycle. Only release the
button at the end of this cycle.EMERGENCY MANOEUVRE
If the switch does not work, the sun roof can be
operated manually as follows:
❒remove the protective cap A fig. 67 located on the
rear of the inner trim;
❒take the Allen key supplied located in the
container housing the documentation or in the
luggage compartment (versions with automatic
Fix&Go);
❒introduce the Allen key into housing B and turn:
clockwise to open the roof;
- anti-clockwise to close the roof.
fig. 67
F0Q0738
74GETTING TO
KNOW YOUR CAR
SAFETY
STARTING AND
DRIVING
WARNING LIGHTS
AND MESSAGES
IN AN EMERGENCY
SERVICING AND
MAINTENANCE
TECHNICAL
SPECIFICATIONS
INDEX
-
Page 80 of 275
WARNING
After engaging the child lock on both
rear doors, check for proper engagement
by trying to open a rear door with the internal
handle.
REAR DOOR EMERGENCY LOCKING
DEVICE
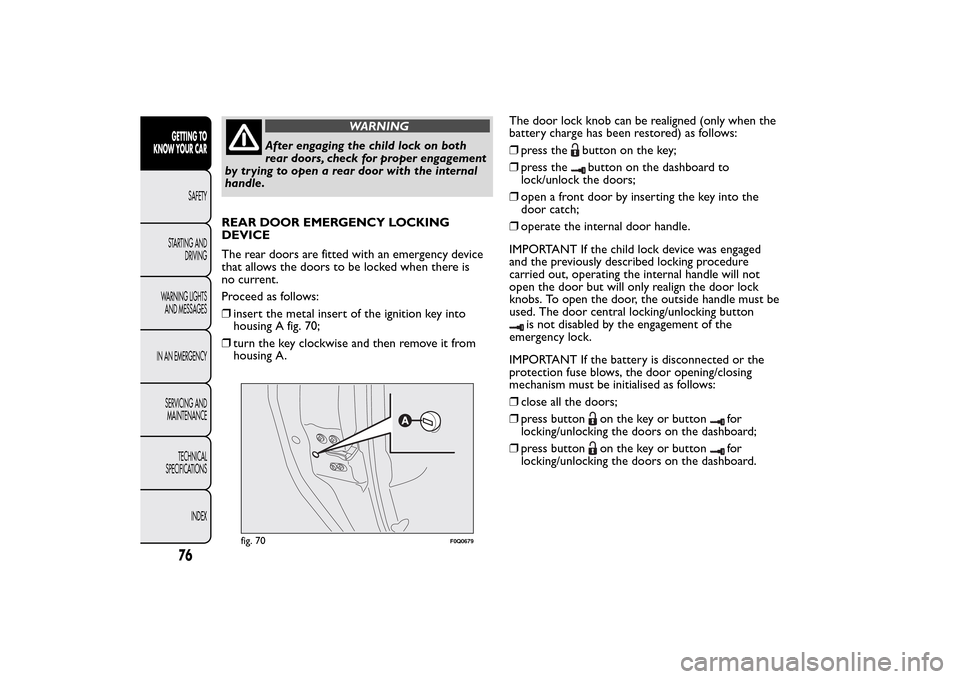
The rear doors are fitted with an emergency device
that allows the doors to be locked when there is
no current.
Proceed as follows:
❒insert the metal insert of the ignition key into
housing A fig. 70;
❒turn the key clockwise and then remove it from
housing A.The door lock knob can be realigned (only when the
battery charge has been restored) as follows:
❒press the
button on the key;
❒press thebutton on the dashboard to
lock/unlock the doors;
❒open a front door by inserting the key into the
door catch;
❒operate the internal door handle.
IMPORTANT If the child lock device was engaged
and the previously described locking procedure
carried out, operating the internal handle will not
open the door but will only realign the door lock
knobs. To open the door, the outside handle must be
used. The door central locking/unlocking button
is not disabled by the engagement of the
emergency lock.
IMPORTANT If the battery is disconnected or the
protection fuse blows, the door opening/closing
mechanism must be initialised as follows:
❒close all the doors;
❒press button
on the key or button
for
locking/unlocking the doors on the dashboard;
❒press button
on the key or button
for
locking/unlocking the doors on the dashboard.
fig. 70
F0Q0679
76GETTING TO
KNOW YOUR CAR
SAFETY
STARTING AND
DRIVING
WARNING LIGHTS
AND MESSAGES
IN AN EMERGENCY
SERVICING AND
MAINTENANCE
TECHNICAL
SPECIFICATIONS
INDEX
Page 83 of 275
WARNING
Improper use of the electric windows
can be dangerous. Before and during
their operation ensure that any passengers are
not at risk from the moving glass either by
personal objects getting caught in the
mechanism or by being hit by it directly.When
leaving the car, always remove the ignition
key to prevent the electric windows from being
inadvertently activated, as this could present
a danger for the passengers remaining in the
vehicle.
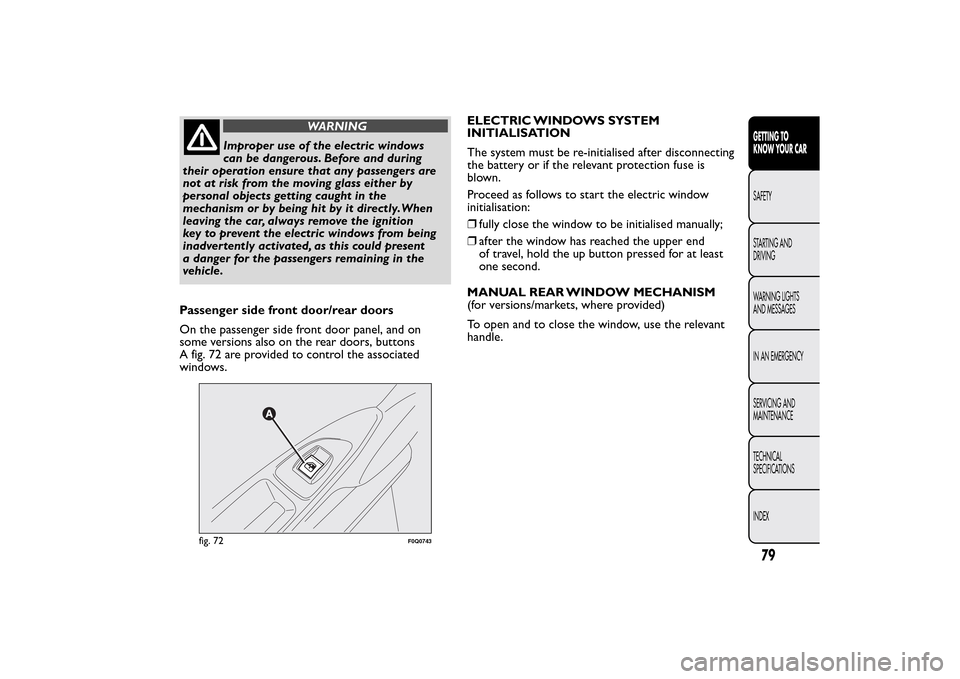
Passenger side front door/rear doors
On the passenger side front door panel, and on
some versions also on the rear doors, buttons
A fig. 72 are provided to control the associated
windows.ELECTRIC WINDOWS SYSTEM
INITIALISATION
The system must be re-initialised after disconnecting
the battery or if the relevant protection fuse is
blown.
Proceed as follows to start the electric window
initialisation:
❒fully close the window to be initialised manually;
❒after the window has reached the upper end
of travel, hold the up button pressed for at least
one second.
MANUAL REAR WINDOW MECHANISM
(for versions/markets, where provided)
To open and to close the window, use the relevant
handle.
fig. 72
F0Q0743
79GETTING TO
KNOW YOUR CARSAFETY
STARTING AND
DRIVING
WARNING LIGHTS
AND MESSAGES
IN AN EMERGENCY
SERVICING AND
MAINTENANCE
TECHNICAL
SPECIFICATIONS
INDEX
Page 103 of 275

IMPORTANT When the SPORT button is pressed,
the function is activated about 5 seconds later.
IMPORTANT During acceleration, when the SPORT
function is used the steering may shudder which is
typical of a sports setting.
IMPORTANT During parking manoeuvres requiring a
lot of steering, the steering may become harder;
this is normal and is due to the intervention of the
system to protect the electric steering motor from
overheating; so, no intervention is required. When
the car is used again later on, the power steering will
work normally.Acceleration
Sudden acceleration has a very negative effect on fuel
consumption and emissions: accelerate gradually to
contain consumption.
When the SPORT function is used the consumption
figures will be slightly higher than those stated.
WARNING
Under no circumstances should
aftermarket operations involving
steering system or steering column
modifications (e.g.: installation of anti-theft
device) be carried out that could badly affect
performance and safety.This also causes the
warranty to become null and void and results in
vehicle non-compliance with type-approval
requirements.
WARNING
Before starting any servicing operation,
stop the engine and remove the key
from the ignition switch to operate the steering
lock, particularly when the wheels do not touch
the ground. If this is not possible (for example
if the key needs to be turned to MAR-ON or
the engine must be running), remove the main
fuse that protects the electric power steering.
99GETTING TO
KNOW YOUR CARSAFETY
STARTING AND
DRIVING
WARNING LIGHTS
AND MESSAGES
IN AN EMERGENCY
SERVICING AND
MAINTENANCE
TECHNICAL
SPECIFICATIONS
INDEX
Page 162 of 275

EXTERNAL LIGHT FAILURE
(amber)
The warning light switches on when a fault is
detected on one of the following lights:
❒side lights
❒brake (stop) lights or corresponding fuse (see the
description provided for this symbol
).
❒rear fog lights
❒direction indicators
❒number plate lights.
The failure relating to these lights could be: one or
more blown bulbs, a blown protection fuse or a
break in the electrical connection.
The display will show the dedicated message.
REAR FOG LIGHTS (amber)
The warning light switches on when the rear fog
lights are activated.
FRONT FOG LIGHTS (green)
The warning light comes on when the front fog lights
are turned on.LEFT-HAND DIRECTION
INDICATOR (green) (intermittent)
The warning light comes on when the direction
indicator control stalk is moved downwards
or, together with the right-hand direction indicator,
when the hazard warning light button is pressed.RIGHT-HAND DIRECTION
INDICATOR (green) (intermittent)
The warning light switches on when the direction
indicator control stalk is moved upwards or, together
with the left direction indicator, when the hazard
warning light button is pressed.
158GETTING TO KNOW
YOUR CAR
SAFETY
STARTING AND
DRIVINGWARNING LIGHTS
AND MESSAGESIN AN EMERGENCY
SERVICING AND
MAINTENANCE
TECHNICAL
SPECIFICATIONS
INDEX
Page 178 of 275

CHANGING A BULBGENERAL INSTRUCTIONS
❒Before changing a bulb check the contacts for
oxidation;
❒Burnt bulbs must be replaced by others of the
same type and power;
❒after replacing a headlight bulb, always check its
alignment;
❒when a light is not working, check that the
corresponding fuse is intact before changing a bulb.
For the location of fuses, refer to the paragraph
“If a fuse blows” in this section;
WARNING
Modifications or repairs to the electric
system that are not carried out properly
or do not take the system technical
specifications into account can cause
malfunctions leading to the risk of fire.
WARNING
Halogen bulbs contain pressurised gas,
in the case of breakage they may burst .
Halogen bulbs must be handled holding
the metallic part only.Touching the
transparent part of the bulb with your
fingers may reduce the intensity of the emitted
light and even reduce the lifespan of the bulb. In
case of accidental contact , wipe the bulb with
a cloth moistened with alcohol and let the bulb
dry.If possible, we recommend have bulbs
replaced by a Fiat Dealership.The correct
operation and aiming of the outer lights
are absolutely essential for the safety of the car
and of compliance with law.Due to the high supply voltage, gas
discharge bulbs (Bi-Xenon) (for versions/
markets, where provided) must only be
replaced by a specialist technician: danger of
death! Contact a Fiat Dealership.
IMPORTANT When the weather is cold or damp or
after heavy rain or washing, the surface of headlights
or rear lights, may steam up and/or form drops of
condensation on the inside. This is a natural
phenomenon due to the difference in temperature
and humidity between the inside and the outside
of the glass which does not indicate a fault and does
not compromise the normal operation of lighting
devices. The mist disappears quickly when the lights
are turned on, starting from the centre of the
diffuser, extending progressively towards the edges.
174GETTING TO KNOW
YOUR CAR
SAFETY
STARTING AND
DRIVING
WARNING LIGHTS
AND MESSAGES
IN AN
EMERGENCY
SERVICING AND
MAINTENANCE
TECHNICAL
SPECIFICATIONS
INDEX