Page 69 of 476

operation of the headlights, side marker lights, daytime
running lights, fog lights and the dimming of the
instrument cluster and interior lighting.
Turning on the headlights will illuminate the instru-
ment cluster and the controls located on the instrument
panel.Automatic Lighting — If Equipped
Light Sensor
The light sensor is equipped with an infrared LED,
located on the windshield. It detects changes in light
intensity outside the vehicle, based on the sensitivity of
light set by using the Menu on the display or on the
Uconnect system.
The higher the sensitivity, the lesser the amount of
external light required for controlling the lighting.
Automatic Headlights
Turn the headlight switch to the AUTO position.
When the automatic headlights are enabled, the head-
light time delay is active. After the ignition switch is
placed in the STOP mode, the headlights will automati-
cally turn off after approximately 90 seconds depending
on the settings of the feature.
The timing of the headlights is adjustable between 0, 30,
60 and 90 seconds. Refer to “Uconnect Settings” in
“Multimedia” for further information.
NOTE:The engine must be running before the head-
lights will come on in the automatic mode.
Headlight Switch
1 — Rotate Headlight Switch
2 — Ambient Light Dimmer
3 — Instrument Panel Dimmer
4 — Push Fog Light Switch
4
GETTING TO KNOW YOUR VEHICLE 67
Page 70 of 476

Daytime Running Lights (DRL) — If Equipped
The Daytime Running Lights (DRLs) will turn on when
the engine is started and remain on unless the head-
lights are turned on or the engine is shut off.
The DRLs will be disabled during turn signal operation
and resume operation when the turn signal operation
has ended.
Front Fog Lights — If Equipped
The front fog light switch is built into the headlight
switch.To activate the front fog lights, turn on the
parking lights or the low beam headlights and
push the headlight switch. To turn off the front fog
lights, push the headlight switch a second time or turn
off the headlight switch.
An indicator light in the instrument cluster illuminates
when the fog lights are turned on. NOTE:
•
The fog lights will operate with the low beam head-
lights or parking lights on. Selecting the high beam
headlights will turn off the fog lights.
• The fog lights also function as cornering lights.
Therefore there will be times when only one light is
on.
Parking Lights
Rotate the headlight switch to the first position to turn
on the parking lights. The parking light indicator in the
cluster will illuminate.
Headlight Delay
This feature provides the safety of headlight illumina-
tion for up to 90 seconds when leaving your vehicle in
an unlit area.
The time delay of the headlights is programmable
between 0, 30, 60 and 90 seconds. Refer to “Uconnect
Settings” in “Multimedia” for further information.
Headlight Delay Activation
To activate the delay feature, place the ignition in the
STOP position while the headlights are still on. Then,
68 GETTING TO KNOW YOUR VEHICLE
Page 72 of 476
Turn Signals
Move the multifunction lever up or down and the
arrows on each side of the instrument cluster flash to
show proper operation of the front and rear turn signal
lights.
When the Daytime Running Lights are on and a turn
signal is activated, the Daytime Running Lamp will
turn off on the side of the vehicle in which the turn
signal is flashing. The Daytime Running Lamp will turn
back on when the turn signal is turned off.
INTERIOR LIGHTS
Front Courtesy Light
The courtesy lights will automatically turn on when the
door is open or closed. The light switches in the
overhead console are for reading lamps.Push the driver or passenger light switch to operate the
reading lamps individually.
Front Courtesy/Reading Lights
1 — Left Courtesy/Reading Light
2 — Left Light Switch
3 — Right Light Switch
4 — Right Courtesy/Reading Light
70 GETTING TO KNOW YOUR VEHICLE
Page 121 of 476
GETTING TO KNOW YOUR INSTRUMENT PANEL
CONTENTS
�INSTRUMENT CLUSTER ................120
� ONBOARD DIAGNOSTIC SYSTEM (OBD II) . .121
▫ Onboard Diagnostic System (OBD II)
Cybersecurity ...................... .122
� INSTRUMENT CLUSTER DISPLAY .........123
▫ Instrument Cluster Display Description .....123
▫ Mapping And Reconfigurable Zone Display — If
Equipped ......................... .123
▫ Instrument Cluster Display Control Buttons .124 ▫
Engine Oil Change Reset ...............125
▫ Instrument Cluster Display Main Menu .....125
� WARNING AND INDICATOR LIGHTS ......132
▫ Red Telltale Indicator Lights .............132
▫ Yellow Telltale Indicator Lights ...........140
▫ Green Telltale Indicator Lights ...........150
▫ White Telltale Indicator Lights ...........152
▫ Blue Telltale Indicator Lights ............152
5
Page 122 of 476
INSTRUMENT CLUSTER
120 GETTING TO KNOW YOUR INSTRUMENT PANEL
Page 123 of 476

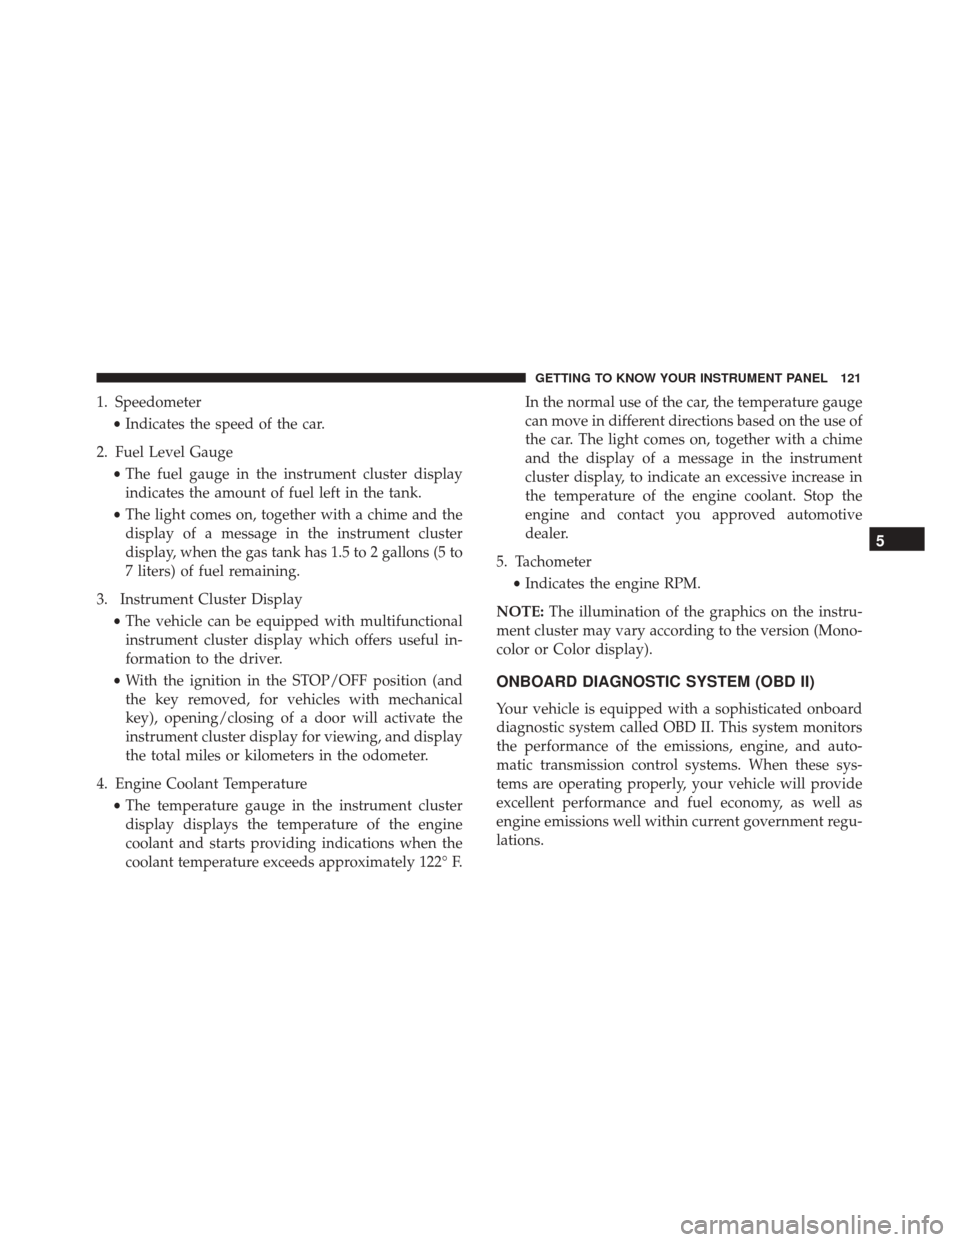
1. Speedometer•Indicates the speed of the car.
2. Fuel Level Gauge •The fuel gauge in the instrument cluster display
indicates the amount of fuel left in the tank.
• The light comes on, together with a chime and the
display of a message in the instrument cluster
display, when the gas tank has 1.5 to 2 gallons (5 to
7 liters) of fuel remaining.
3. Instrument Cluster Display •The vehicle can be equipped with multifunctional
instrument cluster display which offers useful in-
formation to the driver.
• With the ignition in the STOP/OFF position (and
the key removed, for vehicles with mechanical
key), opening/closing of a door will activate the
instrument cluster display for viewing, and display
the total miles or kilometers in the odometer.
4. Engine Coolant Temperature •The temperature gauge in the instrument cluster
display displays the temperature of the engine
coolant and starts providing indications when the
coolant temperature exceeds approximately 122° F. In the normal use of the car, the temperature gauge
can move in different directions based on the use of
the car. The light comes on, together with a chime
and the display of a message in the instrument
cluster display, to indicate an excessive increase in
the temperature of the engine coolant. Stop the
engine and contact you approved automotive
dealer.
5. Tachometer •Indicates the engine RPM.
NOTE: The illumination of the graphics on the instru-
ment cluster may vary according to the version (Mono-
color or Color display).
ONBOARD DIAGNOSTIC SYSTEM (OBD II)
Your vehicle is equipped with a sophisticated onboard
diagnostic system called OBD II. This system monitors
the performance of the emissions, engine, and auto-
matic transmission control systems. When these sys-
tems are operating properly, your vehicle will provide
excellent performance and fuel economy, as well as
engine emissions well within current government regu-
lations.
5
GETTING TO KNOW YOUR INSTRUMENT PANEL 121
Page 125 of 476
INSTRUMENT CLUSTER DISPLAY
Instrument Cluster Display Description
The vehicle can be equipped with an instrument cluster
display which offers useful information to the driver.
With the ignition in the STOP/OFF position, opening/
closing of a door will activate the display for viewing, and
display the total miles or kilometers in the odometer.
Mapping And Reconfigurable Zone Display — If
Equipped
The display shows the following information, if
equipped:
ZONE LOCATIONSCONTENT
Zone 1 & 3 Date
Compass Time
Ext. Temp
Zone 2 Automatic Gear Display
Zone 4 Audio Information
Browsing Arrows
Display Menu Titles
Zone 5 Speed Display
Trip
Fuel Economy
Turn By Turn Navigation
Zone 6 Odometer Reading
Cruise Control Speed Set Speed Buzzer
Telltales Bottom Left Red
Telltales Bottom right Yellow
Mapping And Reconfigurable Zone Display
5
GETTING TO KNOW YOUR INSTRUMENT PANEL 123
Page 126 of 476
Instrument Cluster Display Control Buttons
The system allows the driver to select information by
pushing the following buttons mounted on the steering
wheel:
•Up Arrow Button
Push and release the up arrow button to scroll
upward through the main menu and
submenus. •
Down Arrow Button
Push and release the down arrow button to
scroll downward through the main menu and
submenus.
• Right Arrow Button
Push and release the right arrow button to
access the information screens or submenu
screens of a main menu item.
• Left Arrow Button
Push and release the left arrow button to
access the information screens or submenu
screens of a main menu item.
• OK Button
The OK button may be used for the following:
• Select
• Reset (hold)
Instrument Cluster Display Control Buttons
1 — Arrow Up/Down Scroll Through Menus And Submenus
2 — Arrow Right/Left Access Information/Submenu Screens
3 — OK Button For Selecting And Resetting Information
124 GETTING TO KNOW YOUR INSTRUMENT PANEL