2014 FIAT 500L phone
[x] Cancel search: phonePage 61 of 116

•For best performance, adjust the rearview mirror to provide at least ½ in (1 cm) gap
between the overhead console (if equipped) and the mirror.This will create an unob-
structed path to the microphone on the overhead console.
•Always wait for the beep before speaking.
•Speak normally, without pausing, just as you would speak to a person sitting a few
feet/meters away from you.
•Make sure that no one other than you is speaking during a Voice Command period.
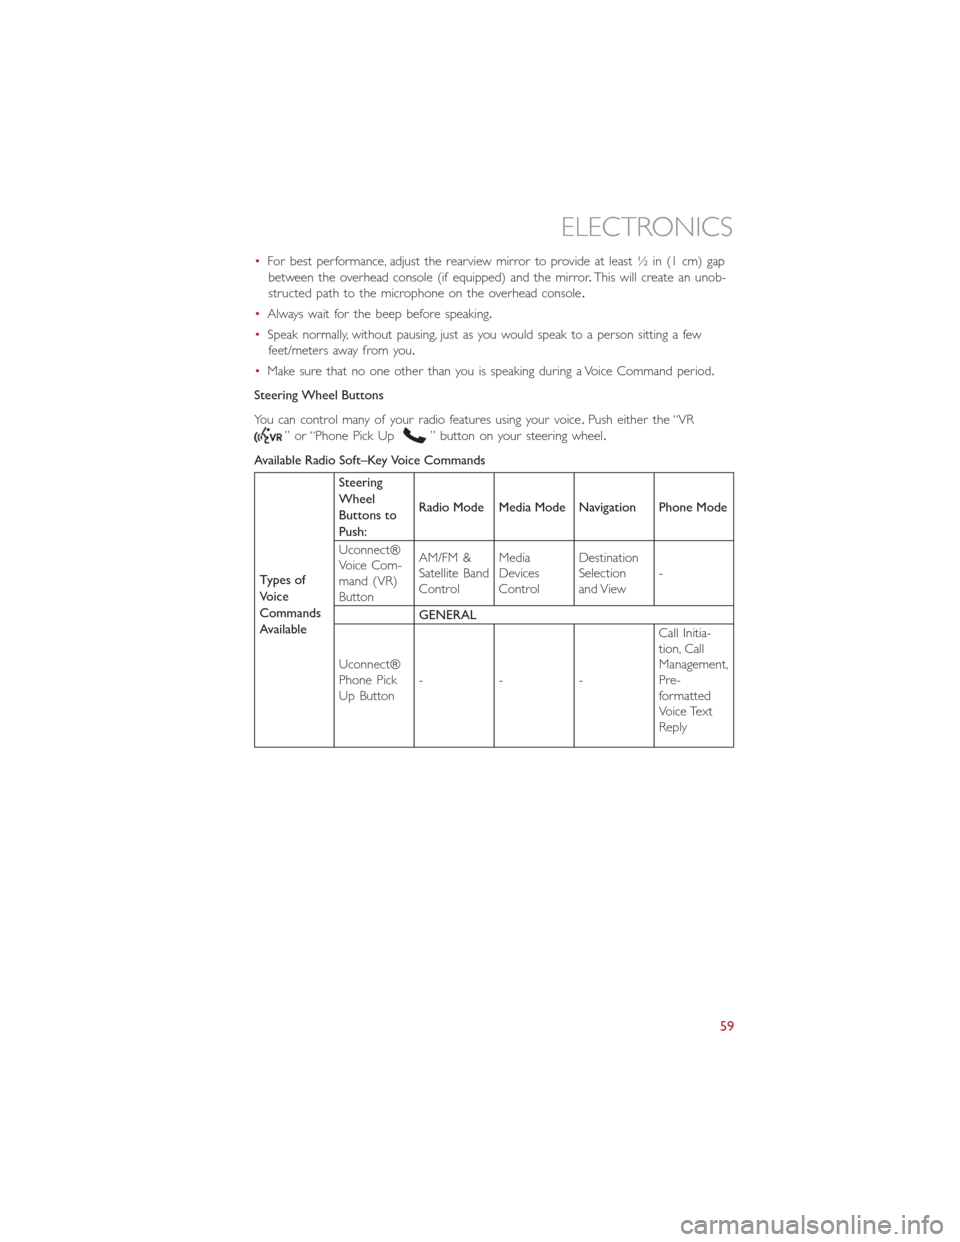
Steering Wheel Buttons
You can control many of your radio features using your voice.Push either the “VR
” or “Phone Pick Up” button on your steering wheel.
Available Radio Soft–Key Voice Commands
Types of
Voice
Commands
AvailableSteering
Wheel
Buttons to
Push:Radio Mode Media Mode Navigation Phone Mode
Uconnect®
Voice Com-
mand (VR)
ButtonAM/FM &
Satellite Band
ControlMedia
Devices
ControlDestination
Selection
and View-
GENERAL
Uconnect®
Phone Pick
Up Button---Call Initia-
tion, Call
Management,
Pre-
formatted
Voice Text
Reply
ELECTRONICS
59
Page 62 of 116

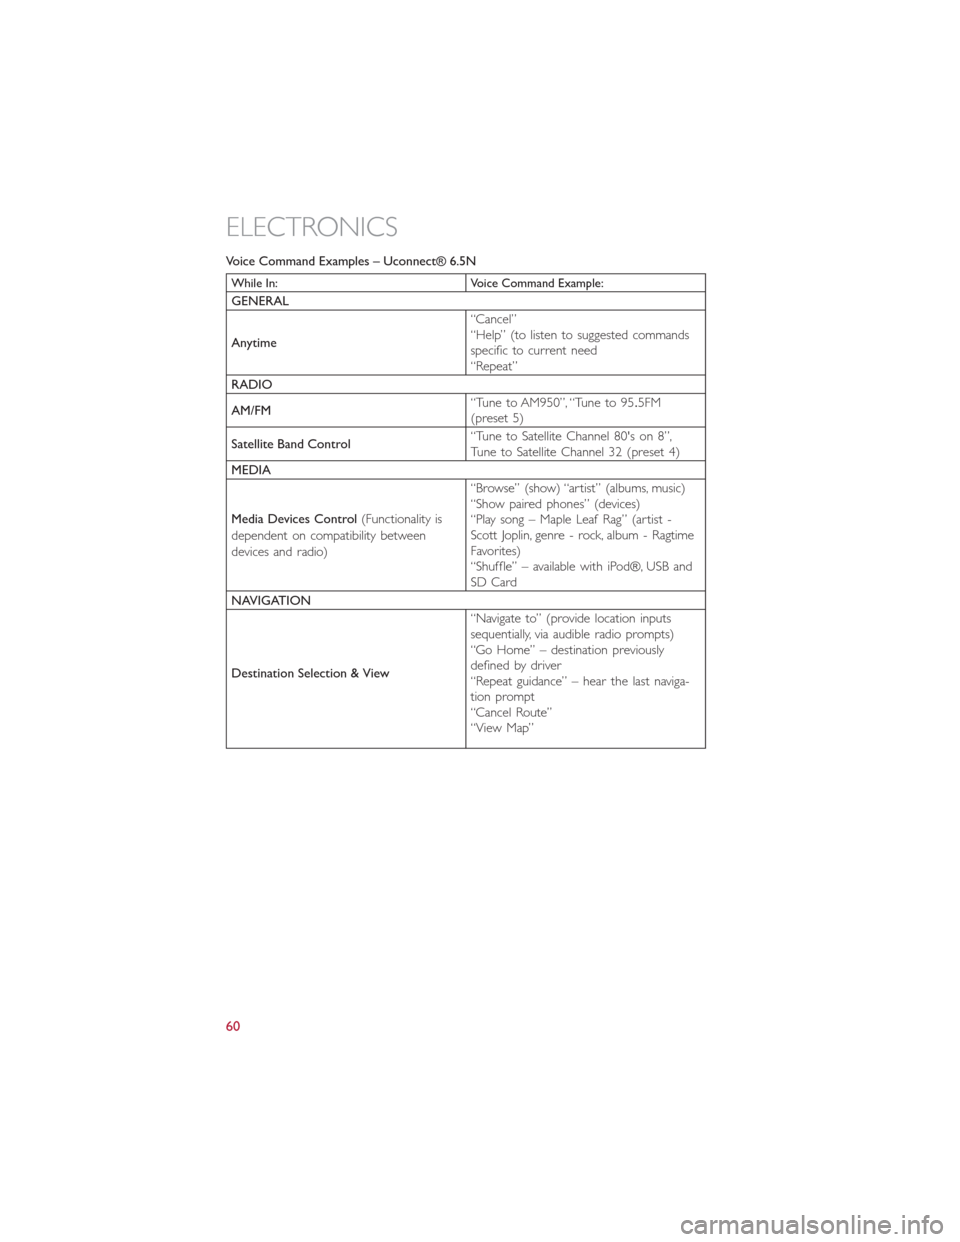
Voice Command Examples – Uconnect® 6.5N
While In: Voice Command Example:
GENERAL
Anytime“Cancel”
“Help” (to listen to suggested commands
specific to current need
“Repeat”
RADIO
AM/FM“Tune to AM950”, “Tune to 95.5FM
(preset 5)
Satellite Band Control“Tune to Satellite Channel 80's on 8”,
Tune to Satellite Channel 32 (preset 4)
MEDIA
Media Devices Control(Functionality is
dependent on compatibility between
devices and radio)“Browse” (show) “artist” (albums, music)
“Show paired phones” (devices)
“Play song – Maple Leaf Rag” (artist -
Scott Joplin, genre - rock, album - Ragtime
Favorites)
“Shuffle” – available with iPod®, USB and
SD Card
NAVIGATION
Destination Selection & View“Navigate to” (provide location inputs
sequentially, via audible radio prompts)
“Go Home” – destination previously
defined by driver
“Repeat guidance” – hear the last naviga-
tion prompt
“Cancel Route”
“View Map”
ELECTRONICS
60
Page 63 of 116

While In: Voice Command Example:
PHONE
Call Initiation(Requires that phone has
been Bluetooth® paired with radio)“Dial 123-456-7890” (phone number)
“Call John Smith mobile” (home, office,
other)
“Redial”
“Show outgoing” (recent) “calls”
Call Management“Search for John Smith” (any contact name
in address book)
“Show (display list) contacts”
Voice Text Reply(Radio audibly recognizes
these 18 pre-formatted SMS messages as
you speak)Forward one of 18 pre-formatted SMS
messages to incoming calls/text messages:
“Yes.”
“No.”
“Okay.”
“I can’t talk right now.”
“Call me.”
“I’ll call you later.”
“I’m on my way.”
“Thanks.”
“I’ll be late.”
“I will be
“See you in
“Stuck in traffic.”
“Start without me.”
“Where are you?”
“Are you there yet?”
“I need directions.”
“I’m lost.”
“See you later.”
ELECTRONICS
61
Page 65 of 116

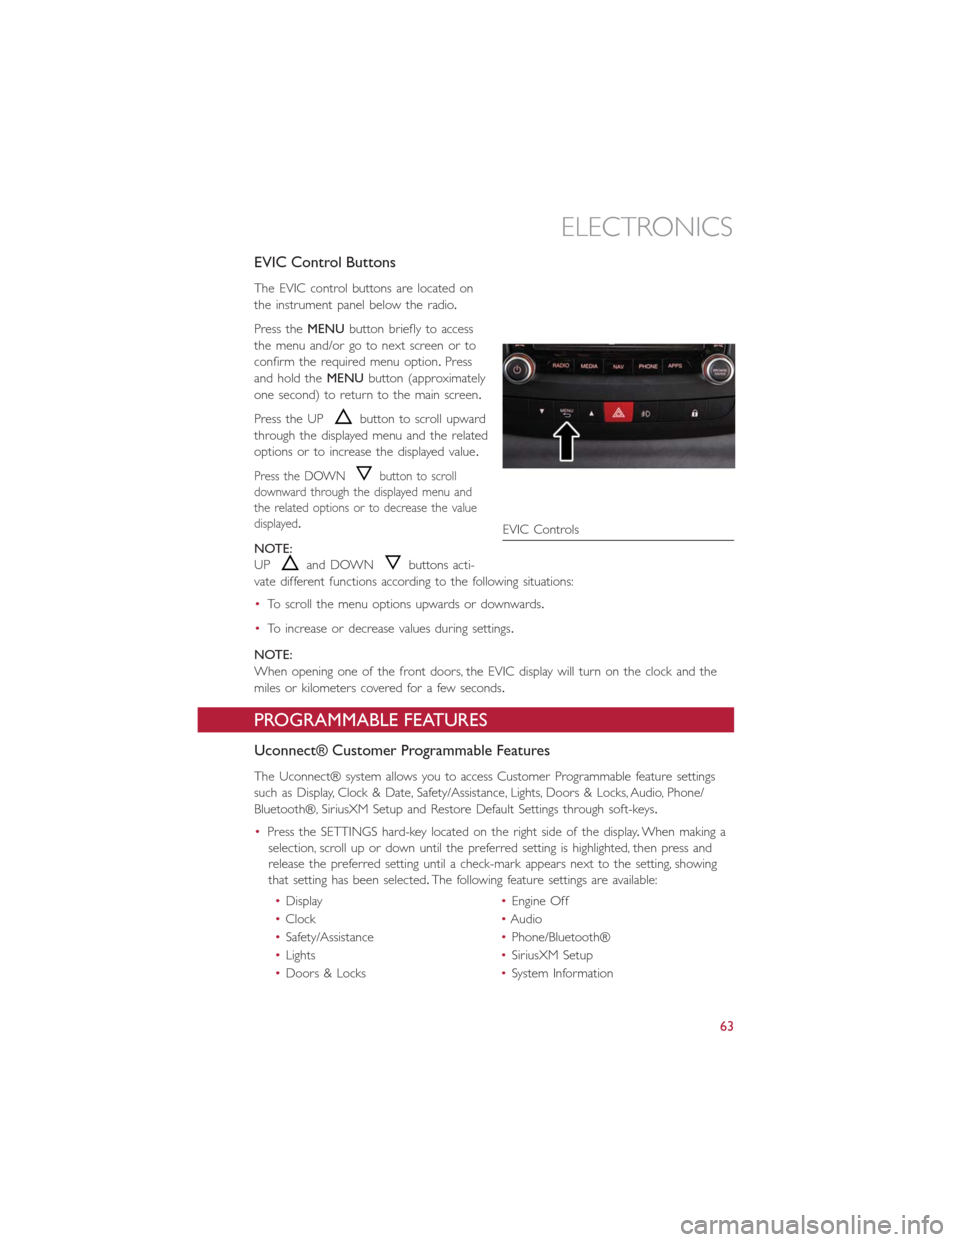
EVIC Control Buttons
The EVIC control buttons are located on
the instrument panel below the radio.
Press theMENUbutton briefly to access
the menu and/or go to next screen or to
confirm the required menu option.Press
and hold theMENUbutton (approximately
one second) to return to the main screen.
Press the UP
button to scroll upward
through the displayed menu and the related
options or to increase the displayed value.
Press the DOWNbutton to scroll
downward through the displayed menu and
the related options or to decrease the value
displayed.
NOTE:
UP
and DOWNbuttons acti-
vate different functions according to the following situations:
•To scroll the menu options upwards or downwards.
•To increase or decrease values during settings.
NOTE:
When opening one of the front doors, the EVIC display will turn on the clock and the
miles or kilometers covered for a few seconds.
PROGRAMMABLE FEATURES
Uconnect® Customer Programmable Features
The Uconnect® system allows you to access Customer Programmable feature settings
such as Display, Clock & Date, Safety/Assistance, Lights, Doors & Locks, Audio, Phone/
Bluetooth®, SiriusXM Setup and Restore Default Settings through soft-keys.
•Press the SETTINGS hard-key located on the right side of the display.When making a
selection, scroll up or down until the preferred setting is highlighted, then press and
release the preferred setting until a check-mark appears next to the setting, showing
that setting has been selected.The following feature settings are available:
•Display•Engine Off
•Clock•Audio
•Safety/Assistance•Phone/Bluetooth®
•Lights•SiriusXM Setup
•Doors & Locks•System Information
EVIC Controls
ELECTRONICS
63
Page 68 of 116

WARNING!
•Your motorized door or gate will open and close while you are programming the
universal transceiver.Do not program the transceiver if people or pets are in the
path of the door or gate.
•Do not run your vehicle in a closed garage or confined area while programming
the transceiver.Exhaust gas from your vehicle contains Carbon Monoxide (CO)
which is odorless and colorless.Carbon Monoxide is poisonous when inhaled and
can cause you and others to be severely injured or killed.
POWER INVERTER
•There is a 115 Volt, 150 Watt power
inverter outlet located on the back of
the center console.This outlet can
power cellular phones, electronics and
other low power devices requiring
power up to 150 Watts.
•To turn on the power outlet, simply plug
in the device.The outlet automatically
turns off when the device is unplugged.
NOTE:
The power inverter is designed with built-in overload protection.If the power rating of
150 Watts is exceeded, the power inverter will automatically shut down.Once the elec-
trical device has been removed from the outlet, the inverter should automatically reset.
If the power rating exceeds approximately 170 Watts, the power inverter may have to be
reset manually.To reset the inverter manually, unplug the device and plug it in again.To
avoid overloading the circuit, check the power ratings on electrical devices prior to using
the inver ter.
WARNING!
To Avoid Serious Injury or Death: Do Not
•insert any objects into the receptacles,
•or touch with wet hands.
Close the lid when not in use.If this outlet is mishandled, it may cause an electric shock
and failure.
ELECTRONICS
66
Page 71 of 116

24-HOUR ROADSIDE ASSISTANCE
•If your FIAT 500 L requires jump start assistance, out of gas/fuel delivery, tire service,
lockout service or towing due to a defect covered under the Basic Limited Warranty,
dial toll-free 1-888-242-6342 or 1-800-363-4869 for Canadian Residents.See your
Warranty booklet for further details.
•Provide your name, vehicle identification number and license plate number.
•Provide your location, including telephone number, from which you are calling.
•Briefly describe the nature of the problem and answer a few simple questions.
•You will be given the name of the service provider and an estimated time of arrival.
If you feel you are in an “unsafe situation,” please let us know.With your consent,
we will contact local police or safety authorities.
INSTRUMENT CLUSTER WARNING LIGHTS
- Generic Warning Light
The Generic Warning Light will illuminate if any of the following conditions occur: Oil
Change Request, Engine Oil Pressure Sensor Failure, External Light Failure, Fuel Cut-Off
Intervention, Fuel Cut-Off Not Available, Parking Sensor Failure, DST System Failure.
- Power Steering System Warning
This light is used to manage the electrical warning of the EPS (Electric Power Steering
System).When the ignition is turned to the ON/RUN position, the warning light will illu-
minate momentarily.If the warning light stays on, cycle the ignition to the OFF position
and back to ON/RUN.If the warning light stays on, contact your authorized dealer.
If the warning light switches on while driving you may not have steering assistance.
Although it will still be possible to steer the car, the effort needed to operate the
steering wheel could be increased: contact an authorized dealer as soon as possible.
- EURO Twin Clutch Transmission — If Equipped
•This light will illuminate when there is an EURO Twin Clutch Transmission fault.
•Have the vehicle serviced by an authorized dealer immediately.
- Engine Temperature Warning Light
This light warns of an overheated engine condition.
If the light turns on or flashes continuously while driving, safely pull over and stop the
vehicle.If the A/C system is on, turn it off.Also, shift the transmission into NEUTRAL and
idle the vehicle.If the temperature reading does not return to normal, turn the engine
off immediately.
We recommend that you do not operate the vehicle or engine damage will occur.
Have the vehicle serviced immediately.
WHAT TO DO IN EMERGENCIES
69
Page 90 of 116

5.Start the engine in the vehicle that has the booster battery, let the engine idle a few
minutes, and then start the engine in the vehicle with the discharged battery.
6.Once the engine is started, remove the jumper cables in the reverse sequence:
•Disconnecting The Jumper Cables
1.Disconnect the negative(-)jumper cable from the negative(-)battery cable terminal
of the vehicle with the discharged battery.
2.Disconnect the opposite end of the negative(-)jumper cable from the negative(-)
post of the booster battery.
3.Disconnect the positive(+)jumper cable from the positive(+)post of the booster
battery.
4.Disconnect the opposite end of the positive(+)jumper cable from the positive(+)
post of the vehicle with the discharged battery.
NOTE:
The negative(-)battery cable must be connected to the negative(-)post of the battery.
Follow these steps to connect the negative(-)battery cable:
1.Connect the negative(-)battery terminal to the negative(-)post of the battery.
2.Push inward on the negative(-)battery cable terminal release lever to the closed
position.
•If frequent jump-starting is required to start your vehicle, you should have the battery
and charging system inspected at your authorized dealer.
CAUTION!
•Accessories that can be plugged into the vehicle power outlets draw power from
the vehicle’s battery, even when not in use (i.e., cellular phones, etc.).Eventually, if
plugged in long enough, the vehicle’s battery will discharge sufficiently to degrade
battery life and/or prevent the engine from starting.
•Do not use a portable battery booster pack or any other booster source with a
system voltage greater than 12 Volts or damage to the battery, starter motor, alter-
nator or electrical system may occur.
•Failure to follow these procedures could result in damage to the charging system
of the booster vehicle or the discharged vehicle.
WHAT TO DO IN EMERGENCIES
88
Page 107 of 116

FIAT CUSTOMER CENTER
P.O.Box 21–8004 Auburn Hills, MI 48321–8004 Phone: 1-888-242-6342
FIAT CANADA CUSTOMER CENTER
P.O.Box 1621 Windsor, Ontario N9A 4H6 Phone: 1–800–465–2001 (English)
Phone: 1–800–387–9983 (French)
ASSISTANCE FOR THE HEARING IMPAIRED
To assist customers who have hearing difficulties, the manufacturer has installed special
TDD (Telecommunication Devices for the Deaf ) equipment at its customer center.Any
hearing or speech impaired customer, who has access to a TDD or a conventional tele-
typewriter (TTY) in the United States, can communicate with the manufacturer by dialing
1–800–380–CHRY.Canadian residents with hearing difficulties that require assistance can
use the special needs relay service offered by Bell Canada.For TTY teletypewriter users,
dial 711 and for Voice callers, dial 1–800–855–0511 to connect with a Bell Relay Service
operator.
WARNING!
Engine exhaust, some of its constituents, and certain vehicle components contain, or
emit, chemicals known to the State of California to cause cancer and birth defects, or
other reproductive harm.In addition, certain fluids contained in vehicles and certain
products of component wear contain, or emit, chemicals known to the State of
California to cause cancer and birth defects, or other reproductive harm.
PUBLICATIONS ORDERING
•If you are the first registered retail owner of your vehicle,you may obtain one free
printed copy of the Owner's Manual, Warranty Booklet or Radio Manuals on your
DVD by calling 1–888–242–6342 (U.S.) or 1–800–387–1143 (Canada) or by
contacting your authorized dealer.
•Replacement English User Guide kits or DVDs may be purchased by visiting
www.techauthority.com or by calling 1–800–890–4038 (U.S.) or 1–800–387–1143
(Canada).Visa, Master Card, American Express and Discover orders are accepted.
If you prefer mailing your order, please call the above numbers for an order form.
NOTE:
A street address is required when ordering manuals (no P.O.Boxes).
CONSUMER ASSISTANCE
105