2014 FIAT 500L display
[x] Cancel search: displayPage 39 of 116
SiriusXM Premier Over 160 Channels
Get every channel available on your satellite radio, and enjoy all you want, all in one place.
Hear commercial-free music plus sports, news, talk and entertainment.Get all the pre-
mium programming, including Howard Stern, every NFL game, Oprah Radio®, every
MLB® and NHL® game, every NASCAR® race and more.And get 20+ Xtra channels,
including SiriusXM Latino, a selection of channels dedicated to Spanish language program-
ming.
•To access SiriusXM Satellite Radio, press the RADIO hard-key and then the “SXM”
soft-key.
SiriusXM services require subscriptions, sold separately after the 12-month trial included
with the new vehicle purchase.If you decide to continue your service at the end of your
trial subscription, the plan you choose will automatically renew and bill at then-current
rates until you call SiriusXM at 1-866-635-2349 for U.S. residents and 1-888-539-7474
for Canadian residents to cancel. See SiriusXM Customer Agreement for complete
terms at www.siriusxm.com.All fees and programming subject to change.Our satellite
service is available only to those at least 18 and older in the 48 contiguous USA and
D.C.Our Sirius satellite service is also available in PR (with coverage limitations).Our
Internet radio service is available throughout our satellite service area and in AK and HI.
© 2014 Sirius XM Radio Inc.Sirius, XM and all related marks and logos are trademarks
of Sirius XM Radio Inc.
Disc Operation — If Equipped
Your vehicle may have a remote CD player located in the lower center console storage
bin.
•CD/Disc Mode is entered by either inserting a CD/Disc or by touching the MEDIA
button located below the display.Once in Media Mode, select Disc.
•Gently insert one CD into the CD player with the CD label facing as indicated on the
illustration located on the Disc player.
Seek Up/Down Buttons
•Press to seek through Disc tracks.
•Hold either button to bypass tracks without stopping.
Browse
•Touch the “Browse” soft-key to scroll through and select a desired track on the Disc.
Touch the “Exit” soft-key if you wish to cancel the browse function.
ELECTRONICS
37
Page 40 of 116
USB/Audio Jack (AUX)/Bluetooth® Operation
USB/iPod®
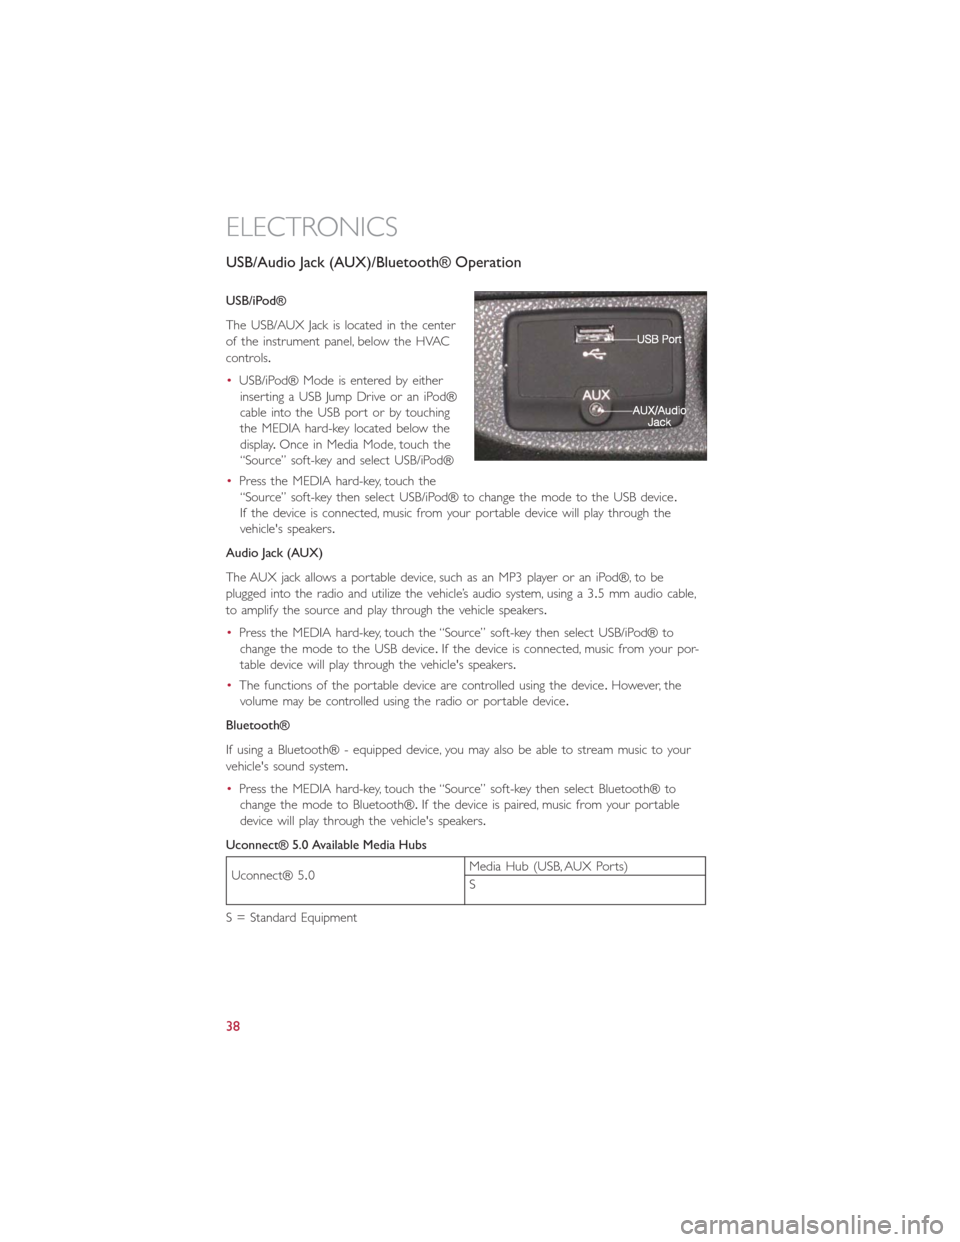
The USB/AUX Jack is located in the center
of the instrument panel, below the HVAC
controls.
•USB/iPod® Mode is entered by either
inserting a USB Jump Drive or an iPod®
cable into the USB port or by touching
the MEDIA hard-key located below the
display.Once in Media Mode, touch the
“Source” soft-key and select USB/iPod®
•Press the MEDIA hard-key, touch the
“Source” soft-key then select USB/iPod® to change the mode to the USB device.
If the device is connected, music from your portable device will play through the
vehicle's speakers.
Audio Jack (AUX)
The AUX jack allows a portable device, such as an MP3 player or an iPod®, to be
plugged into the radio and utilize the vehicle’s audio system, using a 3.5 mm audio cable,
to amplify the source and play through the vehicle speakers.
•Press the MEDIA hard-key, touch the “Source” soft-key then select USB/iPod® to
change the mode to the USB device.If the device is connected, music from your por-
table device will play through the vehicle's speakers.
•The functions of the portable device are controlled using the device.However, the
volume may be controlled using the radio or portable device.
Bluetooth®
If using a Bluetooth® - equipped device, you may also be able to stream music to your
vehicle's sound system.
•Press the MEDIA hard-key, touch the “Source” soft-key then select Bluetooth® to
change the mode to Bluetooth®.If the device is paired, music from your portable
device will play through the vehicle's speakers.
Uconnect® 5.0 Available Media Hubs
Uconnect® 5.0Media Hub (USB, AUX Ports)
S
S = Standard Equipment
ELECTRONICS
38
Page 41 of 116
Uconnect® 5.0 Phone
Bluetooth® Hands Free Calling
•If the Uconnect® Phone Buttonexists on your steering wheel, then you have
the Uconnect® Phone features.
•The Uconnect® Phone is a voice-activated, hands-free, in-vehicle communications sys-
tem with Voice Command Capability (see Voice Command section).
•The Uconnect® Phone allows you to dial a phone number with your mobile phone
using simple voice commands or using screen soft-keys.
•Refer to the Understand The Features Of Your Vehicle section of your vehicle's
Owner's Manual on the DVD for further details.
NOTE:
The Uconnect® Phone requires a mobile phone equipped with the Bluetooth® Hands-Free
Profile, Version 1.0 or higher.For Uconnect® Customer Support: U.S.residents visit
www.UconnectPhone.com or call 1-888-242-6342.Canadian Residents visit
www.UconnectPhone.com or call 1-800-465–2001 (English) or 1-800-387-9983 (French).
Pairing A Phone
•To use the Uconnect® Phone feature, you must first pair your Bluetooth® phone with
the Uconnect® system.
Start Pairing Procedure On Mobile Phone
•
Search for available devices on your Bluetooth® enabled mobile phone.This is usually
within Settings or Options under “Bluetooth.” See your mobile phone’s manual for details.
•When your phone finds the system, select “Uconnect” as the paired device.Yo u m a y
be prompted by your phone to download the phonebook.This is so you can make
calls by saying the name of your contact (PBAP-Phone Book Access Profile).
Start Pairing Procedure On The Radio
•Press the PHONE hard-key then press “Yes” to start searching for the mobile phone.
•Uconnect® Phone will display an “In progress” screen while the system is connecting.
Complete The Pairing Procedure
•When prompted on the phone, verify with radio password shown on the Uconnect®
Screen.
•If your phone asks you to accept a connection request from Uconnect®, select “Yes.”
If available, check the box telling it not to ask again – that way your phone automati-
cally connects each time you start the vehicle.
Select The Mobile Phone's Priority Level
•When the pairing process has successfully completed, the system prompts you to
choose whether or not this is your favorite phone.Selecting “Yes” makes this phone
the highest priority.This phone takes precedence over other paired phones within
range.Only one phone can be paired at a time.
•You are now ready to make hands-free calls.Press the Uconnect® Phone button on
your steering wheel to begin.
ELECTRONICS
39
Page 43 of 116
Voice Command Tips
•Using the complete name of a contact, as stored in your phonebook, (e.g.Call John
Doe vs.Call John) results in greater system accuracy.
•You can ‘chain’ commands together for faster results.Say “Call John Doe, mobile,” for
example.
•If you are listening to available voice command options, you do not have to listen to
the entire list.When you hear the command that you need, press the
button
on the steering wheel, wait for the beep and say your command.
Changing The Volume
•Start a dialogue by pressing the Phone button, then say a command for example
- "Help".
•Use the radio ON/OFF VOLUME rotary knob to adjust the volume to a comfortable
level while the Uconnect® system is speaking.Please note the volume setting for
Uconnect® is different than the audio system.
NOTE:
To access help, press the Uconnect® Phone
button on the steering wheel and say
"help." Touch the display or push either
orbutton and say "cancel" to
cancel the help session.
Voice Text Reply
•Uconnect® Phone can read or send new text messages on your mobile phone.
•Your mobile phone must be MAP (Message Access Profile) compatible to support SMS
via Bluetooth® to use this feature.If the Uconnect® Phone determines your phone is
not compatible with SMS messaging over Bluetooth® the “Messaging” button is greyed
out and the feature is not available for use.
NOTE:
For mobile phone compatibility and pairing instructions, please visit www.UconnectPhone.com
WARNING!
•Any voice commanded system should be used only in safe driving conditions fol-
lowing applicable laws regarding phone use.Your attention should be focused on
safely operating the vehicle.Failure to do so may result in a collision causing you
and others to be severely injured or killed.
•In an emergency, to use Uconnect® Phone, your mobile phone must be:
•turned on,
•paired to Uconnect® Phone,
•and have network coverage.
ELECTRONICS
41
Page 44 of 116
VOICE COMMAND QUICK REFERENCE
Uconnect® 5.0 Voice Command
•If the Uconnect Voice Commandbutton exists on your steering wheel, you
have the Voice Command feature, which is optimized for the driver.The Voice Com-
mand feature lets you keep your hands on the wheel, and your eyes on the road.
•When you press the Voice Command
button located on the steering wheel,
you hear a beep.After the beep, give your command.If you do not know what com-
mands to say, you can say “help” and the system provides options to you.If you ever
wish to interrupt the system while it lists options, press the Voice Command
button, and after the beep, say your command.
NOTE:
All phone oriented voice commands are accessible by first pressing the Phone Pick Up
button, not the Voice Command button.To end a call, simply press the Phone Hang Up
button.In some vehicles, the Phone Pickup button serves the dual purpose of ending calls
as well.
Voice Command (VR) User TIPs
•To hear available commands, press the Uconnect® Voice Command button and say
“Help.” You hear available commands for the menu displayed.
•At any time, you can say the words “Cancel” or “Help.” These commands are universal
and can be used from virtually any menu.All other specific commands can be used
depending upon the active application.
•You can interrupt the system prompts at any time by pressing the Uconnect® Voice
Command button while the system is speaking.After the beep, you can say a com-
mand.
•You can ‘chain’ commands together for faster results.Say “Call Joe Doe mobile,” for
example.
•For best performance, adjust the rearview mirror to provide at least ½ inch (1 cm)
gap between the overhead console (if equipped) and the mirror.This creates an
unobstructed path to the microphone on the overhead console.
•Always wait for the beep before speaking.
•Speak normally, without pausing, just as you would speak to a person sitting a few
feet/meters away from you.
•Ensure that no one other than you is speaking during a Voice Command period.
ELECTRONICS
42
Page 46 of 116

While In: Voice Command Example:
PHONE
Call Initiation(Requires that phone has
been Bluetooth® paired with radio)“Dial 123-456-7890” (phone number)
“Call John Smith mobile” (home, office,
other)
“Redial”
“Show outgoing” (recent) “calls”
Call Management“Search for John Smith” (any contact name
in address book)
“Show (display list) contacts”
Voice Text Reply(Radio audibly recognizes
these 18 pre-formatted SMS messages as
you speak)Forward one of 18 pre-formatted SMS
messages to incoming calls/text messages:
“Yes.”
“No.”
“Okay.”
“I can’t talk right now.”
“Call me.”
“I’ll call you later.”
“I’m on my way.”
“Thanks.”
“I’ll be late.”
“I will be
“See you in
“Stuck in traffic.”
“Start without me.”
“Where are you?”
“Are you there yet?”
“I need directions.”
“I’m lost.”
“See you later.”
ELECTRONICS
44
Page 47 of 116

Uconnect® 6.5N
At A Glance
Displaying The Time
•If the time is not currently displayed on the radio or player main page press the
Settings button.In the Settings list, touch the “Clock” soft-key then touch On or Off
for Show Time in Status Bar.
Setting The Time
•Model 6.5N synchronizes time automatically via GPS, so should not require any time
adjustment.If you do need to set the time manually, follow the instructions below.
•For Model 6.5N, turn the unit on, then touch the time display at the top of the
screen.Touch Yes.
•If the time is not displayed at the top of the screen, press the Settings button.In the
Settings screen, touch the “Clock” soft-key, then check or uncheck this option.
•Touch “+” or “–” next to Set Time Hours and Set Time Minutes to adjust the time.
•If these features are not available, touch Off for Sync with GPS.
•Touch “X” to save your settings and exit out of the Clock Setting screen.
ELECTRONICS
45
Page 48 of 116
Audio Settings
•Touch the “Audio” soft-key to activate the Audio settings screen to adjust Balance\Fade,
Equalizer, and Speed Adjusted Volume.
•You can return to the Radio screen by touching the “X” located at the top right.
Balance/Fade
•Touch the “Balance/Fade” soft-key to Balance audio between the front speakers or fade
the audio between the rear and front speakers.
•Touching the “Front,” “Rear,” “Left,” or “Right” soft-keys or touch and drag the Speaker
Icon to adjust the Balance/Fade.
Equalizer
•Touch the “Equalizer” soft-key to activate the Equalizer screen.
•Touch the “+” or “-” soft-keys, or touch and drag over the level bar for each of the
equalizer bands.The level value, which spans between plus or minus 9, is displayed at
the bottom of each of the Bands.
Speed Adjusted Volume — If Equipped
•Touch the “Speed Adjusted Volume” soft-key to activate the Speed Adjusted Volume
screen.The Speed Adjusted Volume is adjusted by touching the “+” and “-” buttons or
by touching and dragging over the level bar.This alters the automatic adjustment of the
audio volume with variation to vehicle speed.
Surround Sound — If Equipped
•Touch the “Surround Sound” soft-key, select On or Off followed by pressing the back
arrow soft-key.When this feature is activated, it provides simulated surround sound
mode.
ELECTRONICS
46