Page 59 of 116

Phonebook
•Uconnect® radios automatically downloads your phonebook from your paired phone,
if this feature is supported by your phone.Entries are updated each time that the
phone is connected.If your phone book entries do not appear, check the settings on
your phone.Some phones require you to enable this feature manually.
•Your phonebook can be browsed on your radio screen, but editing can only be done
on your phone.To browse, touch the “Phone” soft-key, then the “Phonebook” soft-key.
•Favorite phonebook entries can be saved as Favorites for quicker access.Favorites are
shown at the top of your main phone screen.
Voice Command Tips
•Using complete names (i.e; Call John Doe vs.Call John) will result in greater system
accuracy.
•You can “chain” commands together for faster results.Say “Call John Doe, mobile”, for
example.
•If you are listening to available voice command options, you do not have to listen to
the entire list.When you hear the command that you need, press the
button
on the steering wheel, wait for the beep and say your command.
Changing The Volume
•Start a dialogue by pressing the Phone button, then say a command for example
- "Help".
•Use the radio ON/OFF VOLUME rotary knob to adjust the volume to a comfortable
level while the Uconnect® system is speaking.Please note the volume setting for
Uconnect® is different than the audio system.
NOTE:
To access help, press the Uconnect® Phone
button on the steering wheel and say
"help." Touch the display or push either
orbutton and say "cancel" to
cancel the help session.
Voice Text Reply
•Uconnect® Phone can read or send new text messages on your mobile phone.
•Your mobile phone must be MAP (Message Access Profile) compatible to support SMS
via Bluetooth® to use this feature.If the Uconnect® Phone determines your phone is
not compatible with SMS messaging over Bluetooth® the “Messaging” button is greyed
out and the feature is not available for use.
NOTE:
For mobile phone compatibility and pairing instructions, please visit
www.UconnectPhone.com
ELECTRONICS
57
Page 63 of 116
While In: Voice Command Example:
PHONE
Call Initiation(Requires that phone has
been Bluetooth® paired with radio)“Dial 123-456-7890” (phone number)
“Call John Smith mobile” (home, office,
other)
“Redial”
“Show outgoing” (recent) “calls”
Call Management“Search for John Smith” (any contact name
in address book)
“Show (display list) contacts”
Voice Text Reply(Radio audibly recognizes
these 18 pre-formatted SMS messages as
you speak)Forward one of 18 pre-formatted SMS
messages to incoming calls/text messages:
“Yes.”
“No.”
“Okay.”
“I can’t talk right now.”
“Call me.”
“I’ll call you later.”
“I’m on my way.”
“Thanks.”
“I’ll be late.”
“I will be minutes late.”
“See you in minutes.”
“Stuck in traffic.”
“Start without me.”
“Where are you?”
“Are you there yet?”
“I need directions.”
“I’m lost.”
“See you later.”
ELECTRONICS
61
Page 65 of 116

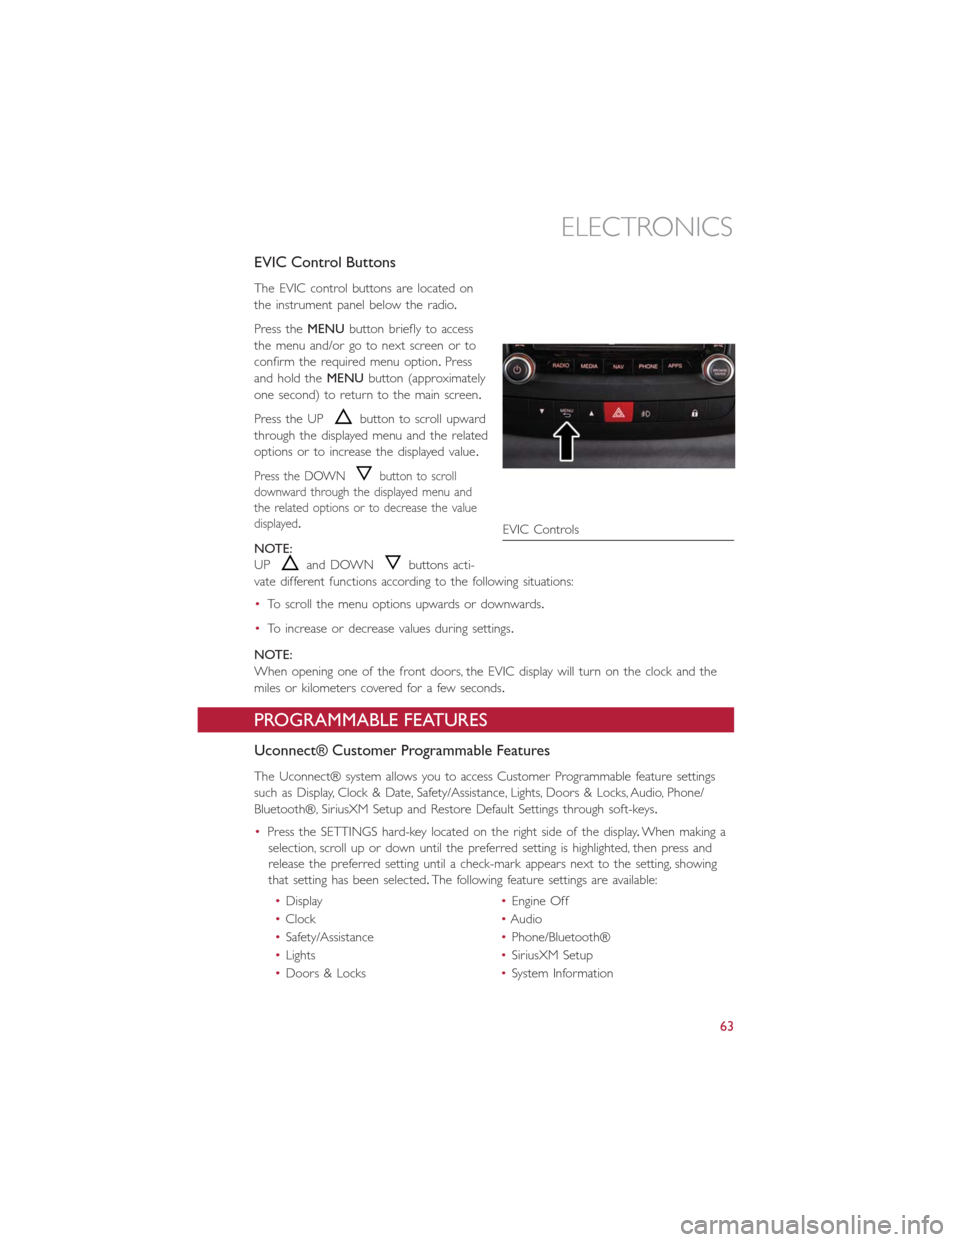
EVIC Control Buttons
The EVIC control buttons are located on
the instrument panel below the radio.
Press theMENUbutton briefly to access
the menu and/or go to next screen or to
confirm the required menu option.Press
and hold theMENUbutton (approximately
one second) to return to the main screen.
Press the UP
button to scroll upward
through the displayed menu and the related
options or to increase the displayed value.
Press the DOWNbutton to scroll
downward through the displayed menu and
the related options or to decrease the value
displayed.
NOTE:
UP
and DOWNbuttons acti-
vate different functions according to the following situations:
•To scroll the menu options upwards or downwards.
•To increase or decrease values during settings.
NOTE:
When opening one of the front doors, the EVIC display will turn on the clock and the
miles or kilometers covered for a few seconds.
PROGRAMMABLE FEATURES
Uconnect® Customer Programmable Features
The Uconnect® system allows you to access Customer Programmable feature settings
such as Display, Clock & Date, Safety/Assistance, Lights, Doors & Locks, Audio, Phone/
Bluetooth®, SiriusXM Setup and Restore Default Settings through soft-keys.
•Press the SETTINGS hard-key located on the right side of the display.When making a
selection, scroll up or down until the preferred setting is highlighted, then press and
release the preferred setting until a check-mark appears next to the setting, showing
that setting has been selected.The following feature settings are available:
•Display•Engine Off
•Clock•Audio
•Safety/Assistance•Phone/Bluetooth®
•Lights•SiriusXM Setup
•Doors & Locks•System Information
EVIC Controls
ELECTRONICS
63
Page 69 of 116
POWER OUTLETS
•The front power outlet is located in
front of the shift lever, between the two
cupholders.
•The rear power outlet is located in the
left rear cargo area.
NOTE:
•Do not exceed the maximum power of
160 Watts (13 Amps) at 12 Volts.If the
160 Watt (13 Amp) power rating is ex-
ceeded, the fuse protecting the system
will need to be replaced.
•Power outlets are designed for accessory
plugs only.Do not insert any other
object in the power outlet as this will
damage the outlet and blow the fuse.
Improper use of the power outlet can
cause damage not covered by your new
vehicle warranty.
•F85 Fuse 15A Blue Front Power Outlet
•F86 Fuse 15A Blue Rear Power Outlet
ELECTRONICS
67
Page 102 of 116

FUSES
Underhood Fuses
•The Front Distribution Unit is located on the drivers side of the engine compartment,
next to the battery.To access the fuses, press the release tabs and remove the cover.
•The ID number of the electrical component corresponding to each fuse can be found
on the back of the cover.
Cavity Maxi Fuse Mini Fuse Description
F01 60 Amp Blue Body Controller
F02 60 Amp BlueBody Controller Rear Distribution
Unit
F03 20 Amp Yellow Ignition Switch
F04 40 Amp Orange Anti-Lock Brake Pump
F05 70 Amp Tan Electric Power Steering
F06 30 Amp Green Radiator Fan - Low Speed
F07 50 Amp Red Radiator Fan - High Speed
F08 40 Amp Orange Blower Motor
F09 7.5 Amp Brown Transmission
F10 15 Amp Blue Horn
F11 10 Amp Red Powertrain
F14 20 Amp Yellow Power Outlet 115V
F15 15 Amp Blue Transmission
F16 7.5 Amp Brown Transmission Powertrain
F17 10 Amp Red Powertrain
F18 5 Amp Tan Powertrain (Multiair – If Equipped)
F19 7.5 Amp Brown Air Conditioning
F20 30 Amp Green Rear Defroster
MAINTAINING YOUR VEHICLE
100
Page 103 of 116

Cavity Maxi Fuse Mini Fuse Description
F21 15 Amp Blue Fuel Pump
F23 20 Amp Yellow Anti-Lock Brake Valves
F24 7.5 Amp Brown Stability Control System
F30 5 Amp Tan After Run Pump
F81 70 Amp Tan PTC (Secondary)
F82 40 Amp Orange Transmission
F83 40 Amp Orange PTC (Primary)
F84 7.5 Amp Brown Transmission
F85 15 Amp Blue Front Power Outlet 12V
F86 15 Amp Blue Rear Power Outlet 12V
F88 7.5 Amp Brown Heated Mirrors
Interior Fuses
•The interior fuse panel is part of the Body Control Module (BCM) and is located on
the driver's side under the instrument panel.
CavityVehicle Fuse
NumberMini Fuse Description
1 F12 7.5 Amp Brown Right Low Beam
2 F32 7.5 Amp BrownFront and Rear Ceiling Lights Trunk
and Door Courtesy Lights
3 F53 7.5 Amp Brown Instrument Panel Node
4 F38 20 Amp Yellow Central Door Locking
5 F36 15 Amp BlueDiagnostic Socket, Car Radio, Climate
Control System, TPMS, Sunroof
6 F43 20 Amp Yellow Bi-Directional Washer
7 F48 20 Amp Yellow Passenger Power Window
MAINTAINING YOUR VEHICLE
101
Page 104 of 116

CavityVehicle Fuse
NumberMini Fuse Description
8 F13 7.5 Amp Brown Left Low Beam, Headlamp Leveling
9 F50 7.5 Amp Brown Airbag
10 F51 5 Amp TanCar Radio Switch, Climate Control
System, Stop Light, Clutch, Reverse
Gear, Sunroof, Parking Sensor, Rear
Camera
11 F37 7.5 Amp BrownStop Light Switch, Instrument Panel
Node
12 F49 5 Amp TanExterior Mirror, GPS, Electric Mirror,
Parking Sensor
13 F31 5 Amp Tan Climate Control, Seat Regulation
14 F47 20 Amp Yellow Driver Power Window
Rear Interior Fuses
•The rear interior fuse panel is located on the driver's side in the rear compartment.
CavityVehicle Fuse
NumberMini Fuse Description
1 F61 15 Amp Blue Lumbar Regulation Seats
2 F62 15 Amp Blue Heated Seats
3 F64 20 Amp Yellow Hi Fi System
4 F65 20 Amp Yellow Sun Blind
5 F66 20 Amp Yellow Sunroof
6 F90 7.5 Amp Brown Left High Beam
7 F91 7.5 Amp Brown Right High Beam
8 F92 7.5 Amp Brown Left Fog Light
9 F93 7.5 Amp Brown Right Fog Light
10 F33 5 Amp Tan BSM, ESP
11 F34 20 Amp Yellow Rear Left Passenger Window
12 F49 20 Amp Yellow Rear Right Passenger Window
MAINTAINING YOUR VEHICLE
102
Page 110 of 116
FREQUENTLY ASKED QUESTIONS
GETTING STARTED
•How do I install my LATCH Equipped Child Seat? pg.13
•How do I adjust my rear seat? pg.17
ELECTRONICS
•What Sound System do I have? pg.32
•How do I set the clock on my radio? pg.35
•How do I set the presets on my radio? pg.36
•How do I use my USB/Audio Jack (AUX)? pg.38
•How do I pair my cell phone via Uconnect® Phone (Bluetooth® Hands Free Calling)?
pg.39
UTILITY
•How much can I tow with my FIAT 500L? pg.68
•How do I tow my FIAT 500L behind another vehicle? pg.68
WHAT TO DO IN EMERGENCIES
•What do I do if my TPMS warning light is blinking? pg.71
•How do I Jump-Start my vehicle? pg.86
•What should I do if my engine overheats? pg.74
•How do I change a flat tire? pg.75
MAINTAINING YOUR VEHICLE
•Where is my underhood fuse block located? pg.100
•Where is my interior fuse block located? pg.101
•What type of oil do I use? pg.95
•How often should I change my engines oil? pg.96
•What should my tire pressure be set at? pg.103
FAQ’s
108