2014 DODGE DURANGO audio
[x] Cancel search: audioPage 101 of 188
Disc Operation
•Your vehicle may have a remote CD player located in the lower center console storage bin.
• CD/Disc Mode is entered by either inserting a CD/Disc or by touching the “Media” buttonlocated on the side of the display. Once in Media Mode, select “Disc”.
• Gently insert one CD into the CD player with the CD label facing as indicated on the illustration located on the Disc player.
Seek Up/Down Buttons
• Press to seek through Disc tracks.
• Hold either button to bypass tracks without stopping.
Browse
• Touch the “Browse” soft-key to scroll through and select a desired track on the Disc. Touch the “Exit” soft-key if you wish to cancel the browse function.
MEDIA HUB – PLAYING iPod®/USB/MP3 DEVICES
• There are many ways to play music from iPod®/MP3 players or USB devices through yourvehicle's sound system.
Audio Jack (AUX)
• The AUX allows a portable device, such as an MP3 player or an iPod®, to be plugged into the radio and utilize the vehicle’s sound system, using a 3.5 mm audio cable, to amplify
the source and play through the vehicle speakers.
• Touching the Media soft-key then choose AUX source will change the mode to auxiliary device if the audio jack is connected, allowing the music from your portable device to be
heard through the vehicle's speakers. In order to activate the AUX, plug in the audio jack.
• The functions of the portable device are controlled using the device buttons. The volume may be controlled using the radio or portable device.
• To route the audio cable out of the center console, use the access cut out in the front of the console.
USB Port
• Connect your iPod® or compatible device using a USB cable into the USB Port. USB Memory sticks with audio files can also be used. Then, audio from the device can be
played on the vehicle’s sound system while providing metadata (artist, track title, album,
etc.) information on the radio display.
• When connected, the iPod®/compatible USB device can be controlled using the radio or Steering Wheel Audio Controls to play, skip to the next or previous track, browse, and list
the contents.
• The iPod® battery charges when plugged into the USB port (if supported by the specific device).
• To route the USB/iPod® cable out of the center console, use the access cut out.
ELECTRONICS
99
Page 102 of 188
NOTE:
• When connecting your iPod® device for the first time, the system may take severalminutes to read your music, depending on the number of files. For example, the system
will take approximately five minutes for every 1000 songs loaded on the device. Also
during the reading process, the Shuffle and Browse functions will be disabled. This
process is needed to ensure the full use of your iPod® features and only happens the first
time it is connected. After the first time, the reading process of your iPod® will take
considerably less time unless changes are made or new songs are added to the playlist.
• The USB port supports certain Mini, Classic, Nano, Touch, and iPhone® devices. The USB port also supports playing music from compatible external USB Mass Storage Class
memory devices. Some iPod® software versions may not fully support the USB port
features. Please visit Apple’s website for iPod® software updates.
SD Card
• Play songs stored on an SD card inserted into the SD card slot.
• Song playback can be controlled using the radio or Steering Wheel Audio Controls to play, skip to the next or previous track, browse, and list the contents.
Bluetooth® Streaming Audio
• If equipped with Uconnect® Voice Command, your Bluetooth®-equipped iPod® devices, cell phones or other media players, may also be able to stream music to your vehicle's
sound system. Your connected device must be Bluetooth®-compatible, and paired with
your system (see Uconnect® Phone for pairing instructions). You can access the music
from your connected Bluetooth® device by touching the Bluetooth® soft-key while in
Media mode.
Uconnect®
8.4A & 8.4AN Media Hub
(USB, AUX Ports) Media Hub
(SD, USB,
AUX Ports) Remote USB
Port (Fully
Functional) Remote USB
Port (Charg- ing Only) Dual Charg-
ing Ports
-SSOO
S = Standard Equipment
O = Optional Equipment
ELECTRONICS
100
Page 110 of 188
Phonebook
• Uconnect® radios automatically downloads your phonebook from your paired phone, ifthis feature is supported by your phone. Entries are updated each time that the phone is
connected. If your phone book entries do not appear, check the settings on your phone.
Some phones require you to enable this feature manually.
• Your phonebook can be browsed on your radio screen, but editing can only be done on your phone. To browse, touch the “Phone” soft-key, then the “Phonebook” soft-key.
• Favorite phonebook entries can be saved as Favorites for quicker access. Favorites are shown at the top of your main phone screen.
Voice Command Tips
• Using complete names (i.e; Call John Doe vs. Call John) will result in greater systemaccuracy.
• You can “chain” commands together for faster results. Say “Call John Doe, mobile”, for example.
• If you are listening to available voice command options, you do not have to listen to the entire list. When you hear the command that you need, press the
button on the
steering wheel, wait for the beep and say your command.
Changing The Volume
• Start a dialogue by pressing the Phone button, then say a command for example
- "Help".
• Use the radio ON/OFF VOLUME rotary knob to adjust the volume to a comfortable level while the Uconnect® system is speaking. Please note the volume setting for Uconnect®
is different than the audio system.
NOTE:
To access help, press the Uconnect® Phone
button on the steering wheel and say
"help." Touch the display or push either
orbutton and say "cancel" to cancel
the help session.
ELECTRONICS
108
Page 111 of 188
Voice Text Reply (Not Compatible With iPhone®)
• Once your Uconnect® system is paired with a compatible mobile device, the system canannounce a new incoming text message, and read it to your over the vehicle audio
system. You can reply to the message using Voice Recognition, by selecting, or saying
one of the 18 pre-defined messages.
• Here’s How:
Press the Uconnect® Phone buttonand wait for the beep, then say “reply.”
Uconnect® will give the following prompt: “ Please say the message you would like to send.”
Wait for the beep and say one of the pre-defined messages. (If you are not sure, you can say
“help”). Uconnect® will then read the pre-defined messages allowed. As soon as you hear
the message you would like to send, you can interrupt the list of prompts by pressing the
Uconnect® phone button and saying the phrase. Uconnect® will confirm the message by
reading it back to you. Then press the Phone button and say “Send.”
PRE-DEFINED VOICE TEXT REPLY RESPONSES
Yes. Stuck in Traffic. See you later.
No. Start without me. I’ll be Late.
Okay. Where are you?
I will be
minutes late.
Call me. Are you there yet?
I’ll call you later. I need directions.
See you in
of minutes.
I’monmyway.
Can’t talk right now.
I’m lost. Thanks.
• Voice texting reply and voice texting features require a compatible mobile device en-
abled with Bluetooth® Message Access Profile (MAP). iPhone® and some other smart-
phones do not currently support Bluetooth® MAP. Visit www.UconnectPhone.com for
system and device compatibility.
• Want to dictate a personal message? You must first register with Uconnect® Access (U.S. residents only) to take advantage of a new, cloud-based Voice Texting service, an
enhancement to Voice Text Reply.
VOICE COMMAND QUICK REFERENCE
Uconnect® 8.4AN Voice Command Quick Reference
• If the Uconnect® Voice Commandbutton exists on your steering wheel, you have
the Voice Command feature, which is optimized for the driver. The Voice Command
feature lets you keep your hands on the wheel, and your eyes on the road.
• When you press the Voice Command
button located on the steering wheel, you
will hear a beep. After the beep, give your command. If you do not know what commands
to say, you can say “help” and the system will provide options to you. If you ever wish to
interrupt the system while it lists options, press the Voice Command
button,
after the beep, say your command.
ELECTRONICS
109
Page 117 of 188
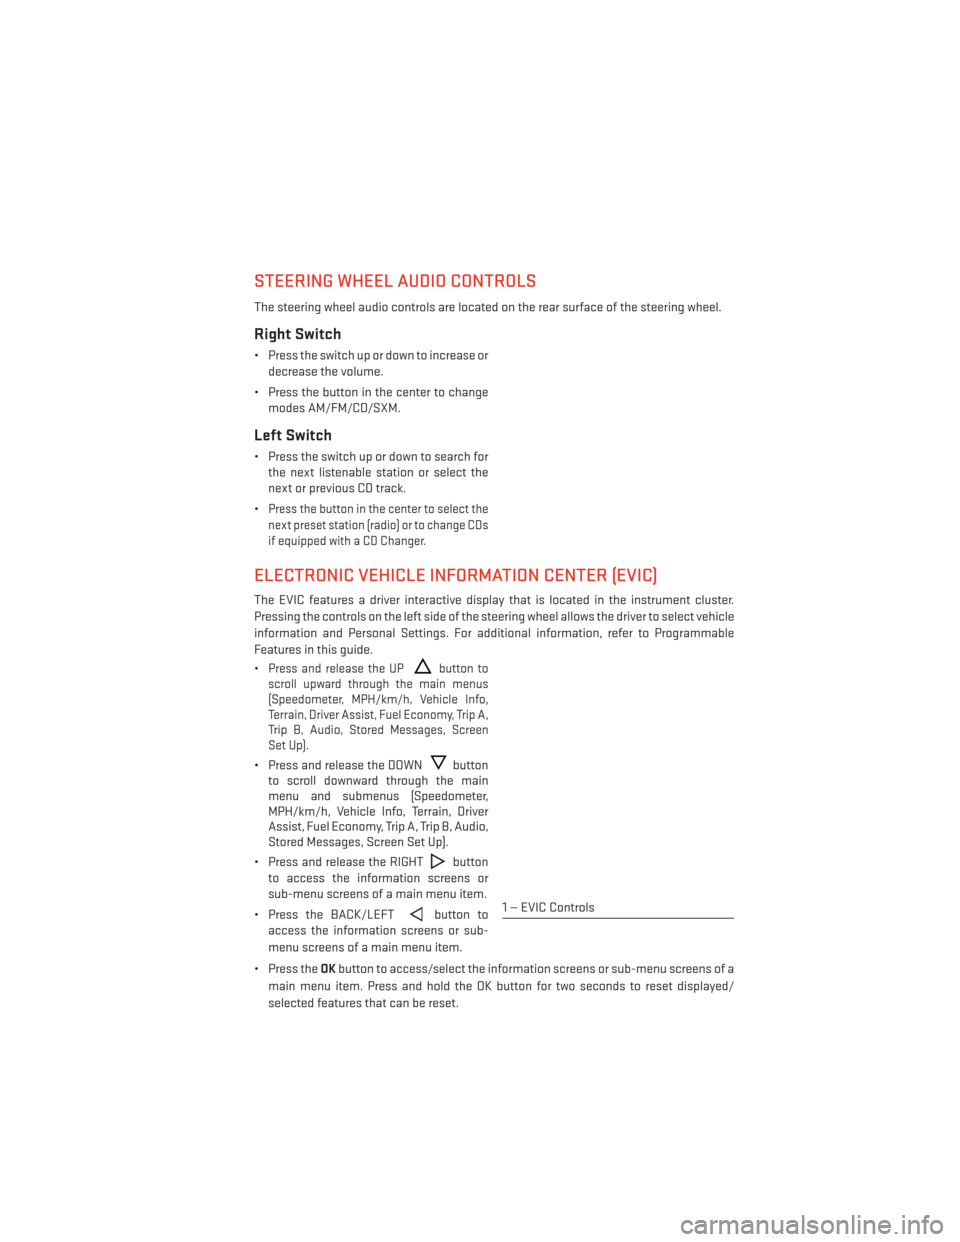
STEERING WHEEL AUDIO CONTROLS
The steering wheel audio controls are located on the rear surface of the steering wheel.
Right Switch
• Press the switch up or down to increase ordecrease the volume.
• Press the button in the center to change modes AM/FM/CD/SXM.
Left Switch
• Press the switch up or down to search forthe next listenable station or select the
next or previous CD track.
•
Press the button in the center to select the
next preset station (radio) or to change CDs
if equipped with a CD Changer.
ELECTRONIC VEHICLE INFORMATION CENTER (EVIC)
The EVIC features a driver interactive display that is located in the instrument cluster.
Pressing the controls on the left side of the steering wheel allows the driver to select vehicle
information and Personal Settings. For additional information, refer to Programmable
Features in this guide.
•
Press and release the UPbutton to
scroll upward through the main menus
(Speedometer, MPH/km/h, Vehicle Info,
Terrain, Driver Assist, Fuel Economy, Trip A,
Trip B, Audio, Stored Messages, Screen
Set Up).
• Press and release the DOWNbutton
to scroll downward through the main
menu and submenus (Speedometer,
MPH/km/h, Vehicle Info, Terrain, Driver
Assist, Fuel Economy, Trip A, Trip B, Audio,
Stored Messages, Screen Set Up).
• Press and release the RIGHT
button
to access the information screens or
sub-menu screens of a main menu item.
• Press the BACK/LEFT
button to
access the information screens or sub-
menu screens of a main menu item.
• Press the OKbutton to access/select the information screens or sub-menu screens of a
main menu item. Press and hold the OK button for two seconds to reset displayed/
selected features that can be reset.1 — EVIC Controls
ELECTRONICS
115
Page 118 of 188
Compass Calibration
This compass is self-calibrating, which eliminates the need to set the compass manually.
When the vehicle is new, the compass may appear erratic and the EVIC will display “CAL”
until the compass is calibrated.
You may also calibrate the compass by completing one or more 360 degree turns (in an area
free from large metal or metallic objects) until the “CAL” message displayed in the EVIC
turns off. The compass will now function normally.
ECO
The ECO message will appear in your EVIC display whenever you are driving in a fuel
efficient manner.
This feature allows you to monitor when you are driving in a fuel efficient manner, and it can
be used to modify driving habits in order to increase fuel economy.
PROGRAMMABLE FEATURES
EVIC Programmable Features
The EVIC can be used to view the following main menu items:
NOTE:
Depending on the vehicles options, feature settings may vary.
• Speedometer• Trip
• MPH to km/h • Audio
• Vehicle Info • Stored Messages
• Driver Assist • Screen Setup
• Fuel Economy • Speed Warning - If Equipped
NOTE:
Refer to your Owner's Manual on the DVD for further information.
Uconnect® Customer Programmable Features
The Uconnect® system allows you to access Customer Programmable feature settings
such as Display, Clock, Safety/Assistance, Lights, Doors & Locks, Auto-On Comfort &
Remote Start, Engine Off Operation, Compass Settings, Audio, Trailer Brake, Phone/
Bluetooth®, Suspension and SiriusXM Setup and System Information through soft-keys.
• Press the SETTINGS button (Uconnect® 5.0), or press the “Apps” button (Uconnect® 8.4)
located near the bottom of the touchscreen, then press the “Settings” button on the
touchscreen to access the Settings screen. When making a selection, scroll up or down
until the preferred setting is highlighted, then press and release the preferred setting
until a check-mark appears next to the setting, showing that setting has been selected.
ELECTRONICS
116
Page 119 of 188
The following feature settings are available:
• Display• Clock
• Safety/Assistance • Doors & Locks
• Auto-On Comfort & Remote Start • Engine Off Options
• Phone/Bluetooth® • Audio
• Lights • SiriusXM Setup
• Compass (Uconnect® 5.0) • Trailer Brake
• Suspension • System Information
• Units • Voice
NOTE:
Depending on the vehicles options, feature settings may vary.
EVIC Screen Setup
The following settings allow you to change what information is displayed in the instrument
cluster as well as the location that information is displayed.
• Compass • Fuel Economy Info
• Date • Speed
• Time • Range to Empty
• Outside Temp
Trip A
• Press and release the UP or DOWN arrow button until the Trip A icon is highlighted in the EVIC (Toggle left or right to select Trip A or Trip B). Press and release the OK button to
display the Trip A information.
Trip B
• Press and release the UP or DOWN arrow button until the Trip B icon is highlighted in theEVIC (Toggle left or right to select Trip A or Trip B). Press and release the OK button to
display the Trip B information.
Fuel Economy
Press and release the UP or DOWN arrow button until the Fuel Economy icon is highlighted.
Press the RIGHT arrow button and the next screen will display the following:
• Average Fuel Economy/Miles Per Gallon (MPG Bargraph)
• Range To Empty (RTE)
• Current Miles Per Gallon (MPG)
ELECTRONICS
117
Page 168 of 188

Cavity Cartridge Fuse Micro FuseDescription
F39 30 Amp Pink Power Liftgate — If Equipped
F40 10 Amp Red Daytime Running Lights
F42 20 Amp Yellow Horn
F44 10 Amp RedDiagnostic Port
F46 10 Amp Red Tire Pressure Monitor — If Equipped
F49 10 Amp Red Integrated Central Stack / Climate
Control
F50 20 Amp Yellow Air Suspension Control Module —
If Equipped
F51 10 Amp Red Ignition Node Module / Keyless Igni-
tion / Steering Column Lock
F52 5 Amp TanBattery Sensor
F53 20 Amp Yellow Trailer Tow – Left Turn/Stop Lights —
If Equipped
F56 15 Amp Blue Additional Content (Diesel engine
only)
F57 15 Amp BlueTransmission
F59 10 Amp Red Purging Pump (Diesel engine only)
F60 15 Amp Blue Transmission Control Module
F62 10 Amp RedAir Conditioning Clutch
F63 20 Amp Yellow Ignition Coils (Gas), Urea Heater
(Diesel)
F64 25 Amp Natural Fuel Injectors / Powertrain
F66 10 Amp Red Sunroof / Passenger Window
Switches / Rain Sensor
F67 15 Amp Blue CD / DVD / Bluetooth Hands-free
Module — If Equipped
F68 20 Amp YellowRear Wiper Motor
F70 20 Amp YellowFuel Pump Motor
F71 30 Amp GreenAudio Amplifier
F73 15 Amp BlueHID Headlamps Right
F74 20 Amp Yellow Brake Vacuum Pump — If Equipped
F76 10 Amp Red Antilock Brakes/Electronic
Stability Control
F77 10 Amp Red Drivetrain Control Module/Front Axle
Disconnect Module
F78 10 Amp Red Engine Control Module / Electric
Power Steering — If Equipped
F80 10 Amp Red Universal Garage Door Opener /
Compass / Anti-Intrusion Module
F81 20 Amp Yellow Trailer Tow Right Turn/Stop Lights
MAINTAINING YOUR VEHICLE
166