2014 DODGE CHARGER light
[x] Cancel search: lightPage 34 of 148

Instrument Panel Dimmer
• Rotate the dimmer control to the extreme bottom position to fully dim the instrumentpanel lights and prevent the interior lights from illuminating when a door is opened.
• Rotate the dimmer control up to increase the brightness of the instrument panel and cupholders when the parking lights or headlights are on.
• Rotate the dimmer control up to the next detent position to fully brighten the odometer and radio when the parking lights or headlights are on.
• Rotate the dimmer control up to the last detent position to turn on the interior lighting.
• If your vehicle is equipped with a touchscreen, the dimming is programmable through the Uconnect® system. Refer to “Uconnect® Settings ” in “Understanding Your Instrument
Panel” in the Owner's Manual on the DVD for further details.
Ambient Light Dimmer
• Rotate the ambient light control up or down to increase or decrease the brightness of therelease handle, map pocket (if equipped), overhead and floor lighting when the parking
lights or headlights are on.
• Rotate to extreme bottom position to turn off.
SPEED CONTROL
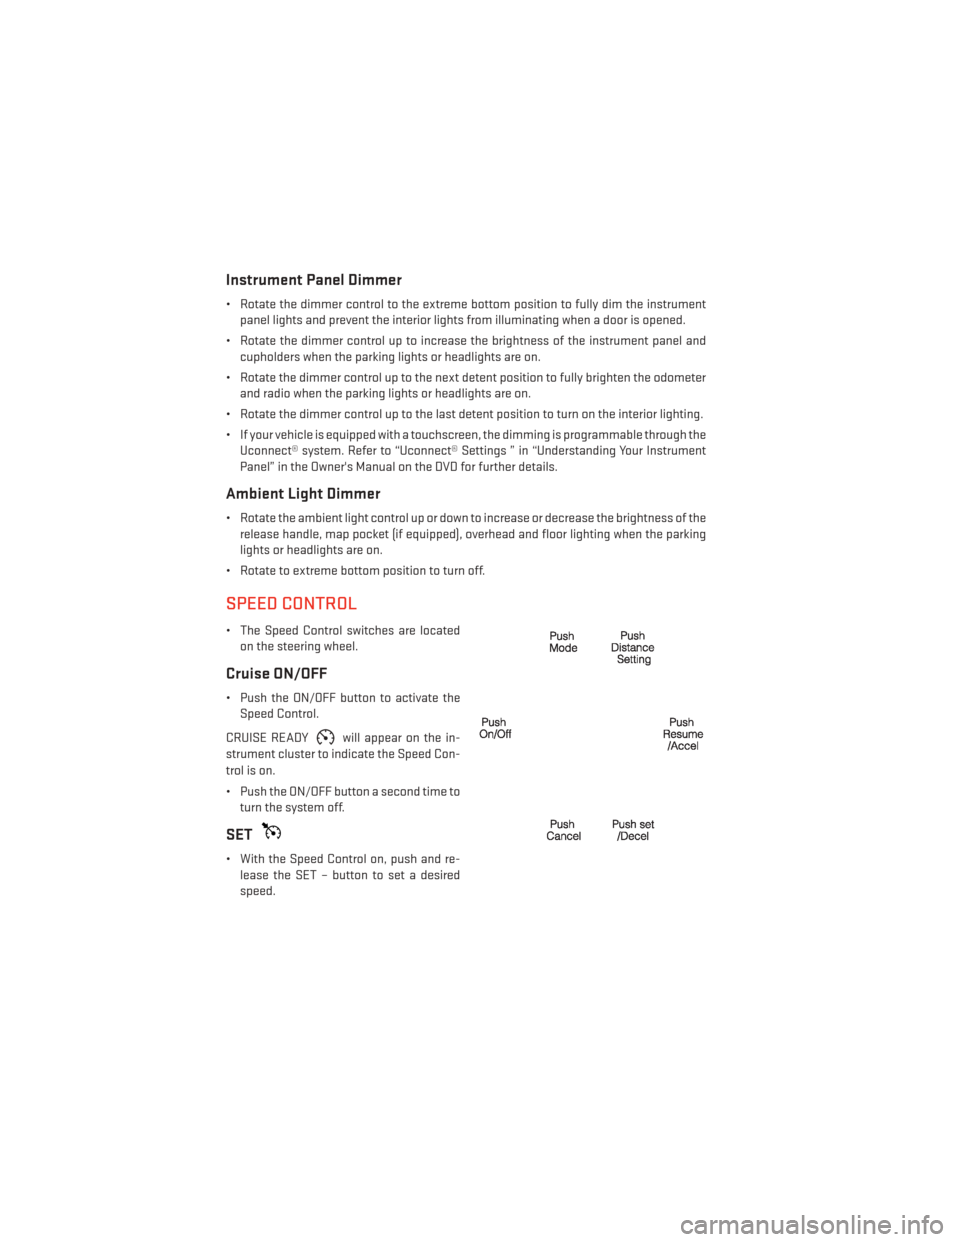
• The Speed Control switches are located on the steering wheel.
Cruise ON/OFF
• Push the ON/OFF button to activate theSpeed Control.
CRUISE READY
will appear on the in-
strument cluster to indicate the Speed Con-
trol is on.
• Push the ON/OFF button a second time to turn the system off.
SET
• With the Speed Control on, push and re-lease the SET – button to set a desired
speed.
OPERATING YOUR VEHICLE
32
Page 39 of 148

ELECTRONIC SHIFTER — 3.6L ENGINE
•Your vehicle is equipped with a fuel efficient
8 speed transmission. The electronic shift
lever in this vehicle does not slide like a
conventional shifter. Instead, the shift lever
is spring loaded and moves forward and
rearward, always returning to the center po-
sition after each gear is selected.
•The transmission gear range (PRND) is dis-
played both on the shift lever and in the
Electronic Vehicle Information Center
(EVIC).
Shifting From PARK To DRIVE
• Firmly depress the brake pedal, press the
lock button on the shift lever, then pull
and hold the shift lever fully rearward until
“D” is highlighted in the EVIC.
• To shift back into PARK from DRIVE, bring the vehicle to a complete stop, firmly de-
press the brake pedal, press the lock but-
ton on the shift lever, then push and hold
the shift lever fully forward until “P” is
highlighted in the EVIC.
Shifting From REVERSE To NEUTRAL
• Pull the shift lever rearward to the first detent and release. “N” will be highlighted
in the EVIC.
• To shift back into REVERSE from NEU- TRAL, firmly depress the brake pedal,
press the lock button on the shift lever, then push the shift lever forward to the first detent
and release. “R” will be highlighted in the EVIC.
Shifting From NEUTRAL To DRIVE
• Firmly depress the brake pedal, press the lock button on the shift lever, then pull the shift lever rearward and release. “D” will be highlighted in the EVIC.
• To shift back into NEUTRAL from DRIVE, firmly depress the brake pedal, press the lock button on the shift lever, then push the shift lever forward and release. “N” will be
highlighted in the EVIC.
OPERATING YOUR VEHICLE
37
Page 40 of 148

Shifting From REVERSE To DRIVE
• Bring the vehicle to a complete stop, firmly depress the brake pedal, then pull the shiftlever fully rearward and release when “D” is highlighted in the EVIC.
• To shift back into REVERSE from DRIVE, bring the vehicle to a complete stop, firmly depress the brake pedal, press the lock button on the shift lever, then push the shift lever
forward to the second detent and release when “R” is highlighted in the EVIC.
Shifting From DRIVE To SPORT/LOW
Vehicles Equipped With SPORT Mode
• To shift from DRIVE to SPORT, pull the shift lever rearward until “S” is highlighted in the EVIC.
• To shift back into DRIVE from SPORT, pull the shift lever rearward until “D” is highlighted in the EVIC.
Vehicles Equipped With LOW Mode
• To shift from DRIVE to LOW, pull the shift lever rearward until “L” is highlighted in the EVIC.
• To shift back into DRIVE from LOW, pull the shift lever rearward until “D” is highlighted in the EVIC.
TRANSMISSION MODES/AUTOSTICK®
Sport Mode (If Equipped)
Sport mode is driver selectable and provides more aggressive shifting, for spirited driving.
• Shifting into SPORT mode can be done anytime the vehicle is in the “D” Drive position.Simply tap the shift lever rearward and release when “S” is highlighted in the EVIC.
Tapping the shift lever rearward a second time will return the vehicle to the “D” Drive
position.
NOTE:
When the vehicle is in SPORT mode, a “SPORT” message and green flag icon will be
illuminated in the instrument cluster.
Low Mode (If Equipped)
• LOW range should be used for engine braking when descending very steep grades. In this range, the transmission will downshift for increased engine braking. To switch between
DRIVE and LOW modes, tap the shift lever rearward.
Shifting into LOW can be done anytime the vehicle is in the “D” DRIVE position.
OPERATING YOUR VEHICLE
38
Page 43 of 148

Climate Control Knobs
• For your convenience the climate controls can also be operated by using the soft-keyslocated on the touchscreen or the climate control knobs below the touchscreen.
Automatic Operation
• Press the AUTO button.
• Select the desired temperature by pressing the Temperature Control buttons.
• The system will maintain the set temperature automatically.
Air Conditioning (A/C)
• If the air conditioning button is pressed while in the AUTO mode, the system will entermanual mode with the air conditioning on.
Air Recirculation
• Use recirculation for maximum A/C operation.
• For window defogging, turn the recirculation button off.
• If the recirculation button is pressed while in the AUTO mode, the indicator light mayflash three times to indicate the cabin air is being controlled automatically.
Heated Mirrors
The mirrors are heated to melt frost or ice. This feature is activated whenever you turn on
the rear window defroster.
OPERATING YOUR VEHICLE
41
Page 74 of 148

Uconnect® 4.3 Customer Programmable Features
• The Uconnect® 4.3 system allows you to access Customer Programmable feature set-tings such as Display, Clock, Safety/Assistance, Lights, Doors & Locks, Heated Seats,
Engine Off Operation, Compass Settings, Audio, Phone/Bluetooth and SiriusXM Setup
through hard-keys and soft-keys.
• Press the Settings hard-key to on the right side of the unit to access the Settings screen, use the Page Up/Down soft-keys to scroll through the following settings. The following
feature settings are available:
• Display • Clock
• Safety / Assistance • Doors & Locks
• Heated Seats • Engine Off Options
• Compass Settings • Audio
• Phone / Bluetooth • SiriusXM Setup
• Auto-On Comfort & Remote Start • Lights
Uconnect® 8.4 Customer Programmable Features
• The Uconnect® 8.4 system allows you to access Customer Programmable feature set- tings such as Display, Clock, Safety/Assistance, Lights, Doors & Locks, Heated Seats,
Engine Off Operation, Compass Settings, Audio, Phone/Bluetooth and SiriusXM Setup
through soft-keys.
• Touch the More soft-key on the bottom of the screen, then touch the Settings soft-key to access the Settings screen. When making a selection, scroll up or down until the
preferred setting is highlighted, then press and release the preferred setting until a
check-mark appears next to the setting, showing that setting has been selected. The
following feature settings are available:
• Display • Clock
• Safety & Driving Assistance • Doors & Locks
• Auto-On Comfort & Remote Start • Engine Off Options
• Compass Settings • Audio
• Phone / Bluetooth • SiriusXM Setup
• Lights
ELECTRONICS
72
Page 75 of 148

UNIVERSAL GARAGE DOOR OPENER
Universal Garage Door Opener (HomeLink®)
• HomeLink® replaces up to three hand-held transmitters that operate devices such asgarage door openers, motorized gates, lighting or home security systems. The
HomeLink® unit is powered by your vehicles 12 Volt battery.
• The HomeLink® buttons that are located in the overhead console or sunvisor designate the three different HomeLink® channels.
• The HomeLink® indicator is located above the center button.
Before You Begin Programming
HomeLink®
Ensure that your vehicle is parked outside of
the garage before you begin programming.
For efficient programming and accurate
transmission of the radio-frequency signal,
it is recommended that a new battery be
placed in the hand-held transmitter of the
device that is being programmed to the
HomeLink® system.
Erase all channels before you begin pro-
gramming. To erase the channels, place the
ignition switch into the ON/RUN position,
then press and hold the two outside HomeLink® buttons (I and III) for up to 20 seconds or
until the red indicator flashes.
NOTE:
Erasing all channels should only be performed when programming HomeLink® for the first
time. Do not erase channels when programming additional buttons.
If you have any problems, or require assistance, please call toll-free 1-800-355-3515 or, on
the Internet at www.HomeLink.com for information or assistance.
Programming A Rolling Code
NOTE:
For programming Garage Door Openers that were manufactured after 1995. These Garage Door
Openers can be identified by the “LEARN” or “TRAIN” button located where the hanging antenna
is attached to the Garage Door Opener. It is NOT the button that is normally used to open and
close the door. The name and color of the button may vary by manufacturer.
1. Place the ignition switch into the ON/RUN position.
2. Place the hand-held transmitter 1 to 3 in (3 to 8 cm) away from the HomeLink® button you wish to program while keeping the HomeLink® indicator light in view.
ELECTRONICS
73
Page 76 of 148

3. Simultaneously press and hold both the HomeLink® button you want to program and thehand-held transmitter button.
4. Continue to hold both buttons and observe the indicator light. The HomeLink® indicator will flash slowly and then rapidly after HomeLink® has received the frequency signal
from the hand-held transmitter. Release both buttons after the indicator light changes
from slow to rapid.
5. At the garage door opener motor (in the garage), locate the “LEARN” or “TRAINING” button. This can usually be found where the hanging antenna wire is attached to the
garage door opener motor. Firmly press and release the “LEARN” or “TRAINING” button.
NOTE:
You have 30 seconds in which to initiate the next step after the LEARN button has been
pressed.
6. Return to the vehicle and press the programmed HomeLink® button twice (holding the button for two seconds each time). If the device is plugged in and activates, program-
ming is complete.
NOTE:
If the device does not activate, press the button a third time (for two seconds) to complete
the training.
7. To program the remaining two HomeLink® buttons, repeat each step for each remaining button. DO NOT erase the channels.
Programming A Non-Rolling Code
NOTE:
For programming Garage Door Openers manufactured before 1995.
1. Turn the ignition switch to the ON/RUN position.
2. Place the hand-held transmitter 1 to 3 inches (3 to 8 cm) away from the HomeLink® button you wish to program while keeping the HomeLink® indicator light in view.
3. Simultaneously press and hold both the HomeLink® button you want to program and the hand-held transmitter button.
4. Continue to hold both buttons and observe the indicator light. The HomeLink® indicator will flash slowly and then rapidly after HomeLink® has received the frequency signal
from the hand-held transmitter. Release both buttons after the indicator light changes
from slow to rapid.
5. Press and hold the programmed HomeLink® button and observe the indicator light. If the indicator light stays on constantly, programming is complete and the garage door (or
device) should activate when the HomeLink® button is pressed.
6. To program the two remaining HomeLink® buttons, repeat each step for each remaining button. DO NOT erase the channels.
ELECTRONICS
74
Page 77 of 148

Using HomeLink®
• To operate, press and release the programmed HomeLink® button. Activation will nowoccur for the programmed device (e.g., garage door opener, gate operator, security
system, entry door lock, home/office lighting, etc.,). The hand-held transmitter of the
device may also be used at any time.
WARNING!
• Your motorized door or gate will open and close while you are programming the
universal transceiver. Do not program the transceiver if people or pets are in the path
of the door or gate.
• Do not run your vehicle in a closed garage or confined area while programming the
transceiver. Exhaust gas from your vehicle contains Carbon Monoxide (CO) which is
odorless and colorless. Carbon Monoxide is poisonous when inhaled and can cause
you and others to be severely injured or killed.
POWER OUTLET
• There are three 12 Volt electrical outletson this vehicle.
• The front 12 Volt power outlet has power available only when the ignition is placed
in the ACC or RUN position.
• The center console outlet is powered di- rectly from the battery (power available at
all times). Items plugged into this outlet
may discharge the battery and/or prevent
the engine from starting.
• There is also a 12 Volt power outlet lo- cated on the back of the center console for rear passengers. This power outlet has power
available only when the ignition is placed in the ACC or RUN position.
ELECTRONICS
75