Page 277 of 635

Service The ParkSense® Rear Park Assist
System
During vehicle start up, when the ParkSense® Rear Park
Assist System has detected a faulted condition, the
instrument cluster will actuate a single chime, once per
ignition cycle, and it will display the “CLEAN PARK
ASSIST”, “SERVICE PARK ASSIST” or “SERVICE PARK
ASSIST SYSTEM” message for five seconds. Refer to
“Electronic Vehicle Information Center (EVIC)” in “Un-
derstanding Your Instrument Panel” for further informa-
tion. When the shift lever is moved to REVERSE and the
system has detected a faulted condition, the EVIC will
display the “CLEAN PARK ASSIST”,�SERVICE PARK
ASSIST� or the “SERVICE PARK ASSIST SYSTEM” mes-
sage for as long as the vehicle is in REVERSE. Under this
condition, ParkSense® will not operate.
If “CLEAN PARK ASSIST” appears in the Electronic
Vehicle Information Center (EVIC) make sure the rear
fascia/bumper is clean and clear of snow, ice, mud, dirt or other obstruction and then cycle the ignition. If the
message continues to appear see an authorized dealer.
If “SERVICE PARK ASSIST” or “SERVICE PARK ASSIST
SYSTEM” appears in the EVIC, see an authorized dealer.
Cleaning The ParkSense® System
Clean the ParkSense® sensors with water, car wash soap
and a soft cloth. Do not use rough or hard cloths. Do not
scratch or poke the sensors. Otherwise, you could dam-
age the sensors.
ParkSense® System Usage Precautions
NOTE:
•
Ensure that the rear bumper is free of snow, ice, mud,
dirt and debris to keep the ParkSense® system oper-
ating properly.
• Jackhammers, large trucks, and other vibrations could
affect the performance of ParkSense®.
3
UNDERSTANDING THE FEATURES OF YOUR VEHICLE 275
Page 278 of 635

•When you turn ParkSense® off in DRIVE, the instru-
ment cluster will display �PARK ASSIST SYSTEM
OFF� for five seconds. Furthermore, once you turn
ParkSense® off, it remains off until you turn it on
again, even if you cycle the ignition key.
• When you move the shift lever to the REVERSE
position and ParkSense® is turned off, the EVIC will
display “PARK ASSIST SYSTEM OFF” message for as
long as the vehicle is in REVERSE.
• ParkSense®, when on, will MUTE the radio when it is
sounding a tone.
• Clean the ParkSense® sensors regularly, taking care
not to scratch or damage them. The sensors must not
be covered with ice, snow, slush, mud, dirt or debris.
Failure to do so can result in the system not working
properly. The ParkSense® system might not detect an obstacle behind the fascia/bumper, or it could provide
a false indication that an obstacle is behind the fascia/
bumper.
• Ensure the ParkSense® system is OFF if objects such as
bicycle carriers, trailer hitches, etc., are placed within
30 cm from the rear fascia/ bumper. Failure to do so
can result in the system misinterpreting a close object
as a sensor problem, causing the “SERVICE PARK
ASSIST SYSTEM” message to be displayed in the
EVIC.
276 UNDERSTANDING THE FEATURES OF YOUR VEHICLE
Page 279 of 635

CAUTION!
•ParkSense® is only a parking aid and it is unable to
recognize every obstacle, including small obstacles.
Parking curbs might be temporarily detected or not
detected at all. Obstacles located above or below
the sensors will not be detected when they are in
close proximity.
• The vehicle must be driven slowly when using
ParkSense® in order to be able to stop in time
when an obstacle is detected. It is recommended
that the driver looks over his/her shoulder when
using ParkSense®.
WARNING!
Drivers must be careful when backing up even when
using the Rear Park Assist system. Always check
(Continued)
WARNING! (Continued)
carefully behind your vehicle, and be sure to check
for pedestrians, animals, other vehicles, obstructions,
or blind spots before backing up. You are responsible
for the safety of your surroundings and must con-
tinue to pay attention while backing up. Failure to do
so can result in serious injury or death.
PARKVIEW® REAR BACK UP CAMERA — IF
EQUIPPED
Your vehicle may be equipped with the ParkView® Rear
Back Up Camera that allows you to see an on-screen
image of the rear surroundings of your vehicle whenever
the shift lever is put into REVERSE. The image will be
displayed on the touchscreen display along with a cau-
tion note to “check entire surroundings” across the top of
3
UNDERSTANDING THE FEATURES OF YOUR VEHICLE 277
Page 280 of 635

the screen. After five seconds this note will disappear.
The ParkView® camera is located on the rear of the
vehicle above the rear License plate.
When the vehicle is shifted out of REVERSE, the rear
camera mode is exited and the navigation or audio screen
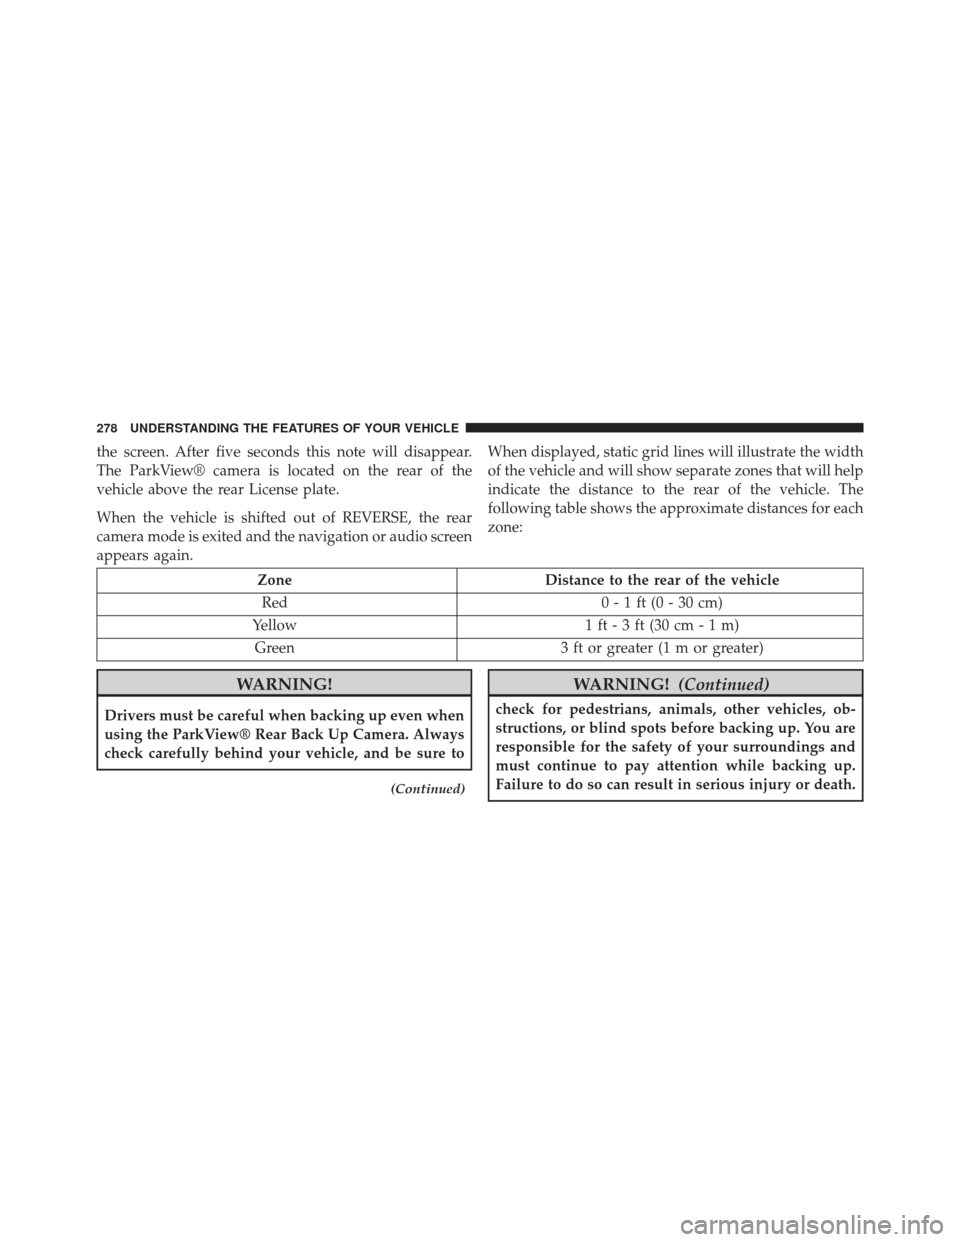
appears again.When displayed, static grid lines will illustrate the width
of the vehicle and will show separate zones that will help
indicate the distance to the rear of the vehicle. The
following table shows the approximate distances for each
zone:
Zone
Distance to the rear of the vehicle
Red 0 - 1 ft (0 - 30 cm)
Yellow 1 ft - 3 ft (30 cm - 1 m)
Green 3 ft or greater (1 m or greater)
WARNING!
Drivers must be careful when backing up even when
using the ParkView® Rear Back Up Camera. Always
check carefully behind your vehicle, and be sure to
(Continued)
WARNING!(Continued)
check for pedestrians, animals, other vehicles, ob-
structions, or blind spots before backing up. You are
responsible for the safety of your surroundings and
must continue to pay attention while backing up.
Failure to do so can result in serious injury or death.
278 UNDERSTANDING THE FEATURES OF YOUR VEHICLE
Page 311 of 635
UNDERSTANDING YOUR INSTRUMENT PANEL
CONTENTS
�INSTRUMENT PANEL FEATURES ..........311
� INSTRUMENT CLUSTER .................312
� INSTRUMENT CLUSTER — PREMIUM .......313
� INSTRUMENT CLUSTER DESCRIPTIONS .....314
� ELECTRONIC VEHICLE INFORMATION
CENTER (EVIC) ...................... .324
▫ Electronic Vehicle Information Center (EVIC)
Displays .......................... .326
▫ EVIC White Telltale Lights ...............327
▫ EVIC Amber Telltales ...................328 ▫
EVIC Red Telltale Lights ................329
▫ Gear Shift Indicator (GSI) — If Equipped . . . .332
▫ Oil Change Due ..................... .334
▫ Fuel Economy ....................... .334
▫ Vehicle Speed ....................... .336
▫ Trip Info .......................... .337
▫ Units ............................. .337
▫ Vehicle Info (Customer Information Features) . .337
▫ Messages # ......................... .338
▫ Turn Menu OFF ...................... .339
4
Page 317 of 635

7. Odometer Display/Electronic Vehicle Information
Center (EVIC) Display
Odometer Display
The odometer display shows the total distance the ve-
hicle has been driven.
U.S. Federal regulations require that upon transfer of
vehicle ownership, the seller certify to the purchaser the
correct mileage that the vehicle has been driven. If your
odometer needs to be repaired or serviced, the repair
technician should leave the odometer reading the same
as it was before the repair or service. If s/he cannot do so,
then the odometer must be set at zero, and a sticker must
be placed in the door jamb stating what the mileage was
before the repair or service. It is a good idea for you to
make a record of the odometer reading before the repair/
service, so that you can be sure that it is properly reset, or
that the door jamb sticker is accurate if the odometer
must be reset at zero.Electronic Vehicle Information Center (EVIC) Display
The Electronic Vehicle Information Center (EVIC) fea-
tures a driver-interactive display that is located in the
instrument cluster. For further information, refer to
“Electronic Vehicle Information Center (EVIC) found in
Understanding Your Instrument Panel”.
The Shift Lever Indicator is self-contained within the
EVIC display. It displays the gear position of the auto-
matic transmission.
4
UNDERSTANDING YOUR INSTRUMENT PANEL 315
Page 318 of 635

NOTE:•You must apply the brakes before shifting from
PARK.
• The highest available transmission gear is displayed
in the lower right corner of the Electronic Vehicle
Information Center (EVIC) whenever the Electronic
Range Select (ERS) feature is active. Use the +/-
selector on the shift lever to activate ERS. Refer to
“Automatic Transmission” in “Starting And Operat-
ing” for further information.
8. Tire Pressure Monitoring Telltale Light — If Equipped
Each tire, including the spare (if provided),
should be checked monthly when cold and
inflated to the inflation pressure recommended
by the vehicle manufacturer on the vehicle
placard or tire inflation pressure label. (If your vehicle
has tires of a different size than the size indicated on the vehicle placard or tire inflation pressure label, you should
determine the proper tire inflation pressure for those
tires.)
As an added safety feature, your vehicle has been
equipped with a Tire Pressure Monitoring System
(TPMS) that illuminates a low tire pressure telltale when
one or more of your tires is significantly under-inflated.
Accordingly, when the low tire pressure telltale illumi-
nates, you should stop and check your tires as soon as
possible, and inflate them to the proper pressure. Driving
on a significantly under-inflated tire causes the tire to
overheat and can lead to tire failure. Under-inflation also
reduces fuel efficiency and tire tread life, and may affect
the vehicle’s handling and stopping ability.
Please note that the TPMS is not a substitute for proper
tire maintenance, and it is the driver ’s responsibility to
maintain correct tire pressure, even if under-inflation has
not reached the level to trigger illumination of the TPMS
low tire pressure telltale.
316 UNDERSTANDING YOUR INSTRUMENT PANEL
Page 326 of 635
ELECTRONIC VEHICLE INFORMATION CENTER
(EVIC)
The Electronic Vehicle Information Center (EVIC) fea-
tures a driver-interactive display that is located in the
instrument cluster.The EVIC Menu items consists of the following:
•
Radio Info
• Fuel Economy
• Vehicle Speed
• Trip Info
• Tire Pressure
• Vehicle Info (Stored Warning Messages)
• Cruise
• Messages
• Turn Menu OFF
Electronic Vehicle Information Center (EVIC)
324 UNDERSTANDING YOUR INSTRUMENT PANEL