2014 DODGE CHALLENGER turn signal
[x] Cancel search: turn signalPage 3 of 148

INTRODUCTION/WELCOME
WELCOME FROM CHRYSLER GROUP LLC . . . 2
CONTROLS AT A GLANCE
DRIVER COCKPIT................4
INSTRUMENT CLUSTER ............6
GETTING STARTED
KEYFOB .....................8
REMOTE START.................9
KEYLESS ENTER-N-GO™ ...........10
VEHICLE SECURITY ALARM ..........13
SEATBELT ...................14
SUPPLEMENTAL RESTRAINT SYSTEM (SRS) —
AIRBAGS ....................15
CHILD RESTRAINTS ..............16
FRONT SEATS .................19
REARSEAT ...................21
HEATEDSEATS .................21
TILT/TELESCOPING STEERING COLUMN . . . 22
OPERATING YOUR VEHICLE
ENGINE BREAK-IN RECOMMENDATIONS . . . 23
TURN SIGNAL/WIPER/WASHER/HIGH BEAM
LEVER ......................24
HEADLIGHT SWITCH ..............25
SPEED CONTROL ................26
AUTOSTICK® ..................28
SPORT MODE – IF EQUIPPED .........29
MANUAL TRANSMISSION 1 TO 4 SKIP SHIFT . . 29AUTOMATIC TEMPERATURE CONTROLS
(ATC) ......................30
POWER SUNROOF...............31
WIND BUFFETING ...............33
ELECTRONICS
YOUR VEHICLE'S SOUND SYSTEM ......34
Uconnect® 130 .................36
Uconnect® 130 WITH SiriusXM SATELLITE
RADIO ......................38
Uconnect® 430/430N .............41
Uconnect® 730N ................50
SiriusXM SATELLITE RADIO/TRAVEL LINK . . 61
STEERING WHEEL AUDIO CONTROLS ....65
Uconnect® PHONE ...............65
Uconnect® VOICE COMMAND .........68
Bluetooth® STREAMING AUDIO ........71
iPod®/USB/MP3 CONTROL ..........71
ELECTRONIC VEHICLE INFORMATION CENTER
(EVIC) ......................72
PROGRAMMABLE FEATURES .........73
UNIVERSAL GARAGE DOOR OPENER
(HomeLink®) ..................75
POWER OUTLETS ...............77
UTILITY
TRAILER TOWING WEIGHTS (MAXIMUM TRAILER
WEIGHTRATINGS) ...............79
RECREATIONAL TOWING (BEHIND
MOTORHOME, ETC.) ..............79
SRT
AUTOSTICK®..................80ELECTRONIC CONTROL DAMPING SYSTEM . . . 81SRT PERFORMANCE FEATURES .......82
SUMMER/THREE-SEASON TIRES ......128
WHAT TO DO IN EMERGENCIES
ROADSIDE ASSISTANCE............84
INSTRUMENT CLUSTER WARNING LIGHTS . . 84
IF YOUR ENGINE OVERHEATS .........89
JACKING AND TIRE CHANGING ........90
BATTERY LOCATION ..............96
TIREFIT KIT ...................96
JUMP-STARTING ...............102
SHIFT LEVER OVERRIDE ...........104
TOWING A DISABLED VEHICLE .......105
FREEING A STUCK VEHICLE .........106
EVENT DATA RECORDER (EDR) ........107
MAINTAINING YOUR VEHICLE
OPENING THE HOOD.............108
ENGINE COMPARTMENT ...........109
FLUIDS AND CAPACITIES ...........112
MAINTENANCE SCHEDULE ..........116
FUSES .....................126
SUMMER/THREE-SEASON TIRES ......128
TIRE PRESSURES ...............129
WHEEL AND WHEEL TRIM CARE ......130
EXTERIOR BULBS ..............130
CONSUMER ASSISTANCE
CHRYSLER GROUP LLC CUSTOMER
CENTER....................131
CHRYSLER CANADA INC. CUSTOMER
CENTER ....................131
ASSISTANCE FOR THE HEARING
IMPAIRED ...................131
PUBLICATIONS ORDERING ..........131
REPORTING SAFETY DEFECTS IN THE
UNITEDSTATES ................132
MOPAR® ACCESSORIES
AUTHENTIC ACCESSORIES BY MOPAR® . . 133
FREQUENTLY ASKED QUESTIONS
FAQ’s ......................134
INDEX....................136
TABLE OF CONTENTS
Page 6 of 148

DRIVER COCKPIT
1. Headlight Switch pg. 25
2. Electronic Vehicle Information Center (EVIC) Controls pg. 72
3. Turn Signal/Wiper/Washer/High Beams Lever (behind steering wheel) pg. 24
4. Steering Wheel Paddle Shifters pg. 28
5. Electronic Vehicle Information Center (EVIC) Display
6. Instrument Cluster pg. 6
7. Speed Control pg. 26
8. Engine Start/Stop Button Automatic Transmission pg. 12
9. Your Vehicle's Sound System pg. 34
10. Automatic Climate Controls pg. 30
11. Glove Compartment
12. Power Outlet pg. 77
CONTROLS AT A GLANCE
4
Page 9 of 148

Indicators
- Turn Signal Indicators
- High Beam Indicator
- Front Fog Light Indicator
- Vehicle Security Indicator*
- Electronic Speed Control Set
- Electronic Stability Control(ESC) Off Indicator*
- Windshield Washer Fluid LowIndicator***
- Door Ajar Indicator***
- Decklid Ajar Indicator***
- Sport Mode Indicator
* If equipped
** Bulb Check with Key On
***On vehicles equipped with a Premium Instrument Cluster, this display shows
the Electronic Vehicle Information Cen-
ter (EVIC) messages when the appropri-
ate conditions exist.
CONTROLS AT A GLANCE
7
Page 10 of 148

KEY FOB
Locking And Unlocking The Doors
• Push and release the LOCK button on theRKE transmitter to lock all doors. The turn
signal lights will flash and the horn will
chirp to acknowledge the signal.
• Push and release the UNLOCK button on the RKE transmitter once to unlock the
driver's door or twice within five seconds
to unlock all doors. The turn signal lights
will flash to acknowledge the unlock sig-
nal. The illuminated entry system will also
turn on.
1st Push Of Key Fob Unlocks
This feature lets you program the system to
unlock either the driver's door or all doors on
the first push of the UNLOCK button on the
RKE transmitter. To change the current set-
ting, refer to your Owner's Manual on the DVD
for further information.
Opening The Trunk
• Press the Trunk Release button on the transmitter two times within five seconds to open the trunk.
Panic Alarm
• Press the PANIC button once to turn the panic alarm on.
• Wait approximately three seconds and press the button a second time to turn the panicalarm off.
Emergency Key
• Should the battery in the vehicle or the Key Fob transmitter go dead, there is anemergency key located in the Key Fob that can be used for locking and unlocking the
doors. To remove the emergency key, slide the button at the top of the Key Fob sideways
with your thumb and then pull the key out with your other hand.
1 — Decklid
2—Lock
3 — Unlock
4 — Remote Start
5 — Emergency Key
GETTING STARTED
8
Page 26 of 148

TURN SIGNAL/WIPER/WASHER/HIGH BEAM LEVER
Turn Signal/Lane Change Assist
• Tap the lever up or down once and the turn signal (right or left) will flash three times andautomatically turn off.
Front Wipers
Intermittent, Low And High Operation
• Rotate the end of the lever to the first detent position for one of five intermittent settings,the second detent for low wiper operation and the third detent for high wiper operation.
Mist
• Rotate the end of the lever downward when a single wipe is desired.
NOTE:
The mist feature does not activate the washer pump; therefore, no washer fluid will be
sprayed on the windshield. The wash function must be activated in order to spray the
windshield with washer fluid.
Washer Operation
• Push the end of the lever inward and hold for as long as spray is desired.
High Beam Operation
•Push the lever forward to activate the high beams. Pull the lever toward you for flash to pass.
NOTE:
For safe driving, turn off the high beams when oncoming traffic is present to prevent
headlight glare and as a courtesy to other motorists.
OPERATING YOUR VEHICLE
24
Page 52 of 148

Acquiring Satellites
• The GPS Satellite strength bars indicate the strength of your satellite reception.
• Acquiring satellite signals can take a few minutes. When at least one of the bars is green,your device has acquired satellite signals.
• You may experience delays receiving satellite signals when in areas with an obstructed view to the sky, such as garages, tunnels, or large cities with tall buildings.
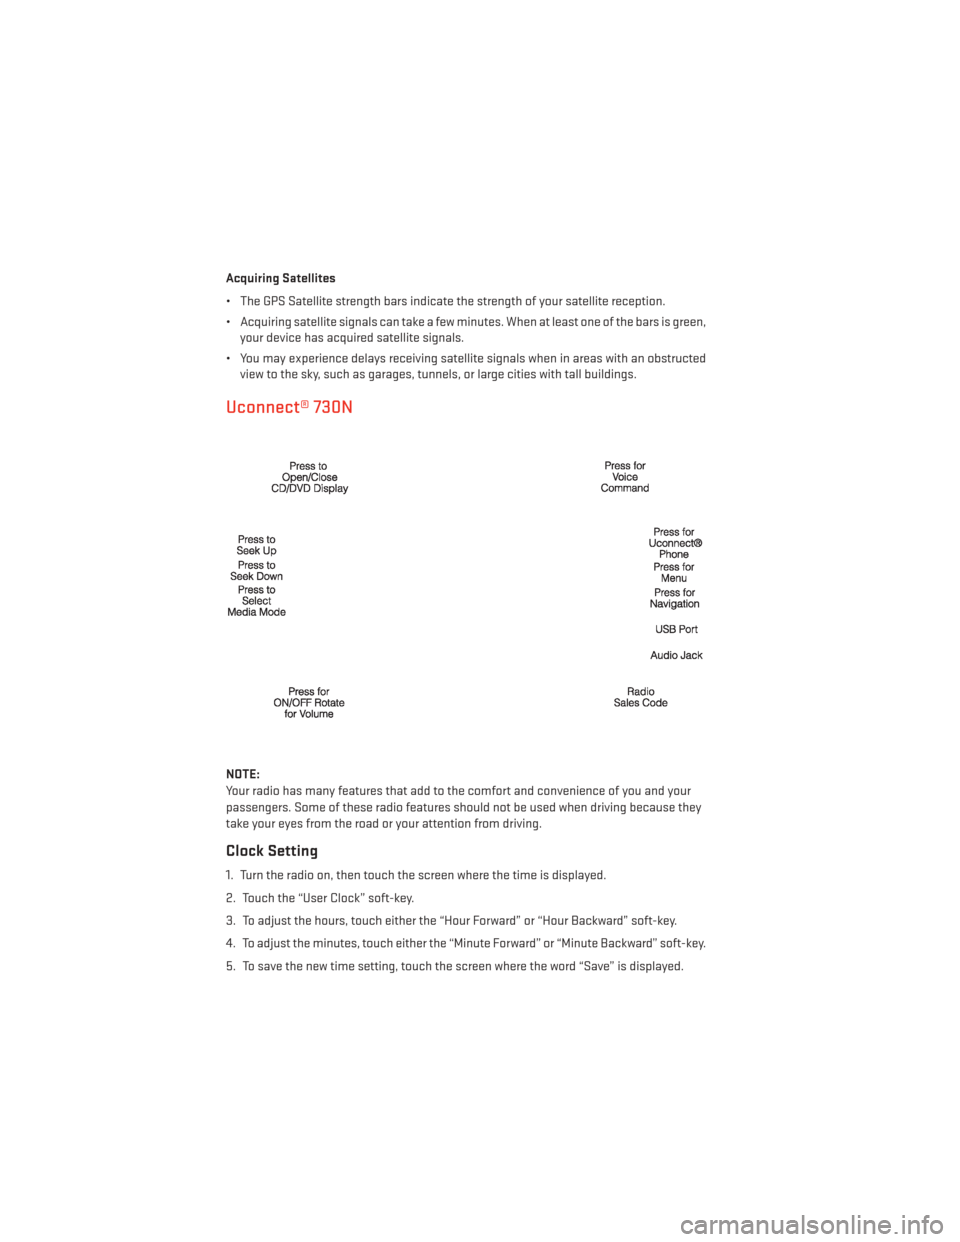
Uconnect® 730N
NOTE:
Your radio has many features that add to the comfort and convenience of you and your
passengers. Some of these radio features should not be used when driving because they
take your eyes from the road or your attention from driving.
Clock Setting
1. Turn the radio on, then touch the screen where the time is displayed.
2. Touch the “User Clock” soft-key.
3. To adjust the hours, touch either the “Hour Forward” or “Hour Backward” soft-key.
4. To adjust the minutes, touch either the “Minute Forward” or “Minute Backward” soft-key.
5. To save the new time setting, touch the screen where the word “Save” is displayed.
ELECTRONICS
50
Page 70 of 148

Changing The Volume
• Start a dialogue by pressing the “Phone” button, then adjust the volume during a
normal call.
• Use the radio ON/OFF VOLUME rotary knob to adjust the volume to a comfortable level while the Uconnect® system is speaking. Please note the volume setting for Uconnect®
is different than the audio system.
WARNING!
• Any voice commanded system should be used only in safe driving conditions follow-
ing applicable laws regarding phone use. Your attention should be focused on safely
operating the vehicle. Failure to do so may result in a collision causing you and others
to be severely injured or killed.
• In an emergency, to use Uconnect® Phone, your mobile phone must be:
• turned on,
• paired to Uconnect® Phone,
• and have network coverage.
Uconnect® VOICE COMMAND
Voice Command Operation
• The Uconnect® Voice Command system allows you to control your AM, FM radio, satelliteradio, disc player, HDD, Uconnect® Phone, a memo recorder, and supported portable
media devices.
• When you press the “Voice Command” button
located on the radio faceplate or
steering wheel, you will hear a beep. The beep is your signal to give a command. If you do
not say a command within a few seconds, the system will present you with a list of
options. If you ever want to interrupt the system while it lists options, press the “Voice
Command” button
, listen for the BEEP, and say your command.
NOTE:
Visit http://www.driveuconnect.com/features/voiceCommand/ for more info on which
voice command features apply to your vehicle.
• Start a dialogue by pressing the “Voice Command” button
, you will hear a beep.
The beep is your signal to give a command. Below are a list of voice commands for each
of the different modes.
ELECTRONICS
68
Page 76 of 148

Key Fob Programmable Features
The following features may also be programmed by using the Key Fob transmitter or the
ignition switch and driver's door lock switch.
NOTE:
Pushing the LOCK button while you are inside the vehicle will activate the Vehicle Security
Alarm. Opening a door with the Vehicle Security Alarm activated will cause the alarm to
sound. Push the UNLOCK button to deactivate the Vehicle Security Alarm.
Unlock On First Push
To unlock either the driver's side, or all doors, on the first push of the UNLOCK button:
• Push and hold the LOCK button for at least four seconds, but no longer than 10 seconds.Then, push and hold the UNLOCK button while still holding the LOCK button.
• Release both buttons at the same time.
Auto Unlock Doors On Exit
To have all of the vehicle doors unlock when any door is opened:
• Enter your vehicle and close all the doors, and fasten your seat belt.
• Cycle the ignition switch between the LOCK and ON position four times, ending in the LOCK position (do not start the engine).
• Push the power door UNLOCK switch to unlock the doors. A single chime will indicate that programming is complete.
Sound Horn With Lock
To turn the horn chirp on or off when the doors are locked:
• Push the LOCK button and PANIC button at the same time for at least four seconds, butno longer than 10 seconds.
• Release both buttons at the same time.
Flashing Lights With Lock
The turn signal lights flash when the doors are locked, which can be turned on or off. To turn
this feature on or off:
• Push and hold the UNLOCK button and the LOCK button at the same time for at least four seconds, but no longer than 10 seconds.
• Release both buttons at the same time.
ELECTRONICS
74