Page 333 of 529

WARNING!
Fluid level should be checked on a level surface and
with the engine off to prevent injury from moving
parts and to ensure accurate fluid level reading. Do
not overfill. Use only manufacturer’s recommended
power steering fluid.
If necessary, add fluid to restore to the proper indicated
level. With a clean cloth, wipe any spilled fluid from all
surfaces. Refer to “Fluids, Lubricants, and Genuine
Parts” in “Maintaining Your Vehicle” for further informa-
tion.
FUEL SAVER TECHNOLOGY — IF EQUIPPED
This feature offers improved fuel economy by shutting
off four of the engine’s eight cylinders during light load
and cruise conditions. The system is automatic with no
driver inputs or additional driving skills required. NOTE:
This system may take some time to return to full
functionality after a battery disconnect.
PARKING BRAKE
Before leaving the vehicle, make sure that the parking
brake is fully applied and place the shift lever in the
PARK or REVERSE (manual transmission only) position.
When the parking brake is applied and the ignition
switch is in the ON position (RUN position with Keyless
Enter-N-Go™), the “Brake Warning Light” in the instru-
ment cluster will illuminate.
NOTE:
• When the parking brake is applied and the transmis-
sion is placed in gear, the “Brake Warning Light” will
flash. If vehicle speed is detected, a chime will sound
to alert the driver. Fully release the parking brake
before attempting to move the vehicle.
332 STARTING AND OPERATING
Page 334 of 529
•This light only shows that the parking brake is ap-
plied. It does not show the degree of brake application.
When parking on a hill, it is important to turn the front
wheels toward the curb on a downhill grade and away
from the curb on an uphill grade. For vehicles equipped
with an automatic transmission, apply the parking brake
before placing the shift lever in PARK, otherwise the load
on the transmission locking mechanism may make it
difficult to move the shift lever out of PARK. The parking
brake should always be applied whenever the driver is
not in the vehicle.Manual Transmission — If Equipped
The foot operated parking brake is positioned below the
lower left corner of the instrument panel. To release the
parking brake, pull the parking brake release handle.
Manual Transmission Parking Brake Release
5
STARTING AND OPERATING 333
Page 340 of 529
does not come on when the ignition switch is turned to
the ON position, have the bulb repaired as soon as
possible.
If both the “Brake Warning Light” and the “ABS Warning
Light” remain on, the ABS and EBD systems are not
functioning. Immediate repair to the ABS system is
required.
ELECTRONIC BRAKE CONTROL SYSTEM
Your vehicle is equipped with an advanced electronic
brake control system commonly referred to as ESC. This
system includes the Anti-Lock Brake System (ABS), the
Traction Control System (TCS), the Brake Assist System
(BAS), and the Electronic Stability Control (ESC). These
systems work together to enhance both vehicle stability
and control in various driving conditions.An additional electronic brake control feature called Hill
Start Assist (HSA) is standard on manual transmission
models.
Anti-Lock Brake System (ABS)
This system aids the driver in maintaining vehicle control
under adverse braking conditions by controlling hydrau-
lic brake pressure. This prevents wheel lock-up to help
avoid skidding on slippery surfaces during braking.
Refer to “Anti-Lock Brake System” in “Starting and
Operating” for further information.
WARNING!
The ABS cannot prevent the natural laws of physics
from acting on the vehicle, nor can it increase the
traction afforded by prevailing road conditions. The
(Continued)
5
STARTING AND OPERATING 339
Page 389 of 529
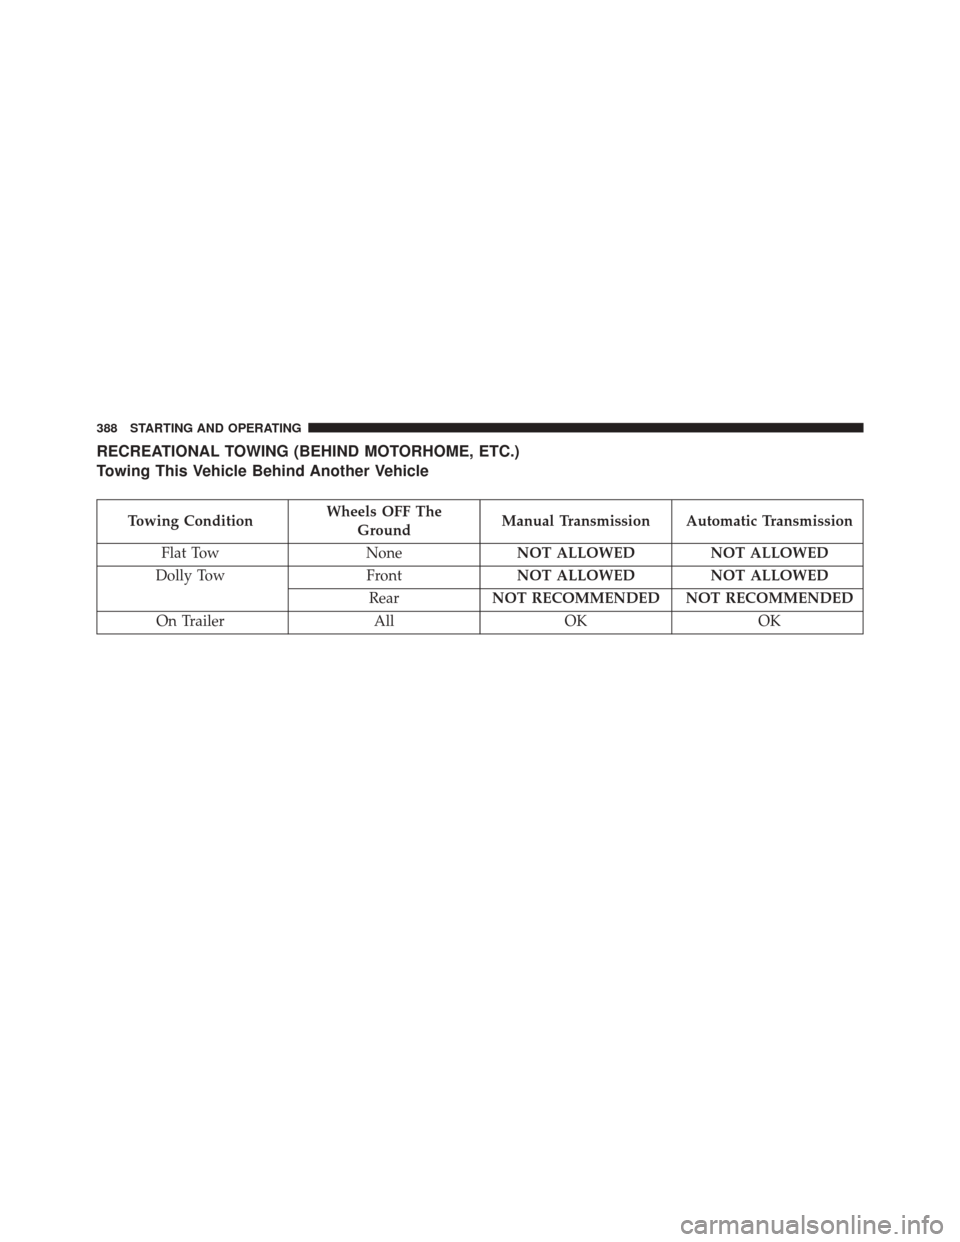
RECREATIONAL TOWING (BEHIND MOTORHOME, ETC.)
Towing This Vehicle Behind Another Vehicle
Towing ConditionWheels OFF The
Ground Manual Transmission Automatic Transmission
Flat Tow None NOT ALLOWED NOT ALLOWED
Dolly Tow FrontNOT ALLOWED NOT ALLOWED
Rear NOT RECOMMENDED NOT RECOMMENDED
On Trailer AllOK OK
388 STARTING AND OPERATING
Page 390 of 529
Automatic Transmission — If Equipped
Recreational towing (with rear wheels on the ground) is
NOT ALLOWED. The only acceptable method for tow-
ing this vehicle (behind another vehicle) is on a vehicle
trailer with all four wheelsOFFthe ground.
Use of a towing dolly (with rear wheels on the ground) is
NOT ALLOWED, as severe transmission damage will
occur. Use of a towing dolly (with front wheels on the
ground) is not recommended, as vehicle damage may
occur.
CAUTION!
Towing this vehicle in violation of the above require-
ments can cause severe transmission damage. Dam-
age from improper towing is not covered under the
New Vehicle Limited Warranty.
Manual Transmission — If Equipped
Recreational towing (with rear wheels on the ground) is
NOT ALLOWED. The only acceptable method for tow-
ing this vehicle (behind another vehicle) is on a vehicle
trailer with all four wheels OFFthe ground.
Use of a towing dolly (with rear wheels on the ground) is
NOT ALLOWED, as severe transmission damage will
occur. Use of a towing dolly (with front wheels on the
ground) is not recommended, as vehicle damage may
occur.
CAUTION!
Towing this vehicle in violation of the above require-
ments can cause severe transmission damage. Dam-
age from improper towing is not covered under the
New Vehicle Limited Warranty.
5
STARTING AND OPERATING 389
Page 392 of 529
WHAT TO DO IN EMERGENCIES
CONTENTS
�HAZARD WARNING FLASHERS ...........392
� IF YOUR ENGINE OVERHEATS ............392
� WHEEL AND TIRE TORQUE
SPECIFICATIONS ..................... .393
▫ Torque Specifications ...................394
� TIREFIT KIT — IF EQUIPPED .............395
▫ TIREFIT Storage ..................... .396
▫ TIREFIT Kit Components And Operation .....396
▫ TIREFIT Usage Precautions ...............397
▫ Sealing A Tire With TIREFIT ..............400�
JUMP-STARTING PROCEDURES ...........405
▫ Preparations For Jump-Start ..............406
▫ Jump-Starting Procedure ................407
� FREEING A STUCK VEHICLE .............409
� SHIFT LEVER OVERRIDE ................411
� TOWING A DISABLED VEHICLE ...........413
▫ Automatic Transmission .................415
▫ Manual Transmission ...................416
6
Page 401 of 529
WARNING!(Continued)
•TIREFIT Sealant solution contains latex. In case of
an allergic reaction or rash, consult a physician
immediately. Keep TIREFIT out of reach of chil-
dren. If swallowed, rinse mouth immediately with
plenty of water and drink plenty of water. Do not
induce vomiting! Consult a physician immediately.
Sealing A Tire With TIREFIT
(A) Whenever You Stop To Use TIREFIT:
1. Pull over to a safe location and turn on the vehicle’s Hazard Warning flashers.
2. Verify that the valve stem (on the wheel with the deflated tire) is in a position that is near to the ground.
This will allow the TIREFIT Hoses (6) and (7) to reach
the valve stem and keep the TIREFIT kit flat on the
ground. This will provide the best positioning of the kit when injecting the sealant into the deflated tire and
running the air pump. Move the vehicle as necessary
to place the valve stem in this position before proceed-
ing.
3. Place the transmission in PARK (auto transmission) or in Gear (manual transmission) and turn Off the igni-
tion.
4. Set the parking brake.
(B) Setting Up To Use TIREFIT:
1. Push in the Mode Select Knob (5) and turn to the Sealant Mode position.
2. Uncoil the Sealant Hose (6) and then remove the cap from the fitting at the end of the hose.
3. Place the TIREFIT kit flat on the ground next to the deflated tire.
400 WHAT TO DO IN EMERGENCIES
Page 402 of 529
4. Remove the cap from the valve stem and then screwthe fitting at the end of the Sealant Hose (6) onto the
valve stem.
5. Uncoil the Power Plug (8) and insert the plug into the vehicle’s 12 Volt power outlet.
NOTE: Do not remove foreign objects (e.g., screws or
nails) from the tire.
(C) Injecting TIREFIT Sealant Into The Deflated
Tire:
• Always start the engine before turning ON the TIRE-
FIT kit.
NOTE: Manual transmission vehicles must have the
parking brake engaged and the shift lever in NEUTRAL.
• After pressing the Power Button (4), the sealant (white
fluid) will flow from the Sealant Bottle (1) through the
Sealant Hose (6) and into the tire. NOTE:
Sealant may leak out through the puncture in the
tire.
If the sealant (white fluid) does not flow within0–10
seconds through the Sealant Hose (6):
1. Press the Power Button (4) to turn Off the TIREFIT kit. Disconnect the Sealant Hose (6) from the valve stem.
Make sure the valve stem is free of debris. Reconnect
the Sealant Hose (6) to the valve stem. Check that the
Mode Select Knob (5) is in the Sealant Mode position
and not Air Mode. Press the Power Button (4) to turn
On the TIREFIT kit.
2. Connect the Power Plug (8) to a different 12 Volt power outlet in your vehicle or another vehicle, if
available. Make sure the engine is running before
turning ON the TIREFIT kit.
3. The Sealant Bottle (1) may be empty due to previous use. Call for assistance.
6
WHAT TO DO IN EMERGENCIES 401