Page 313 of 529
Gear Ranges
DO NOT race the engine when shifting from PARK or
NEUTRAL into another gear range.
NOTE:
•After selecting any gear range, wait a moment to allow
the selected gear to engage before accelerating. This is
especially important when the engine is cold.
• If there is a need to restart the engine, be sure to cycle
the ignition to the OFF position before restarting.
Transmission gear engagement may be delayed after
restarting the engine if the ignition is not cycled to the
OFF position first.
PARK (P)
This range supplements the parking brake by locking the
transmission. The engine can be started in this range.
Never attempt to use PARK while the vehicle is in
motion. Apply the parking brake when leaving the
vehicle in this range.
When parking on a level surface, you may shift the
transmission into PARK first, and then apply the parking
brake.
When parking on a hill, apply the parking brake before
shifting the transmission to PARK, otherwise the load on
the transmission locking mechanism may make it diffi-
cult to move the shift lever out of PARK. As an added
precaution, turn the front wheels toward the curb on a
downhill grade and away from the curb on an uphill
grade.
312 STARTING AND OPERATING
Page 317 of 529
WARNING!
Do not coast in NEUTRAL and never turn off the
ignition to coast down a hill. These are unsafe
practices that limit your response to changing traffic
or road conditions. You might lose control of the
vehicle and have a collision.
CAUTION!
Towing the vehicle, coasting, or driving for any other
reason with the transmission in NEUTRAL can cause
severe transmission damage. Refer to “Recreational
Towing” in “Starting And Operating” and “Towing A
Disabled Vehicle” in “What To Do In Emergencies”
for further information.
DRIVE (D)
This range should be used for most city and highway
driving. It provides the smoothest upshifts and down-
shifts, and the best fuel economy. The transmission
automatically upshifts through underdrive first, second,
and third gears, direct fourth gear and overdrive fifth
gear. The DRIVE position provides optimum driving
characteristics under all normal operating conditions.
When frequent transmission shifting occurs (such as
when operating the vehicle under heavy loading condi-
tions, in hilly terrain, or traveling into strong head
winds), use the AutoStick® shift control (refer to
“AutoStick®” in this section for further information) to
select a lower gear. Under these conditions, using a lower
gear will improve performance and extend transmission
life by reducing excessive shifting and heat buildup.
316 STARTING AND OPERATING
Page 331 of 529
CAUTION!(Continued)
•Determine the condition of the road or the path
that is under water and if there are any obstacles in
the way before driving through the standing water.
• Do not exceed 5 mph (8 km/h) when driving
through standing water. This will minimize wave
effects.
• Driving through standing water may cause damage
to your vehicle’s drivetrain components. Always
inspect your vehicle’s fluids (i.e., engine oil, trans-
mission, axle, etc.) for signs of contamination (i.e.,
fluid that is milky or foamy in appearance) after
driving through standing water. Do not continue to
operate the vehicle if any fluid appears contami-
nated, as this may result in further damage. Such
damage is not covered by the New Vehicle Limited
Warranty.
(Continued)
CAUTION! (Continued)
•Getting water inside your vehicle’s engine can
cause it to lock up and stall out, and cause serious
internal damage to the engine. Such damage is not
covered by the New Vehicle Limited Warranty.
POWER STEERING
The standard power steering system will give you good
vehicle response and increased ease of maneuverability
in tight spaces. The system will provide mechanical
steering capability if power assist is lost.
If for some reason the power assist is interrupted, it will
still be possible to steer your vehicle. Under these condi-
tions, you will observe a substantial increase in steering
effort, especially at very low vehicle speeds and during
parking maneuvers.
330 STARTING AND OPERATING
Page 343 of 529
WARNING!
There may be situations on minor hills with a loaded
vehicle, or while pulling a trailer, when the system
will not activate and slight rolling may occur. This
could cause a collision with another vehicle or object.
Always remember the driver is responsible for brak-
ing the vehicle.
Disabling/Enabling HSA
If you wish to turn on or off the HSA system, it can be
done using the Customer Programmable Features in the
Electronic Vehicle Information Center (EVIC). Refer to
“Electronic Vehicle Information Center (EVIC)” in “Un-
derstanding Your Instrument Panel” for further informa-
tion.For vehicles not equipped with the EVIC, perform the
following steps:
NOTE:
You must complete Steps 1 through 8 within 90
seconds.
1. Center the steering wheel (front wheels pointing straight forward).
2. Shift the transmission into NEUTRAL.
3. Apply the parking brake.
4. Start the engine.
5. Release the clutch pedal (if equipped).
6. Rotate the steering wheel one-half turn to the left.
7.
Press the “ESC Off” switch (located in the lower switch
bank below the climate controls) four times within 20
seconds. The “ESC Activation/Malfunction Indicator
Light” should turn on and turn off two times.
342 STARTING AND OPERATING
Page 352 of 529
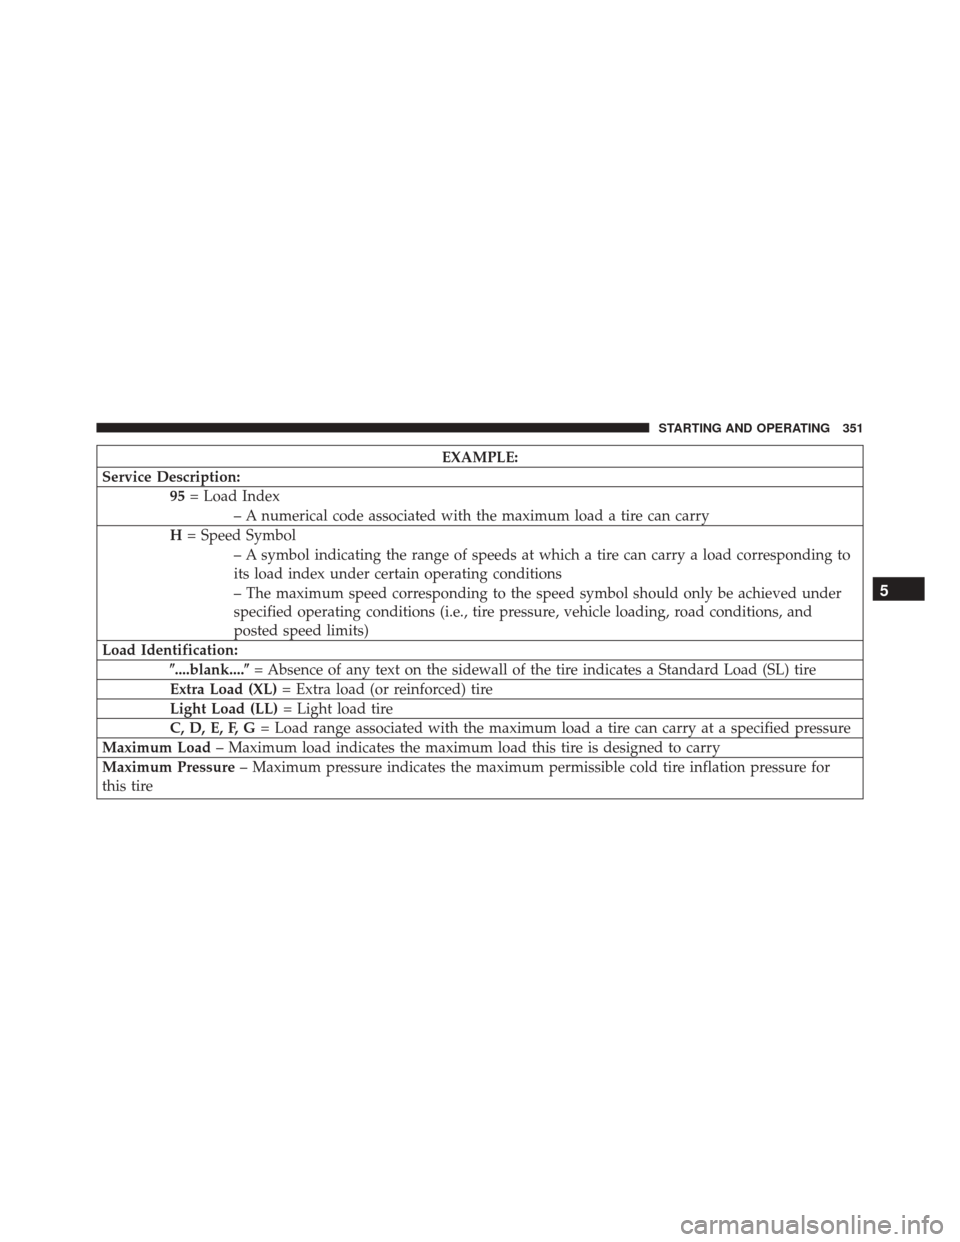
EXAMPLE:
Service Description: 95= Load Index
– A numerical code associated with the maximum load a tire can carry
H = Speed Symbol
– A symbol indicating the range of speeds at which a tire can carry a load corresponding to
its load index under certain operating conditions
– The maximum speed corresponding to the speed symbol should only be achieved under
specified operating conditions (i.e., tire pressure, vehicle loading, road conditions, and
posted speed limits)
Load Identification: �....blank....� = Absence of any text on the sidewall of the tire indicates a Standard Load (SL) tire
Extra Load (XL) = Extra load (or reinforced) tire
Light Load (LL) = Light load tire
C, D, E, F, G = Load range associated with the maximum load a tire can carry at a specified pressure
Maximum Load – Maximum load indicates the maximum load this tire is designed to carry
Maximum Pressure – Maximum pressure indicates the maximum permissible cold tire inflation pressure for
this tire
5
STARTING AND OPERATING 351
Page 363 of 529
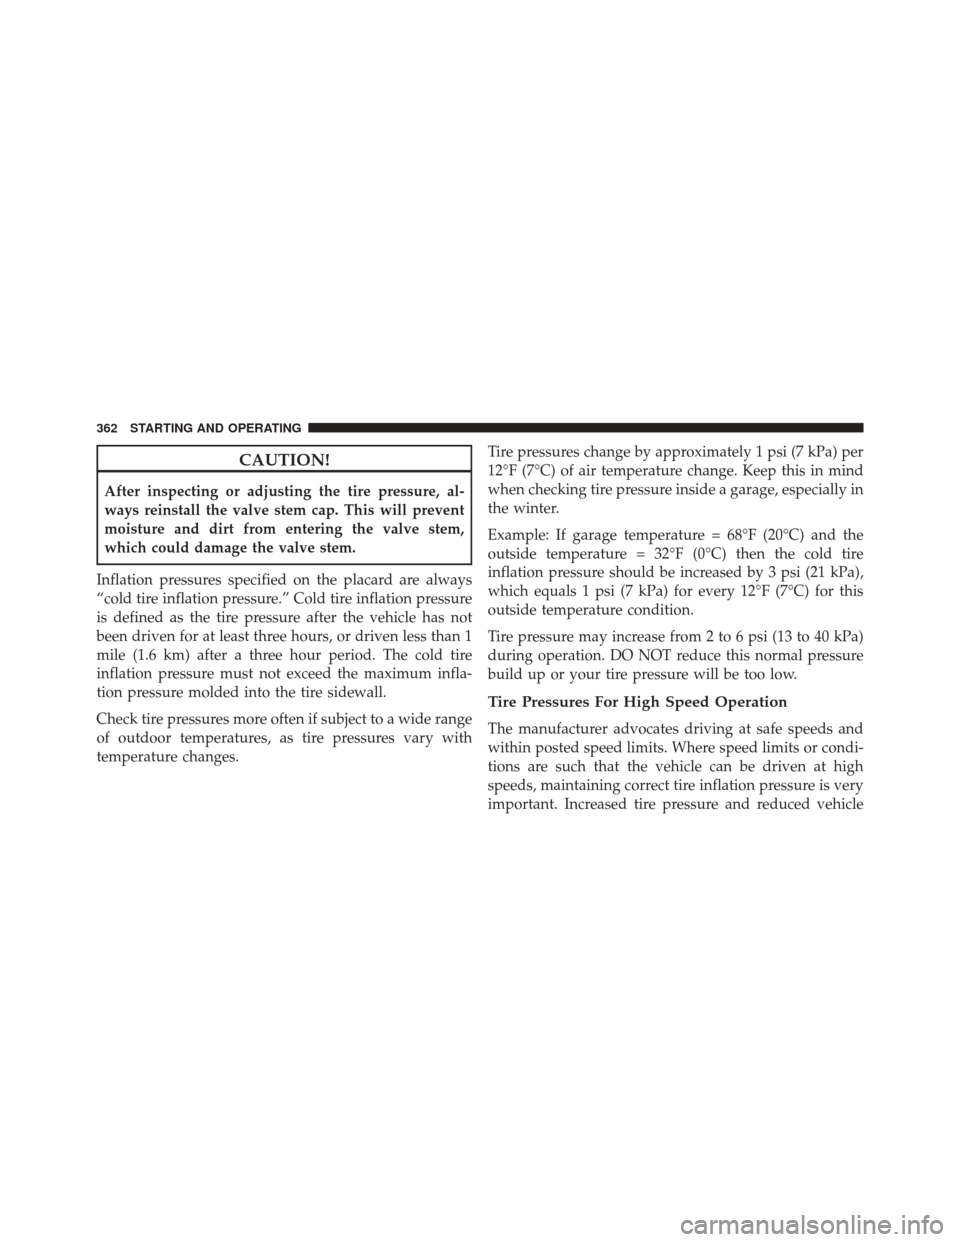
CAUTION!
After inspecting or adjusting the tire pressure, al-
ways reinstall the valve stem cap. This will prevent
moisture and dirt from entering the valve stem,
which could damage the valve stem.
Inflation pressures specified on the placard are always
“cold tire inflation pressure.” Cold tire inflation pressure
is defined as the tire pressure after the vehicle has not
been driven for at least three hours, or driven less than 1
mile (1.6 km) after a three hour period. The cold tire
inflation pressure must not exceed the maximum infla-
tion pressure molded into the tire sidewall.
Check tire pressures more often if subject to a wide range
of outdoor temperatures, as tire pressures vary with
temperature changes. Tire pressures change by approximately 1 psi (7 kPa) per
12°F (7°C) of air temperature change. Keep this in mind
when checking tire pressure inside a garage, especially in
the winter.
Example: If garage temperature = 68°F (20°C) and the
outside temperature = 32°F (0°C) then the cold tire
inflation pressure should be increased by 3 psi (21 kPa),
which equals 1 psi (7 kPa) for every 12°F (7°C) for this
outside temperature condition.
Tire pressure may increase from 2 to 6 psi (13 to 40 kPa)
during operation. DO NOT reduce this normal pressure
build up or your tire pressure will be too low.
Tire Pressures For High Speed Operation
The manufacturer advocates driving at safe speeds and
within posted speed limits. Where speed limits or condi-
tions are such that the vehicle can be driven at high
speeds, maintaining correct tire inflation pressure is very
important. Increased tire pressure and reduced vehicle
362 STARTING AND OPERATING
Page 371 of 529
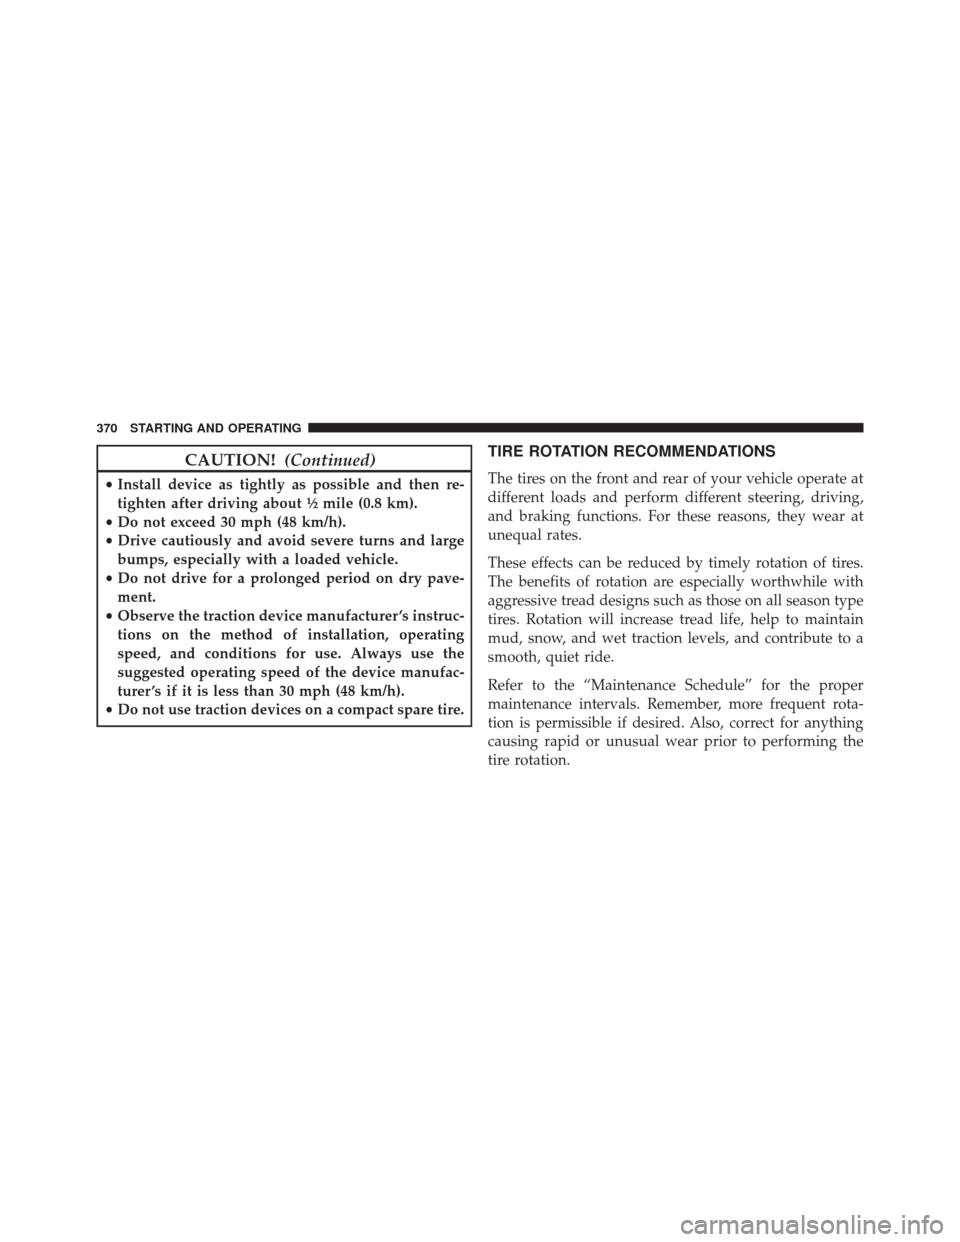
CAUTION!(Continued)
•Install device as tightly as possible and then re-
tighten after driving about ½ mile (0.8 km).
• Do not exceed 30 mph (48 km/h).
• Drive cautiously and avoid severe turns and large
bumps, especially with a loaded vehicle.
• Do not drive for a prolonged period on dry pave-
ment.
• Observe the traction device manufacturer ’s instruc-
tions on the method of installation, operating
speed, and conditions for use. Always use the
suggested operating speed of the device manufac-
turer ’s if it is less than 30 mph (48 km/h).
• Do not use traction devices on a compact spare tire.
TIRE ROTATION RECOMMENDATIONS
The tires on the front and rear of your vehicle operate at
different loads and perform different steering, driving,
and braking functions. For these reasons, they wear at
unequal rates.
These effects can be reduced by timely rotation of tires.
The benefits of rotation are especially worthwhile with
aggressive tread designs such as those on all season type
tires. Rotation will increase tread life, help to maintain
mud, snow, and wet traction levels, and contribute to a
smooth, quiet ride.
Refer to the “Maintenance Schedule” for the proper
maintenance intervals. Remember, more frequent rota-
tion is permissible if desired. Also, correct for anything
causing rapid or unusual wear prior to performing the
tire rotation.
370 STARTING AND OPERATING
Page 375 of 529

NOTE:
•The TPMS is not intended to replace normal tire care
and maintenance or to provide warning of a tire failure
or condition.
• The TPMS should not be used as a tire pressure gauge
while adjusting your tire pressure.
• Driving on a significantly under-inflated tire causes
the tire to overheat and can lead to tire failure.
Under-inflation also reduces fuel efficiency and tire
tread life, and may affect the vehicle’s handling and
stopping ability.
• The TPMS is not a substitute for proper tire mainte-
nance, and it is the driver ’s responsibility to maintain
correct tire pressure using an accurate tire pressure
gauge, even if under-inflation has not reached the level
to trigger illumination of the “TPM Telltale Light.” •
Seasonal temperature changes will affect tire pressure,
and the TPMS will monitor the actual tire pressure in
the tire.
Premium System
The Tire Pressure Monitor System (TPMS) uses wireless
technology with wheel rim mounted electronic sensors to
monitor tire pressure levels. Sensors mounted to each
wheel as part of the valve stem transmit tire pressure
readings to the receiver module.
NOTE: It is particularly important for you to check the
tire pressure in all of the tires on your vehicle monthly
and to maintain the proper pressure.
The TPMS consists of the following components:
• Receiver module,
• Four TPM sensors,
374 STARTING AND OPERATING